Gameboy XL


Greetings everyone, and welcome back.
Here's something fun, the Gameboy XL. The slightly bigger Gameboy XL is a retro game emulator with a gameboy design that can run any kind of game, from NES to PS2, and it can even run DOOM.
The whole device was modeled in Fusion360 from scratch and then 3D printed on a regular Ender 3 printer.
The brand-new Raspberry Pi 5 is the brains and brawn of this device, able to handle practically anything you throw at it.
We used a 7-inch LCD display as the screen, and some custom PCBs were also used for the audio board and GPIO buttons.
I had created a project called PALPI in the past that was similar to this one; it was a game emulator device with a PAL display and all GPIO buttons added, but in this one we have only added the direction pad and two buttons.
Although this device can be used as a handheld console, we reduced the number of buttons because its intended usage is to be placed on a table and used with a gaming controller. To enable you to keep this item in a designated position, we even put a stand to the rear of it.
We have included information about installing ROMs and configuring the OS in this Instructables, along with the full build procedure for this gaming console.
Supplies
These were the materials used in this build-
- Custom PCBs (Provided by Seeed Studio Fusion)
- 3D-printed parts (all parts)
- Raspberry Pi 5
- Audio Board (from a previous project)
- 3 ohm laptop speaker
- 12V Battery Pack
- DC-DC 12V to 5V Buck converter circuit
- Tactile Switches
- 7 inch LCD Display with HDMI
- HDMI to micro HDMI port
3D Design/Concept


Using images of the original Gameboy, a 3D model of the Gameboy XL had to be designed for this project. The Raspberry Pi model and LCD display were first imported, and we then made sketches around them to construct the gameboy's base body, which has a similar layout. Our model only loosely adheres to the original Gameout's design language; it is not entirely accurate.
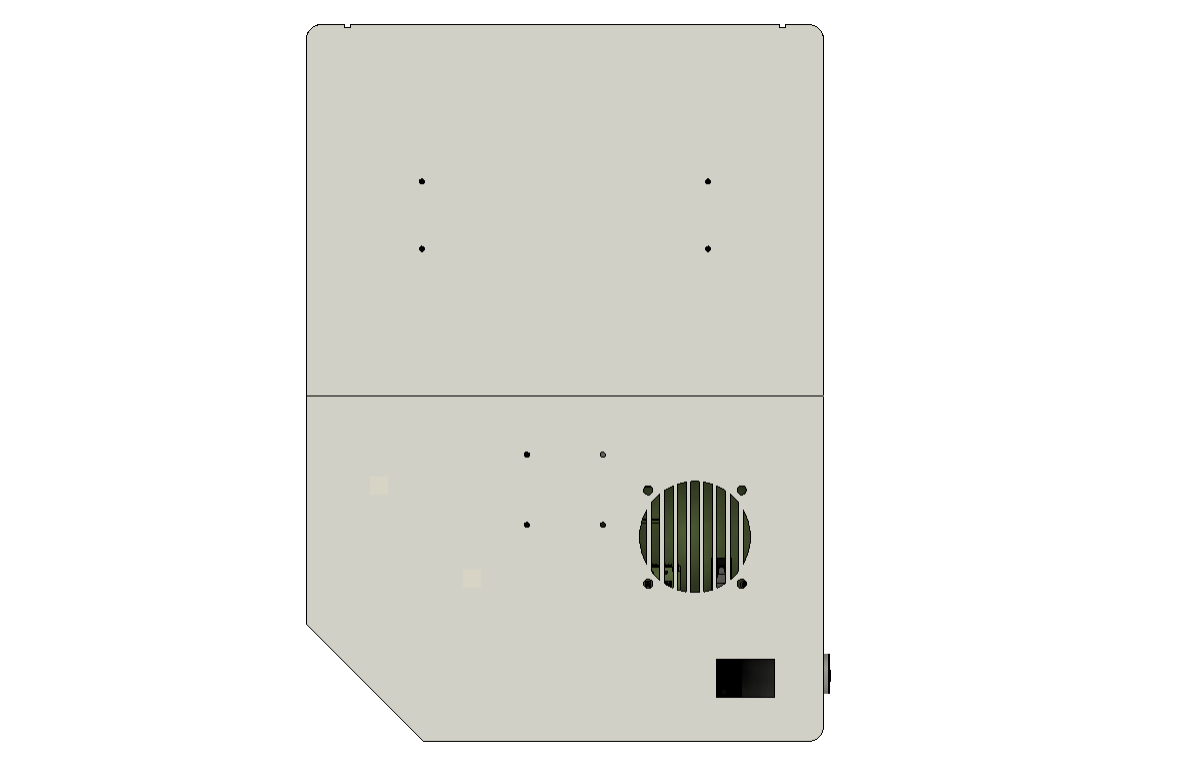
We had to divide the front body and back lid piece into two halves because the model was quite big.
This design also included buttons, and much like the original, we just used A-B and a D pad button.
Additionally, we created a PCB with a tactile switch that operates when the button is pressed, allowing the Pi to register the button press. The PCB keeps the button in its place.
We have modeled a Pi stand that is attached to the body and holds the Pi in place. M2 screws are used to fasten the Pi to the Pi stand.
We created a model of a Pi stand that fastens to the body and supports the Pi. The Pi is attached to the Pi stand using M2 screws.
Because of the ribs we modeled that keep the battery raised, there is a space between the button PCB and the battery. We made a battery retaining clamp that securely fastens the battery pack to the base body in order to keep it in place.
We have created a few ribs on three sides of the display to mount it. This will aid in the assembly process because the display is easy to slide into place and will not wobble or even move.
Additionally, there is a display mount that keeps the display fixed to the body; M2 screws are used to fasten the mount to the body.
On the underside, close to the Pi's USB opening, we have also installed a DC Jack that serves as a battery pack charging socket.
We stole a 3 ohm speaker and an audio module from a previous project, modeled them both, and put them in the lower portion.
Regarding the back lid part, we have separated it into two halves and included an additional Fan Grill to aid in cooling the Pi.
Additionally, a slot that will be used to mount the rocker switch has been added to the lid part.
The objective of making the XL version of Gameboy was to create a larger version that we could place on our table, attach a wireless or USB controller to, and use to play games.
To do that, we created a model of a stand that allowed us to use the device on a table.
Finally, a nameplate has been placed to the rear side.
The model was exported into STL files, and each component was then 3D printed. We chose to utilize marble PLA for the main body, orange PLA for the switches, and transparent yellow for the lid and holders.
Downloads
Raspberry Pi 5- Heart of This Project


We opted for a little overkill approach for this project, purchasing both the latest 4GB Raspberry Pi 5 and the Original Cooler unit.
We got the Raspberry Pi 5 from Seeed Studio Market.
Regarding the Pi, this emulator project could have been carried out with a Pi4 or a Pi3, but the problem was that neither Pi4 nor Pi3 had the power to run PS1 or PS2 emulator games. Pi4 can run some games for a while before overheating, but Pi3 was underpowered, and I had created a few emulators with it. Therefore, the best course of action was to test out the new Pi5, and I have to say that it ran everything we threw at it.
Though there was a problem with the emulator we were using, we have not tried the PS2 games yet. We want to do so later on, and to make Pi even quicker, we are going to add an NVME SSD.
Adding the Cooler with the Pi5
After placing the cooler in the correct order and removing the thermal paste cover, we connected it to the Pi. Two plastic snap latches on the cooler were a really great idea for mounting heatsinks.
After that, we linked the JST connector on the cooler to the JST connector on the Pi5, and the system was prepared for some retro gaming.
PCB Design


Just a few button boards and one GPIO shield are utilized on the PCB because there is no microcontroller employed in this project. This project, also took use of an audio board that was created for a prior project.
There are three boards made, which are the following:
The GPIO Breakout Board was designed to connect buttons and audio signals to the Raspberry Pi. It was made up of a 40-pin Raspberry Pi header and a few breakout pins.
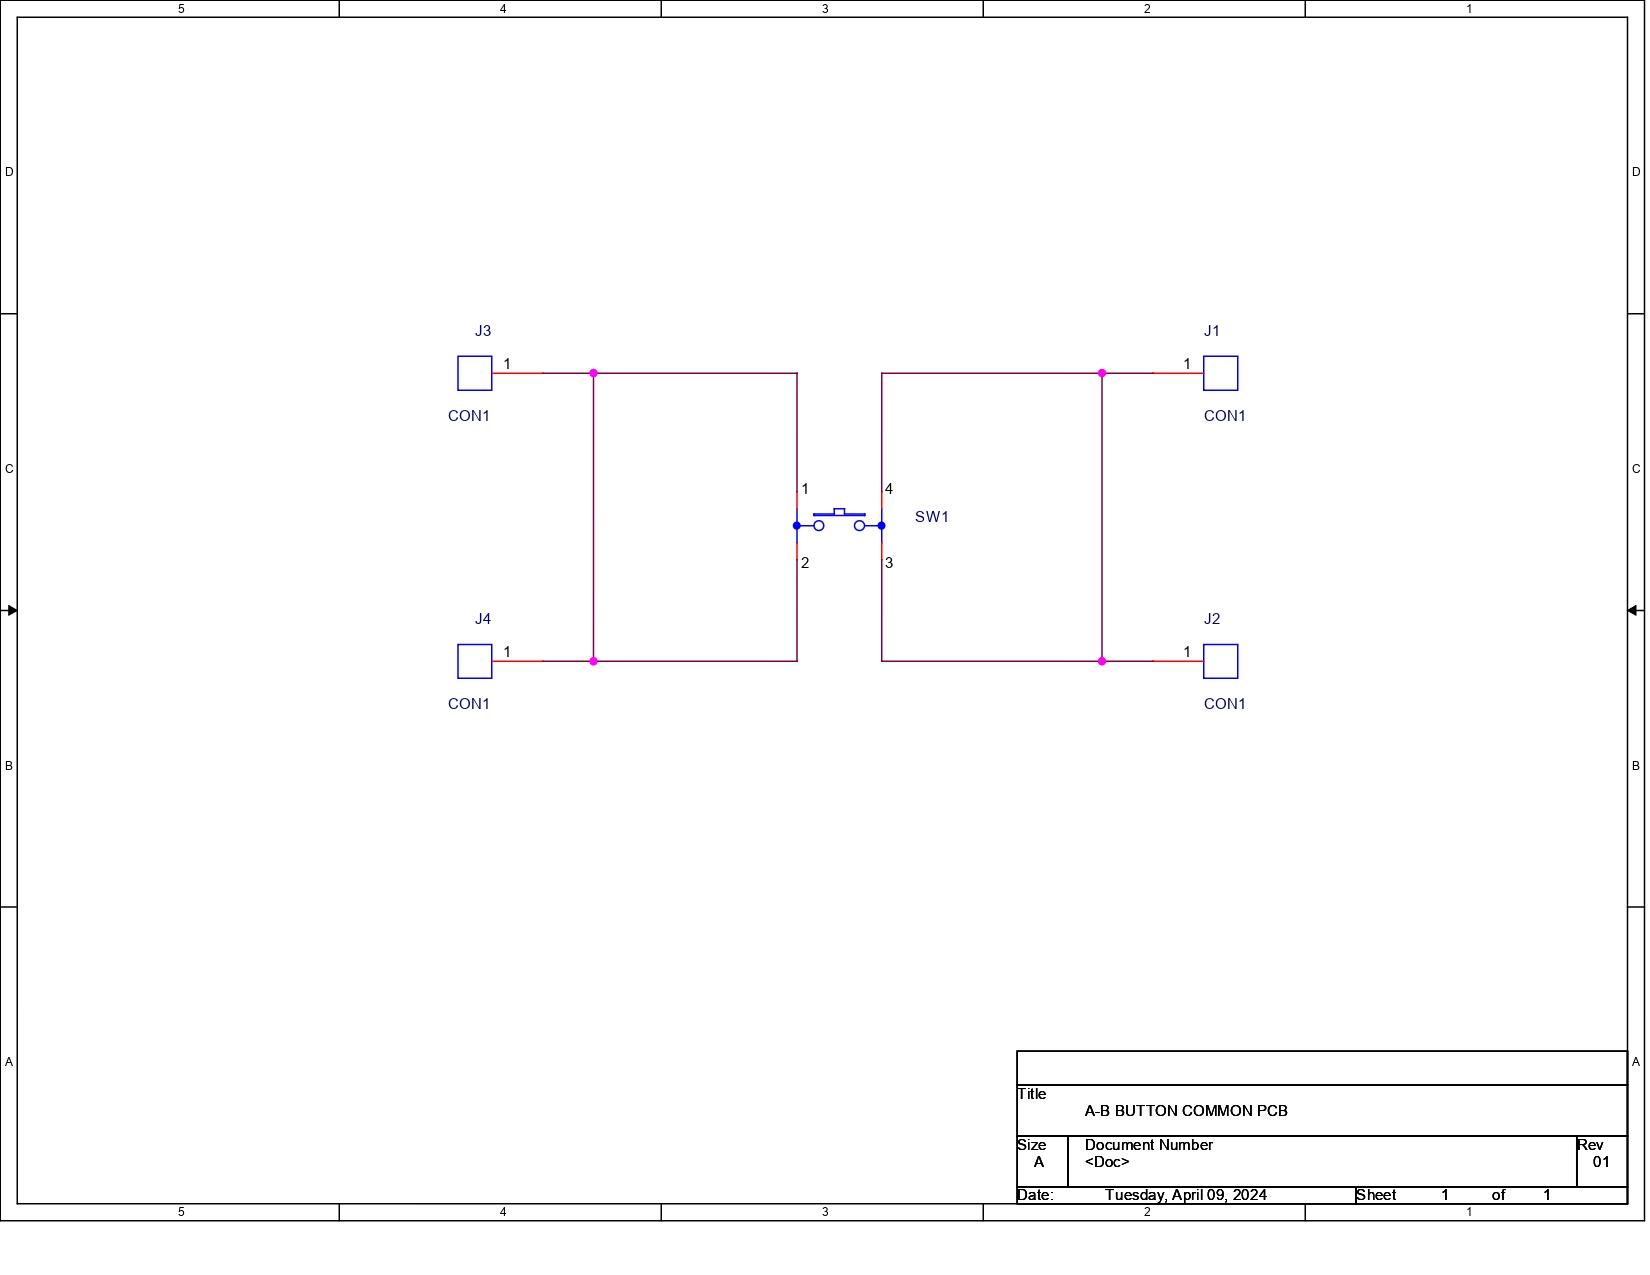
The A-B button board, which is just a single button connected with four CON1 ports, will be used to connect a single button to the GPIO shield. Two PCBs will be used overall for the A button and the B button.
The D Pad Board, which contains four buttons connected to four different Con1 ports, will be connected to the GPIO Shield's UP DOWN LEFT and RIGHT ports, respectively.
We utilize the Cad model's outline for the layout of these three boards, positioning the switch in PCB Cad in accordance with the design's size and location.
Seeed Fusion Service


After completing the PCB design for all three boards, we send the Gerber data to seeed studio for samples.
Three orders were placed: for both button boards, we picked a yellow solder mask with white silkscreen, and for the Pi GPIO Shield, we used a red solder mask with white silkscreen.
PCBs were received in a week, and their quality was super good considering the rate, which was also pretty low.
Seeed Fusion PCB Service offers one-stop prototyping for PCB manufacture and PCB assembly, and as a result, they produce superior-quality PCBs and fast turnkey PCBAs within 7 working days.
Seeed Studio Fusion PCB Assembly Service takes care of the entire fabrication process, from Seeed Studio Fusion Agile manufacturing and hardware customization to parts sourcing, assembly, and testing services, so you can be sure that they are getting a quality product.
After gauging market interest and verifying a working prototype, Seeed Propagate Service can help you bring the product to market with professional guidance and a strong network of connections.
PCB Assembly Process


Three main PCBs must be assembled for this project in order to complete the PCB assembly process.
- The method of assembling the A-B Switch PCB begins with the installation of tactile switches to four Switch PCBs. (Even though we only need two PCBs, we make four.)
- The board is then turned over, and we use a soldering iron to solder the tactile switch pads.
- For the DPad PCB, we repeat the same procedure, starting with the addition of four tactile switches to a single Dpad PCB.
- We soldered the pads of the tactile switches using a soldering iron.
- Next, we are ready to assemble the GPIO breakout board by applying solder paste to the PCB pads.
- Following that, we pick and position the SMD 40-pin GPIO connection on the GPIO breakout board.
- The PCB was then raised and put on the SMD Reflow hotplate, which heated it from below to the temperature at which solder paste melts and the GPIO connector is connected to its pads. This process took place as soon as the temperature reached 200 degrees Celsius.
Main Body Assembly


We begin the assembly procedure by gluing the upper and lower parts of the base body together with super glue.
- Paper clips are used to securely keep two items together once superglue has been applied to both of them.
- After an hour of curing the superglue, we took the paperclips out.
- Two M2 screws are used to fasten two sections together, which increases the joint's robustness and resilience. Holes were already created during the design phase.
Lid Assembly


The next step involved assembling the lid, which was similar to assembling the base body. First, we had to combine both pieces together with super glue, allow it to set for an hour, and then use M2 screws to secure the two parts firmly so that the bond would be permanent.
Complete Screen Assembly


After preparing the body, we start the screen assembly process.
We are utilizing a 7-inch HDMI display here, and since the glass layer covering the front half of the panel is easily broken, we intend to place a 1mm-thick acrylic sheet between the display and the inside of the body to protect it from dust and damage.
We took a 163mm x 100mm piece of acrylic sheet and peeled its protective layer from both the front and back sides.
The acrylic sheet is then positioned as the screen, where it is secured in place by ribs that have been added all around it. These ribs will help eliminate screen wobbles and hold the screen firmly in place. Ribs have been utilized as a design technique in many screen- and battery-related products to help keep the component intact and minimize its movement inside the enclosure or casing.
We then slide the screen into its place.
The screen holder is then used to hold the screen in place. It is positioned on the rear of the display and is secured to the bosses on the base body with M2 screws.
Screen assembly is complete; next, we add buttons.
Complete Button Assembly


- The D Pad button was assembled simply by first positioning it on the base body and then placing the DPad switch on top of it.
- The PCB is mounted to the base body using M2 screws. It is important to provide a 1 mm gap between the switch knob and the 3D printed button, so that the button can travel freely in the intended position and toggle the tactile switch when pressed.
- After that, we inserted the A-B buttons in their proper locations and positioned the PCBs on top of the buttons. Finally, we used M2 screws to fasten the PCBs in place.
Pi Holder Assembly


- The Raspberry Pi 5 was then attached to the Pi Holder part using four M2 screws to create the Pi Holder Assembly.
- Next, we attached the GPIO shield to the PI's GPIO header pins.
- This breakout board, called the GPIO shield, is used to connect button pins to the PI.
Wiring


First, we connected one wire to each button output to prepare for wiring.
Additionally, we linked the A-B button PCB and the D pad PCB's GND together.
Next, we connect each button's wire with the Raspberry Pi GPIO Shield in the order below.
- UP Button-GPIO04
- DOWN Button-GPIO017
- LEFT Button-GPIO027
- RIGHT Button-GPIO022
- A Button-GPIO024
- B Button-GPIO025
Adding Pi5


- The Pi is then mounted in its designated location, the Pi Holder Assembly is positioned there, and the GPIO Shield is detached because it is obstructing the mounting holes.
- To fasten the Pi Holder to the base body, we utilize M2 screws.
- We install the GPIO shield on the Pi once it is firmly in place.
Audio Board


We are using a previously constructed Audio Board Project, for audio, which is a small amplifier based on the PAM8403 that has an extra AMS1117 voltage regulator built in to step down 12V input into 5V output for the 5V display and the audio amplifier.
checkout the project from here-
https://www.instructables.com/DIY-Audio-Amplifier-Board/
With the PCB for the audio amplifier in place, we install the speaker.
Next, we fasten the PCB using an M2 screw into the screw bosses that are provided on the body.
Adding DC Jack- Charging Section-Power Section


When DC Jack is fitted to any body, the nut portion that comes with the DC Barrel Jack tightens the DC Jack into place. DC Jack has been added to one side of the body.
Two wires are used to link the positive and negative terminals of the DC Jack to the charging port on the audio board.
After that, we attach a 12V adaptor to the DC Jack and measure the voltage across the 12V input side and the 5V output side of the AMS1117.
The battery pack will be charged using the 12V converter by placing it before the AMS1117 connector. The battery pack has a BMS, that will properly charge the cells, therefore an external 12V supply cut was not required in this instance.
Next, we linked the 5V of the audio board to the GND and the 5V of the display.
Adding Battery


- We have now positioned the battery in its proper location. We have modeled a whole mounting area for the battery, which is made up of ribs that hold the battery in place and support it. These ribs work similarly to the ribs supporting the display.
- The battery is mounted permanently by utilizing a battery clamp, which is placed on top of the battery and secured with four M2 screws.
- We attach the battery terminals to the battery connector on the Aduio Board. The power board, which has an AMS1117, an indicator, and a diode for mounting the display and audio section of the board, is also connected to the audio board using a soldering iron.
- Finally, we flip the model over and click the rocker switch, to turn on the display, indicating that the battery assembly was successful and that the AMS1117 is powering the display.
DC-DC Buck Converter


We needed to utilize a buck converter to power the power-hungry Raspberry Pi 5 from a 12V supply, but we did not just need any old buck converter—we needed one with a consistent 5V/3A output. After some research, we chose this sucker, which can provide stable 5V/3A from a 12V to 28V source.
- First, we solder connection wires to the buck converter's input and output terminals.
- Next, we linked the buck converter's input to the audio board's 12V.
- We can toggle power using the rocker switch on the audio board's 12V port, which has a switch between the 12V battery and the 12V con2 connector.
- The GPIO breakout board's output terminals were then connected to 5V and GND, which will power the Pi.
Back Lid: Adding Logo


We put the name tag in its place on the Gameboy lid and fasten it to the lid with four M2 screws.
Stand Assembly


- The stand assembly is the next component, and it is made up of two parts: the stand and the holder section.
- Using tweezers and a soldering iron, we must first install M3 threaded inserts on both ends. It is recommended to set the soldering iron temperature to 150 degrees Celsius while working with PLA.
- Next, we use two M3 bolts from each side to fasten the stand and holder components together. The M3 bolts attach the two sections together using M3 threaded inserts.
- The stand holder assembly portion is then positioned on the rear side of the lid, and four m2 screws are used to secure the stand part to the lid.
Lid assembly is now complete.
Final Assembly


On the lid, we added a Rocker switch in the given slot and then connected the rocker switch with the audio board. This rocker switch turns the setup ON or OFF.
- A standard-size HDMI cable was inserted inside the Gameboy body to link the Pi5 to the display. Since the Gameboy is an XL version, there is ample room within the body, so the space issue was not an issue. Since the flat cable I had was short and we required a slightly longer one, we ended up using HDMI cable. A better solution that may be employed in this situation would be flat cable HDMI ports, which would save a lot of space.
- We place the lid on the back side in its proper location and fasten it to the body with eight M2 screws.
The assembly process was completed.
RECALBOX OS


Gameboy is nothing more than an empty shell with RP5 and other items inside of it without the OS.
The core of this project was the Retro Arch-based RecalBox game emulator operating system. RecalBox is a great OS to use because it has a lot of games pre-installed. Installing this OS on the Pi allows us to play popular games like Doom, Wolfenstein, and Quake right out of the box.
Recalbox is quite simple to install; all you need is a 32GB SD card and a Raspberry Pi imager. Then, all you have to do is choose the OS—Recalbox for Rpi5—and install it on the SD card.
Rufus and a Recalbox ISO file may be used to accomplish the same task, but a Raspberry Pi imager is more efficient and quicker.
Configure GPIO Buttons


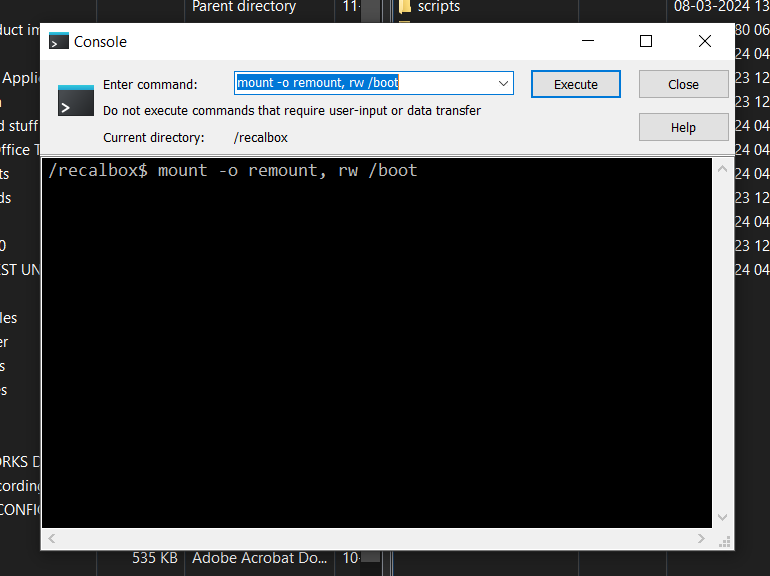
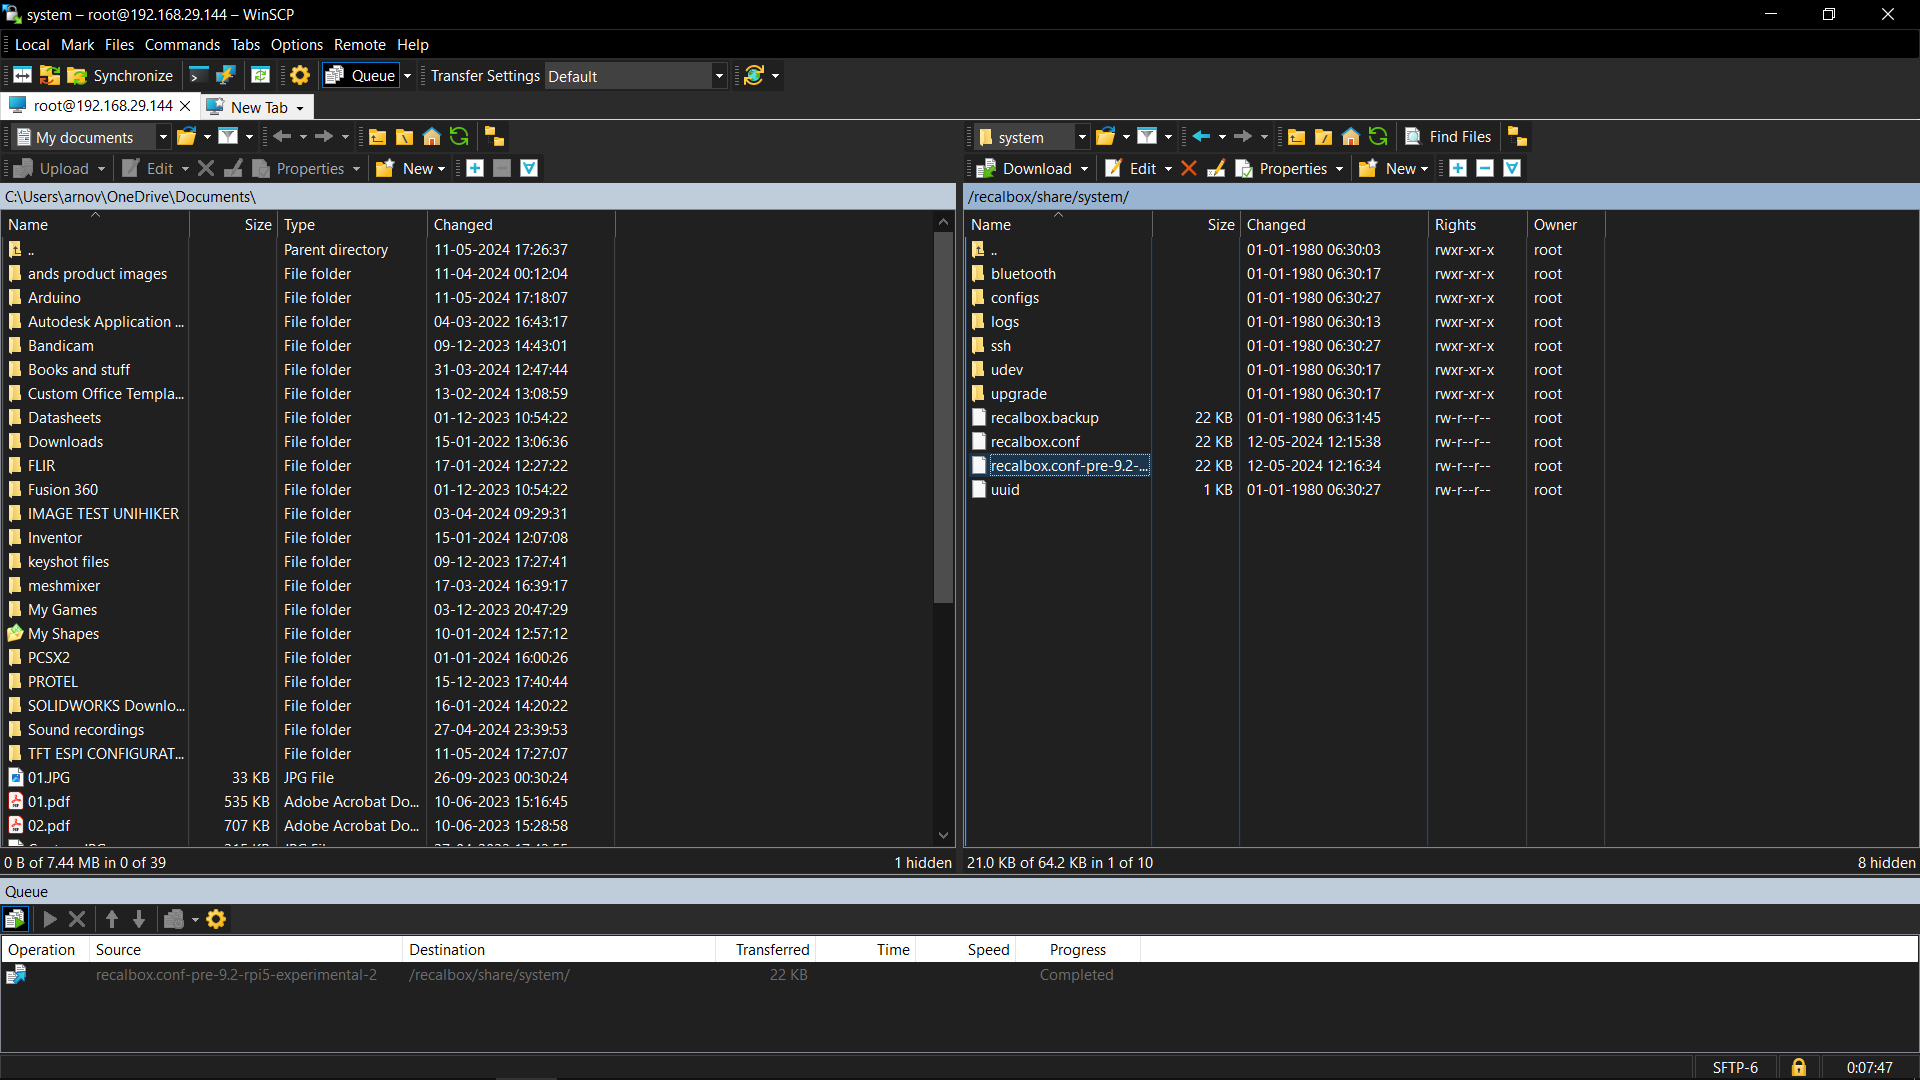
To enable GPIO buttons, we need to edit the Raspberry pi config file, which is located in this path. recalbox>share>system>recalbox.conf
- Because Recablox needs some time to load up, we must first boot the device before connecting to the Raspberry Pi. This will take a few minutes.
- We choose Network Settings from the Settings menu after booting up. By choosing the router's SSID and entering a password, we activate WiFi and establish a connection to the local network using the network settings.
- We obtain Pi's IP address from the network settings.
- Next, we open winSCH and establish a connection with the Pi by entering its IP address, password, and user name. These are recalboxroot and root, respectively.
- We now go to the following path: recalbox>share>system>recalbox.conf and open the recalbox config file.
- We edited the below line, which will enable the GPIO buttons.
set controller.gpio.enabled = 1 (It was 0 before) and change controller.gpio.args.map=1, 2 to controller.gpio.args.map=1 (2 is second player controlls)
Adding Games


We must use the same procedure as before to enable the GPIO pins in order to add games to the Recalbox OS.
To add ROMs, you must first obtain the ROMs of the games you wish to play on this emulator. While it is not advised, most roms are obtained by piracy; however, since I enjoy being a pirate, you are free to obtain the rom file however you see fit.
We use WinSCP again and get into the RecalBox OS by adding its IP address, username, and password.
Next, we go to this path, which contains all the ROM folders.
recalbox>share>rom
To play a game on the SNES emulator, for instance, we only need to add the game file to the SNES folder. Otherwise, we simply need to copy the unzipped game file or folder inside the ROM folders.
The procedure is quite easy to follow; all we have to do is download the game file, copy it into the ROM folder, and restart the computer for everything to work flawlessly.
Result


GameBox XL has been completed and here's how this project looks and works.
As you can see, this is no ordinary handheld console—it is thick and broad, slightly huge, and one hell of a chonky boy.
Thanks to the powerful Raspberry Pi 5, Recalbox is operating well (though not flawlessly; we will talk about that later). All of the games I played on this controller also worked without any problems.
For some reason, the BT Controller was not functioning correctly; it would connect for a short while before disconnecting. The USB controller functioned, so I connected my Xbox controller via a USB cable to play some classic titles, such as DOOM, Mortal Kombat, and Crash Bandicoo.
I even played a couple of older games, like the classic GBA Mario Kart and Pokemon Gold.
This gameboy ran everything I threw at it.
GPIO buttons were functional, but ultimately, there was a problem with the recalbox config file that kept overwriting my edits.
Conclusion- What's Next!


This project was successful overall; however, there were a few issues that needed to be fixed for the next iteration.
For example, the operating system that is presently running has a problem with the Raspberry Pi 5, which results in the jittering of the screen when choosing the emulator. Perhaps Reclabox will release a new build for the Pi5, or someone is already working on it; either way, this needs to be fixed.
Since the model's center of gravity is causing the stand to fail, the lid part needs to be redesigned. We also need to adjust the device's tilt angle.
Buttons function normally; however, occasionally GPIO buttons stop working. This appears to be a software problem, which I want to fix in the upcoming version.
Furthermore, the screen is really bad. It is dull and cannot be adjusted for brightness, so we cannot play games like Crash Bandicoo or Silent Hill on it. Crash Bandicoo is not even that dark, but it does not look nice due to the low brightness of the screen.
We will see if we can replace this screen with a vibrant IPS panel.
The battery life is decent, but in order to know how much juice is left, we need a battery power level monitoring device, which will be included in the next version.
Finally, in order to make this setup faster and more efficient, we will be using an M.2 NVME in the upcoming build.
These were the only few things that needed correction.
Leave a comment if you need any help regarding this project. This is it for today, folks.
Thanks to Seeed Studio for supporting this project.
You guys can check them out if you need great PCB and stencil service for less cost and great quality.
And I'll be back with a new project pretty soon!