Getting a Spark Core Running Without Using Spark's App
by dblando in Circuits > Microcontrollers
4871 Views, 31 Favorites, 0 Comments
Getting a Spark Core Running Without Using Spark's App
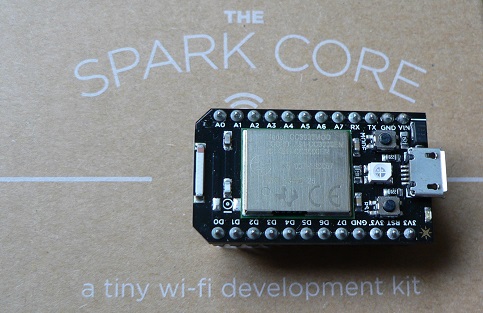
The Spark Core is a powerful tool -- a 32-bit CPU, plenty of on-die and off-die storage for code and results, low power requirements, and built-in WiFi chip and antenna. Many Arduino calls and even many popular libraries for Arduino, such as Neopixel, already work with it. Some of you may not even finish this paragraph if I tell you the low price. You can even pre-order the Photon, their next iteration.
Our gang at CrashSpace, a maker space in Los Angeles, had an event that involved twelve Cores and a lot of fun. Another of our members has posted an Instructable about making a cool 3D-printed diffuser for the Spark Core.
The biggest problem we faced, both in our week of pre-event tests and during our event, was getting the individual Cores to link to user accounts -- a process known as Activation. The existing web page for getting started assumes one person is working alone with a single Core and Spark's app for iPhone or Android. When you have a group of people trying to authenticate and make each Core work for its new owner, you can wind up with mismatches, forced resets, wireless network misdetections, and other annoyances.
We spent a lot of time bouncing around the web site so we could configure Cores manually. Thus we put together a single set of instructions for each major operating system. Now our research will get your adventure started much faster.
Prerequisites
- Spark Core
That may seem obvious, but assumptions make one an ass. The package includes a USB micro connector cable, so make sure that is also within reach.
- Computer connected to the internet via WiFi
The Core does not merely expect to interact with local WiFi. It will only authorize communication to and from a known wireless router.
- Serial Communications Software
- USB Serial Drivers
This is a Windows-specific concern. If you have already installed a Teensy or even an Arduino on the same Windows machine, you should not need to do anything special when you connect the Core via USB.
- Make sure the Core is flashing a medium-speed blue when it connects to the laptop via USB
There are two buttons on either side of the big RGB LED in the middle of the Core. If the USB micro plug is facing 12 o'clock, then the Mode button is at 9 o'clock (that is, on the left) while the Reset button is at 3 o'clock (on the right).
If the Core is flashing a fast green, it probably has older WiFi credentials. Hold down the Mode button for ten seconds, and it will clear its existing WiFi credentials then reboot.
Gathering Details for Web-based Activation

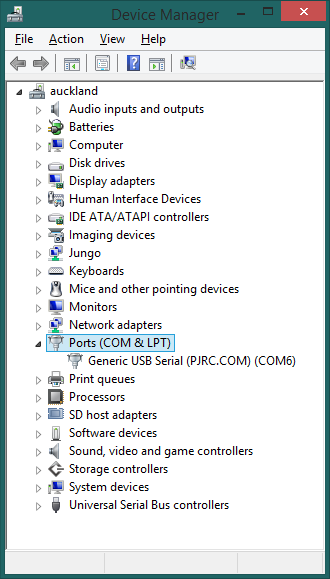
Note that most of these instructions are available from the Spark web site. However there is a bit of jumping around, so it's far more convenient to have everything in execution order and on one screen:
A) Create an account at https://www.spark.io/signup using an email address.
Caveat: Please triple-check when typing the email address. If there is a misspelling, the Spark team does not have an automated resolution system. They can only resolve problems by email and it can take time, though they are very polite and understanding about it;
B) Plug the Core into the laptop's USB port and discover its port --
- Windows:
- Open the Device Manager (devmgmt.msc);
- Go to the "Ports (COM & LPT)" and twist it open if it is not already. Look for the Spark or "Generic USB Serial" entry and note the COM number.
- Mac:
- Pull up Terminal (open a Finder and search for "/Applications/Utilities/Terminal");
- Run the following:
ls -ltr /dev/cu.*
- The item with the most recent time stamp will be the last one in the list. Its filename should begin with 'cu.usbmodem' then have a few digits.
- Linux:
- Open a terminal and run:
ls -l /dev/ttyACM*
- Open a terminal and run:
C) Start a communication session with the discovered port --
- Windows:
- Open Putty;
- Select 'Serial' for connection type, give "COM#" as the address with the number of the COM port for '#', and 9600 for the speed.
- Mac and Linux:
- Type the following to confirm the communication program is in your path --
which screen
- Type
screen /dev/[cu.usbmodem*|ttyACM*] 9600
- Type the following to confirm the communication program is in your path --
D) Get the Core's identifier (serial number) and link it to the WiFi --
- Type 'i' into the communication session;
- It will reply with a 24-character hexadecimal unique ID, most likely to start with 53 or 54, such as
Your core id is 53ff6c06fe01dc23ba459867
- Copy the ID number as text. In Putty, simply click and drag over the ID to copy it. Paste it into a text file to be safe;
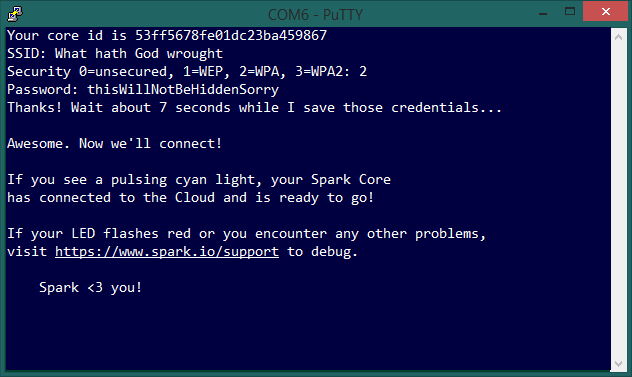
- Go back to the communication session and type 'w'. The Core will switch to a steady blue light, while the communication session will prompt for the SSID (which is case-sensitive), Security, and Password;
- A successful attempt should look like the last screen shot on this page.
Activate Using the Web Site: Linking the Serial Number to a Spark Account

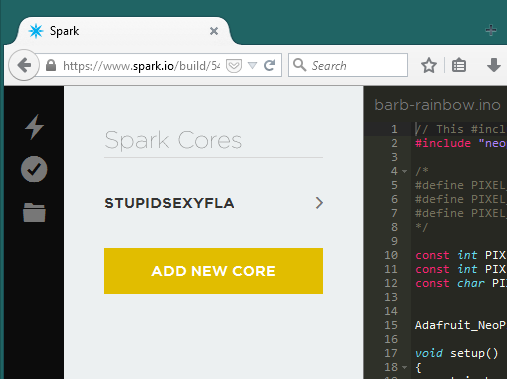

- Log back into the Spark IDE web site: https://www.spark.io/login;
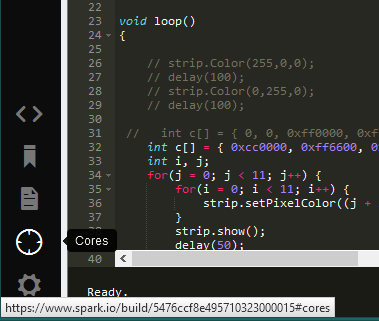
- On the left pane of the IDE, look for the second icon from the bottom (it will look like a target). Hovering a mouse over it will reveal the word "Cores". Click on this button;
- Click on the yellow "Add new core" button. This will launch a popup window;
- Paste the ID number from the communication session, then click on the "Claim it!" button;
- The last step will provide a semi-random name. Accept the default or change it, then click to Name it.
Get Back to the Web IDE and Start Coding
In Mac and Linux, the screen session should close automatically after the WiFi steps are successful; if not, use control-a then control-k to kill the screen session from inside it. In Windows, it is safe to close the Putty session.
Now is the time to write code and bring the Spark Core into active duty:
People already familiar with IDEs should be comfortable. The same people may also wonder why all the code for a device that is still connected to the USB port needs its code sent to it from a web server nowhere near it.
One answer is that the Spark Core is only looking for USB power. So long as the Core is still connected to the same WiFi router as the laptop, then it can be reprogrammed from anywhere in range.
Another answer is to install the Spark CLI tools and the Spark Dev IDE, or even set up a separate Spark Source environment. These will need to wait for a future Instructable.