Hacking a USB Keyboard

How to hack a USB keyboard or any keyboard for that matter. Send inputs into the computer without a pesky microcontroller.
Supplies
You will need:
Open Up the Keyboard

Open up the case. You can use a screwdriver or an any ridiculous looking multi-purpose tool. Sometimes even after all the screws are removed the keyboard still won't open up. In this situation, don't worry, just forcefully pry the case apart with your screwdriver. It doesn't matter if you break the case. You don't really need it.
Trace the Letters Back to the Pins


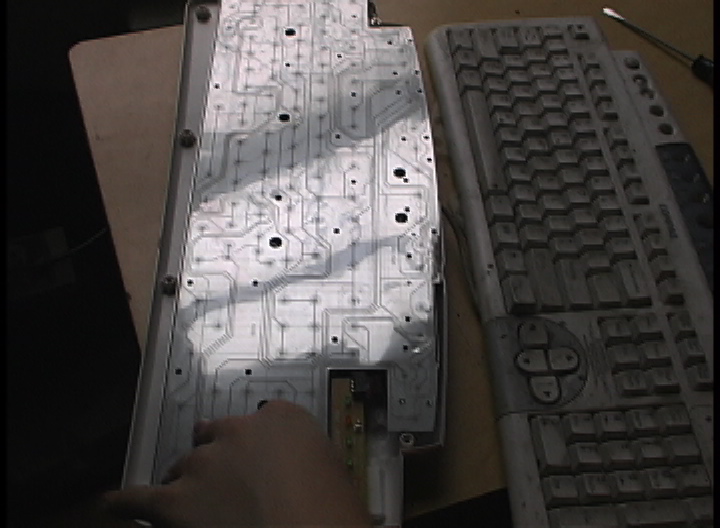
The inside of the case should have two plastic sheets (one on top of the other). One plastic sheet will have printed conductive tracings that go to one set of pins on the circuit board and the other sheet will have tracings that go to another set of pins on the circuit board.
When you press down on a key, the tracings on both sheets will touch each other. This completes the circuit and tells the board to send a letter, number or command back to the computer.
What you need to do is to label each conductive circle on both sheets with the letter key that corresponds to it. So, for instance, if you were to press down "A" on the keyboard, label the plastic circle on both sheets of plastic that would be pushed together if the "A" key would strike (see picture of labeled sheets).
Once you have labeled both plastic sheets with all of the corresponding keys (that you plan to use in your project), the next thing you need to do is to trace the letters back to the circuit board with a Sharpie (see notes on pictures).
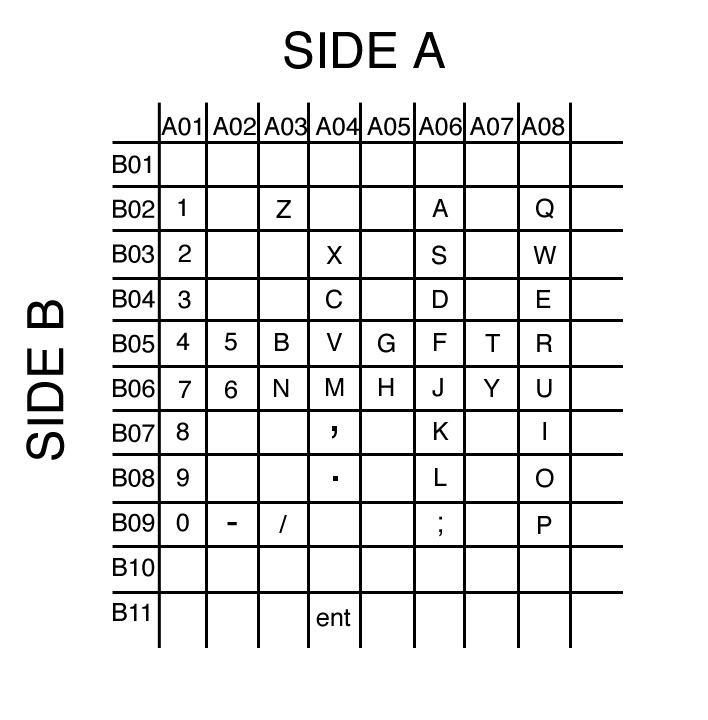
One way to simplify the matter is to consider one sheet "SIDE A" and the other "SIDE B" .
Below is a chart that I made for the particular keyboard I was working on. Please remember that all keyboards are different. It will help you immensely if you make a similar chart for the keyboard you are working on.
PIN LAYOUT:
| | | | | | | | XXXXXX | | X | | | | | | | | X
1234 5678 12 11 10 98765 432 1
SIDE A SIDE B
PIN SIDE A
A01 - 0, 9, 8, 7, 4, 3, 2, 1
A02 - 6, 5, -
A03 - N, B, ?(slash)
A04 - (period), (comma), M, V, C, X, Z, (enter)
A05 - H, G, (space), '
A06 - L, K, J, F, D, S, A, ;
A07 - Y, T
A08 - P, O, I, U, R, E, W, Q
PIN SIDE B
A02 - 1, Q, A, Z
A03 - 2, W, S, X
A04 - 3, E, D, C
A05 - 4, 5, R, T, F, G, V, B
A06 - 6, 7, Y, U, H, J, N, M
A07 - 8, I, K, (comma)
A08 - 9, O, L, (period)
A09 - P, 0, ?, -, ', ;
A11 - (enter)
A12 - (space)
A Note on Pin Layouts and Shift Registers


Basically a keyboard is a specialized shift register. It takes in a lot of inputs and sends out one output to the computer (that being a an ASCII code or control command).
When a switch is closed, the shift register processes which two pins are connected and interprets it as one particular output.
So, if you had ten pins going to each plastic sheet, then you would have one-hundred possible combinations. This is because every single pin on one sheet can be comined with every single pin on the other side. This would produce ten rows of ten possible combinations. In other words, you have just produced a "10 X 10" 2-dimensional array.
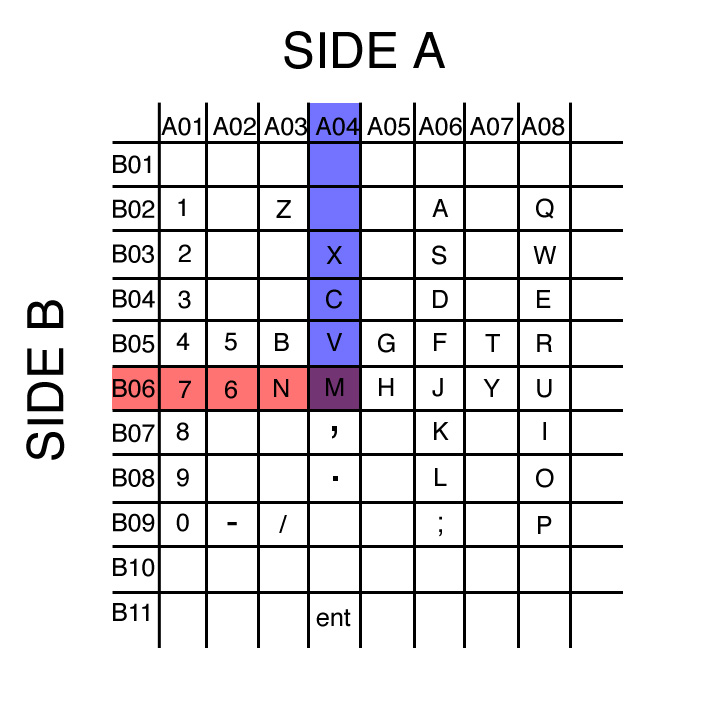
For instance, if you connect "Pin 4" on SIDE A and "Pin 6" on SIDE B you will produce the letter "M" on the computer (see picture).
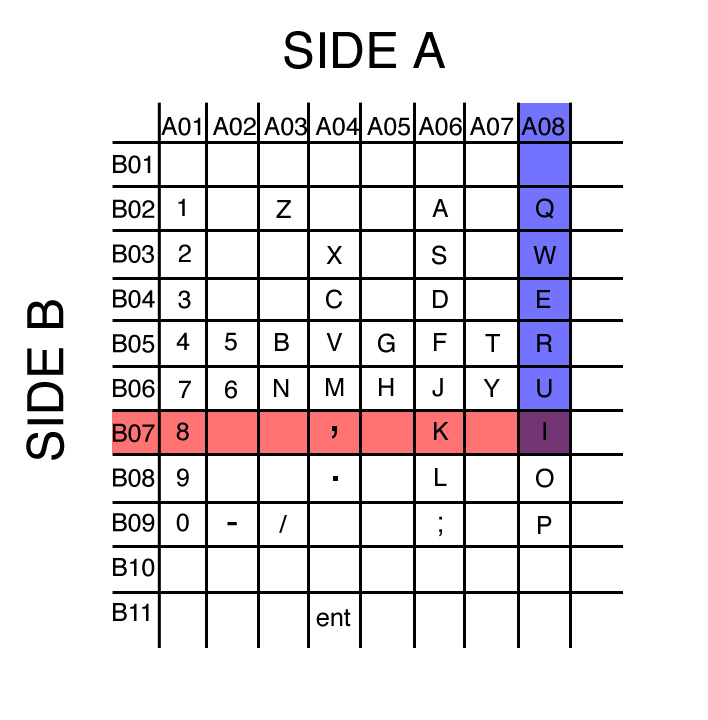
If you connect "Pin 8" on SIDE A and "Pin 7" on SIDE B you will produce the letter "I" on the computer (see picture).
It's really quite simple.
Attaching Wires


So, now you know which pins produce which letters. Now you need to connect your own mad creations to the boards.
But wait!
Before you can connect things to the board, you need to connect wires to the board!
Sigh...
You're going to need:
wire (ideally in a number of colors)
quick setting epoxy (from your local Radioshack or Home Depot)
a razor blade
a soldering iron
So, here is what you do. Count the number of pins you need to attach wires to. Once this is done, prepare all of the wires you're going to need. They need to be stripped on both ends about a quarter of an inch and should be about five to six inches in length. Try to use many different colors of wire so you can tell them apart later. On one end, bend the stripped part of the wire so that it can hold itself to the board (see picture).
Wrap the wire around the board so that the stripped part is touching one and only one of the pins that it needs to be connected to. Make sure none of the wires are touching. When all of the wires are in place (touching the pins and not touching each other), you're going to need to glue.
Prepare some epoxy and cover the back side of the board in epoxy so that the wires are glued in place on the side opposite from the conductive pins. Leave it for how ever many hours the epoxy says it needs to sit for for maximum strength.
Sixteen to twenty hours later or so, you're going to need to solder. So, solder the wire to the pin. If the solder won't stick to the pin, scratch the pin with a razor blade a couple of times and try again. If the pin is coated with something, scrape off the coating with a razor blade and then solder to it.
If you have a lot of money, just glue the wire to the pin with conductive epoxy very, very, carefully.
When everything is dry and in place, test the keyboard. If it works, then you're more less done.
Put it in a nice case or put it in a radioshack case. It doesn't matter.
Other Keyboards and Considerations


Some keyboards have sockets. If it does, it saves you a lot of work. What you need to do is get your own socket or set of header pins and solder wires to each connection. Once you have a socket or header pins with wires attached, plug it into the socket on the board. Test it to see if it works by touching a wire on each side together. If it works, glue the header pins or socket into the socket on the board and you're done. It's so simple to connect, in fact, that you may not even want to bother tracing the plastic sheets and just try to figure out the key combinations by trial and error.
Also, there are Mac USB keyboards that allow you to connect other USB devices to the computer through them. I wish I could tell you something more enlightening about the USB connections on those boards, but I can't. Maybe you can do something profound with them. Otherwise, you can just attach wires to it using the method shown in Step 4.
other considerations:
-The USB cable has a tendency to rip off the shift register board. You may want to glue it in place.
-USB devices are 5v 100ma
-Some boards have LEDS attached (see picture). You may be able to send data back from the computer to light them up. If you can control the LEDS, then you can attach low voltage relays to them and have outputs as well as inputs. I haven't tried to figure it out yet, but if you want to give it a go, a good place to start may be here:
http://www.beyondlogic.org/keyboard/keybrd.htm
One Step Beyond!


Once you have a hacked keyboard you can use it for a number of functions and attach a number of different types of switches.
You can build your own typewriter keyboard. Check the picture and video. It may not auto-load and it may take a long time to load when it does (it's around 20 MB), but here is the video of the typewriter:
http://a.parsons.edu/~randy/video/typewriter.mov
You can use a photocell as a switch (as seen in the picture and video).
You can hook it up to a capacitance sensor and use just about anything to trigger an event in a Flash movie.
You can hook it up to some floor switches and develop your own DDR game.
You can do more things than I could ever dream up.

Did you find this useful, fun, or entertaining?
Follow @madeineuphoria to see my latest projects.