Handmade Space Age Clock

This Instructable describes how to make a futuristic Space Age clock, by hand, out of foam core board. The artwork is printed on paper and glued onto the board, and then cut out with a precision knife (aka X-Acto knife). Powerpoint was chosen to create the artwork due to it's curved line drawing capability. The clock mechanism was from a thrifted clock.
Supplies
- Foam Core Presentation Board (aka Foamboard), 3/16" thick. Look for good quality to avoid gaps in foam edges. I've successfully used Elmer's and Ross.
- Precision Knife (e.g., X-Acto knife) with new, sharp blade
- Powerpoint, or other line drawing program with a curve tool
- Color Printer
- Spray Adhesive, e.g., Elmer's Multi-Purpose which resists "bleed through" and is photo safe.
- Clock Mechanism, e.g., from a crafts store, or from an existing clock. Make sure shaft is long enough to go through the board and expose enough thread for the washer and nut.
Create Artwork


I chose Microsoft Powerpoint in which to create the artwork because of its Curve tool. Google Slides also has a Curve tool but it cannot change individual point curvatures.
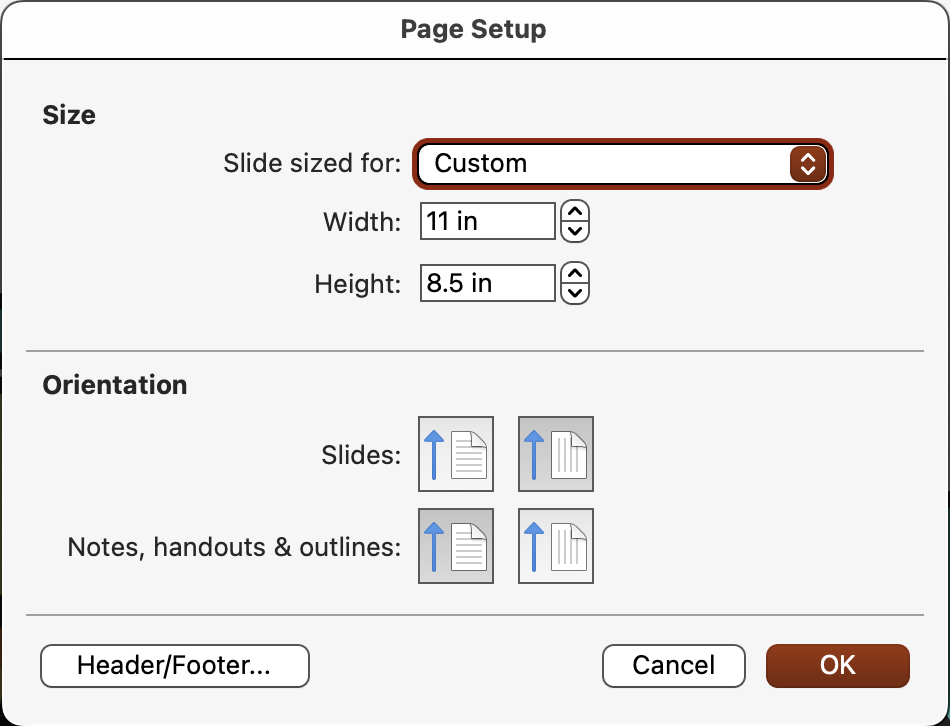
- Change the slide size to the size of the paper that you are using, e.g., 11" x 8.5" in Page Setup (my default is Widescreen 13.33" x 7.5").
- Turn on Guides in View | Guides in order to show the center of the page.
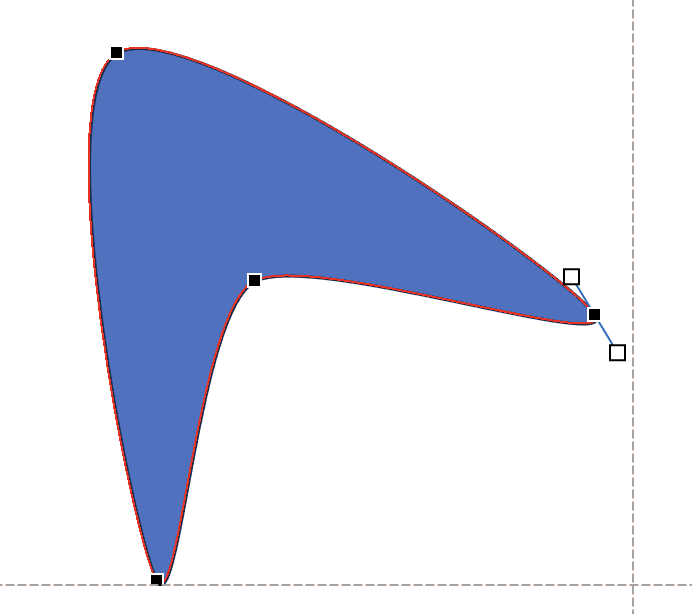
- Create a "Boomerang" by inserting a Curve shape. Powerpoint will display a Cross cursor; add 4 arbitrary points by clicking the mouse button, then a 5th point on top of the first point in order to close the shape.
- Reshape the Curve shape into a "Boomerang" by right-clicking on the shape and selecting Edit Points.
- Drag the points to the desired shape. Adjust the point's curvature by rotating and resizing the adjustment line, as shown in the attached pictures.
- Change the line thickness and fill color as desired, e.g. https://www.color-meanings.com/retro-color-palettes/, or find retro artwork on the web and use Powerpoint's dropper tool to get the color values (which is what I did in the attached PDFs).
- Create clock face. I created two circles; one 4" in diameter, and one about 2.5" diameter. Inside of each one, I added a background picture. I also added a small circle in the center, which indicates where the clock will be inserted. Add clock numbers as desired. I used the font, "Pizzicato-Swash". I used Powerpoint's Format Shape | Text Options to enhance the numbers.
Print Artwork


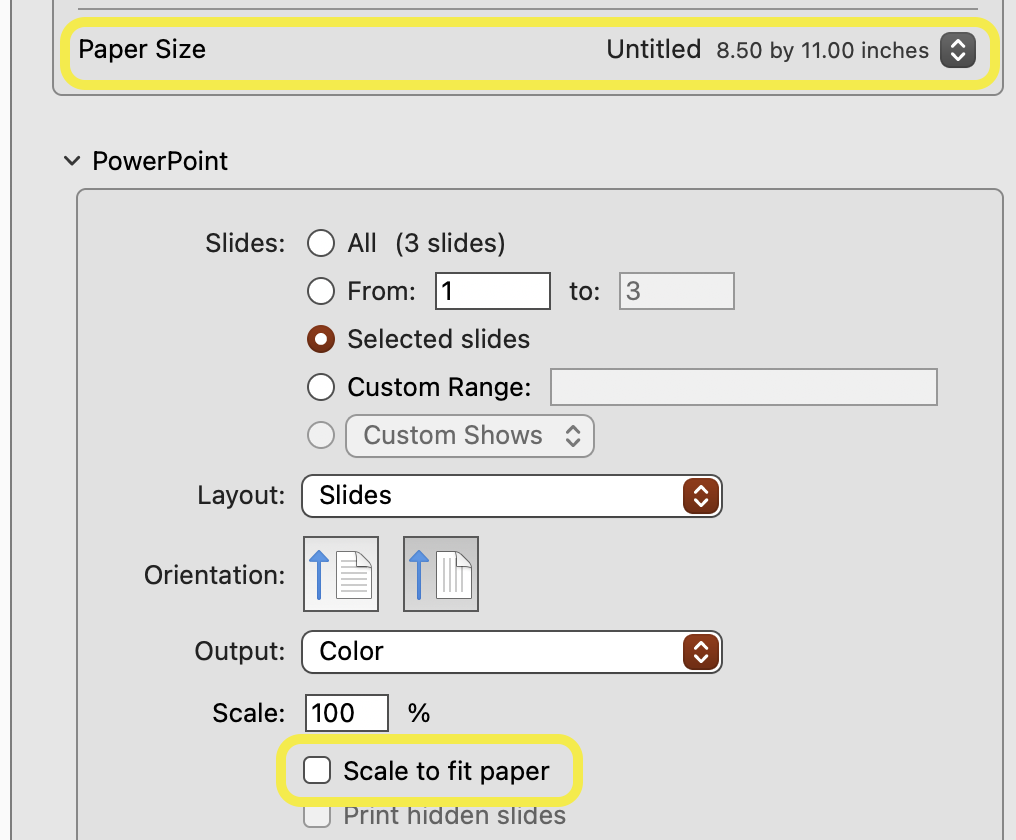
This is the step in which that I had most difficulty. I wanted the clock face diameter to print out at 4 inches, which is the size that I created the circle in Powerpoint, but when I printed it out, it was either too large or too small. One obvious setting to change is to turn off "Scale to fit paper" in the "Print..." dialog. After turning this option off, the size was still wrong. It turned out that even though the selected paper size was 11" x 8.5", there was a margin associated with this paper size, and the image was scaled to accommodate the margin. To fix this, I created a Custom Paper Size in the "Print..." dialog under "Manage Custom Sizes..." with 0" margins (see attached screenshot).
Print the artwork with the above settings.
Attach Artwork to Board


I used a multi-purpose spray adhesive to attach the printed artwork to the foam core board. Follow the precautions and directions on the can. I found that some of the edges peeled up while cutting and handling. I joined the surfaces while the adhesive was still tacky but I am not sure whether I sprayed enough on or there was another other issue. Wait for the adhesive to set (per instructions on can) before cutting out the clock.
Cut Out Clock


Use a Precision Knife (e.g., X-Acto knife) with a new, sharp blade to cut out the shape of the clock. Use a combination of scoring the pattern, plunge cut, and sawing motion (in small steps) to cut through the paper and the foam core. Cutting curves is harder than straight lines, so go slow. Some foam core has a "grain" to it so cutting in some directions is smoother than others. I cut out the inside holes first, since the board has more support with the rest of the board attached. I started scoring the sharp inside corners first. I cut past the outside curves, and cleaned them up later with gentle sawing motions. I also plunge-cut the circle in the center with multiple passes of short strokes around its circumference.
Attach Clock Mechanism


I used a clock mechanism from a thrifted clock. To take the mechanism out of the clock, I needed to remove the hands. The hands are friction-fit. I tried removing the second hand by prying it up with a screwdriver but it broke off. I was able to subsequently fix it with super glue. Gently pry off the minute and hour hands.
The clock mechanism shaft from the clock that I thrifted was a little bit short, so I trimmed out material from the back of the foam core board.
Attach the hands.
Optionally Attach Supports


If you choose to use the clock as tabletop, or mantle, you can create supports with foam core board. Cut small pieces of foam core board as shown in the pictures above. Use tape on both sides of the supports to attach to the clock. I used Linen Hinging Tape.
Conclusions

Since I do not have a laser cutter or 3D printer, I wanted to see whether I could make a retro clock by hand. I chose to use foam core board for its stiffness and ease of cutting. I used Powerpoint for its Curve line drawing tool.
I had difficulty printing the design at the desired size. I use a Mac, so this may just be a Mac issue. I found that Powerpoint/Mac was scaling the image when there was a margin defined in the paper size. To fix this problem, I made a custom paper size without margins.
It's a little difficult to make smooth cuts when cutting by hand, but overall, I found this project produced relatively good results, and is a fun project that takes only a few hours to design and make. I attached a couple of PDFs in Step 1 (color and line art), if you want to make one like mine.
If this Instructable inspired you to make something, please write about it in the comments. I'd love to hear about it.
Have fun,
Barry
Update - More Shadows Added


Per comment below, I made another clock with more shadows on the boomerangs and clock face. I used a local photo kiosk to print the artwork on 8"x10" glossy photo paper to give it a plastic look. Updated PDF is attached below, and PNG attached above.