Heat Sentinel — Your Personal Heat Index Guardian
by The Spanner in Circuits > Gadgets
315 Views, 1 Favorites, 0 Comments
Heat Sentinel — Your Personal Heat Index Guardian
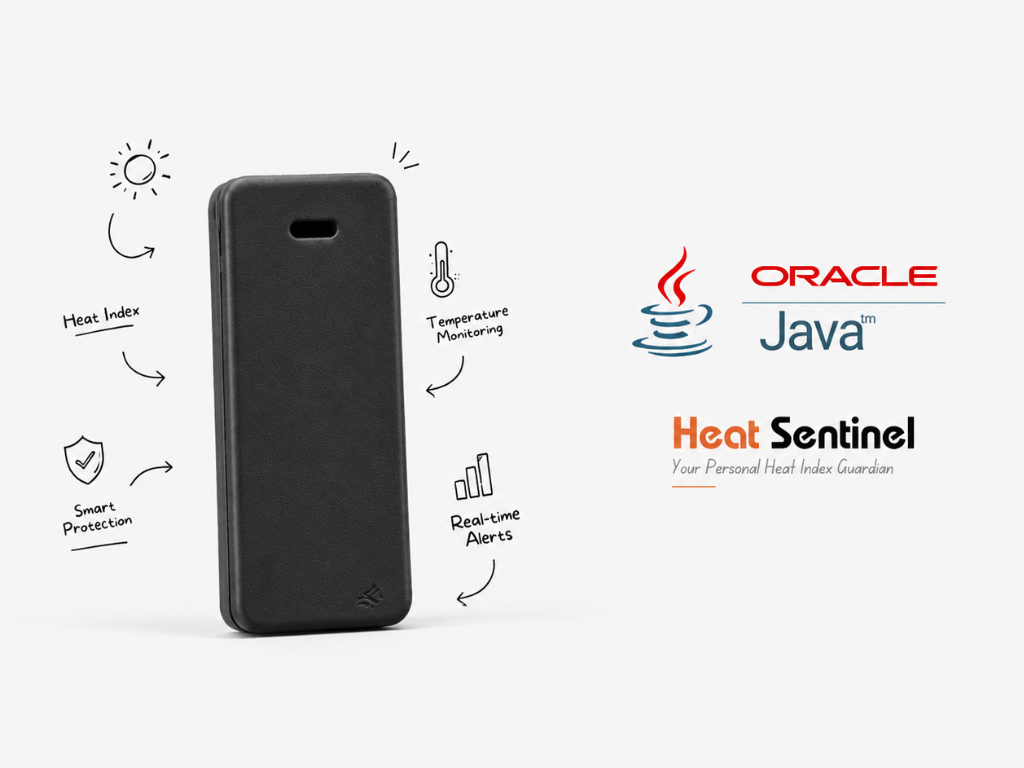
Heat is one of the quietest dangers we face. It doesn't announce itself like a flood or a fire. There is no sudden event to warn you that something has gone wrong. Instead, heat builds gradually—one degree at a time, hour after hour—until a room that seemed perfectly comfortable can become an unsafe place to stay. And often, the people most vulnerable to that change are the least likely to notice it themselves.
An elderly parent living alone. A baby sleeping in a nursery. A pet left at home on a hot afternoon.
A conventional thermometer can tell you that a room is 35°C. But temperature alone doesn't tell the whole story. Humidity can make the same temperature feel significantly hotter, and prolonged exposure can turn an uncomfortable environment into a serious health risk.
We wanted to build something that could recognize that difference.
That idea became Heat Sentinel. It's a room-level heat monitoring and early-warning system designed to continuously watch the environment and notify someone when heat begins to cross into dangerous territory.
Instead of simply asking "How hot is the room?", Heat Sentinel looks at the bigger picture: how hot it actually feels, what risk level that represents, and how long the room has remained there.
Because a brief spike in temperature is not the same as spending several hours in sustained heat.
Heat Sentinel is built around that idea. It doesn't just measure the environment—it keeps track of how the conditions change over time, turning a simple temperature reading into a clearer picture of what is actually happening inside the room.
And most importantly, it doesn't require someone to constantly check a thermometer or keep a dashboard open. When conditions become dangerous, Heat Sentinel brings the warning to you. That is the gap we wanted to close: the gap between knowing the temperature and understanding the danger.
Supplies
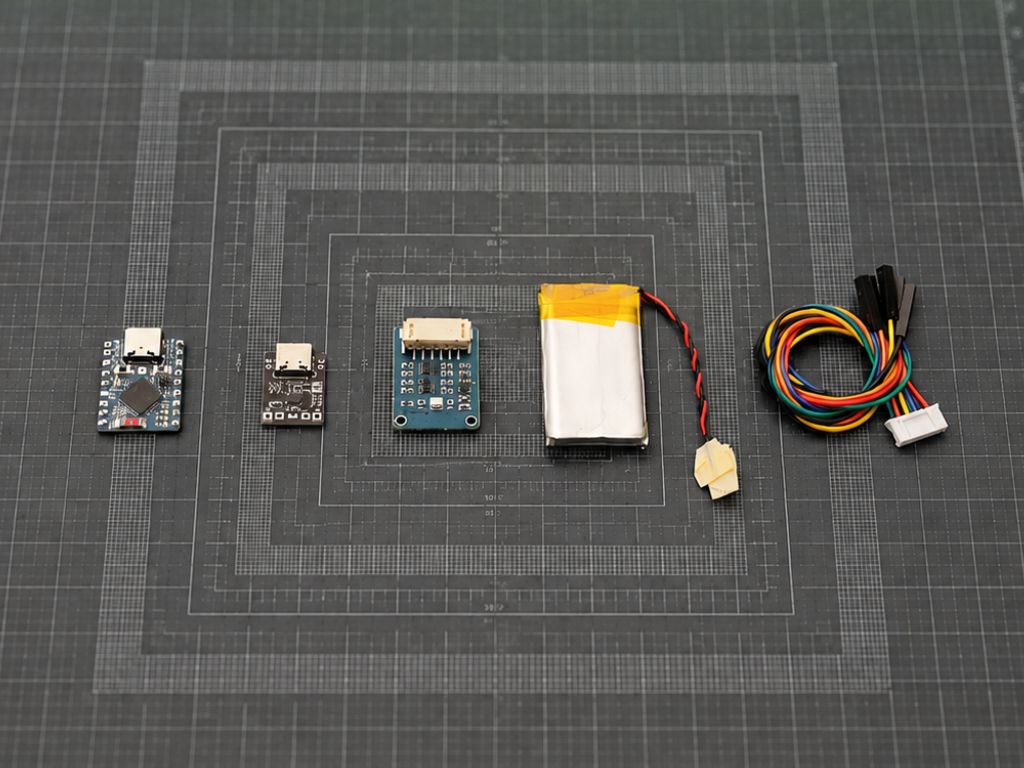
Components
- Waveshare ESP32-S3 Zero
- Waveshare BME280 Sensor
- Lipo Battery 400 mAh
- Battery Charger (Designed)
Tools
- Soldring Iron
- Bambu Lab P2S
- Black PLA filament
- Super Glue
Hardware Support — Waveshare
A big shout-out to Waveshare for supporting HeatSentinel with the core hardware used to bring this project to life. We built the system around their hardware ecosystem, using both the Waveshare ESP32-S3-Zero as the main controller and the Waveshare BME280 for environmental sensing.
How It Works
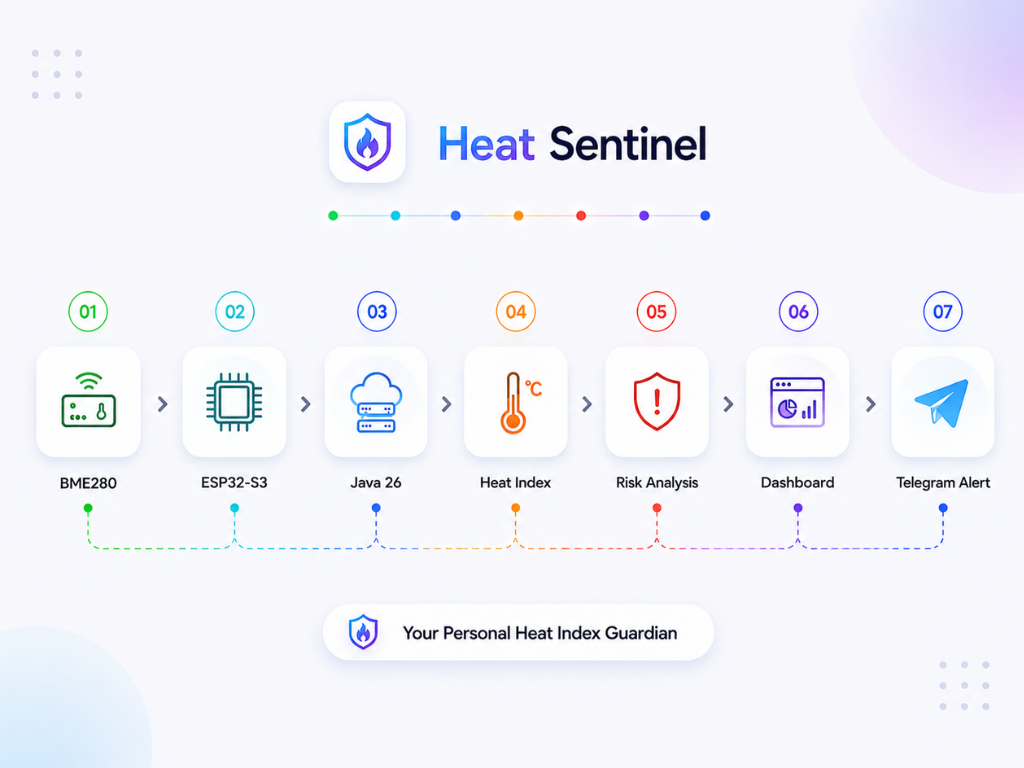
At the edge of the system is a small Waveshare ESP32-S3-Zero paired with a Waveshare BME280 sensor. The sensor measures temperature and humidity and sends that information over Wi-Fi to a Java 26 backend. From there, the raw measurements become something much more meaningful.
The backend calculates the Heat Index, using the established NOAA regression that accounts for both temperature and humidity to estimate how hot the environment actually feels. The result is then classified into different risk levels, allowing the system to understand not just whether a room is warm, but whether its conditions are becoming unsafe.
A brief spike in temperature is not the same as spending several hours in sustained heat. Heat Sentinel therefore keeps track of how long the room remains within each risk zone throughout the day, giving us a much clearer picture of the environment and its progression.
All of this information comes together in a live web dashboard, where the current temperature, humidity, Heat Index, risk level, and history can be monitored in real time. But we didn't want Heat Sentinel to depend on someone constantly watching a screen.
When conditions enter a dangerous range, the system can immediately send a Telegram notification to the person responsible for the space. The room doesn't have to wait for someone to check it—the system brings the warning to them.
The complete journey is surprisingly simple: BME280 → ESP32-S3 → Java 26 → Heat Index → Risk Analysis → Dashboard → Telegram Alert
We also wanted the software side of the project to be an engineering exercise in its own right.
The backend is built directly on Java 26, without Spring, Maven, or a collection of external frameworks. Modern Java features such as sealed interfaces, pattern matching, exhaustive switches, records, and virtual threads allow us to build the sensor API, web dashboard, real-time WebSocket layer, and alert system as a single self-contained application.
The result is a system that is small enough to understand, simple enough to deploy, and powerful enough to continuously monitor a real environment.
3D Printing the Parts
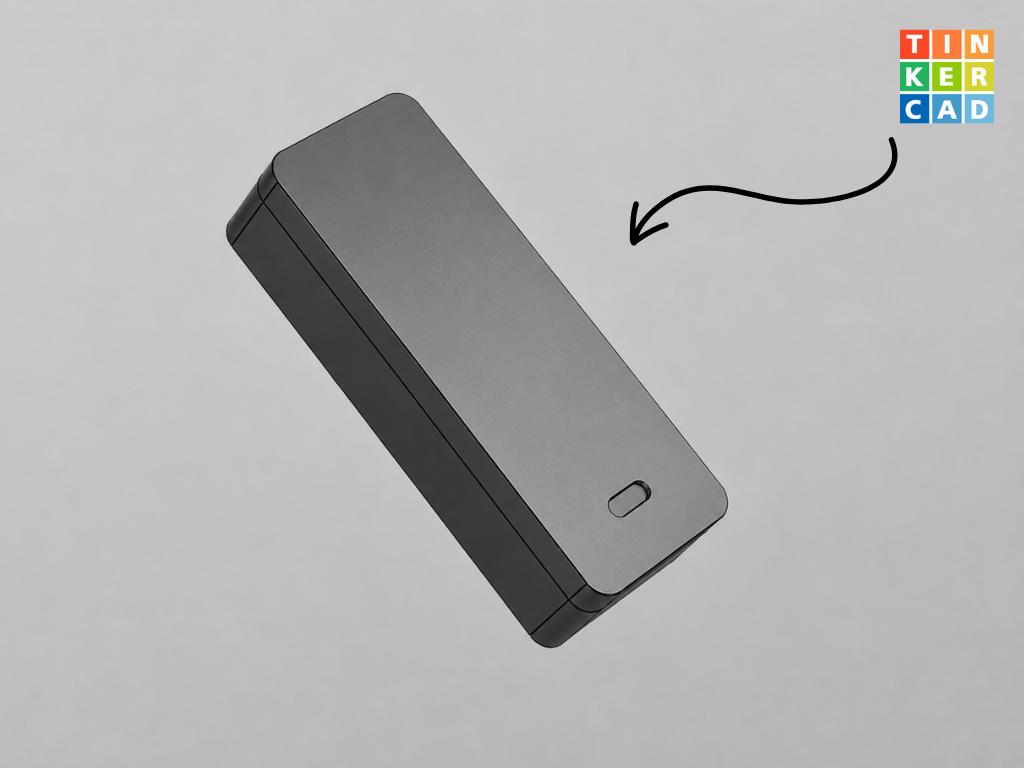

We wanted the enclosure to be cute, simple, and minimal, with a clean form that matched the character of the project. We designed it from scratch in ThinkerCAD, keeping the enclosure compact while making sure there was enough space for everything.
After finalizing the CAD model, we 3D printed the enclosure using black PLA filament on our Bambu Lab P2S 3D printer. The result is a clean, compact enclosure that keeps the electronics protected while giving Heat Sentinel the simple and polished look we were aiming for.
Designing Battery Charger
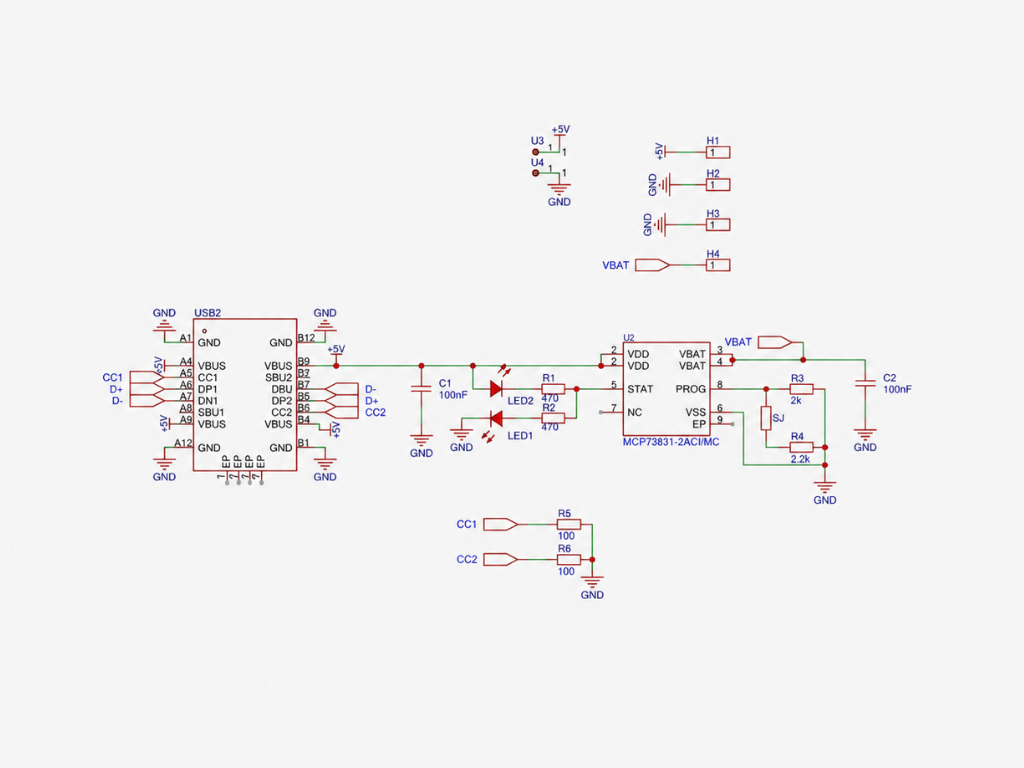
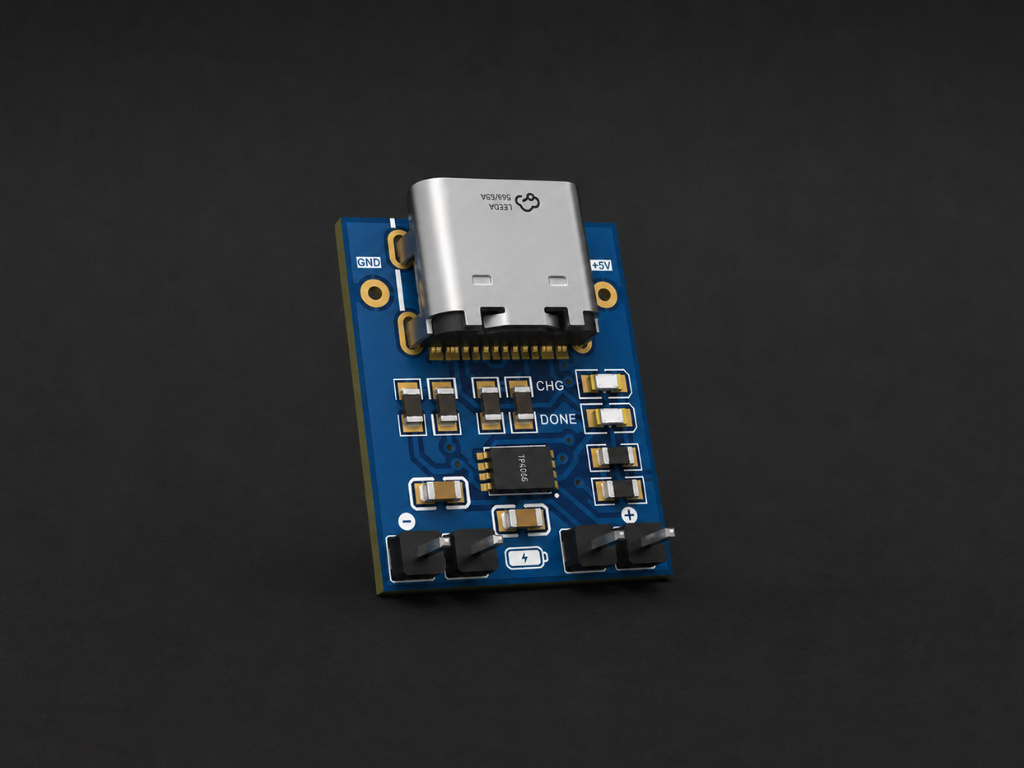
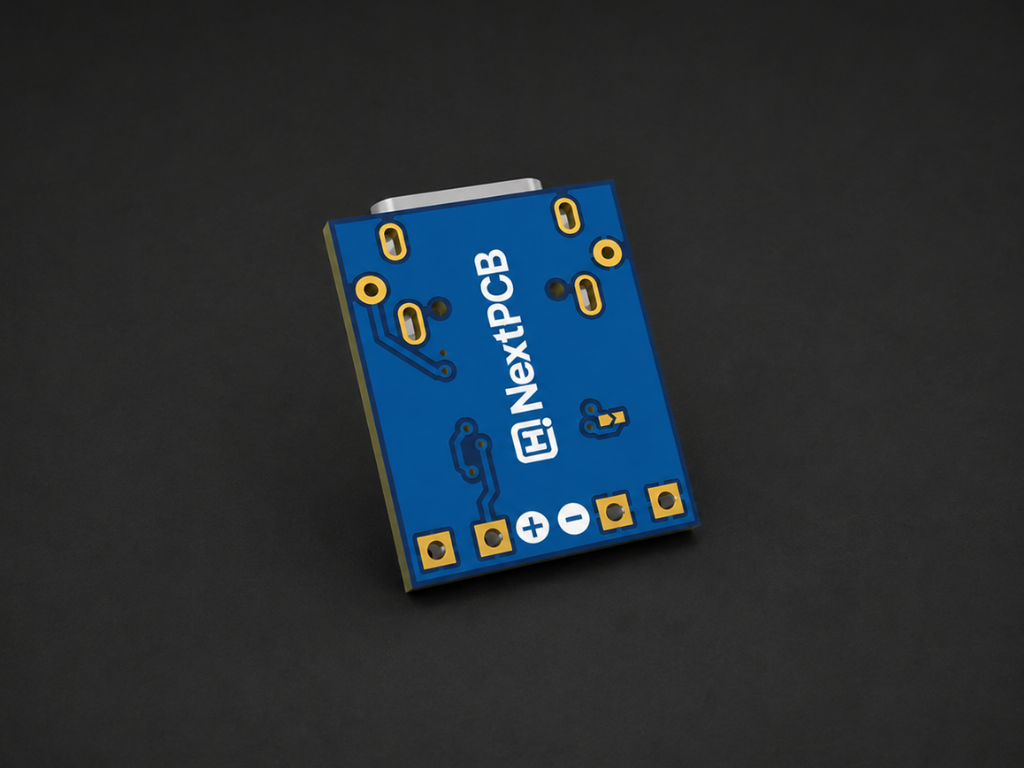
To keep Heat Sentinel compact, we decided to design our own battery charger instead of using a separate off-the-shelf charging module.
The charger was designed from scratch in KiCAD, with an MCP73831 Li-ion charge controller. We also included charge-status LEDs and the required battery connections and supporting components.
The focus was to keep the circuit small, clean, and reliable while making it easy to integrate directly into the Heat Sentinel enclosure. The final schematic gives us a dedicated charging solution designed specifically for the project.
Ordering the PCB


With the design finalized, we sent the charger PCB to NextPCB for manufacturing and assembly.
A big shout-out to NextPCB for supporting Heat Sentinel. The PCB fabrication and assembly quality was excellent, and the overall finish was genuinely impressive—especially considering the price point.
If you're building your own hardware, this is a great time to try NextPCB. Their current turnkey PCBA offer provides up to $200 off qualifying 1–10 piece assembly orders, making it possible to get your prototype assembled at a significantly lower cost.
Assembly
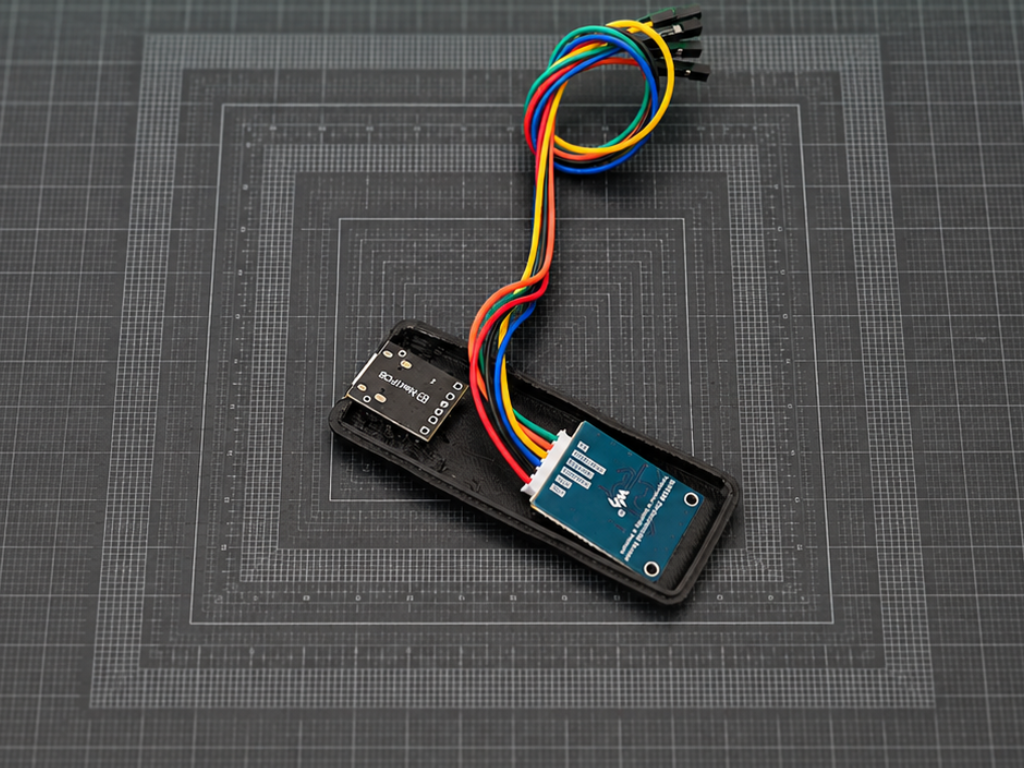
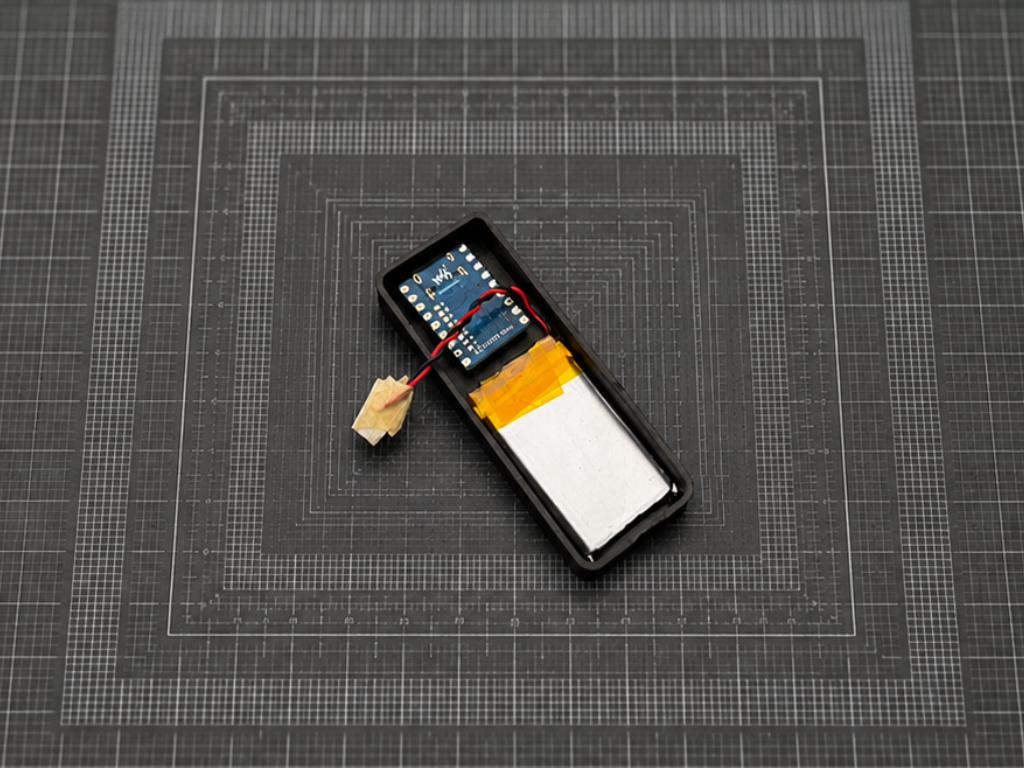
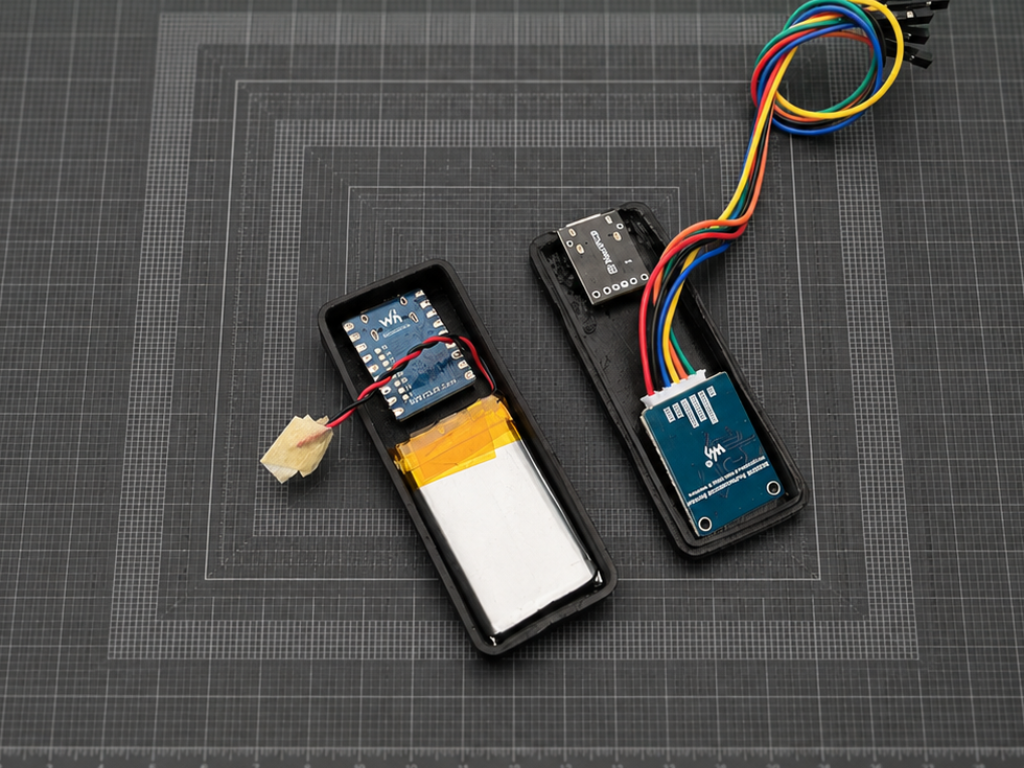
Install the components one by one inside the enclosure, keeping the wiring neat and making sure each part sits correctly in its intended position.
Pay particular attention to the USB-C port. Align the enclosure's USB-C cutout directly with the USB-C connector on the board so the connector is fully accessible from the outside.
Wiring
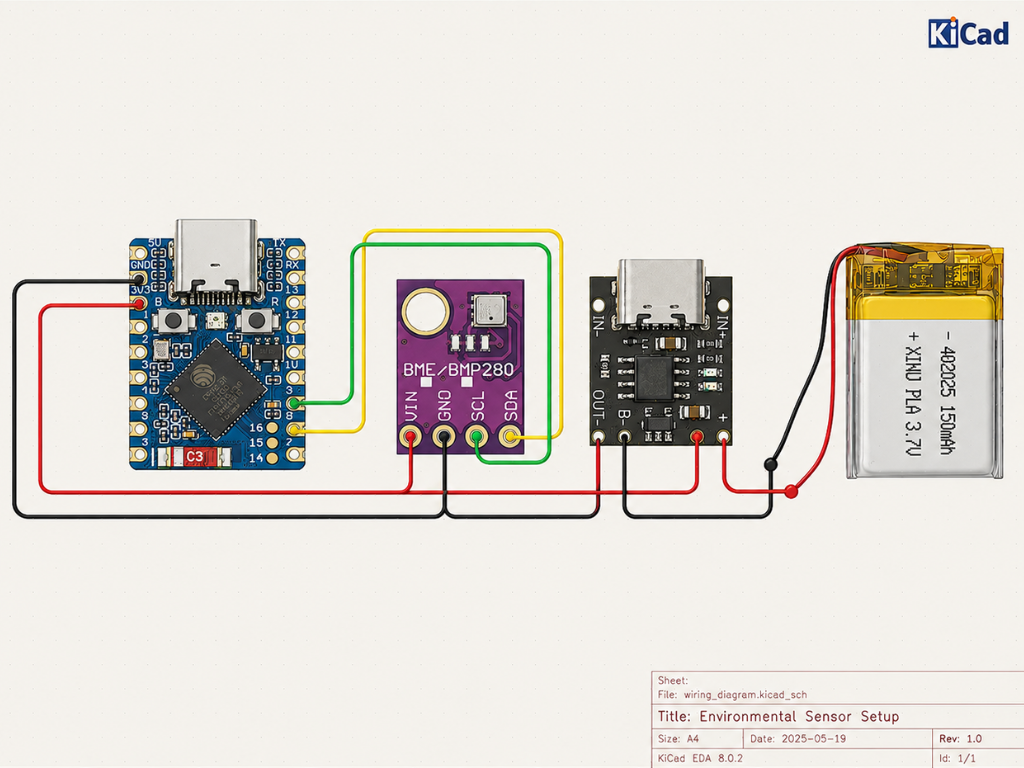
With the enclosure assembled, the next step is connecting the electronics. Follow the wiring diagram above and connect the BME280 to the Waveshare ESP32-S3-Zero, making sure the power and I²C connections are correctly matched. Keep the wires as short and tidy as possible so everything fits cleanly inside the enclosure. Double-check 3.3V, GND, SDA, and SCL before powering the board.
Once the sensor wiring is complete, connect the battery and charging circuit as shown in the diagram. Take a moment to verify every connection before applying power. Always check the polarity of the battery connection carefully—reversing the battery can damage the electronics.
Final Assembly
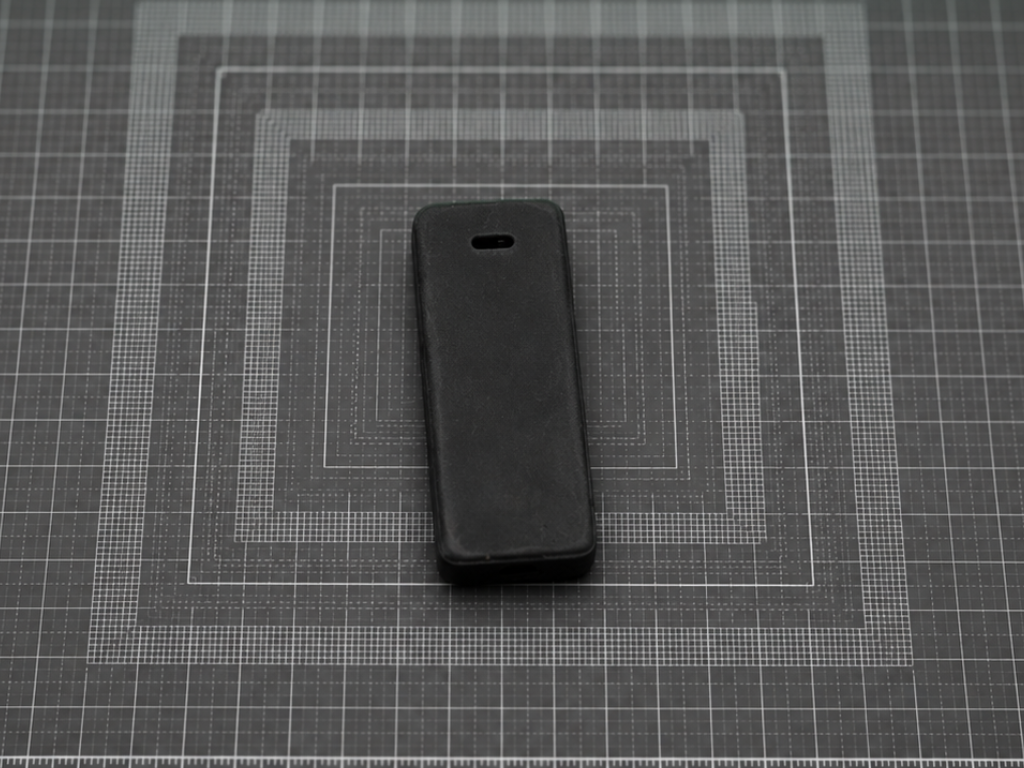
The enclosure was designed with a snap-fit mechanism, so there is no glue or additional hardware required. Simply align the two parts of the enclosure and press them together until they snap securely into place. Make sure the USB-C port and sensor openings are properly aligned before closing the case.
Installing Java 26
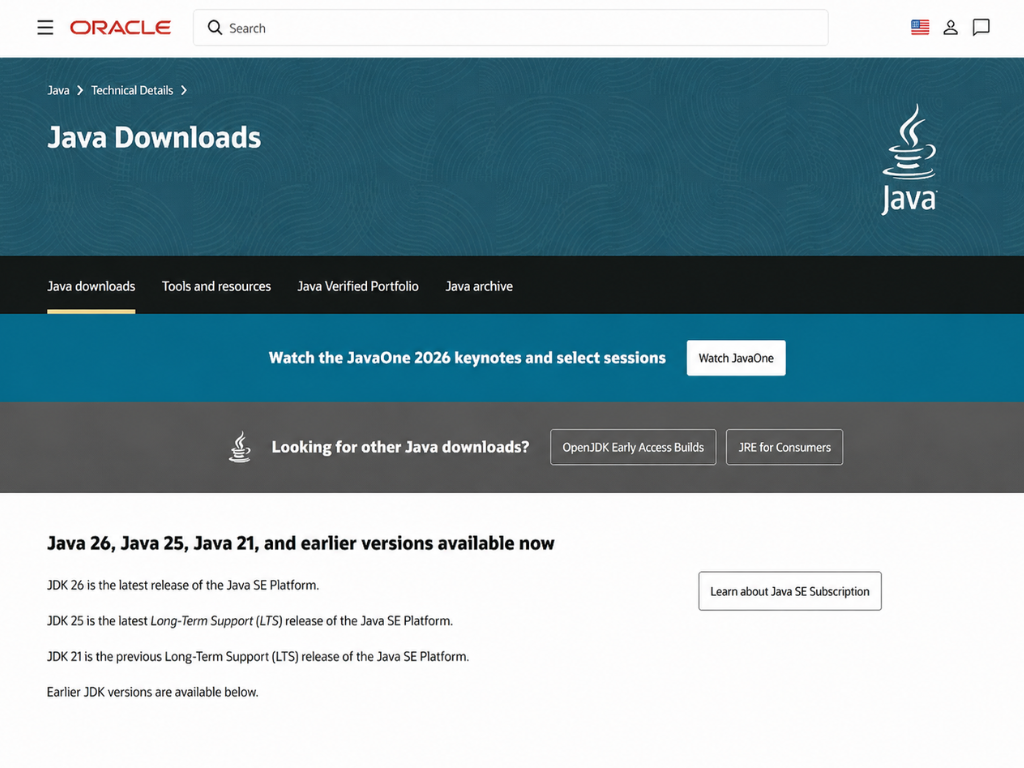
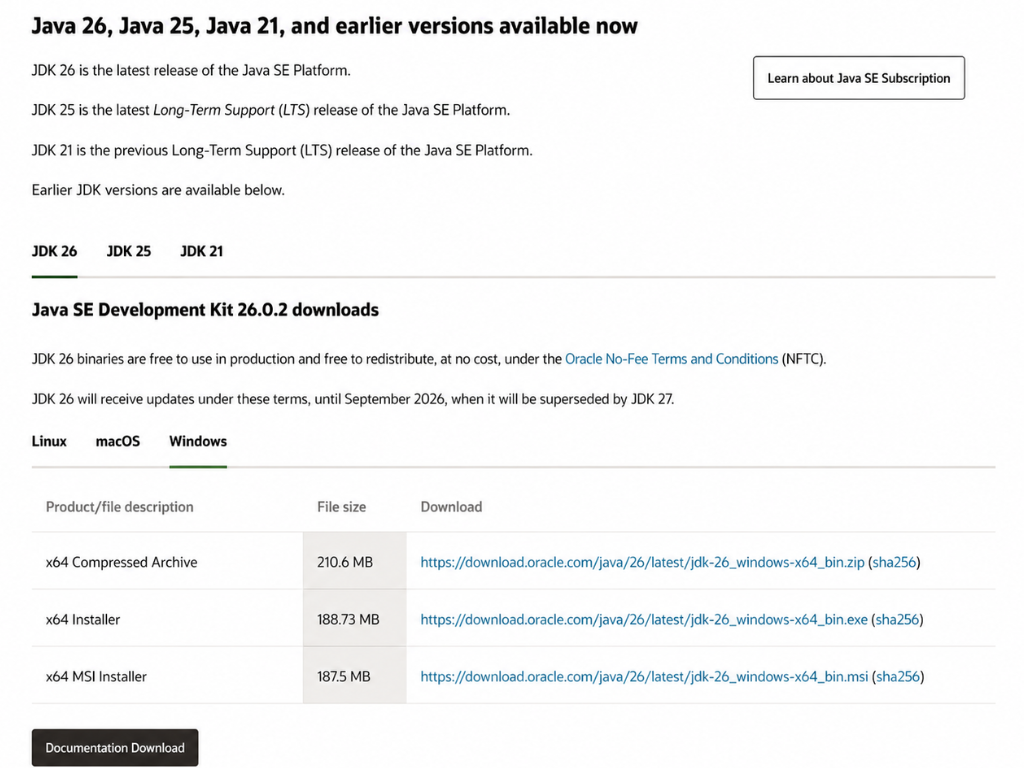
Heat Sentinel's backend runs on Java 26, so the first step is to install the Java Development Kit (JDK) on the computer that will run the server.
Start by opening your browser and visiting Oracle Java. Download JDK 26 for your preferred operating system.
Choose the installer that matches your system:
- Windows: x64 Installer (.exe)
- macOS: Installer package (.dmg)
- Linux: Select the appropriate package for your distribution, such as .deb, .rpm, or the compressed archive.
Once the download is complete, run the installer and keep the default installation options unless you have a specific reason to change them. Follow the setup wizard until the installation is complete.
For Linux, install the downloaded JDK using your distribution's standard package manager or follow Oracle's installation instructions for the package you selected. That's all we need for now. With Java 26 installed, the machine is ready to run the Heat Sentinel backend.
Verify the Java Installation
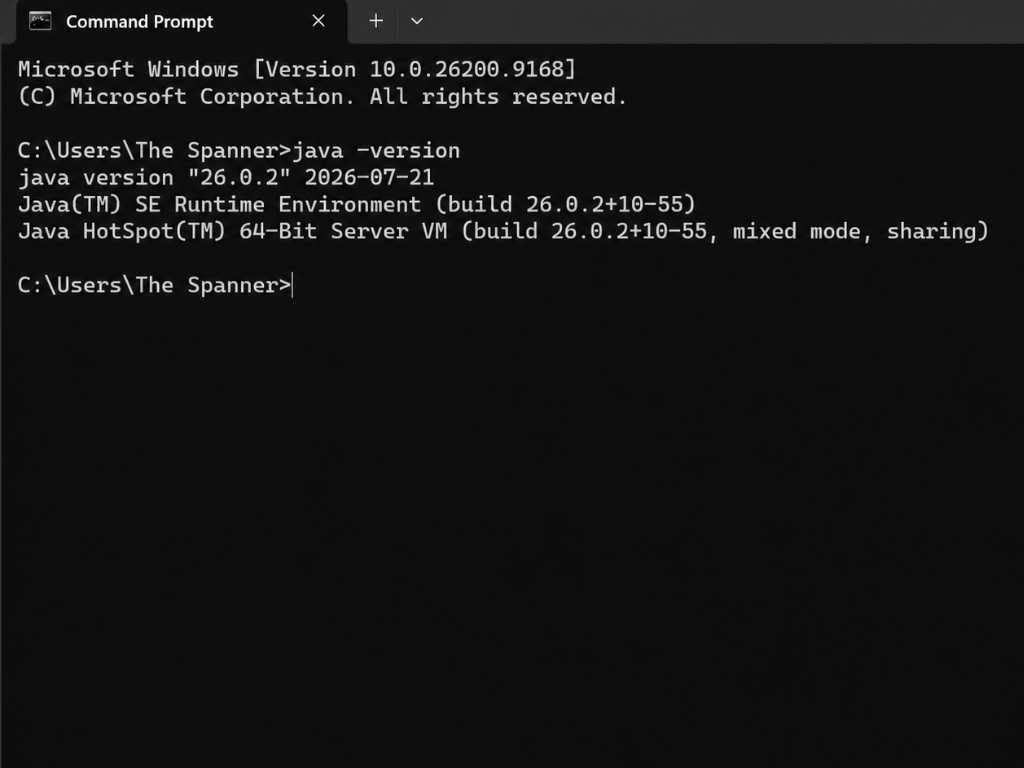
Before moving on to the Heat Sentinel backend, let's make sure Java 26 is installed correctly and available from the command line.
Open a fresh terminal window on your computer:
- Windows: Command Prompt or PowerShell
- macOS / Linux: Terminal
Run the following commands:
Both commands should return a version beginning with 26, confirming that the Java runtime and compiler are available.
If you see “not recognized”, “command not found”, or a similar message, first close the terminal completely and open a new one. A fresh terminal session is sometimes all that's needed for the system to pick up the new Java installation.
If the commands still aren't recognized, the JDK may not be correctly added to your system's PATH. Check the installation for your operating system and make sure the JDK's bin directory is included in PATH.
Setting Up Project Folder
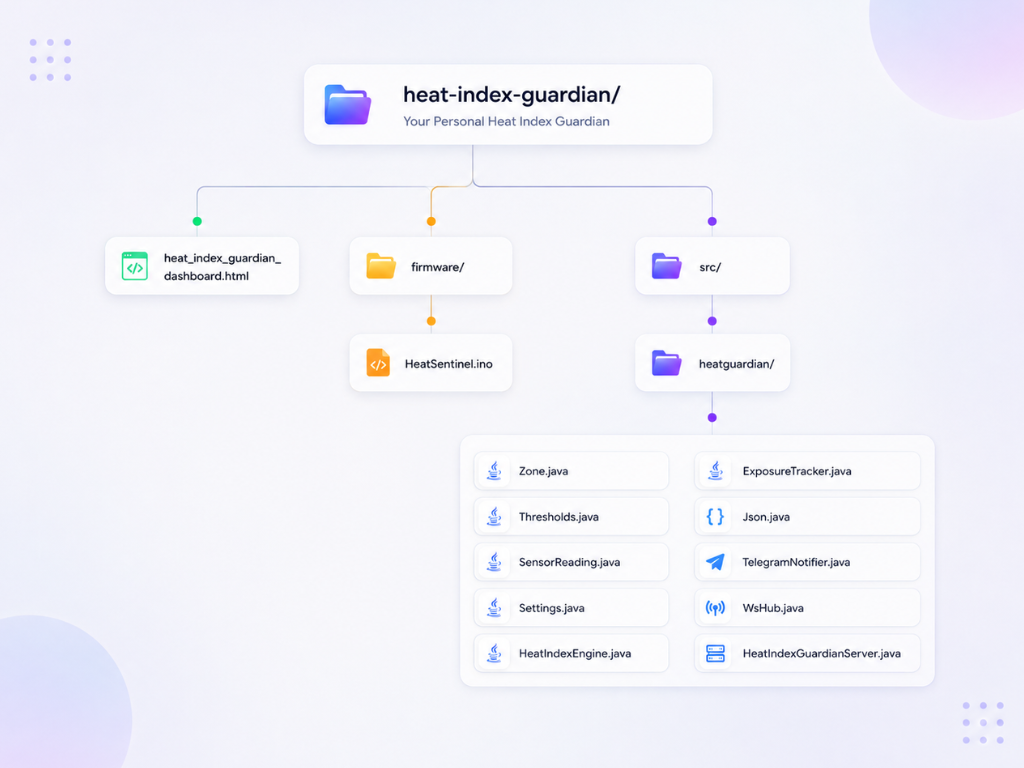
The folder structure is important because Java uses the src/heatguardian path to locate the source files. Make sure src and heatguardian are two separate, nested folders, rather than a single folder with both names.
Your project should look like this:
Create a folder named heat-index-guardian wherever you keep your projects. Inside it, create src, then create heatguardian inside src. Also create a separate firmware folder at the project root.
Now place the project files in their respective locations:
- Put all 10 .java files inside src/heatguardian/.
- Put HeatSentinel.ino inside firmware/.
- Keep heat_index_guardian_dashboard.html directly inside heat-index-guardian/.
Compiling the Java Backend
Compiling simply means converting the .java source files into bytecode that the Java runtime can execute. You'll need to repeat this whenever you make changes to the Java source code. Open a fresh terminal and navigate to the heat-index-guardian project folder.
On Windows:
On macOS or Linux:
Once you're inside the project folder, run:
If the command finishes without printing anything, that's a good sign. javac normally stays silent when compilation succeeds.
You should now see a new out folder inside your project. This folder contains the compiled Java classes that we'll use to run the Heat Sentinel backend.
If you see an error, don't worry. The most common cause at this stage is a missing or incorrectly placed source file. Check that all ten .java files are present inside:
Also make sure you're running the command from the heat-index-guardian project folder.
Running the Server
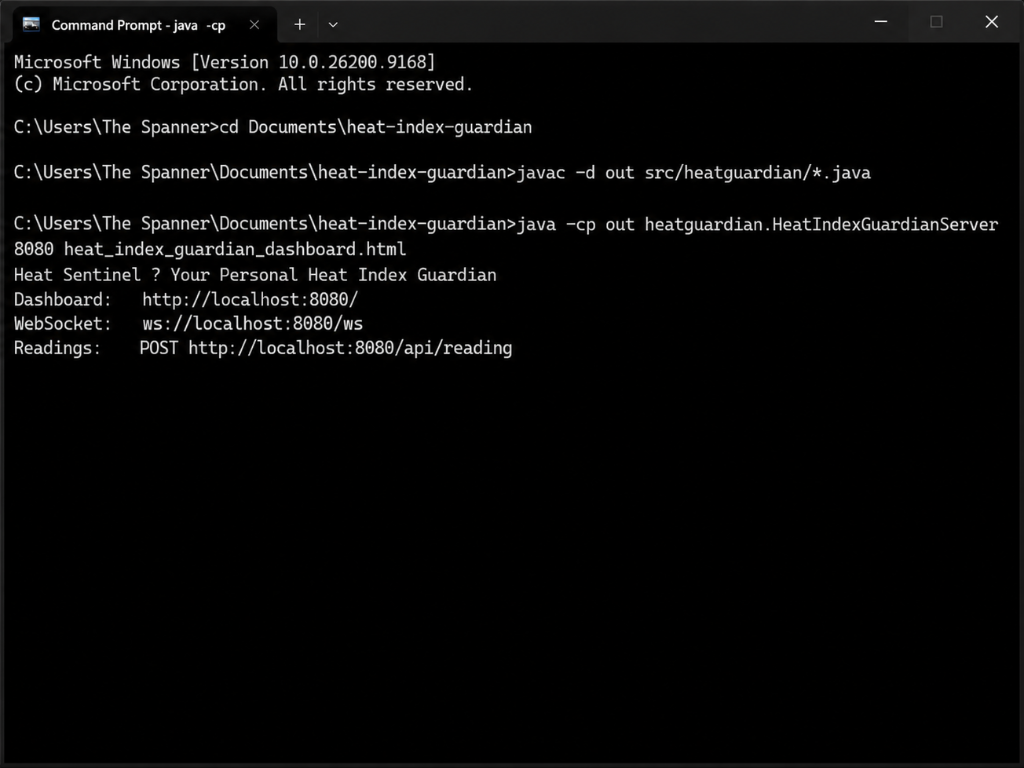
Make sure you're still in the heat-index-guardian folder and using the same terminal window from the previous step. Run:
If everything is configured correctly, the server will start and display a short startup message similar to:
The three addresses tell you what the server is providing:
- Dashboard — the web interface for monitoring Heat Sentinel.
- WebSocket — the real-time connection used to push updates to the dashboard.
- Readings API — the endpoint that will receive temperature and humidity data from the Waveshare ESP32-S3-Zero.
Keep the Server Running
Leave this terminal window open while you're using Heat Sentinel. This terminal is now running the backend, so closing it will stop the server.
When you're finished testing, click inside the terminal and press: Ctrl+C
This will stop the server cleanly. With the backend running, we can now open the Heat Sentinel dashboard and verify that the web interface is working before connecting the sensor hardware.
Verifying the Dashboard
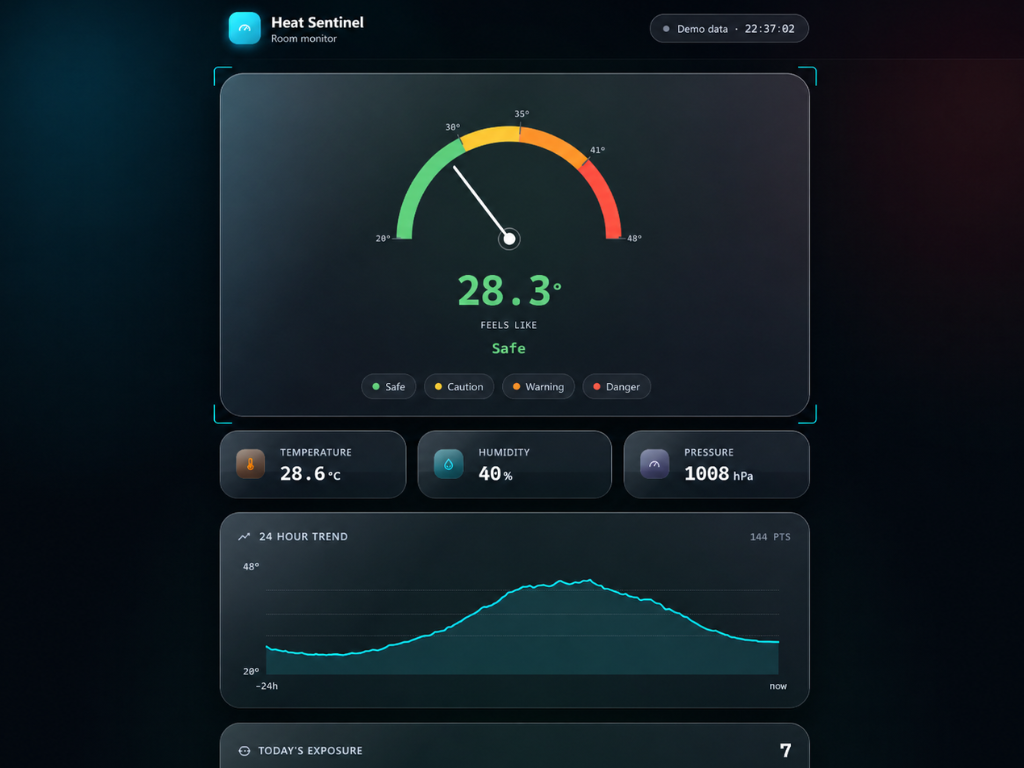
Before connecting the hardware, let's make sure the Heat Sentinel backend and dashboard are communicating correctly.
With the server still running, open any modern web browser and visit:
You should now see the complete Heat Sentinel dashboard, including the heat-risk gauge, temperature, humidity and pressure readings, trend chart, and exposure meter.
At the top, you'll notice a “Demo data” indicator. This is expected. Since the Waveshare ESP32-S3-Zero isn't connected yet, the dashboard uses simulated readings so you can verify the interface without any hardware.
Setting Up IDE
Heat Sentinel uses the Waveshare ESP32-S3-Zero to read the BME280 and send the environmental data to the Java backend over Wi-Fi.
Keep the Heat Sentinel server running in the background while working through this section. We'll connect the hardware to it once the firmware environment is ready.
Installing the Arduino IDE
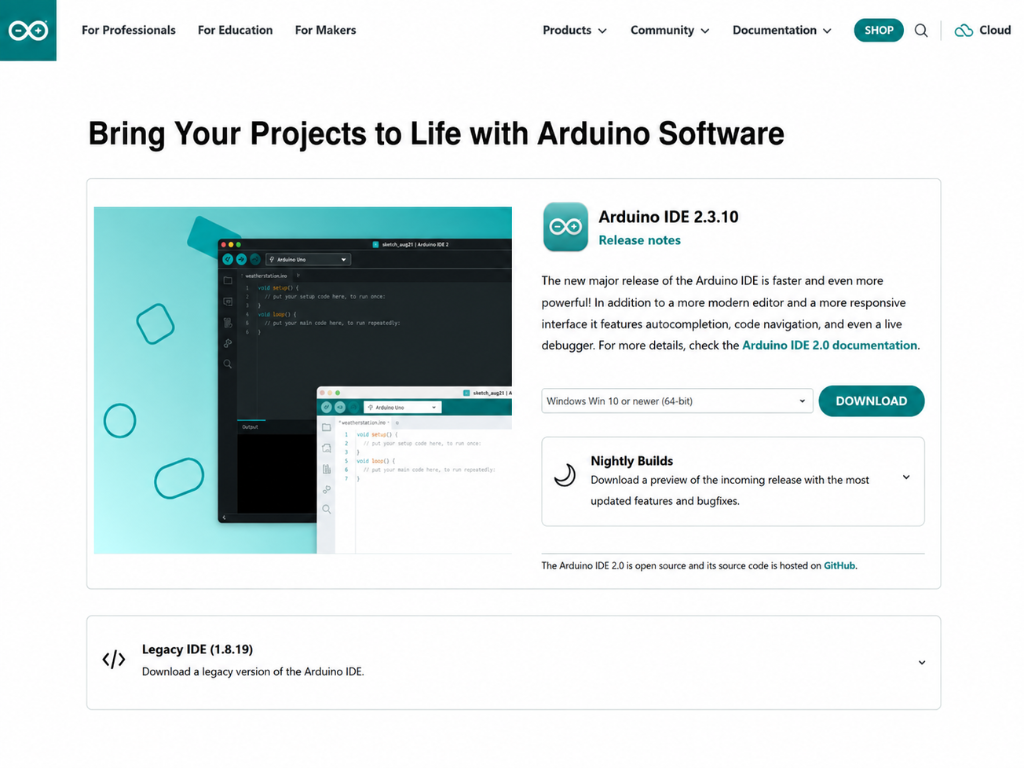
Start by downloading the latest Arduino IDE from Arduino IDE. Choose the installer for your operating system, download it, and complete the installation using the default options. Once finished, launch the Arduino IDE.
Adding ESP32 Board Support
The Arduino IDE doesn't include ESP32 support by default, so we need to add Espressif's board package.
Open Preferences from:
- Windows/Linux: File → Preferences
- macOS: Arduino IDE → Settings
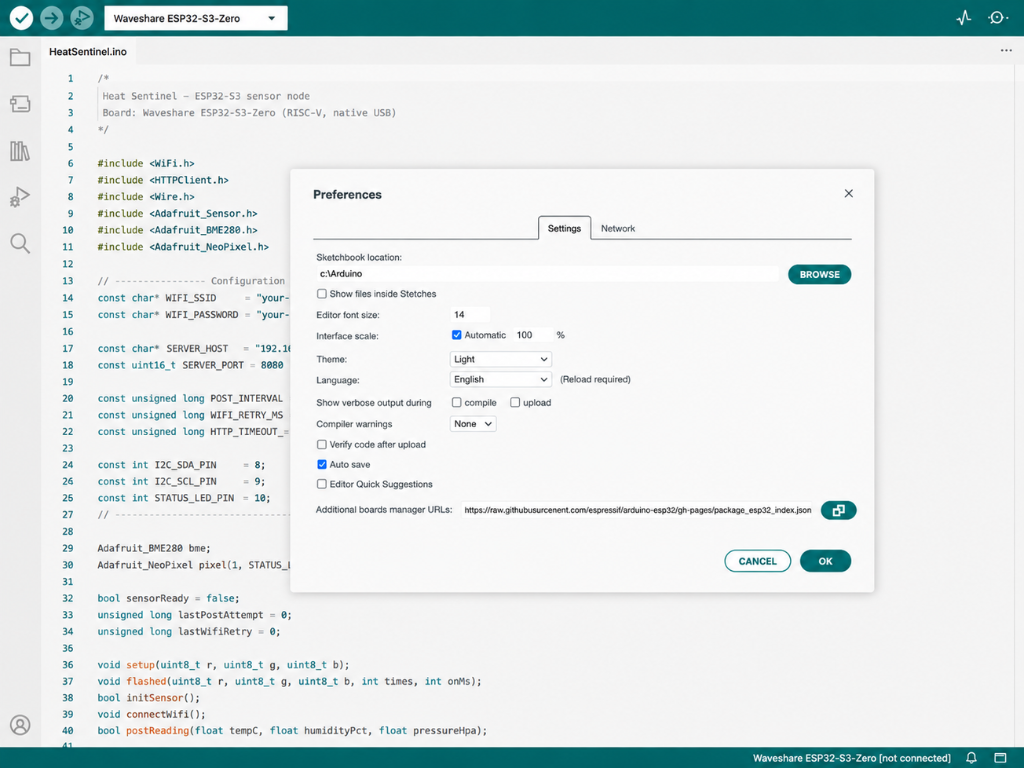
Find Additional Boards Manager URLs and add the following URL:
Click OK, then open: Tools → Board → Boards Manager
Search for esp32, locate esp32 by Espressif Systems, and click Install. The package includes the compiler and tools required to build firmware for the Waveshare ESP32-S3-Zero. The installation can take a few minutes, depending on your connection.
Configuring the Sketch
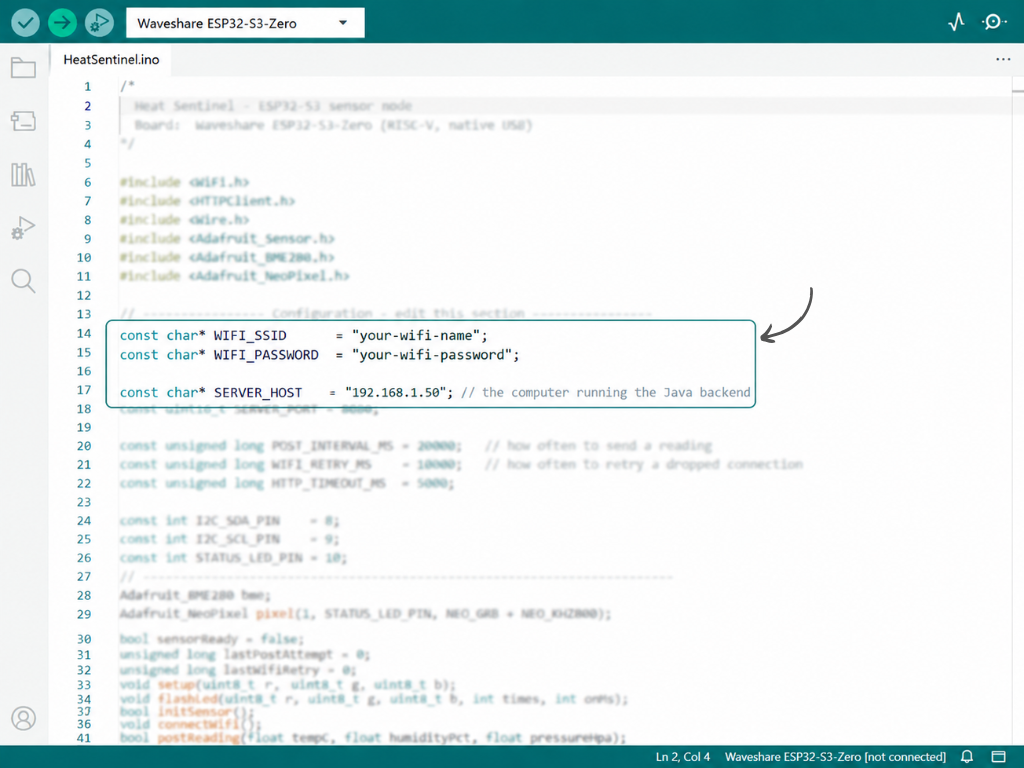
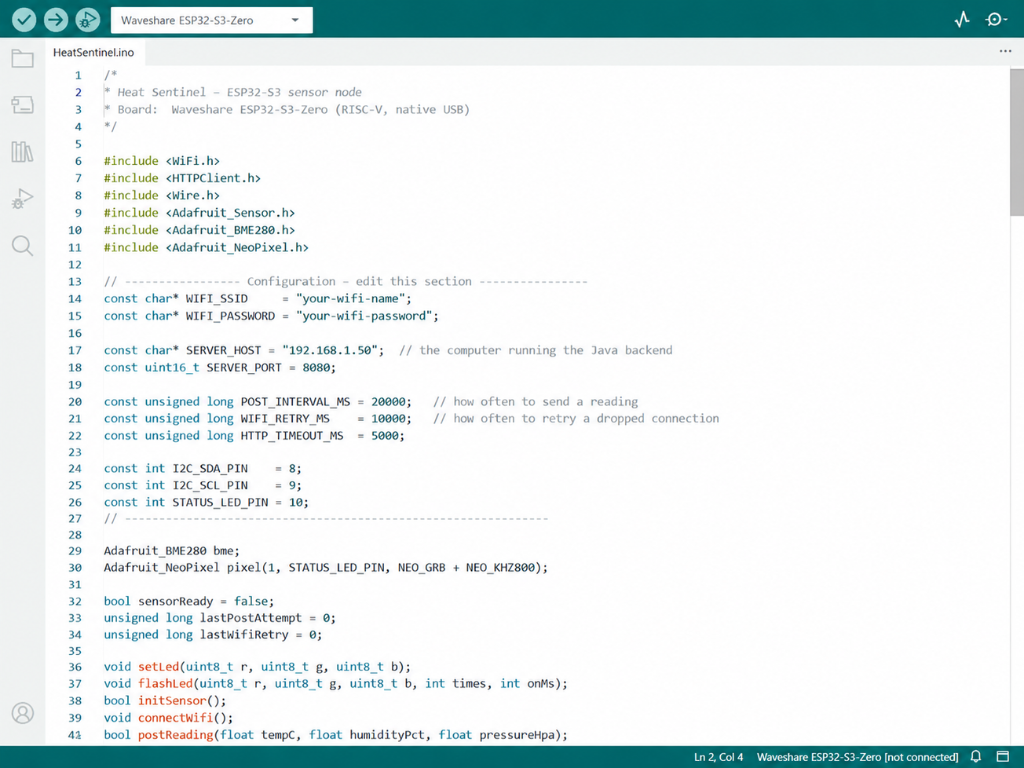
First, download the complete Heat Sentinel source code and project files from the official THE SPANNER GitHub repository. Download or clone the repository, then open the firmware/HeatSentinel.ino file in the Arduino IDE.
in the Arduino IDE. Near the top of the sketch, you'll find the configuration section. Update the following values with your own network details:
Set WIFI_SSID and WIFI_PASSWORD to the exact name and password of the Wi-Fi network the ESP32 will use. Remember that Wi-Fi credentials are case-sensitive.
For SERVER_HOST, enter the local IP address of the computer running the Heat Sentinel Java backend.
Do not enter localhost here. From the ESP32's perspective, localhost refers to the ESP32 itself, not your computer.
Finding IP Address
The Waveshare ESP32-S3-Zero and the computer running the Java server must be connected to the same local network. On Windows, open Command Prompt and run:
Find the IPv4 Address listed under your active network adapter.
On macOS, open System Settings → Network → Wi-Fi → Details. You can also run ifconfig in Terminal and check the active network interface.
On Linux, run:
or:
You'll typically see an address similar to:
Use this address as your SERVER_HOST. Make sure the Java backend is running on this computer when you test the sensor. Also ensure that the computer and ESP32 are connected to the same network.
Uploading the Firmware
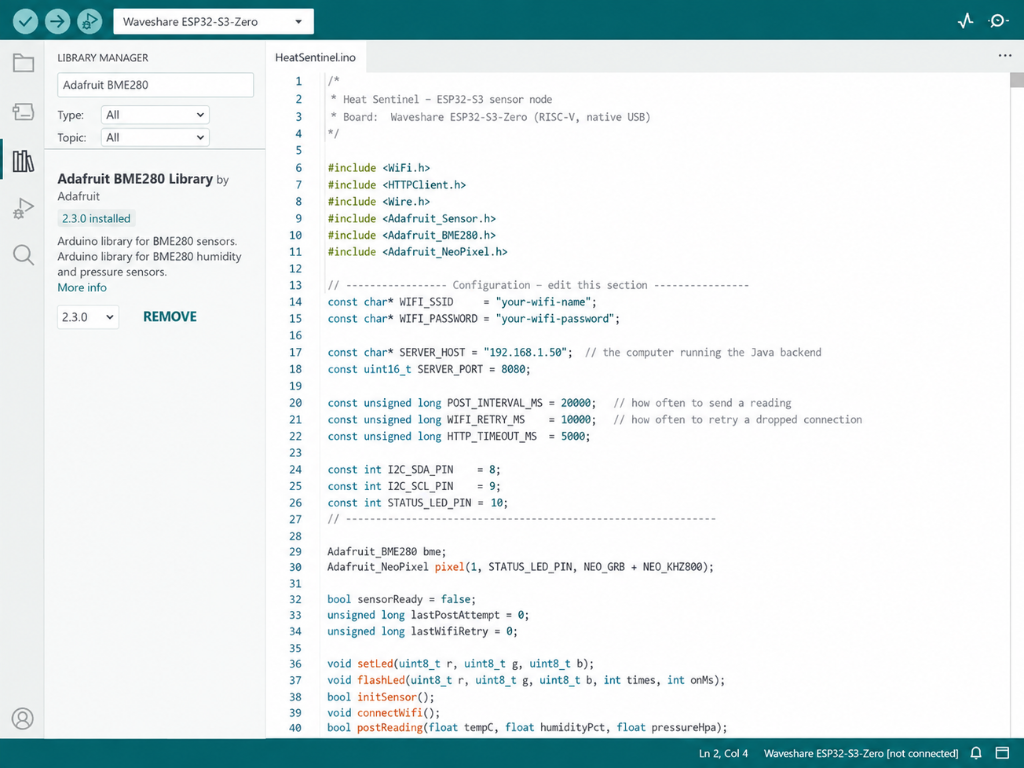
Before compiling the firmware, make sure the required Arduino libraries are installed. In the Arduino IDE, open: Sketch → Include Library → Manage Libraries Search for Adafruit BME280 and install Adafruit BME280 Library.
If the IDE asks to install its dependencies, accept them. Heat Sentinel also requires:
- Adafruit Unified Sensor
- Adafruit BusIO
Finally, search for Adafruit NeoPixel and install it. This library handles the onboard status LED on the Waveshare ESP32-S3-Zero. Once these libraries are installed, the firmware has everything it needs to compile.
Selecting the Board
Connect the Waveshare ESP32-S3-Zero to your computer using a USB-C data cable. In Arduino IDE, open: Tools → Board → esp32 and select: ESP32S3 Dev Module
Next, enable the native USB serial interface: Tools → USB CDC On Boot → Enabled This allows the board's native USB connection to be used by the Serial Monitor. Then open: Tools → Port and select the port corresponding to your connected Waveshare ESP32-S3-Zero.
On Windows, it may appear as something like COM3. On macOS or Linux, it will usually appear as a /dev/... device.
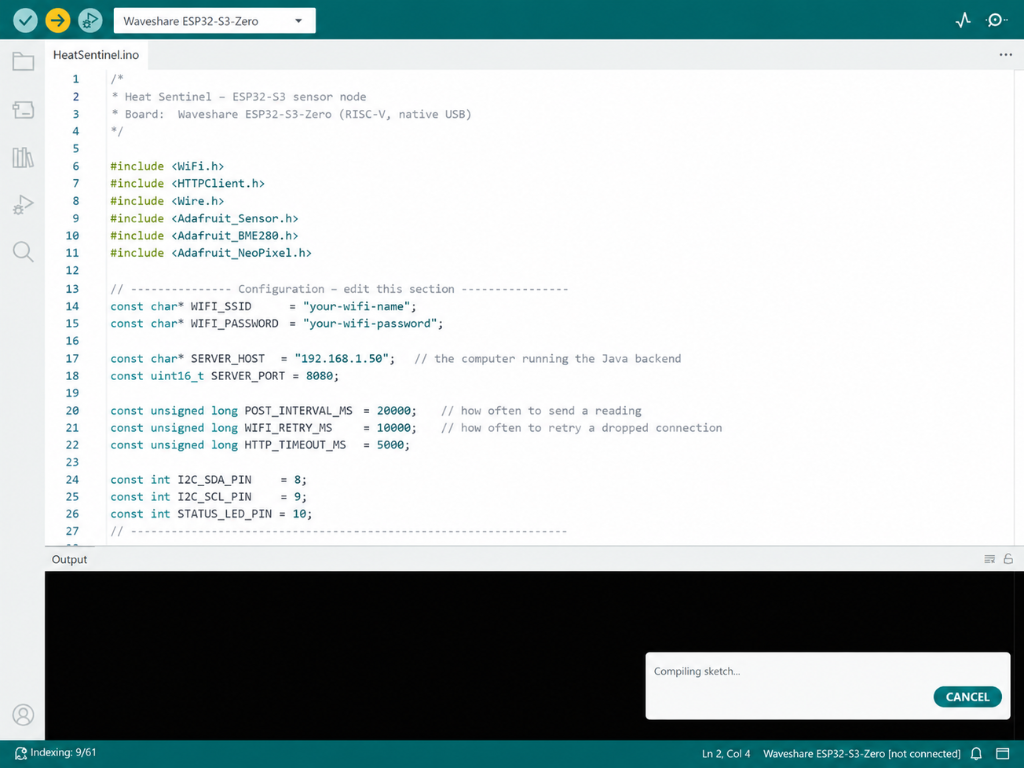
Click the Upload button in the Arduino IDE. The IDE will first compile the sketch and then transfer the firmware to the Waveshare ESP32-S3-Zero. The board will then restart and begin running the Heat Sentinel firmware.
If the Upload Fails
If you see “Failed to connect”, start with the simple checks. Make sure you're using a USB-C cable that supports data, not just charging. Then verify that ESP32S3 Dev Module is selected and that the correct port is chosen under Tools → Port.
If the board still doesn't connect, hold the BOOT button on the Waveshare ESP32-S3-Zero while starting the upload. Release it once the IDE begins showing “Connecting…”.
Verifying Sensor Data
With the firmware uploaded, the next step is to verify that the Waveshare ESP32-S3-Zero is successfully reading the BME280 and sending real measurements to the Heat Sentinel backend.
Open the Arduino IDE and go to: Tools → Serial Monitor & Set the baud rate to 115200.
After a few seconds, the board should connect to your Wi-Fi network. Once connected, it will begin posting sensor readings to the Java backend. You should see output similar to:
The exact values will depend on your environment. The important part is the 200 response, which confirms that the server accepted the reading successfully. Heat Sentinel sends a new reading approximately every 20 seconds.
The onboard RGB LED also provides a quick status indicator:
- Blue — blinking: Connecting to Wi-Fi
- Green — 2 flashes: Wi-Fi connection established
- Green — 1 flash: Sensor reading successfully posted
- Amber — 2 flashes: POST failed — check SERVER_HOST and confirm the Java server is running
- Red — solid or flashing: BME280 not detected, or a sensor read failed, You can use the LED as a quick diagnostic without keeping the Serial Monitor open.
Check the Dashboard
Now return to the Heat Sentinel dashboard in your browser. The “Demo data” indicator should change to “Live” once the first real sensor reading reaches the backend. The displayed temperature, humidity, pressure, Heat Index, and other values should now correspond to the environment around your BME280.
At this point, the complete data path is working:
If the dashboard shows Live and the values continue updating, the hardware and software sides of Heat Sentinel are successfully communicating.
Telegram Bot

Heat Sentinel can send an alert directly to Telegram when the monitored environment enters Caution, Warning, or Danger conditions.
The important part is that you don't need to modify the firmware or Java source code to configure this. Everything is entered through the Heat Sentinel dashboard, while the server keeps the credentials in memory and uses them when an alert needs to be sent.
Open Telegram and search for @BotFather. Make sure you're using the official account with the blue verification checkmark.
Start a conversation and send:
BotFather will ask you for a display name and then a unique username. The username must end in bot, for example:
Once the bot is created, BotFather will give you a bot token. It will look similar to:
Copy this token exactly and keep it private. Treat it like a password.
Your Chat ID
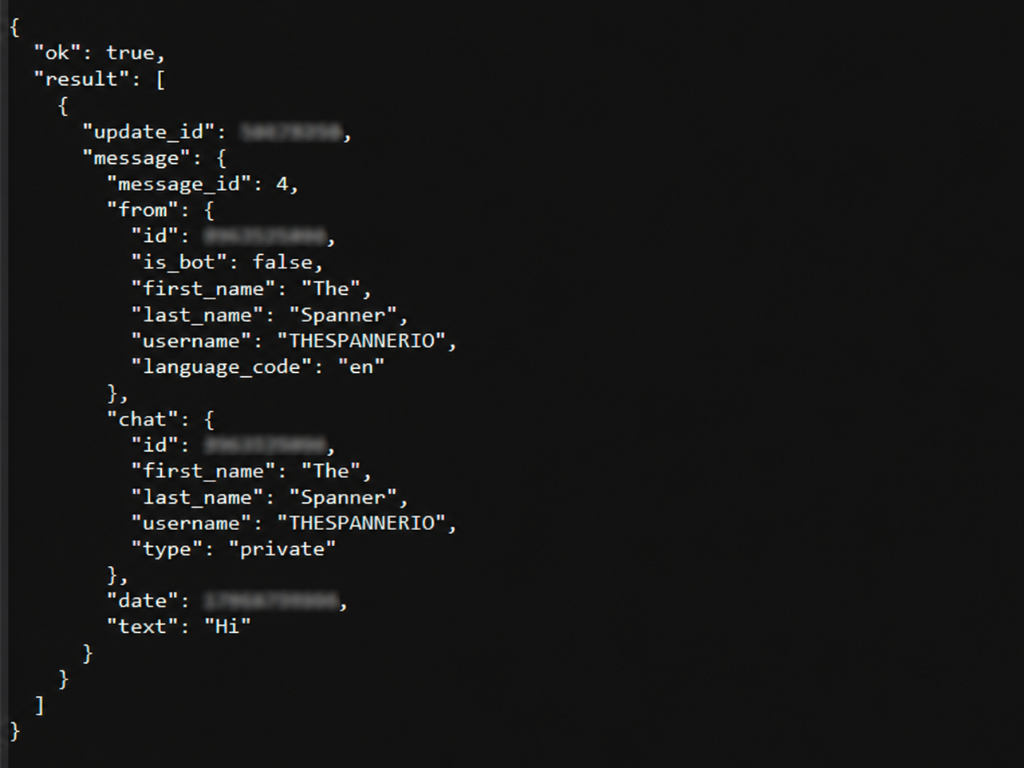
Search for the bot username you just created and open a conversation with it. Send the bot a message such as: Hi. The bot doesn't need to respond. Sending the message simply creates an interaction that Telegram can report through the Bot API.
Now open the following address in your browser, replacing <YOUR_TOKEN> with your actual bot token:
Look through the returned JSON for:
The number shown as id is your Chat ID.
If Telegram returns:
send another message to your bot and refresh the page.
Add the Credentials
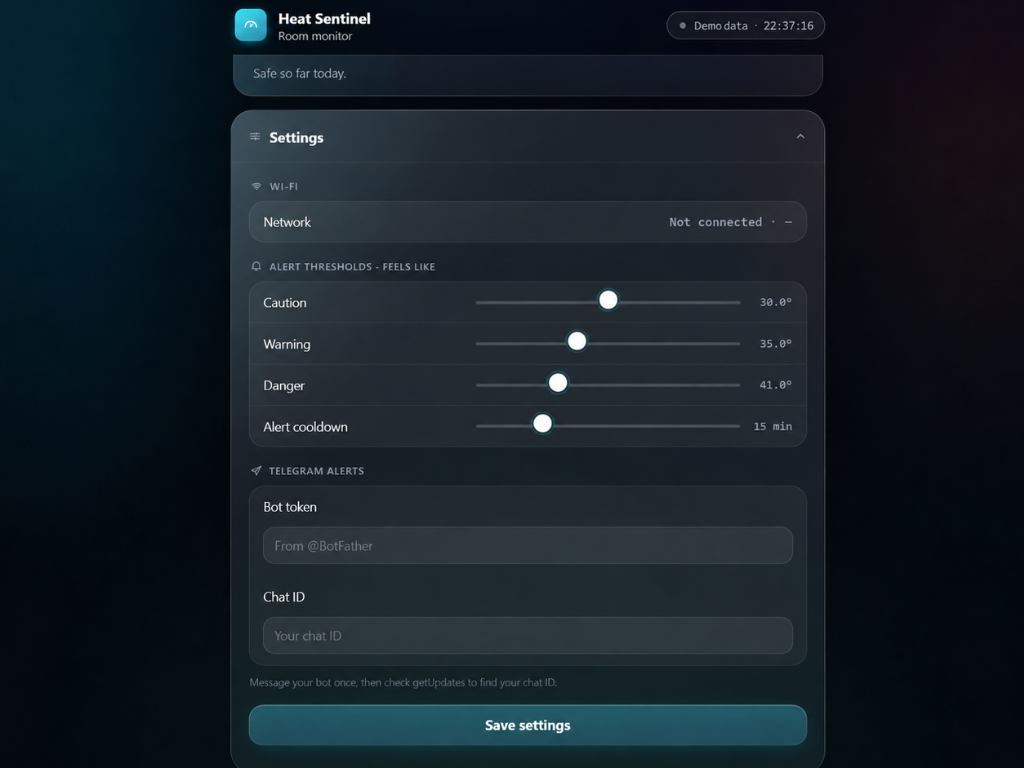
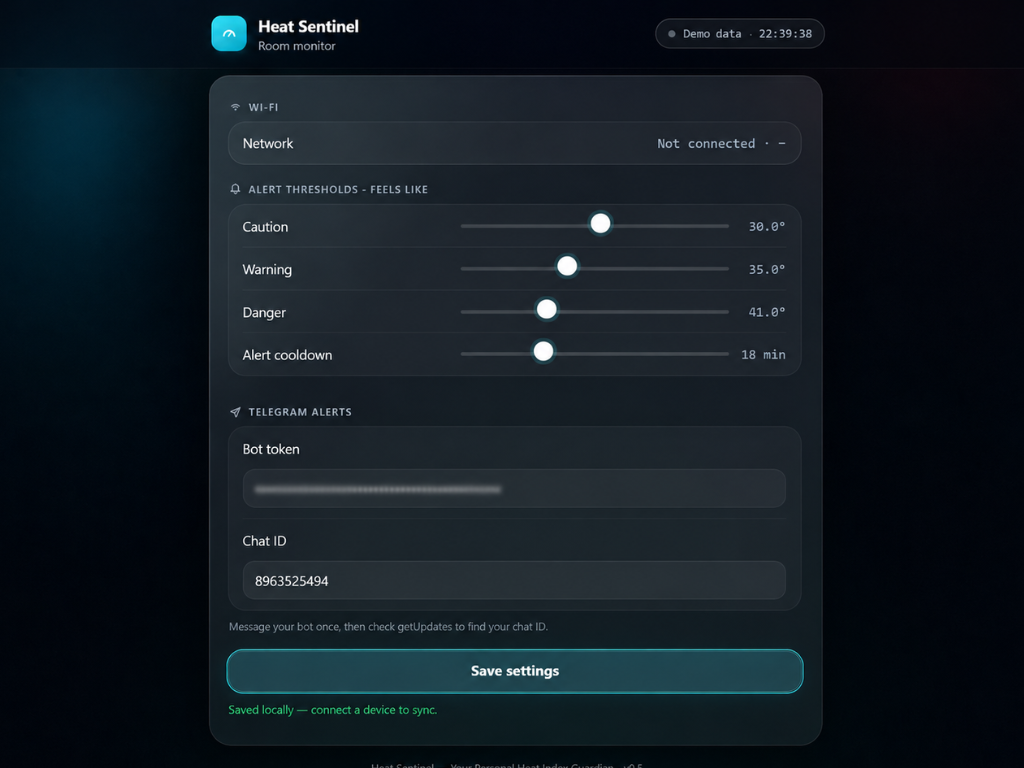
Open the Heat Sentinel dashboard and go to Settings. Enter the bot token into Bot token and the number you obtained above into Chat ID, then select Save settings. The credentials are now available to the running Heat Sentinel server.
Testing
We ran the complete system through a final round of testing to make sure everything worked together as intended. We started by connecting a USB-C power source and checking the charging circuit. The battery began charging correctly, the charge-status indicators behaved as expected, and the system remained stable throughout the test.
Once powered, we checked the Heat Sentinel dashboard. The Waveshare ESP32-S3-Zero connected to Wi-Fi, the dashboard switched from Demo data to Live, and the temperature and humidity readings updated continuously from the BME280.
We then verified the complete data path: BME280 → Waveshare ESP32-S3-Zero → Wi-Fi → Java Backend → Dashboard! Everything responded smoothly, with the live readings matching the physical environment.
Finally, we tested the alert system by triggering a high-temperature condition. Within seconds, the corresponding Telegram alert arrived successfully. The result was exactly what we wanted: charging worked, sensor data was live, the dashboard updated in real time, and the alert system responded immediately.
Usage
Heat Sentinel is designed to run quietly in the background and keep an eye on a room without requiring constant attention.
Place it in a room you want to monitor, and let the Waveshare ESP32-S3-Zero handle the sensing. The BME280 continuously measures the environment, while the Java backend turns those readings into a Heat Index and tracks the room's exposure over time.
The dashboard provides a quick view of the current conditions, while Telegram alerts make sure you don't have to keep watching the screen. This makes it useful for spaces such as bedrooms, nurseries, workspaces, pet areas, or rooms that may be unattended for long periods.
Final Thoughts
Heat Sentinel brought together two ideas we wanted to explore: building something genuinely useful for hot environments and using modern Java as the core of a complete connected system.
From the Waveshare ESP32-S3-Zero and BME280 at the edge to the Java 26 backend, real-time dashboard, exposure tracking, and Telegram alerts, every part was built to work as one pipeline: Sense → Understand → Respond
For us, that's what made Heat Sentinel interesting. It isn't just another temperature monitor. It's a small example of how thoughtful hardware and software can work together to make heat a little easier to understand—and a little harder to ignore.