How to Make an Instructable
by sokamiwohali in Design > Websites
1637 Views, 1 Favorites, 0 Comments
How to Make an Instructable

Hello!! In today's instructable, I will be teaching you how to make an instructable. Speak of the irony huh? Some of you may have been with the website for a couple hours, couple days or even a couple years, browsing around looking for ideas to suit your daily Life Hacking needs...but if you have ever wanted to make an instructable, you didn't know where to start...or maybe the 'Ibles out there are not easy for you to follow. Well, today is your lucky day, as I will be taking you through step by step into how you can make your very own instructable! Just to eliminate confusion and accusations of plagiarism, I understand that there are a few instructables highlighting how to make an instructable, but for everyone's assurance, I did not take this idea rom anyone...I took and edited all the screenshots myself, and formed everything based off my past 22 experiences with instructables.com.
This Instructable has been entered into the Weekend Projects Contest. I have entered it into the contest to help those who want to create an instructable, go through a guided process of how to start and publish their projects. If a subject matter has been thought of, this instructable can help to guide them through the process (and if the project is not too time consuming) to finish their project in one weekend or shorter!!
This Instructable has been entered into the Weekend Projects Contest. I have entered it into the contest to help those who want to create an instructable, go through a guided process of how to start and publish their projects. If a subject matter has been thought of, this instructable can help to guide them through the process (and if the project is not too time consuming) to finish their project in one weekend or shorter!!
Materials

For this project, you will need the following materials:
1:A computer
2:A Camera
3:An instructables.com profile (see my project on how to make an 'Ibles acct)
4:A Subject to hack!!
1:A computer
2:A Camera
3:An instructables.com profile (see my project on how to make an 'Ibles acct)
4:A Subject to hack!!
Process of Starting


The first step to creating an instructable is kinda obvious...you need to be logged into your account. After you have logged into your account, there are several ways to start your project. First you can click on the Instructables home page link. After you get to the home screen, look in the upper right hand corner. you will see a link that says "You" and your picture if you have one. Click on the tiny arrow, and a dropdown menu will appear. In the second section you will see "Instructables" with two options...Drafts and Create. Click on Create. A "blank" instructable project will appear. You can Also do this by looking in the upper left side of the home page where it says "Create". This link has a pop down menu and has four different options to choose from. We will focus on the step by step option as this is where the descriptions come in and people can follow the instructions better.
The Basic Controls


Chances are you don't know anything, or at least very little about HTML...like me...I know enough to get me around a bit, but I am not self sufficient in HTML. So for GP (General Purpose) we will just stick with the basics.
In the first picture you will see the title and text box that (other than the pictures) will be the first thing everyone sees. you want to think up an original title so that members, and people who don't have a membership doesn't get your project confused with another...an added plus is that you'll get a lot of hits on your project as well. **Note that I did a google AND yahoo search for my Ible "Make Your Own Scentsy Bars". They ended up being in the top 5 results of the search in yahoo, and the second result in the google search. MOVING ON...
In the second picture, you will see options to add pictures. we will cover this later on in the project.
Insert, Reorder, and Delete Steps


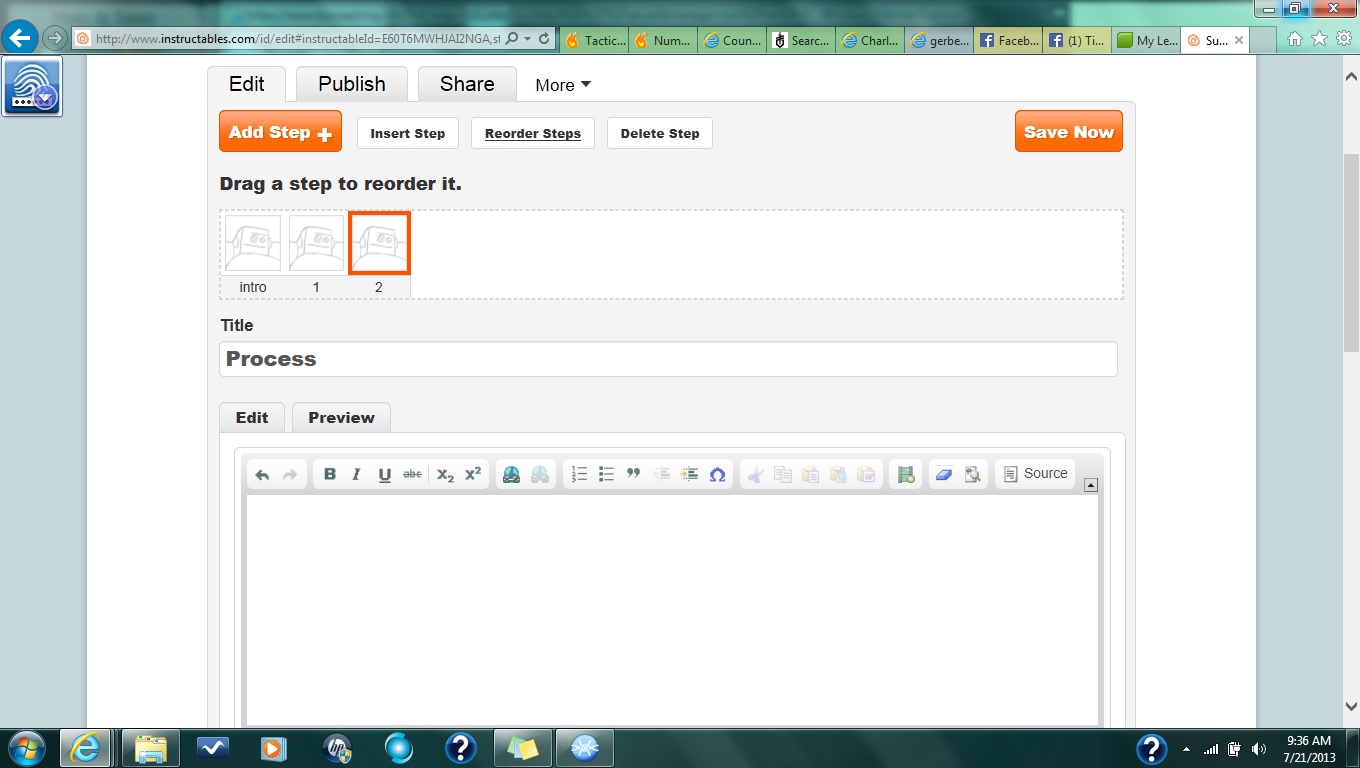


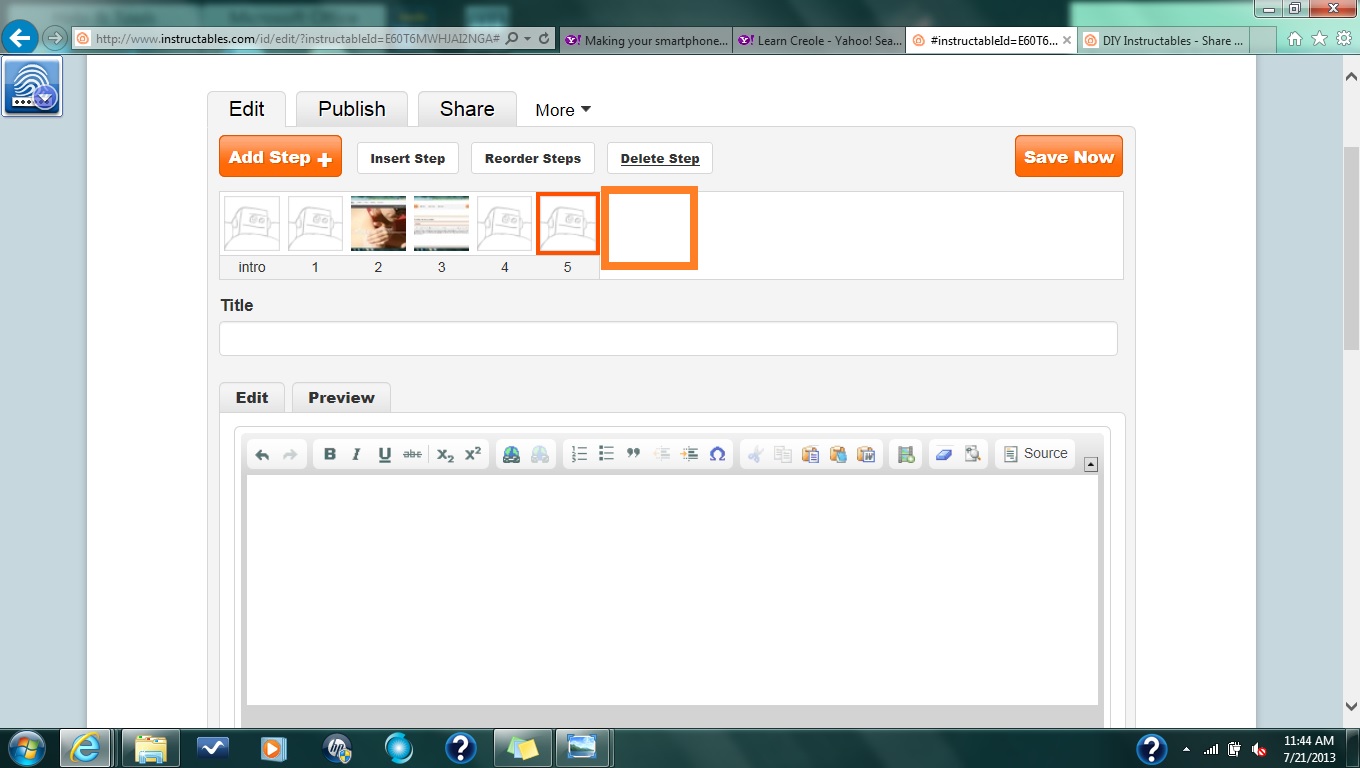
In this step, we will cover how to Insert, Reorder, and Delete Steps. When editing your Instructable, you will have a need to add steps, ore reorder them if you accidentally shotgunned ahead and skipped a step by accident, OR you completely messed a step up, and don't want to take the time to remove EVERYTHING you did on that step...
First notice that in the editing page, there is an Edit tab, Publish Tab, Share Tab, and a "More" tab. In the editing tab, there is an Add Step, Insert Step, Reorder Steps, and Delete Step "link". The Add Step and Insert Step as far as I am concerned are the same thing. press on wither one, and it will add a step to the project. Press the Reorder Steps "link" and it will allow you to move the steps around how you see fit, the only dis advantage though is that you have to press the "link" every time you want to move a step around...I do hope the webmasters can figure out how to allow us to press the link, and move around the steps, and then click a "done" button when you are finished moving things around. I am sure that is in the making though. When you mess something up, you always have the option of starting that step from scratch by pressing the delete link, and then insert, and then reorder if needed.
Now the next thing on the pecking order is to add your step's instructions...go to the text box, and then add whatever your instructions are...simple as pie!!...however there is one thing...if you want to press enter to start an new paragraph, I do not know what has been done, but the box will not let us start a new paragraph by pressing enter...or at least mine isn't...so if this happens to you, there are editing options just above the box...press "source" and you will see the raw format (HTML). find the end of your paragraph in the abysmal abyss of html, and when you do copy the jibberish that looks like this:
( <br /> ) (Minus the parentheses)
And now you have a new paragraph.
The other editing options are pretty much self explanatory. B= Bold, I=Italicize, u= Underline, andabc= strike through. X2=Words that go from this to this, and X2= Words that go from this to this. The world with a chain link lets you make a hyperlink to a website or another Ible, There is "bullets and numbering" icons, Block Quote, Indentation icons, Character input, Cut/Copy/Paste, Insert Video, and erase action. I am pretty sure most of us don't need help to figure out the editing options though.
First notice that in the editing page, there is an Edit tab, Publish Tab, Share Tab, and a "More" tab. In the editing tab, there is an Add Step, Insert Step, Reorder Steps, and Delete Step "link". The Add Step and Insert Step as far as I am concerned are the same thing. press on wither one, and it will add a step to the project. Press the Reorder Steps "link" and it will allow you to move the steps around how you see fit, the only dis advantage though is that you have to press the "link" every time you want to move a step around...I do hope the webmasters can figure out how to allow us to press the link, and move around the steps, and then click a "done" button when you are finished moving things around. I am sure that is in the making though. When you mess something up, you always have the option of starting that step from scratch by pressing the delete link, and then insert, and then reorder if needed.
Now the next thing on the pecking order is to add your step's instructions...go to the text box, and then add whatever your instructions are...simple as pie!!...however there is one thing...if you want to press enter to start an new paragraph, I do not know what has been done, but the box will not let us start a new paragraph by pressing enter...or at least mine isn't...so if this happens to you, there are editing options just above the box...press "source" and you will see the raw format (HTML). find the end of your paragraph in the abysmal abyss of html, and when you do copy the jibberish that looks like this:
( <br /> ) (Minus the parentheses)
And now you have a new paragraph.
The other editing options are pretty much self explanatory. B= Bold, I=Italicize, u= Underline, and
Insert Pictures, and Add Descriptions
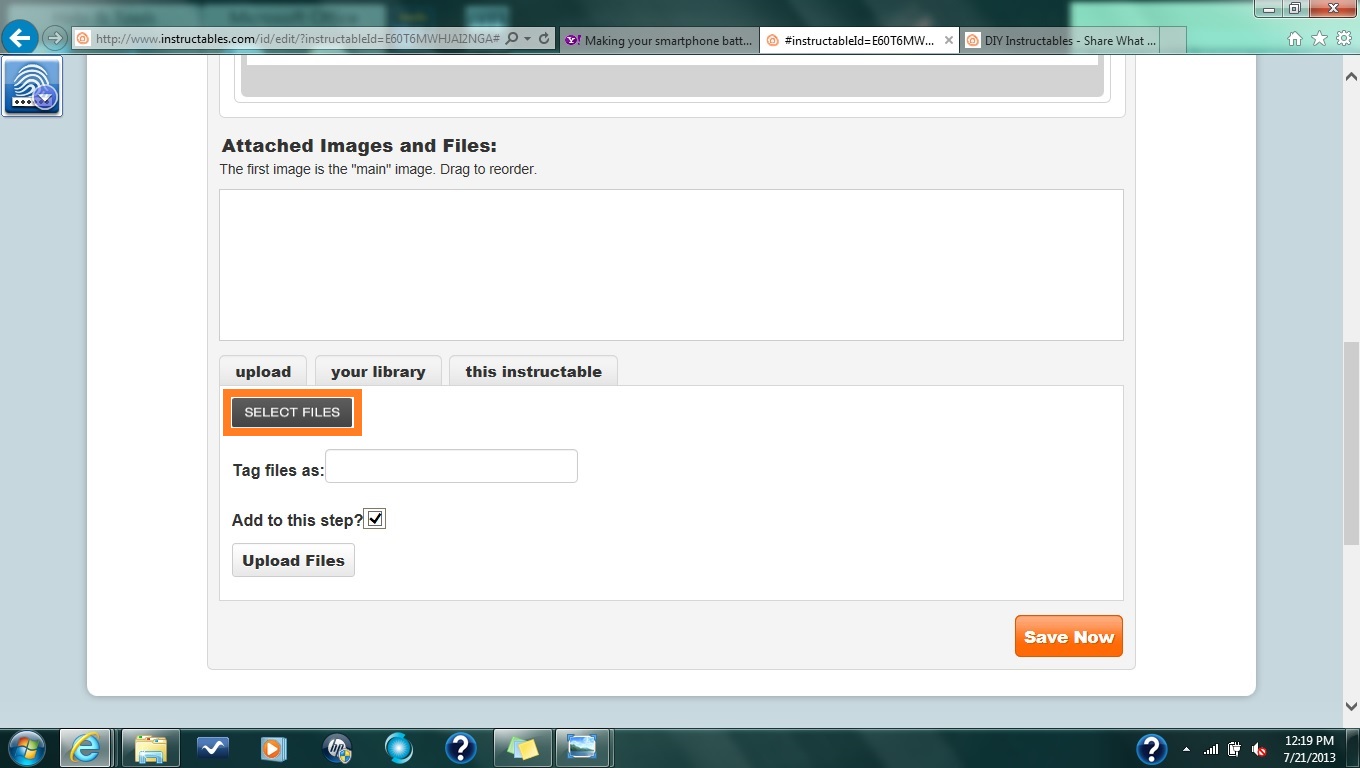



When you are ready to add pictures, scroll down and take a gander at the "Attached Images and Files" box. this is where you will upload your photos, and add captions to them. if you have seen my instructable How To File Your Instructables For Safekeeping, you will know exactly where the pictures you will want to use are! Always have an easy to access folder where you file your photos you know you will use specifically for your ibles...also, name them all according to the name of the instructable, in the order that they will be used and all in the same format.
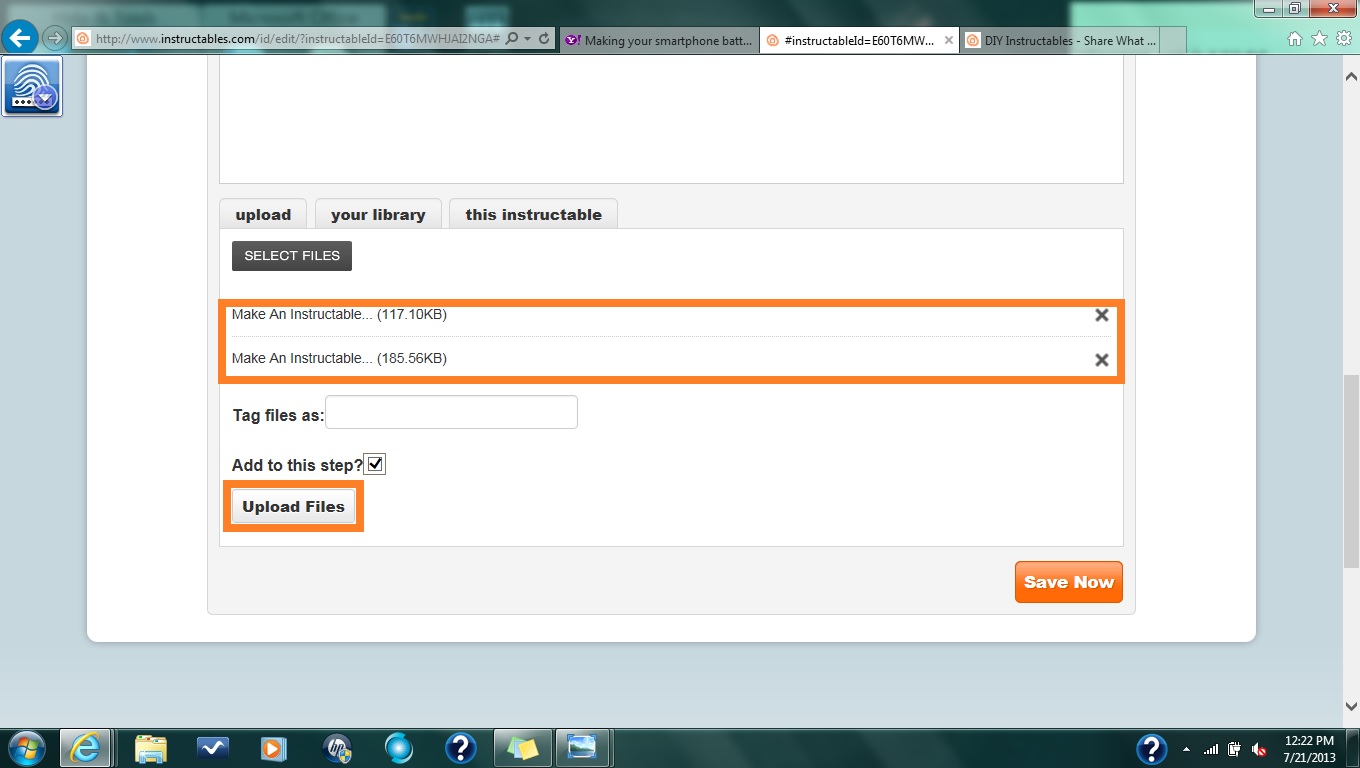
NOW with all of that said, when you want to upload files, you must first click select files. After you click select files, a window will pop up. Find the file that contains your pictures. You have two options now...you can take the pictures and upload them one by one, OR you could just select all the applicable files for that step by simply pressing the CTRL button on your keyboard, and then click on the applicable pictures. Press ok, and you will see the names of the pictures drop down to below the select pictures button. At this point, you will want to push the Upload Files button so they will upload. If you don't do this you will loose the pictures if you navigate away from the step. If you upload all of the pictures before you begin typing even your first step, you can de-select the "add to this step" box, and they will upload to the 'Ibles site and still stay within the current 'Ible you are making. so to find the pictures, press the "this instructable" and there will be all of the pictures you just uploaded for the instructable you are working on.
NOW with all of that said, when you want to upload files, you must first click select files. After you click select files, a window will pop up. Find the file that contains your pictures. You have two options now...you can take the pictures and upload them one by one, OR you could just select all the applicable files for that step by simply pressing the CTRL button on your keyboard, and then click on the applicable pictures. Press ok, and you will see the names of the pictures drop down to below the select pictures button. At this point, you will want to push the Upload Files button so they will upload. If you don't do this you will loose the pictures if you navigate away from the step. If you upload all of the pictures before you begin typing even your first step, you can de-select the "add to this step" box, and they will upload to the 'Ibles site and still stay within the current 'Ible you are making. so to find the pictures, press the "this instructable" and there will be all of the pictures you just uploaded for the instructable you are working on.
Finalize Your Work

After you get your steps formed, lists gathered, descriptions typed out, instructions typed out, etc., its now time to look over your work and masterpiece. Just click through your steps, and correct misspellings, make sure you captioned and highlighted all the things that are detailed to allow those doing the project to understand the step.
Publish Your Masterpiece


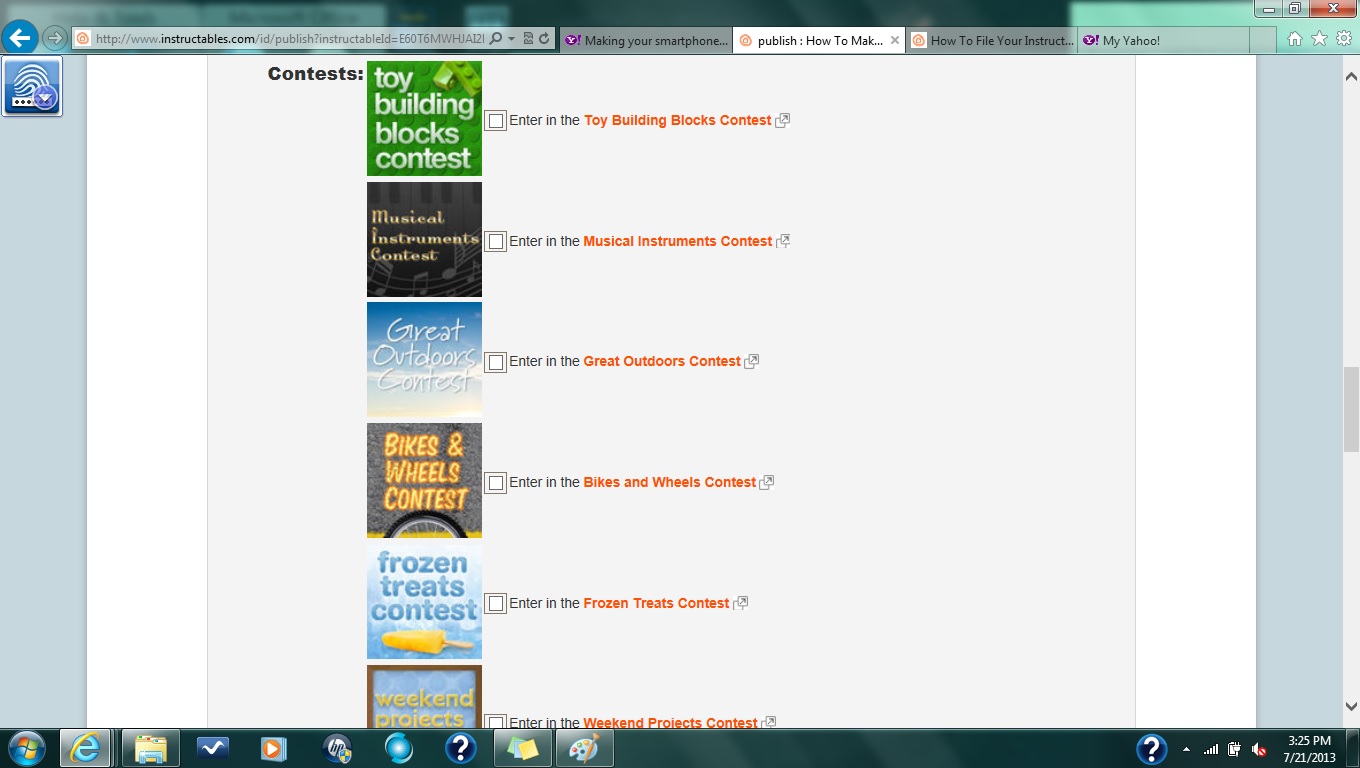


Now is the exciting moment...the time in which you will publish your very first instructable and be a contributing member of this fantastic MAKER'S PARADISE...
After Proof reading your 'Ible, you can now publish the Instructable you have just created. In order to do this go to the Publish tab. Before you publish your Instructable, you need to set the keywords that will bring up your 'ible in a search query that anyone does. After you set your keyword/s then you need to find the appropriate Subject and channel. If you dont put your project in the correct subject and channel, youll get a lovely message from our awesome moderators saying that they either need you to re-publish under a different subject. They may just help you too. I have gotten a message from them once...first timer mistake!! lol
The next thing you need to do is set your License attributes. This can either restrict or allow someone to use portions of your idea for their own project they are working on. Personally, I prefer to create my own works from scratch, that way there is an undeniable distinction between my project and someone elses...it gets rid of the combat casualties created by plagiarism.
Now press the Publish button!!
NOT DONE JUST YET!!!

Think your done with your project?!?! THINK AGAIN!!!
The last thing you need to do is SHARE YOUR PROJECT ON FACEBOOK, TWITTER, STUMBLE, OR DIGG IT!!! OR ALL OF THEM IF YOU HAVE THEM!!!
I hope that this Instructable has helped to answer the question you have about how to make your own instructable!!!
The last thing you need to do is SHARE YOUR PROJECT ON FACEBOOK, TWITTER, STUMBLE, OR DIGG IT!!! OR ALL OF THEM IF YOU HAVE THEM!!!
I hope that this Instructable has helped to answer the question you have about how to make your own instructable!!!