How to 3D Print Multiplanar Origami
by BYU Create Lab in Design > Art
980 Views, 7 Favorites, 0 Comments
How to 3D Print Multiplanar Origami

Love origami? Got a 3D printer? Let’s combine the two to create something truly unique: multiplanar origami! In this project, we’re taking the ancient art of paper folding to a whole new dimension—literally—using 3D printing. The result? Foldable, expandable structures that are both functional and fun to make.
This guide is perfect for makers, origami enthusiasts, and anyone curious about how to create flexible, multiplanar designs. Whether you’re looking to innovate or just experiment, this project has something for everyone.
Here we will provide you with a few multiplanar origami files, and show you how to slice the files to print. If you want to design your own multiplanar origami, or see instructions on preparing CAD models. Please see our other Instructables!
Technical Information:
To read about the research that went into the ideas, read more here!
Stevens, T. R., & Crane, N. B. (2025). Multiplanar manufacturing: A new approach to design for manufacturing and assembly of origami. Mechanism and Machine Theory, 206, 105906. https://doi.org/10.1016/j.mechmachtheory.2024.105906
Links:
- Website: am.byu.edu
- LinkedIn: linkedin.com/company/byu-create-lab
- Thingiverse: thingiverse.com/BYUCreateLab
- Printables: printables.com/@BYUCreateLab_1460028
Supplies
Materials and Tools
Materials:
- Fabric: We used a polyester-nylon mesh to allow the PLA to pass through the gaps and bond to the layer beneath. Feel free to experiment with other fabrics, but make sure they can withstand the printing process.
- PLA: A classic filament for 3D printing. Other materials can work too—just ensure the extrusion temperature won’t melt your chosen fabric!
- PVA (or Kapton): These materials help prevent bonding between planes. We had success with these, but don’t be afraid to try others and find what works best for you! If you find something else, let us know!
- Binder Clips: To hold the mesh to the edge of the print bed
Machine:
- FFF 3D Printer: Any reliable Fused Filament Fabrication printer will do!
Software:
- CAD (Computer-Aided Design) such as OnShape, Fusion 360, Tinkercad, or FreeCAD.
- Slicer: To prepare your 3D model for printing. We used PrusaSlicer.
Files:
- Crane: https://www.thingiverse.com/thing:6928234 or https://www.thingiverse.com/thing:6928234
- Kresling Pattern: https://www.thingiverse.com/thing:6928121 or https://www.printables.com/model/1166979-multiplanar-kresling-pattern-origami
- Kayak: https://www.thingiverse.com/thing:6928251 or https://www.printables.com/model/1167064-multiplanar-origami-kayak
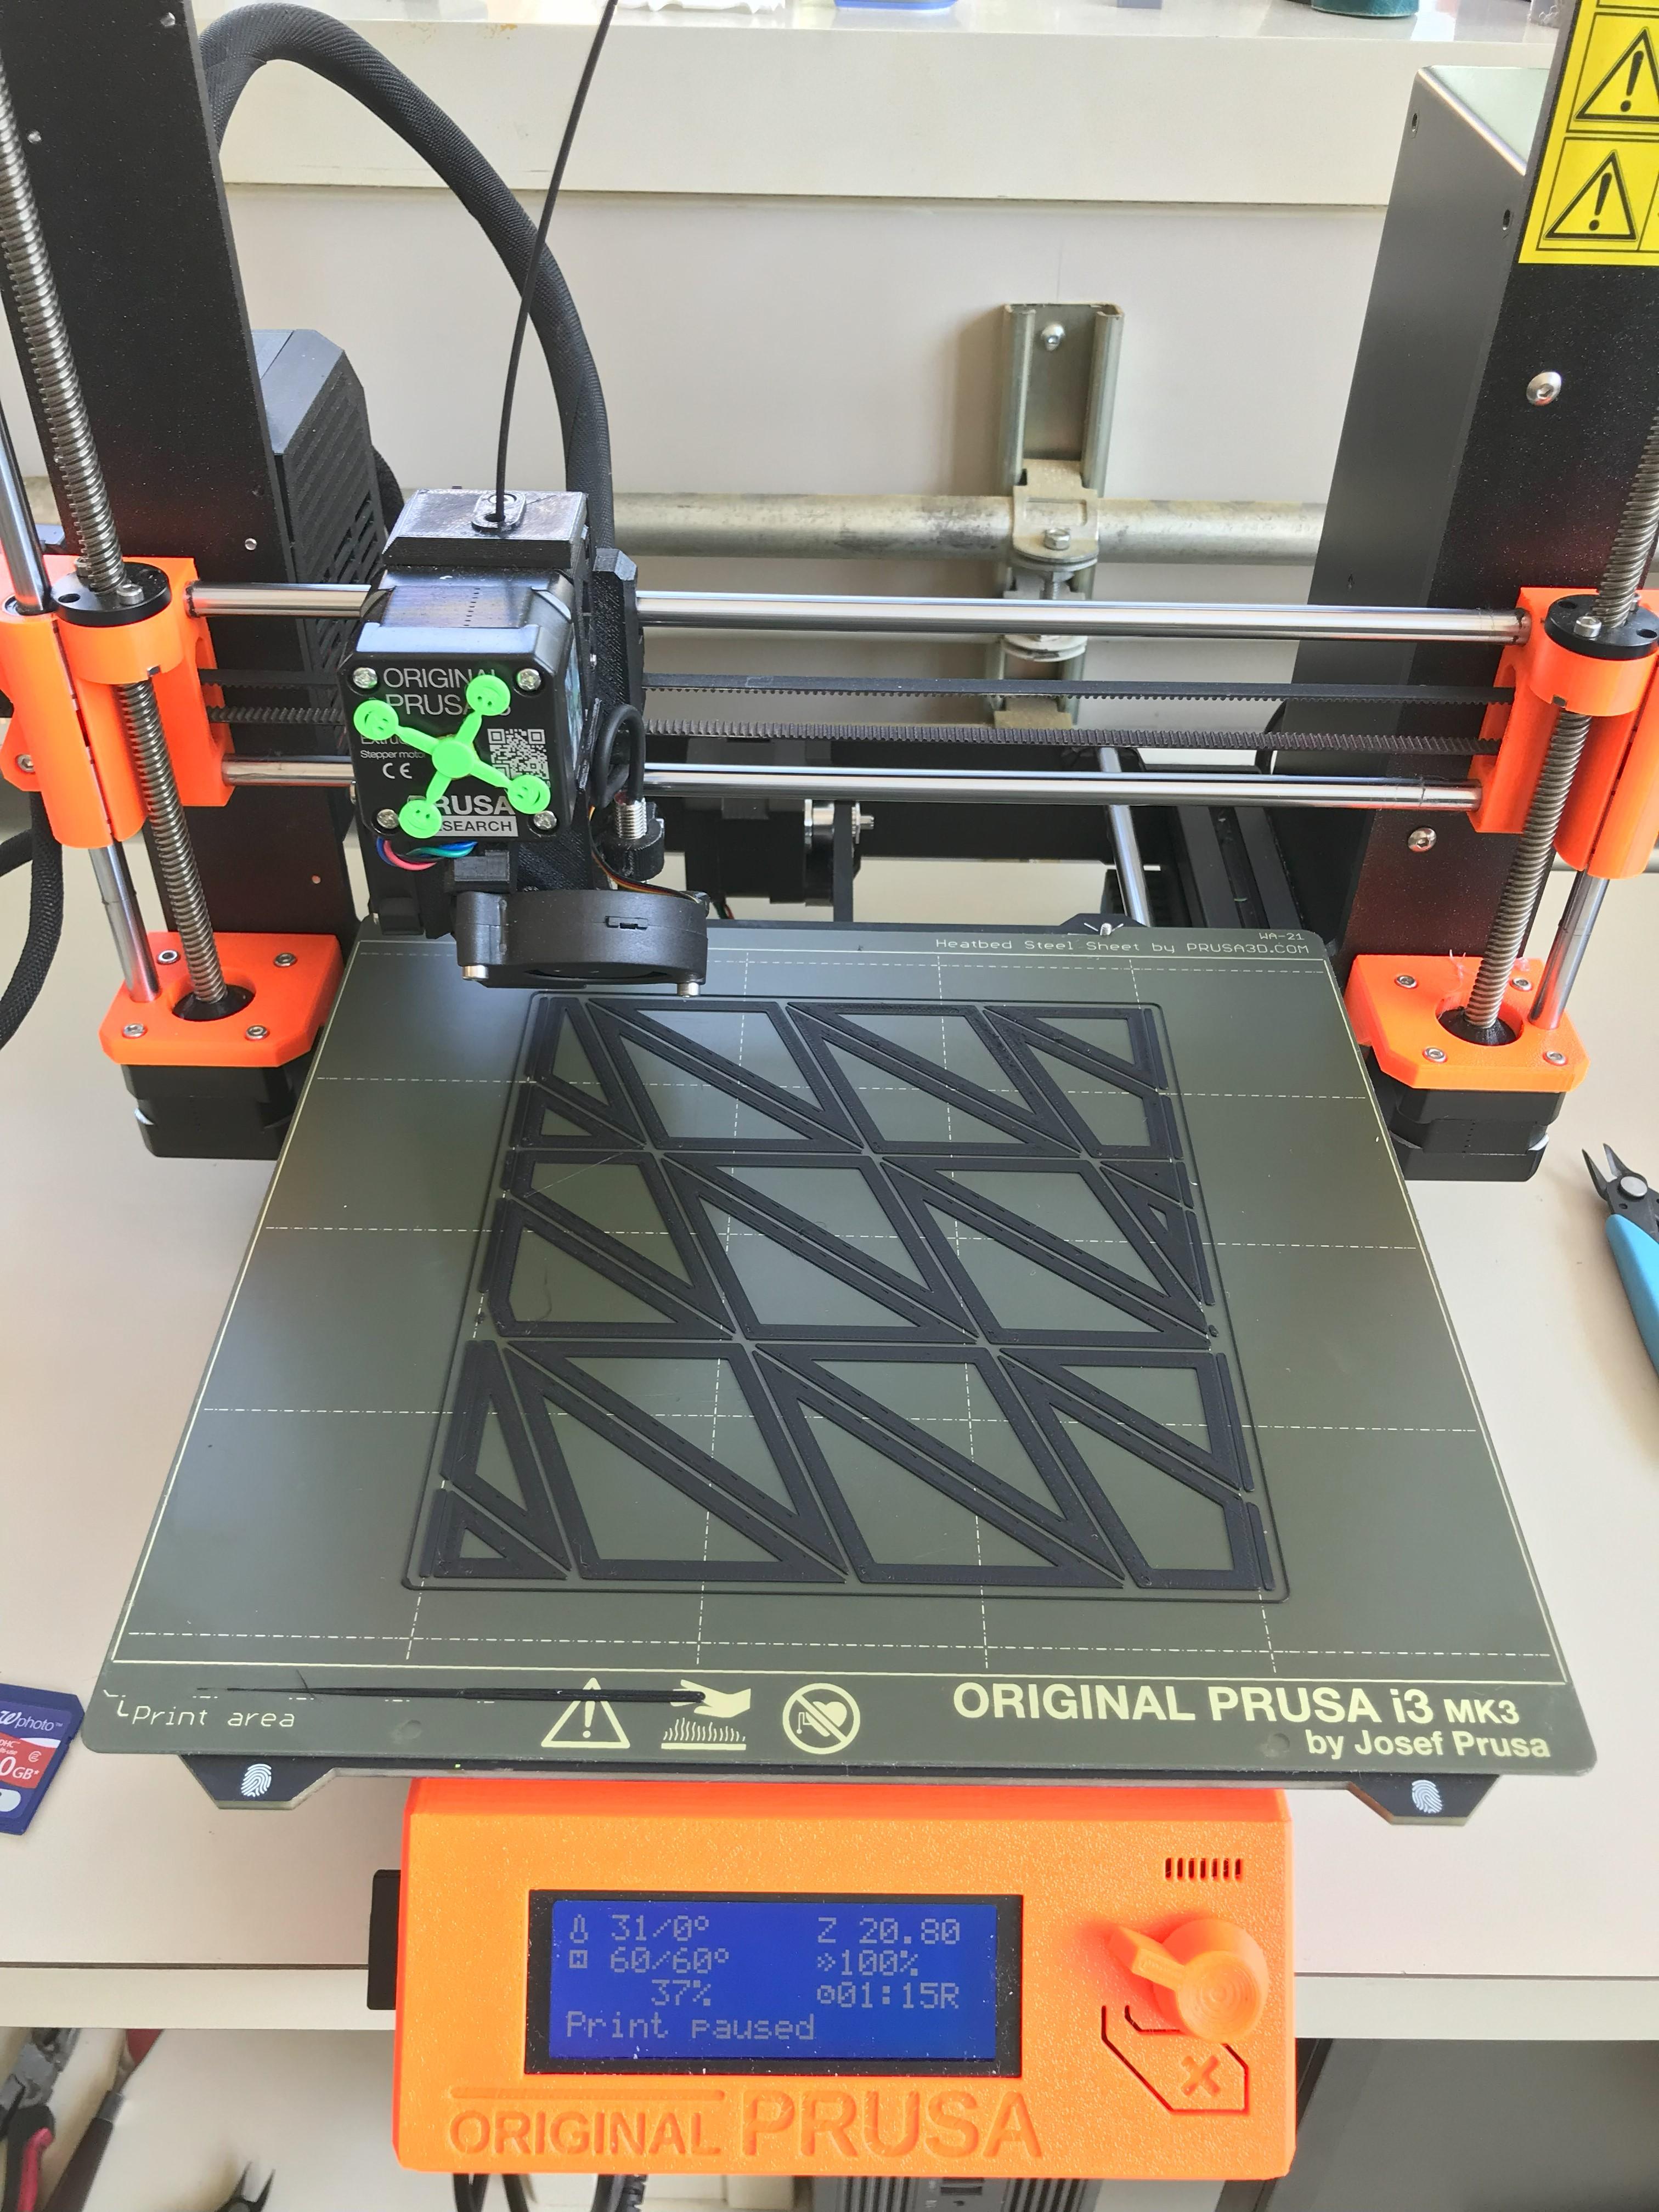
Slicing Your Model!


With your CAD model complete, it’s time to bring your design to life by printing it. In this step, we’ll walk through setting up your 3D printer, preparing the materials, and executing the print for a functional multiplanar origami design.
Instructions
- Prepare Your Printer:
- Ensure your FFF 3D printer is clean and calibrated.
- Load the required filaments:
- PLA for the structure.
- PVA or Kapton
- Prepare Your Slicer Settings:
- Import the CAD model (in STL format) into your slicing software.
- Use these suggested settings:
- Layer Height: 0.2 mm
- Infill: 100% (the model we provide is thin)
- You'll need to add strategic pauses in the print so that you can lay down the mesh. How you this will change based on the slicer software you use. If you are using PrusaSlicer, follow this link: https://help.prusa3d.com/article/insert-pause-or-custom-g-code-at-layer_120490
- PVA or Kapton:
- If you have a multimaterial printer, make sure you have the PVA fill the gap between planes (but not where the hinges are!)
- If you are using Kapton (or another material that you've found works too) then be sure to add a pause to add it!
- Slice!
- With that, you're all ready to get your print going!
Tips for Success:
- Heated Bed Temperature: Use whatever works best for your material!
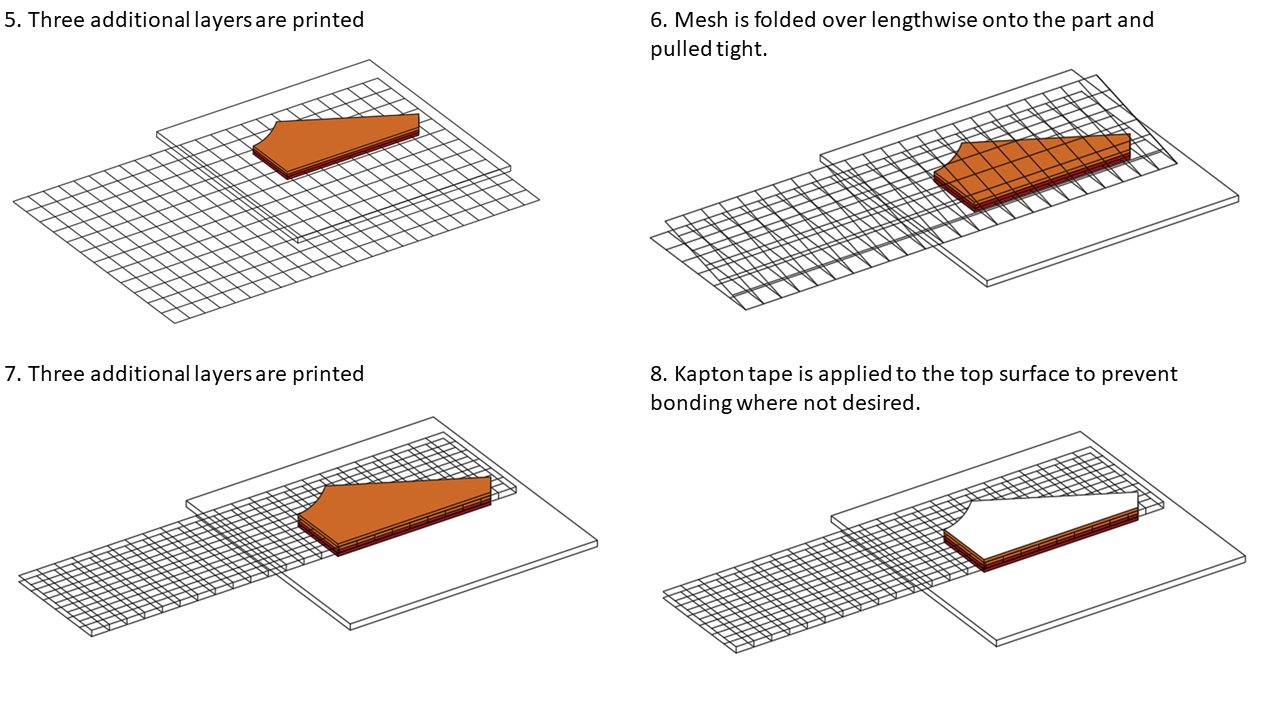
- Where to Add the Mesh: We recommend that you print 2-3 layers of material before pausing the print to add the mesh. This way, you don't have to worry about the fabric moving around during the print and the next layer of material will be printed through the nylon mesh so that it can bind to the layer beneath!
Export G Code and Begin Printing!

Now that your design and slicer settings are finalized, it’s time to export the G-code and start printing your multiplanar origami design. This step ensures a seamless transition from digital design to a physical print.
Instructions
- Export the G-code:
- Once you’ve configured your slicer settings (in Step 5), review the slicing preview for any issues.
- Export the finalized slicing file as G-code, ensuring it’s setup for your specific printer.
- Start Printing:
- Begin the print and closely monitor the initial layers to ensure that the first layer has proper adhesion of the filament to the print bed.
- Monitor Progress:
- Keep an eye on the print periodically to ensure consistent extrusion and no layer shifting.
- If using PVA, confirm that the support material is extruding cleanly.
Once the your printer stops at the first pause we'll add the mesh!
Laying Down the Mesh

During the print process, integrating the mesh is a critical step since the mesh connects all of your panels together. When your printer reaches the pause point, follow these steps to lay down the mesh correctly.
Instructions
- Pause the Print:
- When the printer pauses as programmed in your G-code, make sure that you have enough clearance between the printhead and the print. This is automatically done with a Prusa, but your printer may require you to lift the Z-height if you haven't added that G-code during the slicing.
- Prepare the Mesh:
- Cut a piece of mesh slightly larger than your print bed. This allows for secure attachment without stretching the material.
- Lay the Mesh on the Bed:
- Place the mesh over the print bed, ensuring it fully covers the printed areas.
- Start by securing one corner with a binder clip.
- Move to the opposite corner, pulling the mesh flat but not stretching it.
- Repeat for the remaining corners, eliminating any ridges or kinks in the fabric. Use additional binder clips as needed to hold the mesh securely.
- Double-Check the Mesh Placement:
- Inspect the mesh to ensure it lies flat and does not overlap or fold.
- Make sure it aligns with the areas where the hinges will be integrated.
- Resume Printing:
- Continue the print process and carefully monitor as the filament begins to print over the mesh.
- Watch for:
- Proper adhesion of the filament to both the mesh and the underlying printed plastic.
- Burrs or ridges in the print that could catch the printhead.
Tips for Success:
- Avoid Stretching the Mesh: Stretching can cause uneven binding and affect hinge functionality.
- Use Extra Clips: If the mesh moves during printing, secure it with additional clips.
- Binder Clip Placement: Make sure that the clips won't hit parts of the printer when the printer starts backup!
- Monitor the Print: Keep an eye out for any issues that might arise, such as the printhead catching on the mesh or improper adhesion.
- Watch Video Summary: How to Print Multiplanar Origami
Laying Down Kapton Tape (Optional)

If you're not using a multi-material 3D printer with soluble supports like PVA, you'll need to lay down heat-resistant Kapton tape to separate the layers of your design. This step ensures that the printed layers don’t fuse together and allows for smooth folding in the final product.
Instructions
- Pause the Print Again:
- When the printer pauses at the pre-programmed point for the Kapton, make sure that the printhead is out of the way.
- Prepare the Kapton Tape:
- Put on gloves to avoid transferring oils from your hands to the tape.
- Cut the tape into strips that are wide enough to fully cover the plastic beneath without excessive overlap. Aim to keep overlaps to less than a few millimeters. (The larger the overlap the more problems you may have when printing.)
- Lay the Kapton Tape:
- Gently place the tape over the areas where separation is needed. Be mindful not to put tape where it’s unnecessary, as it could interfere with the print. (Don't cover the hinges!)
- Work carefully to keep the tape flat. Remove any crinkles or ridges that could obstruct the printhead. Remember, any wrinkles may give your print some texture or cause the print to fail!
- You may need to redo this step a few times to achieve a smooth surface.
- Resume the Print:
- Continue printing and watch the first layer over the Kapton tape carefully.
- Be careful if you notice imperfections, such as stray filament strands or misalignments. If you attempt to clip or remove them you may disrupt the print.
Tips for Success:
- Minimize Tape Overlap: Excess overlap can create uneven surfaces, so aim for tight, clean edges.
- Be Patient: Laying the tape smoothly can be tricky and may require a few tries.
- Monitor Closely: The first layer over the tape is critical. Catching small issues early prevents catastrophic print failures.
Reminder For Multi-Material Printers:
If you’re using a multi-material printer, skip this step and design small gaps between layers instead. Use a soluble support material, such as PVA, to achieve separation during printing.
Repeat Steps As Needed for Your Design


Depending on your design’s complexity, you may need to repeat the process of laying down mesh (Step 7) and Kapton tape (Step 8) multiple times. For the Kresling pattern, this involves two layers of mesh and one layer of Kapton tape.
Instructions
- Check Your Model and Slicer:
- Refer to your CAD model or sliced file to determine how many layers of mesh and Kapton tape are required.
- On some FFF 3D Printers, you may be able to leave instructions for yourself so that you remember what you are supposed to do at each phase. If your printer does not support this, make sure you refer to your model!
- For the Kresling pattern:
- Two Step 7s: Two layers of mesh are needed.
- One Step 8: A single layer of Kapton tape.
Tips for Success:
- Stay Organized: Keep track of how many layers you’ve completed to avoid missing or duplicating steps.
- Test Along the Way: Periodically pause and inspect the print for alignment and adhesion issues.
- Be Patient: Complex designs take time, especially with models with multiple layers. So take your time and double check if you should be placing mesh or Kapton at each layer!
With some models, this can get quite complex. For the Kayak, we've included a list of steps to help you.
Pull Off the Finished Print!

Congratulations! Your print is complete, and it’s time to remove it from the printer. This step requires care to ensure you don’t damage the delicate mesh or hinges during removal.
Instructions
- Remove Binder Clips:
- Start by removing the binder clips used to secure the mesh.
- Be gentle, as sudden movements might damage the mesh.
- Detach the Print from the Bed:
- If needed, use a scraper or spatula to carefully lift the edges of the print.
- Work slowly around the edges to avoid applying too much force.
Tips for Success:
- Use the Right Tools: A flexible spatula or scraper is ideal for gently lifting prints.
- Avoid Force: Excessive pulling or prying can warp the print or damage the mesh.
Trimming and Removing Excess Materials
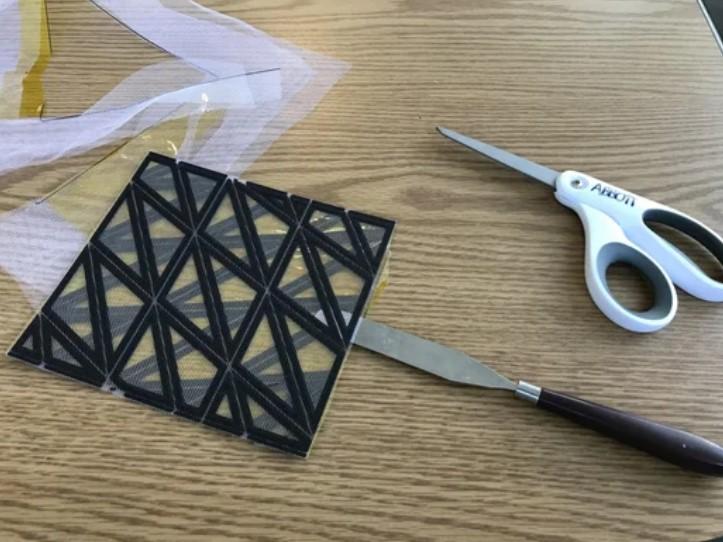

With your print successfully removed from the bed, the next step is to clean up the edges and remove any excess mesh and Kapton tape. This ensures your design is neat, functional, and ready for assembly or testing.
Instructions
- Trim the Excess Mesh:
- Using sharp scissors or a craft knife, carefully cut away any excess mesh around the edges of your print.
- Be cautious not to cut into the embedded mesh or the printed parts.
- Inspect the Kapton Tape:
- Identify where the Kapton tape is adhered to the inside of the print. One side may be tougher to remove due to the adhesive.
- Removing the tape from tight corners will be challenging!
- Remove the Kapton Tape:
- Use a small, pointed tool (like tweezers or a dental pick) to carefully lift an edge of the tape.
- Slowly and steadily peel the tape away from the print.
- This is very challenging with the kayak due to the small enclosed space! Once you've lifted up part of the Kapton, try using a pencil or another small tool to help you lift the rest of it up and push it out through the end of the kayak!
- Clean the Print:
- Inspect the print for any leftover tape adhesive or stray mesh fibers.
- If needed, use a soft cloth with isopropyl alcohol to remove any residue.
Tips for Success:
- Work Slowly: Rushing can result in accidental cuts or damage to the hinges and embedded mesh.
- Use the Right Tools: Precision tools like small scissors or tweezers make this process much easier.
- Steady Pressure: When peeling the Kapton tape, maintain even pressure to avoid ripping.
Try It Out and Share Your Creations!


Now that your print is complete and cleaned up, it’s time for the most exciting part—testing it out! Practice folding and unfolding your design to achieve the desired shape and functionality.
Instructions
- Test the Folding Motion:
- Gently manipulate the pieces to ensure they move smoothly along the hinges.
- If you encounter resistance or sticking, inspect the hinges and edges for stray material or burrs and clean them up as needed.
- Practice the Deployment:
- Experiment with the folding sequence to master the movement. It might take a few tries to get everything aligned and working as intended.
- For complex designs like the Kresling pattern, take your time to understand how each panel interacts with the others.
- Show Off Your Work:
- Share your finished project with friends, family, or the maker community.
- Use it as a conversation starter to explain the combination of origami principles and 3D printing technology.
We’d love to see what you create!
- Share Your Results: Post photos or videos of your finished design. Show us how you used your folding mechanism or applied it to other projects.
- Experiment with New Ideas: Try adapting other origami patterns to multiplanar designs, or scaling your designs. The possibilities are endless!
Tag your creations with #MultiplanarOrigami or join online maker communities to inspire others with your innovative designs.