How to 3D Print on Tulle Fabric
by Penolopy Bulnick in Workshop > 3D Printing
20013 Views, 202 Favorites, 0 Comments
How to 3D Print on Tulle Fabric

I recently came across 3D printing on fabric in this Tweet. I was instantly fascinated by the idea and have been wanting to experiment with using this technique with making jewelry and when I came across this Imgur post by BillieRuben, I knew I had to just go for it.
In this Instructable, I will talk about my experience with 3D printing on Tulle fabric, but any porous fabric should also work with this (as seen in the tweet above, I believe they used fiberglass fabric). I will go through different things you need to keep in mind from creating the design through printing.

You can buy the Floating Chevron necklace in two sizes in my Etsy Store.
Instructable 271
Supplies

I will be making simple jewelry designs so I am just using tulle but if you want to use this technique for something more sturdy (such as for cosplay pieces) consider using a stronger fabric. Just make sure that it is porous so the PLA can adhere to itself through the fabric.
Also, when deciding on fabric think about if you want it to "disappear." You will need something that matches your skin and is fairly holey for that to work such as the tulle I'm using.
Supplies:
- 3D Printer - as usual, my prints are printed on a Creality CR-10
- PLA filament in color of choice
- Tulle or another porous fabric - consider the size of your tulle for what you want to make as it comes in different size rolls as well huge sheets by the yard. Also, if you want it to blend in with your skin so it looks like your design is just floating on you, pick one that matches your skin tone. I'm using a 6" roll in Ivory.
- Painters Tape or Binder Clips - to hold the tulle down to your bed
- Scissors or Exacto Knife
- Fray Check - optional, I used this to try to give extra support to the edges I cut
- Necklace findings: clasp, jump rings, and thin chain
*Any Amazon Links are Amazon Associates Links.
Creating Your Design


Here I will go over the different things you should keep in mind when creating the design you want to print on tulle fabric.
Placement:
Placement is important for prints you want to be attached to the fabric. You have to have the design set up the way you want it when creating it so that when you import it into the slicer it all stays together. For example, with my Celtic design seen above, I aligned and spaced my trinities just as I wanted them and exported them as one design.
If you are creating something for cosplay, such as a bracer, make sure your parts are spaced evenly.
Size and Shape:
Measure and decide on the boundaries of your design before you even get started. I measured on my neck/chest so I knew what sort of space I would be working with. Then, to make it easier while working, I created a shape of roughly the same size, made it a "hole" in Tinkercad and then had it go below the X/Y axis so I could create my design on top of it and know where my boundaries were (see image above).
Support Material:
This will be talked about again in the next step, but make sure your design won't require support material otherwise the support material will also attach to the tulle fabric and tear when you try to cut out your piece. It is best to avoid a design that will need it before you even get to the slicer.
Holes for Jewelry:
If you are going to make jewelry, make sure you put in holes or loops so you can connect your design to jump rings. With the designs I made, I decided to go with holes (unlike my 3D Print Constellation Necklace where I put loops). The holes I cut out are about .05" in diameter. I would say that would be the minimum you want. I'm using pretty small jump rings to, so if you can, measure your jump rings with a Caliper ahead of time and make sure the hole will work. You can also use a string of some sort to attach your design to a jump ring or chain if that is easier.
If you can make the holes as part of the design, it's even better.
Tips About Printing Settings


Now that you have the design you want to print on the tulle, I'll go over what you will do with that design when you bring it into your slicer program of choice. I work with Simplify 3D but much of this should relate to any print you prepare in a slicer.
Editing the Script for a Pause:
You don't need to do this right away, but to me, it was pretty important so we'll go over it first.
You will need to add information in to get the print to pause and move the head out of the way partway through your print. After doing some googling, I found the information I needed here on how to do it with Simplify 3D which is the slicer I use. Luckily, all I need to do was put the following information into the slicer (under the section Additional terminal commands for post processing) and it then put the pause and move of the head in the Gcode.
{REPLACE "; layer 2," "G28 Y0 X0\nM0\n; layer 2,"}For my prints, I wanted the printer to put down the first layer and then pause and move the head to Y0 X0. This gave me the chance to put down my tulle and then click the button on the machine to have the printer continue with layer 2. You can replace the number 2 with whatever layer you want. Just remember that the print will pause BEFORE whatever layer you put in. If you put 1 (like I did once, oops) it won't even start the print because the pause is before layer 1.
If you don't want to mess with the script, you can also try pausing the print and moving the head (or printing something small off to the side just to force the head to move out of the way and when the head moves over there, pause it, put down the tulle, and then continue the print) manually.
In the last photo above, I copied out part of the Gcode where it added the pause. If you can't add in the script above, you can try to alter the Gcode directly with something like this. I do not have experience with doing this, but if it can help you out, that's great :)
Support Material:
As I mentioned in the last step, make sure your print does not require support. It will fuse to the tulle and you won't be able to remove it without tearing the tulle. So, it is better to just not use it.
Skirt:
The skirt is the extra couple layers that are printed around your print to keep the plastic smooth. Make sure you preview the print and look at where the skirt will print. After looking at it, consider either offsetting it more (I upped mine to 5mm) or remove it completely. You don't want it in the way of your design when you cut it out of the tulle or fabric.
I like to leave it if I can because it seems to also hold the tulle in place more as it prints.
Placing the Design:
Another thing to keep in mind is where your design is on your bed. Putting it right in the center is perfectly fine. The main thing to keep in mind is you want to put it somewhere you can easily get to the print to tape down the tulle when the time comes. As long as your head moves to X0Y0 you should be fine, but just in case, make sure your design isn't close to that location. I moved my prints up and off to the right more when possible.
Pausing With Cura (free Slicer) - NOT TESTED


In my previous step I talk about Simplify 3D which I know isn't cheap (we got it as a Christmas gift to ourselves) so I wanted to see if I could figure things out with a free Slicer and it looks like Ultimaker Cura has a pause function built into it.
Now I haven't tested this but I found this video talking about it and checked it out myself. Give this a try if you don't have Simplify 3D but want to try to pause your print.
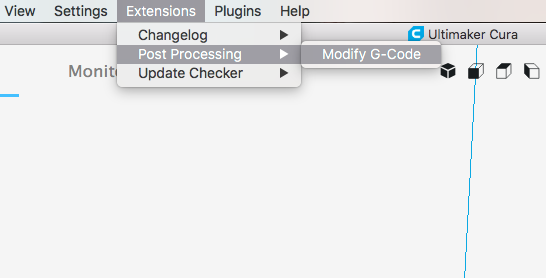
Start by going up to the Menu and clicking Extensions > Post Processing > Modify G-Code
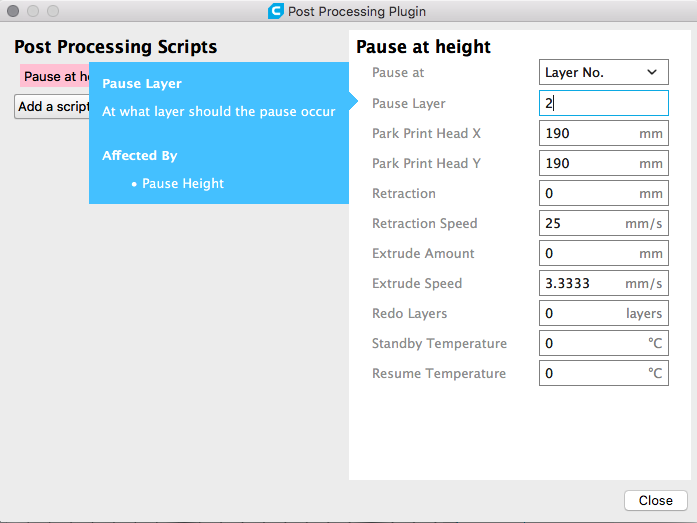
From there you can add different things and the one you want is Pause at height. You can change this to layer and then go from there. Like I mentioned, I haven't tested this so I'm not sure what you will want for all the settings, but the video linked above can help you out.
Hope this helps people out and if someone tries this out, please share your experience in the comments :)
Adding Tulle During the Print


Now that you have your design and you have the Gcode, it is time to print!
Start your printer as you would normally. It should warm up and start when ready.
Once it finishes with your first layer (or whatever layer you put in) the head will move to the zero location and wait for you to start it again. I like to keep an eye on it so it doesn't stay on longer than it has to and I'm ready to put the tulle down as soon as it pauses.
Get your tulle cut out and make sure it is big enough that you can tape it down (or clip it doesn) without interfering with the print design.
Tape all the edges so the tulle is taut and flush with the bed. If it sticks up at all, it could catch on the tip (or in my case, it would get caught on the extra part you can see attached to the head that my husband added so he could print ABS eventually which accidentally fell off during a print ages ago and got a little melted so it was kind of pokey and in the way) and wreak your whole print.
If you need to, after you tape it down, look at it from the side and make sure it isn't puffed up anywhere.
Once it is all in place, restart the print and just let it go. It should continue with the next layer as normal and continue on to finish the print.
When the print is all done, remove the tape and carefully remove your print making sure you don't tear the tulle. If you tear it in the wrong place you could ruin the whole thing.
Cutting Out the Finished Print


Cut it out.
Like I mentioned in the supplies, I put a little fray check on the exposed areas I was going to cut (such as the edges between the chevrons) in the hopes it will give it just a bit more support when cut.
Using your Exacto knife or scissors, cut out your design. I liked using an Exacto as it allowed me to get right next to the print.
Be careful about tearing. It doesn't take much tearing to ruin the whole thing especially if the little parts of the print aren't connected by much.
Creating a Necklace (if You Are Making Jewelry)


Attach your jump rings, clasp, and chain if you are making jewelry.
For my designs, like with my constellation necklace, I used small jump rings to attach my chains to my design and then put a larger jump ring on the end of one chain and a clasp at the end of the other.
That's it! You are done.
Finished Pieces


I'm hoping to create more designs and I'll try to add them here for those who are interested in printing them. If you have designs you really like, feel free to share the files. I'm sure other people will be interested as well :)