How to Add AI to Almost Anything With XIAO
by Abhinav krishna in Teachers > University+
60 Views, 2 Favorites, 0 Comments
How to Add AI to Almost Anything With XIAO


What if you could take a tiny microcontroller, connect a sensor, and give it the ability to see, hear, or understand motion — all without cloud servers, GPUs, or advanced math?
What if you could do that today, even if you’ve never touched machine learning before?
That’s exactly what this workshop is about.
For a long time, AI felt like something reserved for data scientists, powerful computers, and complex software stacks. But today, that barrier is gone. With modern TinyML tools and compact hardware like the XIAO ESP32S3 Sense, AI can live directly inside real-world projects — running locally, instantly, and reliably.
And yes — anyone can do it.
Why This Workshop Is Different
This is not a theory-heavy AI course.
This is a hands-on, confidence-first workshop.
You won’t start with equations or training pipelines.
You’ll start with results.
In the first few minutes, you’ll see AI running live on a microcontroller. From there, we’ll slowly open the hood and show how it actually works, step by step.
No intimidation. No skipping steps.
What You’ll Learn (At a Glance)
By the end of this workshop, you will be able to:
- Run vision AI on a microcontroller
- Build audio-based AI that understands sounds or keywords
- Use motion data (IMU) to recognize patterns
- Train and deploy your own TinyML models
- Trigger real actions — LEDs, motors, relays, buzzers, or any peripheral — based on AI decisions
Most importantly, you’ll learn a transferable skill:
AI is just pattern recognition on sensor data — and any sensor can become intelligent.
Why This Is Worth Learning
TinyML is already being used in:
- Robotics
- Wearables
- Smart sensors
- Assistive technology
- Environmental monitoring
- Low-power IoT systems
Learning how AI works on the edge opens doors to:
- Smarter hardware projects
- More efficient designs
- Real-world problem solving
And it all starts with a board small enough to fit on your fingertip.
So without any delay let's get started.
Supplies
Hardware
- XIAO ESP32S3 Sense
- Built-in camera
- Built-in microphone
- Built-in IMU
- USB-C cable
- Laptop with Chrome browser
Software
- Edge Impulse
- SenseCraft AI (web-based, no installation required)
No programming. No ML setup. required to start.
What Are You Actually Doing? (TinyML in Simple Words)
Before we build anything, let’s take 5 minutes to understand what’s really going on.
You don’t need to master this now — just get the big picture.
First: What Is Machine Learning?
Normally, we write programs like this:
“If this happens, do that.”
But machine learning works differently.
Instead of writing rules, we:
- Show the computer examples
- Let it learn patterns
- Use those patterns to make decisions
So the logic is no longer hard-coded — it’s learned from data.
The Problem with Traditional AI (Why Cloud AI Isn’t Always Ideal)
In many AIoT systems today, this happens:


- Sensors collect data
- Data is sent to the cloud
- AI runs on powerful servers
- A decision comes back
This creates problems:
- ❌ Latency (slow response)
- ❌ High energy use
- ❌ Internet dependency
- ❌ Privacy concerns
- ❌ Bandwidth limits
For real-world hardware projects, this is often not practical.
This Is Where TinyML Comes In
TinyML means running machine learning directly on tiny devices like microcontrollers.


Instead of sending raw data to the cloud:
- The AI model runs on the device
- Decisions are made instantly
- Only important information is sent (or nothing at all)
This is often called Edge AI.
Why TinyML Is Powerful
TinyML allows devices to be:
- ⚡ Low power (battery-friendly)
- 🔒 Private (data stays on device)
- ⏱️ Real-time (no waiting for cloud responses)
- 🔁 Always-on
- 🤖 Autonomous
That’s why TinyML is used in:
- Robotics
- Wearables
- Smart sensors
- Assistive technology
- Environmental monitoring
The One Flow You Should Remember
Every TinyML system — simple or advanced — follows the same idea:


Sensor → Data → Model → Decision → Action
In this workshop:
- Sensors come from the XIAO ESP32S3 Sense
- Models come from SenseCraft AI and Edge Impulse
- Actions can be LEDs, buzzers, motors, relays, or anything you connect
Don’t Worry — You’re Not Training AI Yet
Right now:
- You don’t need ML theory
- You don’t need to understand neural networks
- You don’t need to know math
We’ll start by running AI, not studying it.
Understanding will come naturally, step by step.
What’s Next
Now that you know what TinyML is and why it matters, let’s do the fun part.
👉 Next step:Understanding Our Hardware – The XIAOML Kit
Understanding Our Hardware – the XIAOML Kit
Before we run any AI, let’s get familiar with the hardware we’ll be using.
Good news first 👇
You don’t need to wire complex circuits or add external sensors.
The XIAOML Kit from Seeed Studio already includes everything required to learn TinyML properly.
What Is the XIAOML Kit?
The XIAOML Kit is a beginner-to-pro TinyML learning kit built around the XIAO ESP32S3 Sense.
It combines:
- A powerful microcontroller
- Multiple sensors
- Expansion support
- Tiny form factor
All in one compact setup.


This makes it ideal for learning:
- Vision AI
- Audio AI
- Motion / gesture AI
- Real-time, on-device inference
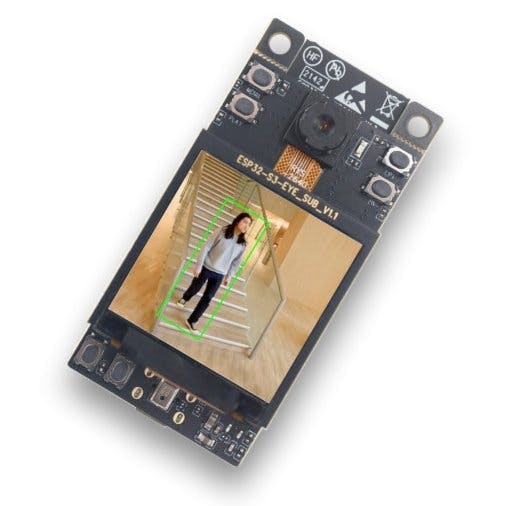
The Brain: XIAO ESP32S3 Sense
At the core of the kit is the XIAO ESP32S3 Sense.
This tiny board is doing a lot more than it looks like.
What’s built in:
- 📷 Camera – for vision AI
- 🎤 Microphone – for audio & keyword detection
- 🧠 ESP32-S3 MCU – runs TinyML models
- 📡 Wi-Fi & BLE – optional connectivity
- ⚡ Low power design – perfect for edge AI
Despite its size, it’s powerful enough to:
- Capture sensor data
- Run ML inference
- Make decisions locally
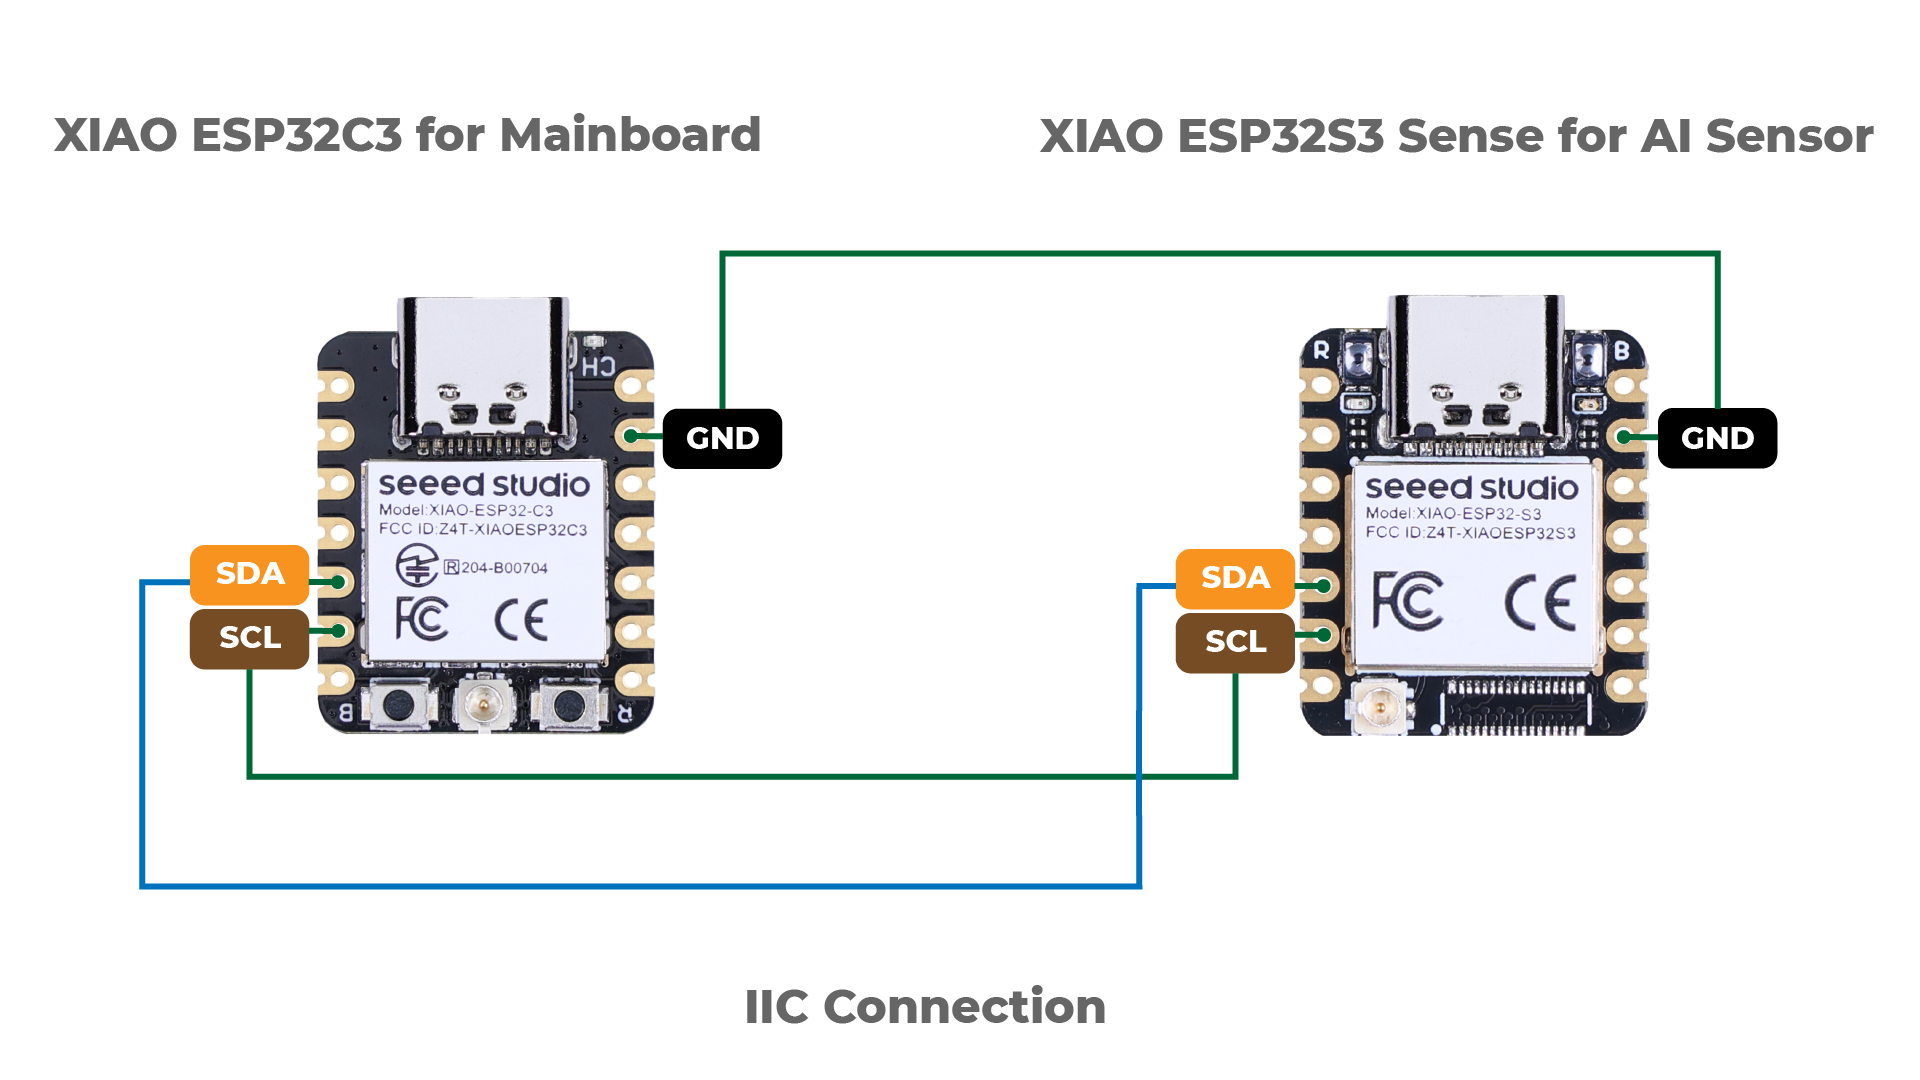
Motion Intelligence: IMU Add-On
The XIAOML Kit also includes an IMU attachment, which adds:
- 🧭 Accelerometer
- 🔄 Gyroscope
This allows us to:
- Detect motion patterns
- Recognize gestures
- Build AI beyond vision and audio
This is important because it shows a key TinyML idea:
AI is not limited to what humans can see or hear.
Sensor Overview (At a Glance)

These three sensors are enough to demonstrate most real-world TinyML use cases.
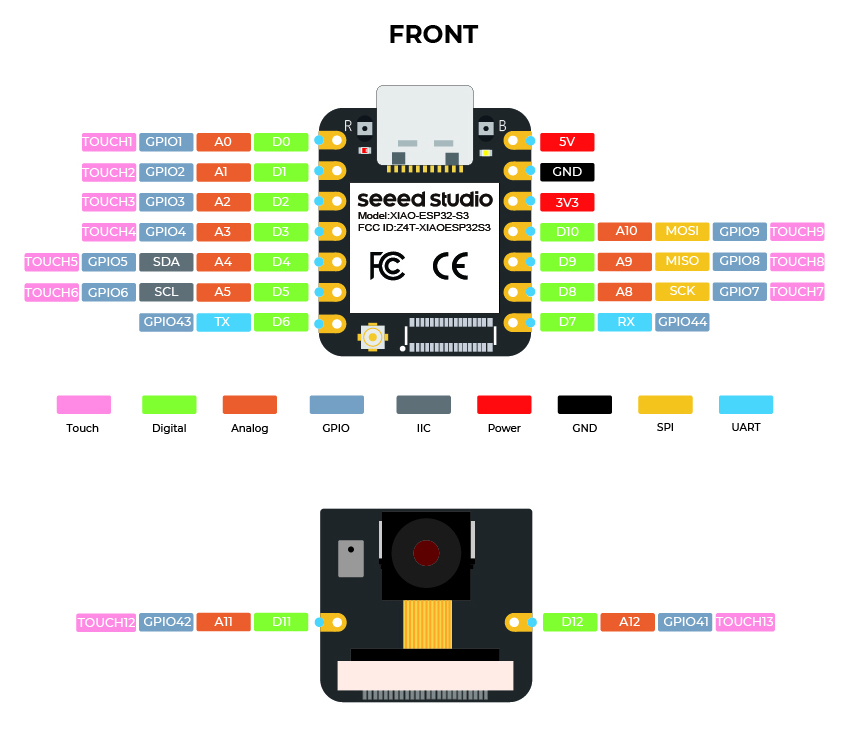
Pinout: What You Actually Need to Know
You don’t need to memorize the full pinout right now.
For this workshop, just remember:
- The camera and microphone are already wired internally
- The IMU connects via standard interfaces
- GPIO pins are available for:
- LEDs
- Buzzers
- Relays
- Motors
- Any external peripheral
Later, we’ll use AI outputs to control these pins and perform actions.
Why This Hardware Is Perfect for Learning TinyML
This kit is ideal because:
- ✅ No complex wiring
- ✅ Multiple AI-ready sensors
- ✅ Small, embeddable form factor
- ✅ Works with SenseCraft AI and Edge Impulse
- ✅ Same hardware scales from beginner → advanced
You learn concepts, not just one demo.
Big Idea to Remember
Everything we do in this workshop follows this loop:
Sensor → AI Model → Decision → Action
The XIAOML Kit gives us:
- Sensors (camera, mic, IMU)
- Compute (ESP32-S3)
- Outputs (GPIOs for actions)
That’s a complete AI system.
Up Next
Now that you know your hardware, it’s time to see intelligence in action.
👉 Next step: Vision AI in minutes — running your first AI model on the XIAO ESP32S3 Sense using SenseCraft AI.
Run Your First AI Model Using SenseCraft AI
Now it’s time to stop reading and start running AI.
In this step, you’ll use SenseCraft AI to deploy a prebuilt vision model to your XIAO ESP32S3 Sense — without writing a single line of code.
Step 3.1: Create a SenseCraft AI Account
- Open your web browser
- Go to SenseCraft AI
- Create a free account or log in if you already have one
Once logged in, you’ll see the SenseCraft dashboard.
Step 3.2: Start a New Vision Project
- Click Create / New Project
- When asked to select a device:
- Choose XIAO ESP32S3 Sense
- Select the task type:
- Choose Detection (Vision)
This tells SenseCraft:
“I want to run a camera-based AI model on this board.”
Step 3.3: Choose a Prebuilt Model
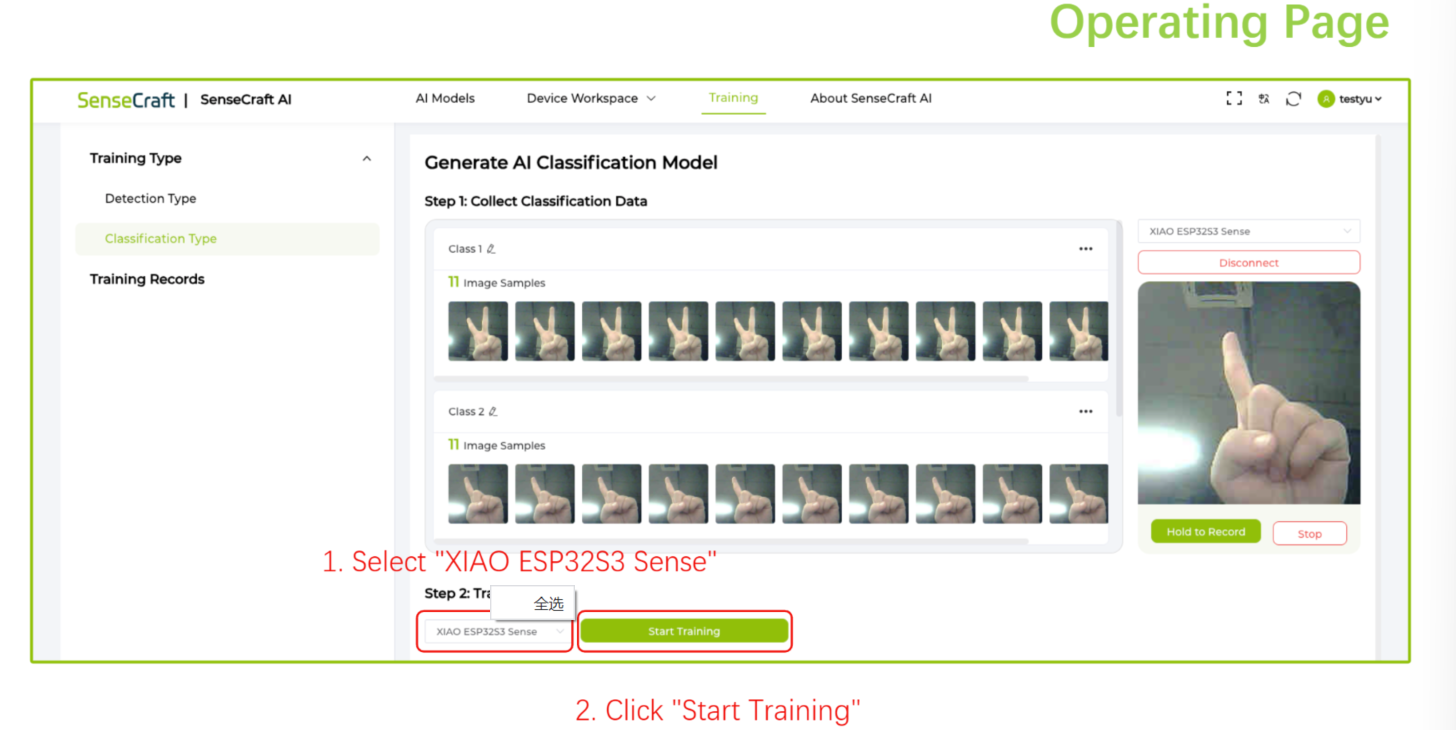

- From the list of available models:
- Select any vision detection model you like
- Don’t worry about choosing the “perfect” model
- This step is about seeing AI work
Prebuilt models are already:
- Trained
- Optimized
- Ready to run on the XIAO
Step 3.4: Deploy the Model
- Click Deploy Model
- SenseCraft AI will:
- Prepare the firmware
- Optimize the model
- Get it ready for your board
This may take a short moment.
Step 3.5: Connect the XIAO ESP32S3 Sense
- Connect your XIAO ESP32S3 Sense to your laptop
- Use a USB Type-C cable
- The board will power on automatically
No additional drivers are required in most cases.
Step 3.6: Connect the Device in SenseCraft AI

- Click Connect Device
- A window will appear asking for a port
- Select the correct USB / serial port
- Click OK
SenseCraft AI will now upload the model to your board.
Step 3.7: Watch the AI Run Live 🎉
Once deployment is complete, you’ll see:
- Live camera feed
- Real-time detection results
- Confidence scores updating instantly
You are now running real AI:
- On-device
- Offline
- In real time
This is TinyML in action.
What You Just Achieved (Important)
Without:
- Writing code
- Training a model
- Using the cloud
You:
- Deployed an AI model
- Ran vision inference
- Used a microcontroller as an AI system
That’s a huge milestone.
Don’t Worry If You Don’t Understand Everything Yet
At this stage:
- You are using AI, not mastering it
- Understanding will come gradually
Right now, the goal is simple:
Build confidence and curiosity.
Step 5: Run Your First Vision AI Model


- Choose a pre-trained vision model in SenseCraft AI
- Start live inference
- Point the camera at different objects or scenes
Within seconds, you’ll see:
- Live camera feed
- AI classification results
- Confidence scores updating in real time
🎉 Congratulations — you just ran AI on a microcontroller.
No cloud. No Python. No training.
Step 6: What Just Happened? (No Math)
Let’s break it down simply:
- The camera captures images
- The model looks for patterns
- The XIAO runs inference locally
- The result is produced instantly
This is called Edge AI or TinyML:
Machine learning models optimized to run on very small devices.
Nothing was sent to the internet.
Everything happened on the board in your hand.
Step 7: Why This Matters (Big Picture)
If AI can run on:
- A board this small
- With this little power
- With no cloud dependency
Then it can be embedded into:
- Wearables
- Robots
- Environmental sensors
- Assistive devices
- Smart tools
- Almost anything
And we’re just getting started.