Connecting and Troubleshooting Your Internet Router
by Daphne Spears in Circuits > Electronics
113 Views, 0 Favorites, 0 Comments
Connecting and Troubleshooting Your Internet Router

Many homes nowadays use the home internet to communicate, connect, and for online TVs, laptops, and smartphones. Connecting to the internet should not be a tedious exercise.
Using these simple steps will connect you to the internet within the shortest time possible.
You can also check the troubleshooting steps in case you face some difficulties.
Supplies
To connect internet at home, you need:
- A Wireless router
- Cables (the size will depend on the distance from the receiver to the house)
- Power Adapter
- Ethernet Cable (to connect to PPOE or a homebuilt Ethernet port)
Optional equipment (not supplied with your router)
- Laptops
- Internet TV
- Smartphones
- Repeater
How to Connect Your Router
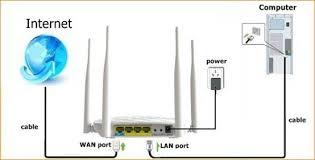
- Power off your router and remove any battery.
- Connect the Wide Area Network (WAN) port of the router to the Local Area Network (LAN) of your modem. You can connect the router to either an Ethernet port or a PPOE port, if necessary.
- Reinstall the battery (if provided) to the router and power it on.
- Use the power adapter to connect your router to the power source. Make sure that your power source and power adapter uses the same specification, such as voltage. A change in voltage could damage your equipment, which is not covered in the warranty documents.
- Once the router is on, connect your devices to your router
For wireless devices
- Connect your wireless devices to the WIFI network of the router using the default WIFI username specified on the product label. The default WIFI name does not need a password.
For wired devices
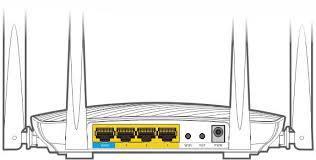
- Connect your wired devices to LAN 1, LAN 2, LAN 3 (or LAN 4) port of the router.
Setting Up Your Router
- Once your router is powered on, open your preferred web browser. On the address bar, type your provided default gateway address (usually 192.168.0.1) and press enter.
- The router automatically detects and determines your internet connection type. Enter the user name provided by your ISP and set up your preferred WIFI name and password, which should not be less than eight characters. Click okay once you have entered the preferred details.
- Connect your wireless device to the new WIFI network of your router using the new user name and password.
- Your wired devices are now connected to the router
- You can now access the internet directly.
Troubleshooting Your Router
Depending on your internet router model, resetting to factory settings should not be a challenge. When you experience a poor internet connection or a “404” error, you need to check if your internet router and cables are functioning correctly. If the router and cables are properly connected, you can reset your internet router by following these simple steps.
- When the LED indicator is blinking continuously, press the WIFI/RST button for about 10 seconds, then release it when the indicator blinks fast.
- The router is now reset to the factory settings.
- Log in to your preferred web browser of the router, type your default gateway address or 192.168.0.1, and press enter on your keyboard
- Enter the administration page, then the device management page, and click on the reset button.
- Follow the on-screen instructions to reset your router.
- Wait for at least a minute to allow the modem to power up and gain stability
- When the modem lights are on the router is connected to the internet.
- Check your internet connection to verify if your router is connected.
If the problem persists please contact your network provider or technician to configure your internet settings and physical hardware such as the receiver.