How to Design Kids Abacus Using 3D CAD Software
by Julie80 in Design > Digital Graphics
301 Views, 2 Favorites, 0 Comments
How to Design Kids Abacus Using 3D CAD Software

Learn How to Design Kids Abacus Using 3D CAD Software with the help of this article
How to Design Kids Abacus Using 3D CAD Software
Designing educational tools for children requires a balance of creativity, functionality, and user-friendliness. The abacus, a timeless learning device, remains one of the most effective tools for teaching basic arithmetic to young learners. With advancements in technology, creating a digital 3D model of a kids' abacus has become an exciting and accessible project for educators, parents, and designers alike. SelfCAD, a versatile and beginner-friendly 3D modeling platform, offers the perfect environment to bring such ideas to life.
From conceptualizing the structure to utilizing the platform's intuitive tools for precise modeling, this guide will provide step-by-step insights for creating a functional and visually appealing educational aid. Whether you're a seasoned designer or a curious beginner, this tutorial will demonstrate how modern tools can transform traditional concepts into interactive, digital designs
To access the interactive tutorial to this article, check out https://www.selfcad.com/tutorials/q3y6l3b1cm4l33734y6x5w2ya4w2w185i2p3
Once you’ve launched the editor;
From the 3D Shapes category on the toolbar choose cylinder; set top radius to 10, Bottom radius to 20, height to 160, vertical segments to 4, position z to 100, rotation y to 45
Click to finalize cylinder
Click copy button to copy selected objects; click move on the toolbar; set z to -11 using highlighted gizmo
Click ‘x’ to close transformation panel
From the 3D Shapes category on the toolbar choose cylinder; set top radius to 5, Bottom radius to 5, position y to 148, position z to 43, rotation x to 90
Click to finalize cylinder
From the tools category on the toolbar choose copy offsets; Set y to -120, Click copy button to create copies.
Click ‘x’ to close copy offsets panel
Click on mesh 4(1), mesh 4 to select
Click color picker button to change color of object; click maroon
Click ok
From the 3D Shapes category on the toolbar choose cylinder; set top radius to 2, Bottom radius to 2, position y to 136, position z to 44, rotation x to 90
Click to finalize cylinder
Click color picker button to change color of object; Click silver
Click ok
From the 3D Shapes category on the toolbar choose sphere; Set radius to 6, position y to 132, , position z to 11
Click to finalize sphere
From the tools category on the toolbar choose copy offsets; Set z to 13, Set amount of copies to 5, Click copy button to create copies.
Click ‘x’ to close copy offsets panel
Click on mesh 12 to select
From the tools category on the toolbar choose copy offsets; Set y to -17, Set amount of copies to 5, Click copy button to create copies.
Click ‘x’ to close copy offsets panel
Click on mesh 16, 16(1,2,3,4,567,8,9,10,11,12,13,14,15,16,17,18,19,20,21,22,23,24,25,26,27,28,29), 12, 12(1, 2,3,4,5) to deselect
Click color picker button to change color of object; click gold
Click ok
Click on mesh 16(29, 28, 27,26,25,24) to select. Click on mesh 16(35, 34,33,32,31,30) to deselect
Click color picker button to change color of object; Click red
Click ok
Click on mesh 16(23,22,21,20,19,18) to select. Click on mesh 16(29,28,27,26,25,24) to deselect
Click color picker button to change color of object; Click purple
Click ok
Click on mesh 16(17,16,15,14,13,12) to select. Click on mesh 16(23,22,21,20,19,18) to deselect
Click color picker button to change color of object; Click green
Click ok
Click mesh 16(11,10,9,8,7,6) to select. Click on mesh 16(17,16,15,14,13,12) to deselect
Click color picker button to change color of object; Navy
Click ok
Click mesh 16(1,2,3,4,5) to select. Click mesh 16(11,10,9,8,7,6) to deselect
Click color picker button to change color of object; Click black
Click ok
Click on all the mesh
From the edit menu on the top toolbar choose group, then click select all
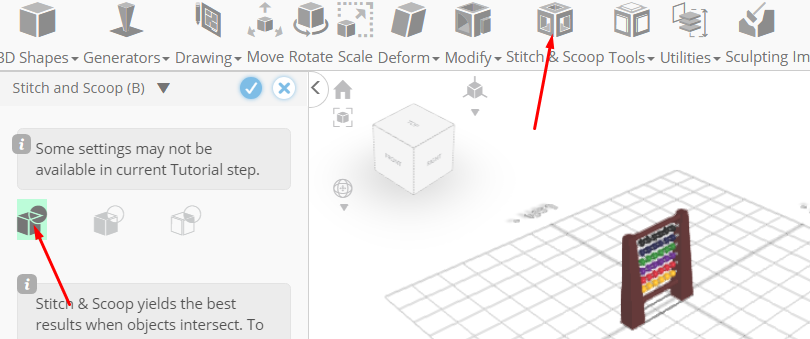
Click stitch & scoop on the toolbar; From the tool panel choose union.
Click to finalize union
As you continue honing your design skills, remember that SelfCAD offers a wealth of resources to support your learning journey. To deepen your understanding and explore more advanced features, consider checking out the interactive tutorials (https://www.selfcad.com/tutorials) available on the SelfCAD website. The tutorials page provides a treasure trove of guides, tips, and tricks that cater to designers of all levels.
More structured learning experience can also be accessed at the SelfCAD Academy (https://www.selfcad.com/academy/curriculum/), https://www.youtube.com/@3dmodeling101, and 3D Modeling 101 series (https://www.youtube.com/playlist?list=PL74nFNT8yS9DcE1UlUUdiR1wFGv9DDfTB). This comprehensive resource offers in-depth courses taught by industry experts, allowing you to master the intricacies of SelfCAD at your own pace