How to Design Multiplanar Origami
by BYU Create Lab in Craft > Paper
405 Views, 4 Favorites, 0 Comments
How to Design Multiplanar Origami

Ever wondered how to bring the elegance of origami into the world of 3D printing? This guide focuses on designing multiplanar origami, where traditional folds are reimagined into functional, manufacturable structures. By learning how to adapt crease patterns and design for multiple planes, you’ll unlock new possibilities for creating intricate, foldable designs that go beyond paper.
This tutorial is all about designing multiplanar origami (from an existing crease pattern), so whether you’re an origami enthusiast, an engineer, or a maker, this is your chance to explore how to translate flat-foldable designs into multiplanar configurations which you can then go and 3D print. If you want to jump to printing an existing design, skip to our Printing Multiplanar Origami Instructable!
What You’ll Learn:
- How to identify and adapt flat-foldable states in origami patterns.
- Techniques for splitting and reconfiguring panels to achieve multiplanar designs.
- Tips for incorporating hinges to connect panels in in different planes.
If you want to just design your own origami, here are some places that you might find inspiration:
- https://www.instructables.com/search/?q=origami&projects=all
- Twists, Tilings, and Tessellations: Mathematical Methods for Geometric Origami by Robert Lang
- Origami Resource Center
- Origami Design Secrets by Robert Lang
- Origametry, Mathematical Methods in Paper Folding by Thomas Hull
Technical Information:
To read about the research that went into the ideas, go here!
Stevens, T. R., & Crane, N. B. (2025). Multiplanar manufacturing: A new approach to design for manufacturing and assembly of origami. Mechanism and Machine Theory, 206, 105906. https://doi.org/10.1016/j.mechmachtheory.2024.105906
Links:
- Website: am.byu.edu
- LinkedIn: linkedin.com/company/byu-create-lab
- Thingiverse: thingiverse.com/byucreatelab
- Printables: printables.com/@BYUCreateLab_1460028
Choose Your Origami Design and Crease Pattern

Start by deciding what type of origami structure you want to create. Beginners might prefer simple designs like cubes or cylinders, while advanced users can tackle more intricate patterns.
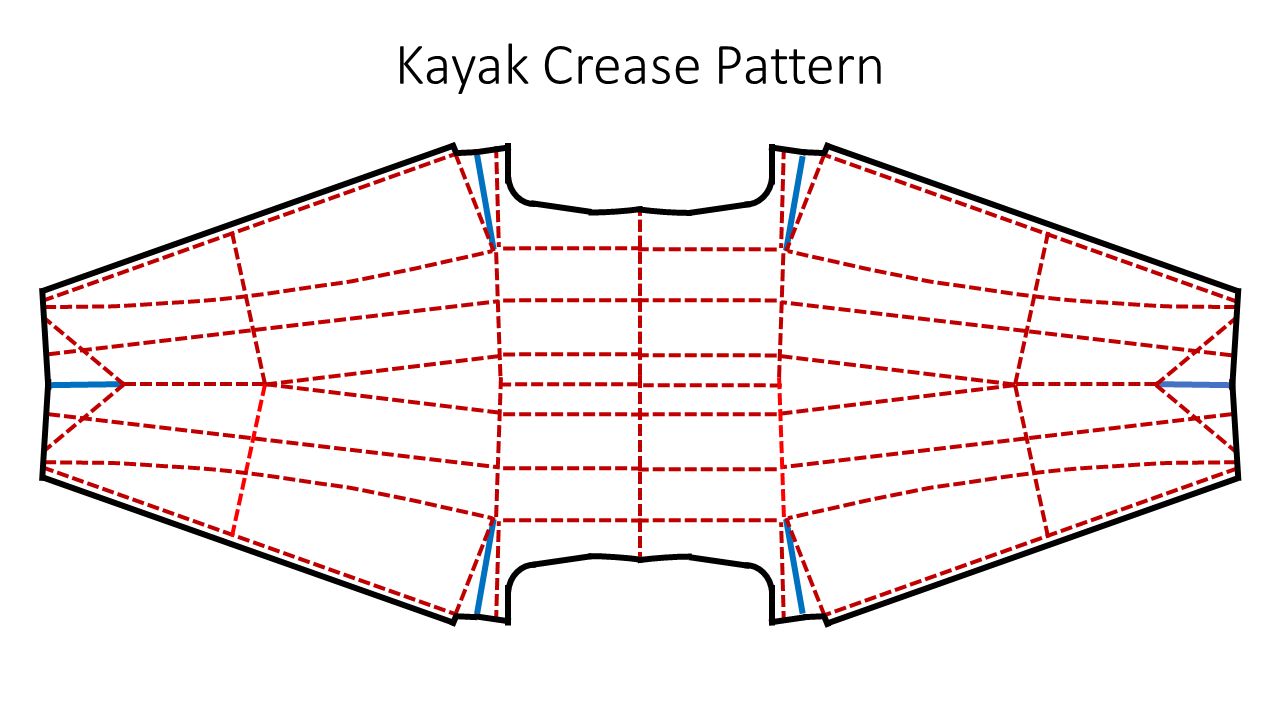
Some things we've made here at BYU's CREATE Lab include a foldable kayak, house, waterbomb, speaker, ukulele, chair and more. Let your imagination run wild, and let us know how it worked! We'd love to hear from you.
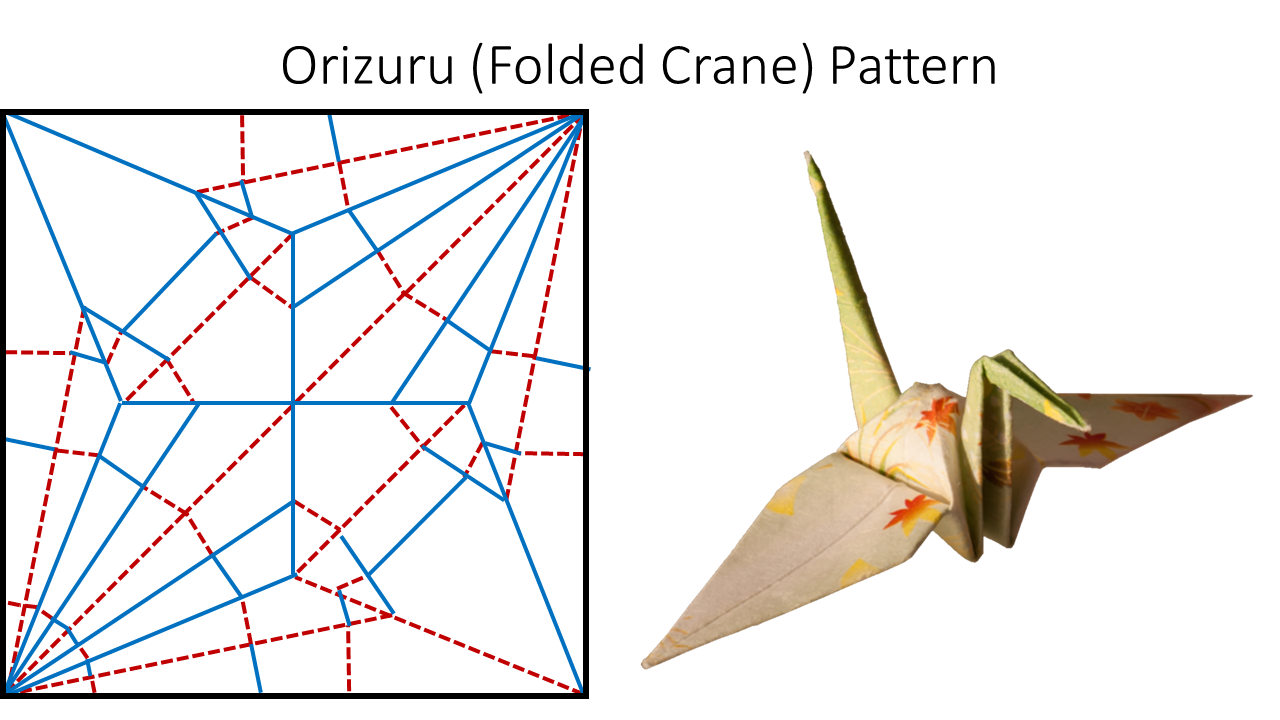
We'll show you how to create a dissect the Origami Crane and Kresling Pattern! And, as a bonus you'll find the design of an origami kayak!
(Orizuru image credit: Jaybear via Wikimedia Licensed under Creative Commons Attribution-Share Alike 3.0 Unported)
Transitioning From a Single to Multiple Planes


Traditional origami starts with a flat sheet of paper folded into a single plane. To make multiplanar origami, we’ll adapt these folds to operate across multiple planes. The secret? Identifying the flat-foldable states hidden within the crease pattern of your design.
What Are Flat-Foldable States?
Flat-foldable states are stages in an origami folding sequence where the design naturally flattens into compact shapes. These states are ideal for multiplanar manufacturing because they:
- Use space efficiently.
- Reduce the need for support material during printing.
- Simplify transitions between manufacturing and deployment.
- For example, when folding an origami waterbomb, certain stages flatten out, creating ideal configurations for 3D printing.
Key Steps Method 1:
- Analyze the Folding Sequence:
- Every origami design has multiple stages in its folding sequence. These stages may flatten completely at specific points, forming intermediate states. You can see the steps for folding the crane out of paper here (credit: Tavins' Origami Instructions licensed under CC-BY-SA).
- Select the Best Flat State: This is up to you!
- You can choose any intermediate flat-foldable state based on:
- Printing limitations: States with fewer overhangs are easier to manufacture.
- Deployment Steps: Opt for configurations requiring fewer steps to reach the final shape.
- Merge Panels Where Possible:
- Panels that move together can often be merged, reducing the number of hinges and simplifying the design.
- Be careful! Any material or folds you remove will not allow you to go between states before the one you print at!
- Preserve Essential Functions:
- When merging panels, ensure the structure retains its functional motion. For example:
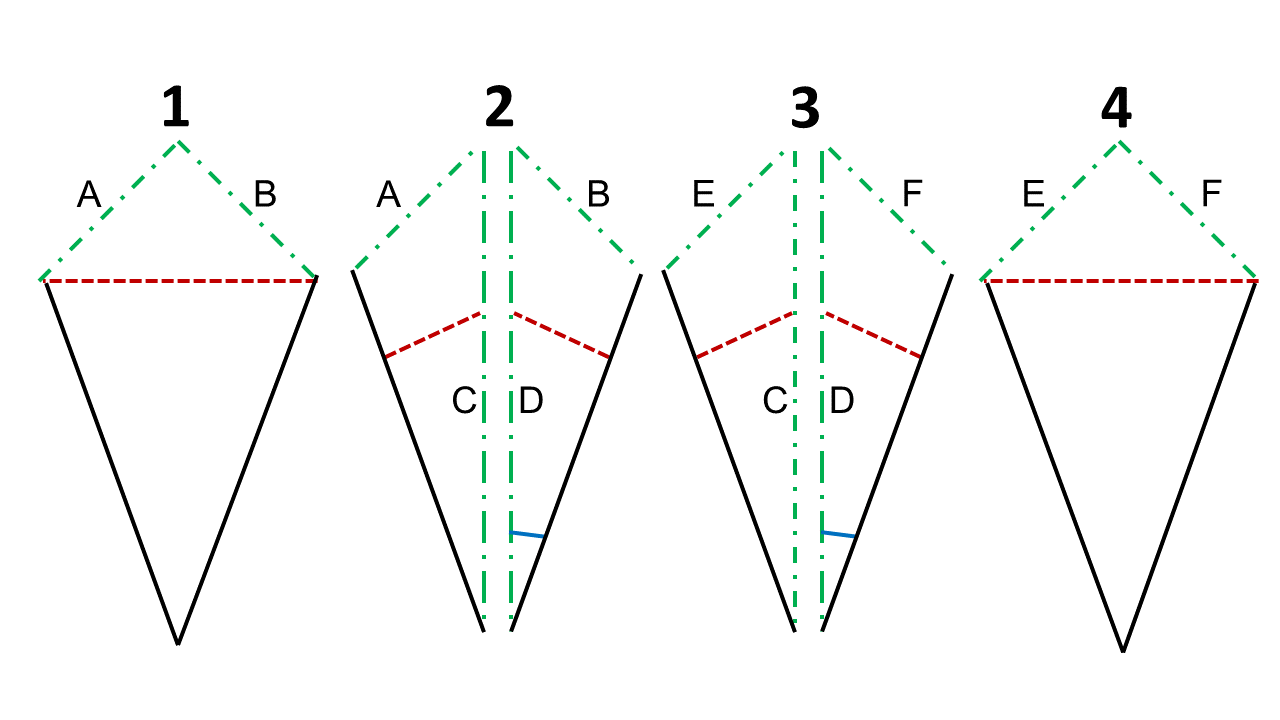
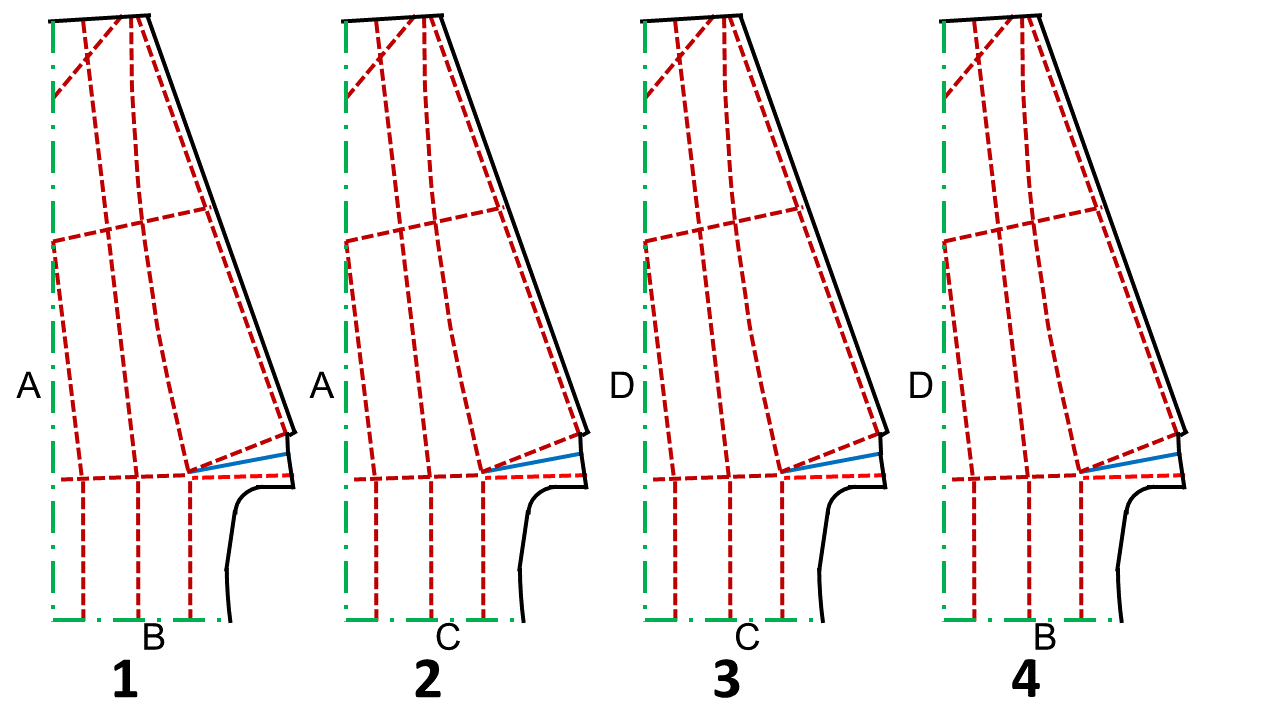
- In a multiplanar crane, merging reduces the number of manufacturing planes from sixteen to four, simplifying the design while preserving the folding motions necessary for deployment.
For the crane, we choose to print form the last step in the instructions. Check out the photo of what the exploded view of our model looks like! You can see that there are four layers of material. We've broken it down to the base pieces and were able to remove a lot of the material that helped us fold the paper to this step, but didn't contribute to the motion from this point to the end. In the images, the green lines represent points where we are connecting between planes (e.g., connect green line A to green line A), red and blue are mountain and valley folds, respectively (same as the original crease pattern).
If you can't find a state that you want to print from, well keep reading!
What to Do If There Isn't a Good State


If a suitable flat-foldable state doesn’t exist in your origami design, don’t worry—this method shows you how to adapt your pattern by splitting panels. Splitting allows for multiplanar manufacturing by rearranging parts of the design onto different planes, even if it alters the original folding kinematics. Let’s explore how this works using the Kresling pattern, a popular cylindrical origami design.
What Does Splitting Panels Mean?
Splitting panels involves cutting sections of the original crease pattern and rearranging them into a new configuration that’s easier to manufacture. This is harder to do than finding a natural flat-foldable state like we did above.
Key Steps Method 2
- Analyze the Original Crease Pattern:
- Start with your crease pattern. See if you can make any observations about the geometry when it is being made or folded. (We've attached some videos to help!)
- With the Kresling pattern, we noticed that when we connect the ends, we have symmetry. So, we can take advantage of the symmetry and remove the portion that we want to manufacture on one layer.
- Mark Incision Lines:
- Add incision lines to the original crease pattern. "Cut" that portion out of the crease pattern. This will be your first plane.
- Reconfigure the Panels:
- Look at the rest of the crease pattern. Rearrange it so that the panels now connect to the ones beneath it.
Tips for Success:
- Avoid Over-Splitting: Every time you split a panel, your origami can now move more! Excessive splitting can lead to unwanted motion.
- Add Stability: Reinforce critical hinges or use techniques like prestressing to control extra undesired motion.
You can see the our process in breaking down the crease pattern and compare the two different manufacturing configurations. Note that to save on print time, we hollowed out the interior of the cylinder to decrease print time!
Modelling Your Design for Printing


We're now reaching the end of the instructable! This last step's goal is to take your design and model it so that you can go print it. Now that you’ve transitioned your origami design to a multiplanar configuration, it’s time to model the design in CAD and incorporate hinges for smooth folding.
Instructions
- Model the Design in CAD:
- Start by modeling your pattern into CAD software (Fusion 360, Tinkercad, etc.).
- Space the Panels:
- Arrange the panels with enough distance between them to allow for folding.
- Add Hinges Between Planes:
- There are various ways to connect planes with hinges. What we found effective was adding small extrusions to the sides of the panels. We've attached a close-up of what it looks like for the Kresling pattern.
Tips for Success:
- Remember, your model is made in multiple planes, so make sure you offset the panels to allow for for the PVA or Kapton (the material you are using as a layer to prevent adhesion) has enough space!
- We've noticed that with thin Kapton you won't need to have an offset. However, Kapton can be quite tricky to remove from tight places!
- We've included an image to show you at least three ways that you can connect panels between planes. For more details on these hinges, check out our work!