How to Design a Stylus Pen Using 3D CAD Software
by Julie80 in Craft > Digital Graphics
65 Views, 0 Favorites, 0 Comments
How to Design a Stylus Pen Using 3D CAD Software

Learn How to Design a Stylus Pen Using 3D CAD Software with the help of this article
How to Design a Stylus Pen Using 3D CAD Software
Designing a stylus pen involves careful consideration of both form and function to create a comfortable and effective tool for digital interaction. Using SelfCAD, a powerful and user-friendly 3D modeling software, designers can craft a precise and ergonomic stylus pen suitable for various touchscreens and graphic tablets. SelfCAD’s comprehensive set of tools allows for the creation of smooth curves, accurate dimensions, and customizable features, making it ideal for developing a functional pen design. This article will provide a step-by-step guide on how to design a stylus pen using SelfCAD, focusing on key aspects such as grip comfort, tip precision, and overall aesthetics to ensure a professional-quality result
To access the interactive tutorial to this article; https://www.selfcad.com/tutorials/4q5o711j5o85ar6g5a6e6h2c4dt6n4t5ob4z
Once you’ve launched the editor;
Click solid+wireframe button to set rendering mode
From the 3D Shapes category on the toolbar choose cylinder; Set top radius to 20, Bottom radius to 20, height to 400, rotation x to 90.
Click to finalize cylinder
Click to activate polygon selection; Click on highlighted region to select it
From the modify category on the toolbar choose extrusion; Set extrusion amount to 50.
Click to finalize extrusion
Click scale on the toolbar; Set x to 50, y to 50
Click ‘x’ to close transformation panel
Click on highlighted region to deselect it
Click to activate edge selection; Click on highlighted region to select it
From the modify category on the toolbar choose fillet; Set intensity to 15, level to 5, profile offset to 0
Click to finalize fillet
Click to activate polygon selection; Click on highlighted region to select it
From the modify category on the toolbar choose inset; Set inset amount to 2.
Click to finalize inset
From the modify category on the toolbar choose extrusion; Set extrusion amount to 10.
Click to finalize extrusion
Click on highlighted region to deselect it
Click to activate edge selection; Click on highlighted region to select it
From the modify category on the toolbar choose fillet; Set intensity to 1, level to 3,
Click to finalize fillet
From the 3D Shapes category on the toolbar choose cylinder; Set top radius to 8, Bottom radius to 25, height to 50, rotation x to 90.
Click to finalize cylinder
From the utilities category on the toolbar choose align; Set reference to mesh 4, layer to middle, position to front
Click ‘x’ to close align panel
Click to activate polygon selection; Click on highlighted region to select it
From the modify category on the toolbar choose inset; Set inset amount to 2.
Click to finalize inset
From the modify category on the toolbar choose extrusion.
Click to finalize extrusion
From the modify category on the toolbar choose inset; Set inset amount to 2.
Click to finalize inset
From the modify category on the toolbar choose extrusion; Set extrusion amount to -10
Click to finalize extrusion
Click on highlighted region to deselect it
Click to activate edge selection; Click on highlighted region to select it
From the modify category on the toolbar choose fillet; Set intensity to 1, level to 3.
Click to finalize fillet
From the 3D Shapes category on the toolbar choose cylinder; Set top radius to 1, Bottom radius to 4, height to 10, rotation x to 90.
Click to finalize cylinder
From the utilities category on the toolbar choose align; Set reference to mesh 8, layer to middle, position to front
Click ‘x’ to close align panel
Click on highlighted region to select it
From the modify category on the toolbar choose fillet; Set intensity to 0.5, level to 3.
Click to finalize fillet
Click highlighted part on selection cube to turn off region selection
From the 3D Shapes category on the toolbar choose cube; Set width to 10, height to 10, depth to 80, position y to 38, position z to 130.
Click to finalize cube
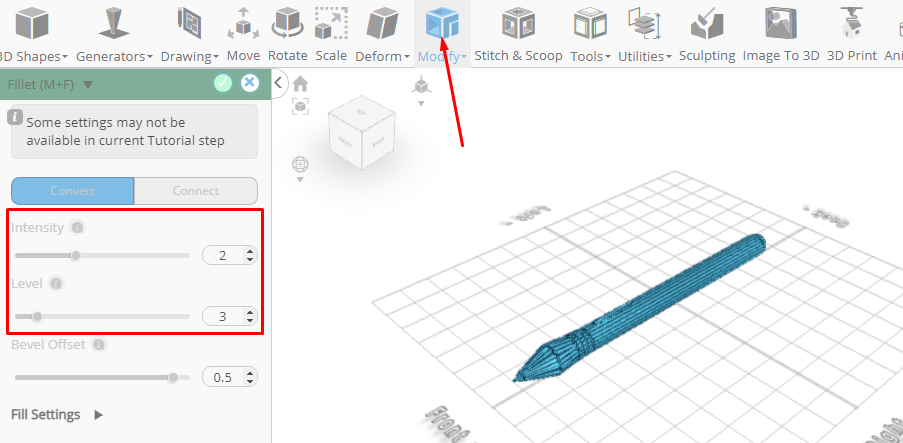
From the modify category on the toolbar choose fillet; Set intensity to 2, level to 3.
Click to finalize fillet
As you continue honing your design skills, remember that SelfCAD offers a wealth of resources to support your learning journey. To deepen your understanding and explore more advanced features, consider checking out the interactive tutorials (https://www.selfcad.com/tutorials) available on the SelfCAD website. The tutorials page provides a treasure trove of guides, tips, and tricks that cater to designers of all levels.
More structured learning experience can also be accessed at the SelfCAD Academy (https://www.selfcad.com/academy/curriculum/), https://www.youtube.com/@3dmodeling101, and 3D Modeling 101 series (https://www.youtube.com/playlist?list=PL74nFNT8yS9DcE1UlUUdiR1wFGv9DDfTB). This comprehensive resource offers in-depth courses taught by industry experts, allowing you to master the intricacies of SelfCAD at your own pace