How to Design for Laser Cutting (& Free Files)
by NirL in Workshop > Laser Cutting
16729 Views, 114 Favorites, 0 Comments
How to Design for Laser Cutting (& Free Files)


Welcome to my 50th instructable! 🥳
Designing for laser cutting seemed really complicated to me when I started, and now I make my own designs easily. Since it seems really intimidating at first, I thought I'd make a few tutorials about how to design your own files. In this instructable, I'll show you one of the simplest methods for creating your own designs for laser cutting. It's based on a concept borrow from physics (and math) called 'cylindrical symmetry', which is kind of what it sounds like. In a few moments you'll see what I mean.
By the end of this article you'll:
- know what cylindrical symmetry means.
- know how to apply this concept to design your own files.
- get some free files (for a few vases I made and a table lamp).
I hope you enjoy reading, and if you have any questions, I'll be happy to answer all of them at the comment section below.
If you prefer a narrated version of this article, the video I made about it is probably for you :)
Supplies
You'll need to know the basics of a CAD software.
Autodesk's Fusion 360 is free for makers, and it's perfect for the job. As I was working on a low performance budget laptop, I had trouble working with Fusion, so I've been using a software called Onshape. It runs on a cloud server through your browser, so I could work on these designs with my cheap computer. But if you can run Fusion 360, definitely go for that because it's optimized for makers and has a ton of support.
In any case, you can follow my instructions using any CAD software you like. The functions we'll be using are simple and even have the same name in most software.
Introduction to Cylindrical Symmetry


Cylindrical symmetry is a term we use in physics to describe anything that looks the same when rotated around a major axis. A cylinder or a symmetric vase would be good examples. So, a small disc for example, and rotate it around an axis somewhere outside it's perimeter, you'll end up with a torus (a doughnut!).
We can use this concept to design 3D objects easily. We start by drawing a small section of our design, and then rotate it around the axis of symmetry. A 3D object made by rotating a 2D section around a major axis is called a surface of revolution (see second image)
Design a Section


I'll be showing you how to design a vase, because that's a simple example. Applying this method to other designs is straightforward, and I'll mention applications later (with free files too).
First, we will draw a section of our design.
- Create a new sketch.
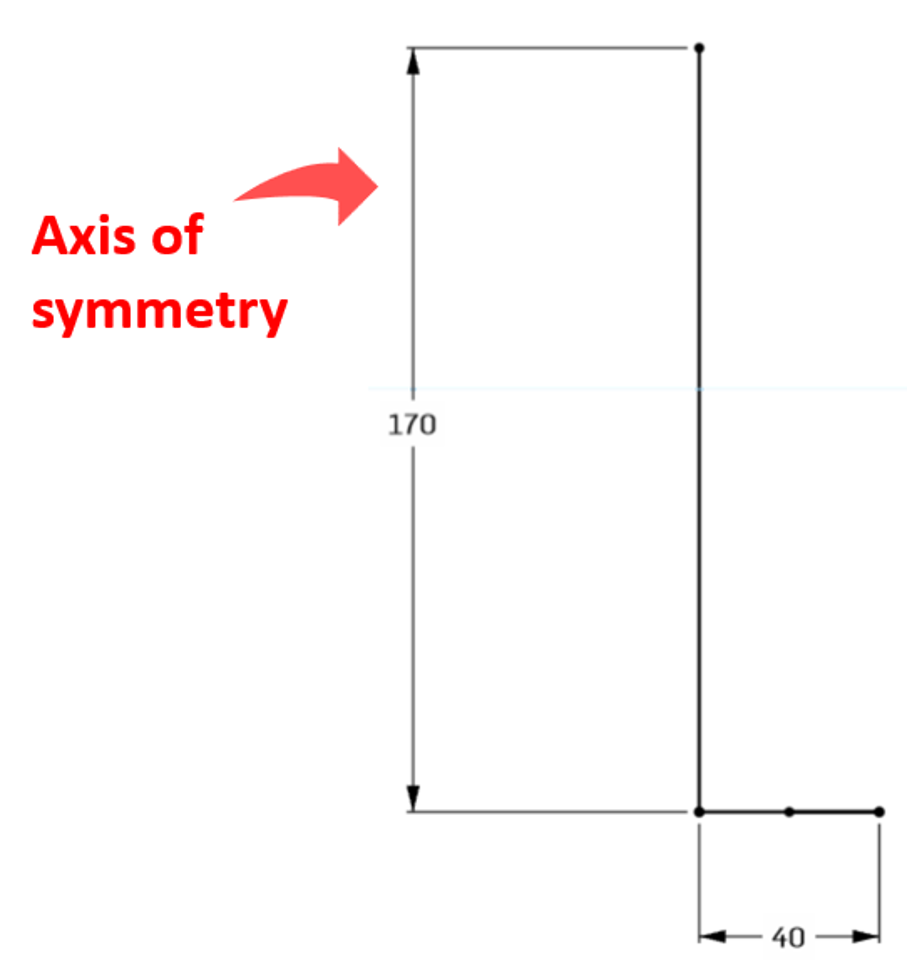
- Mark the height of the vase by drawing a vertical line, and the radius of the vase by drawing a horizontal line. The vertical line will also serve as the axis of symmetry (see first image).
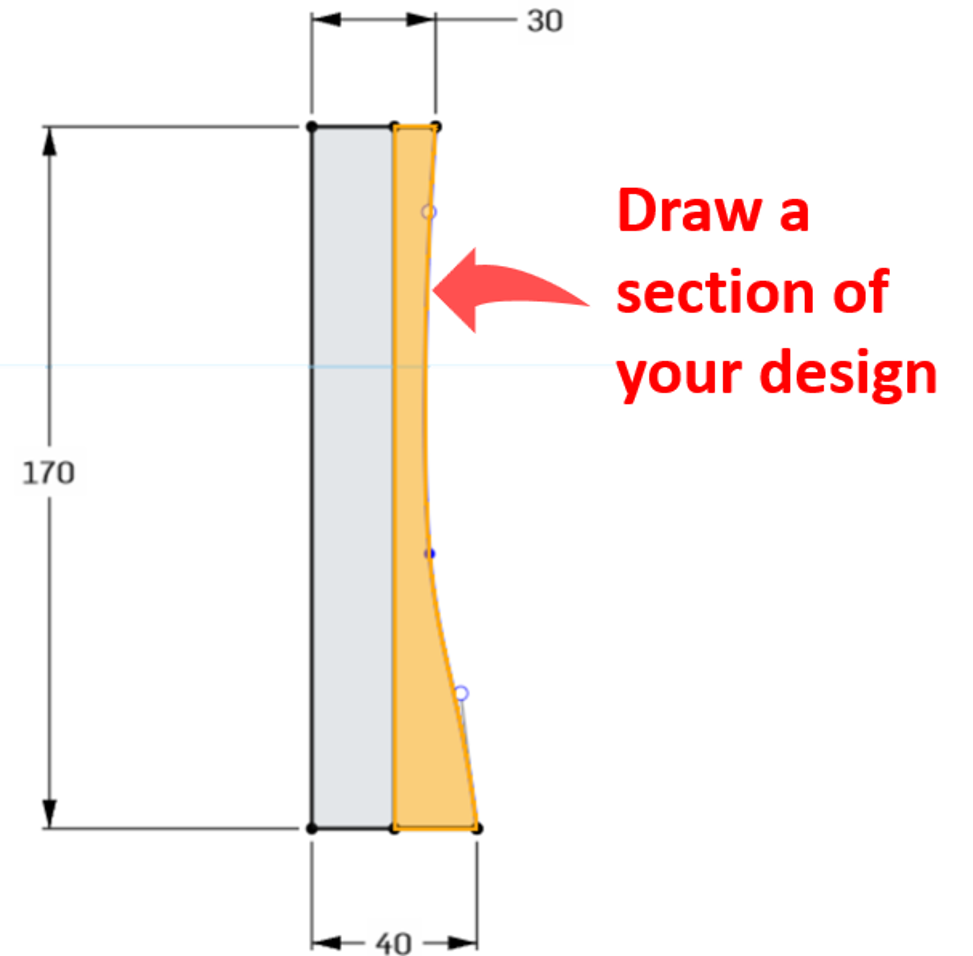
- Draw a section of the vase somewhat off-center. It could be anything you like, and you can always revisit this step later on to modify it. Vases usually have wider bottoms, and you can use a straight line or a curved one (a spline) to connect the top and bottom (see second image).
Extrude

Select the section you've created, and use the extrude to give it a thickness. This thickness should match the width of your wood. You can make sure the extrusion is symmetric (going both ways out of the sketch), but that's not really essential.
*Image of calipers measuring thickness of wood
*Screenshot of extrude
Rotate!


It's time for some magic.
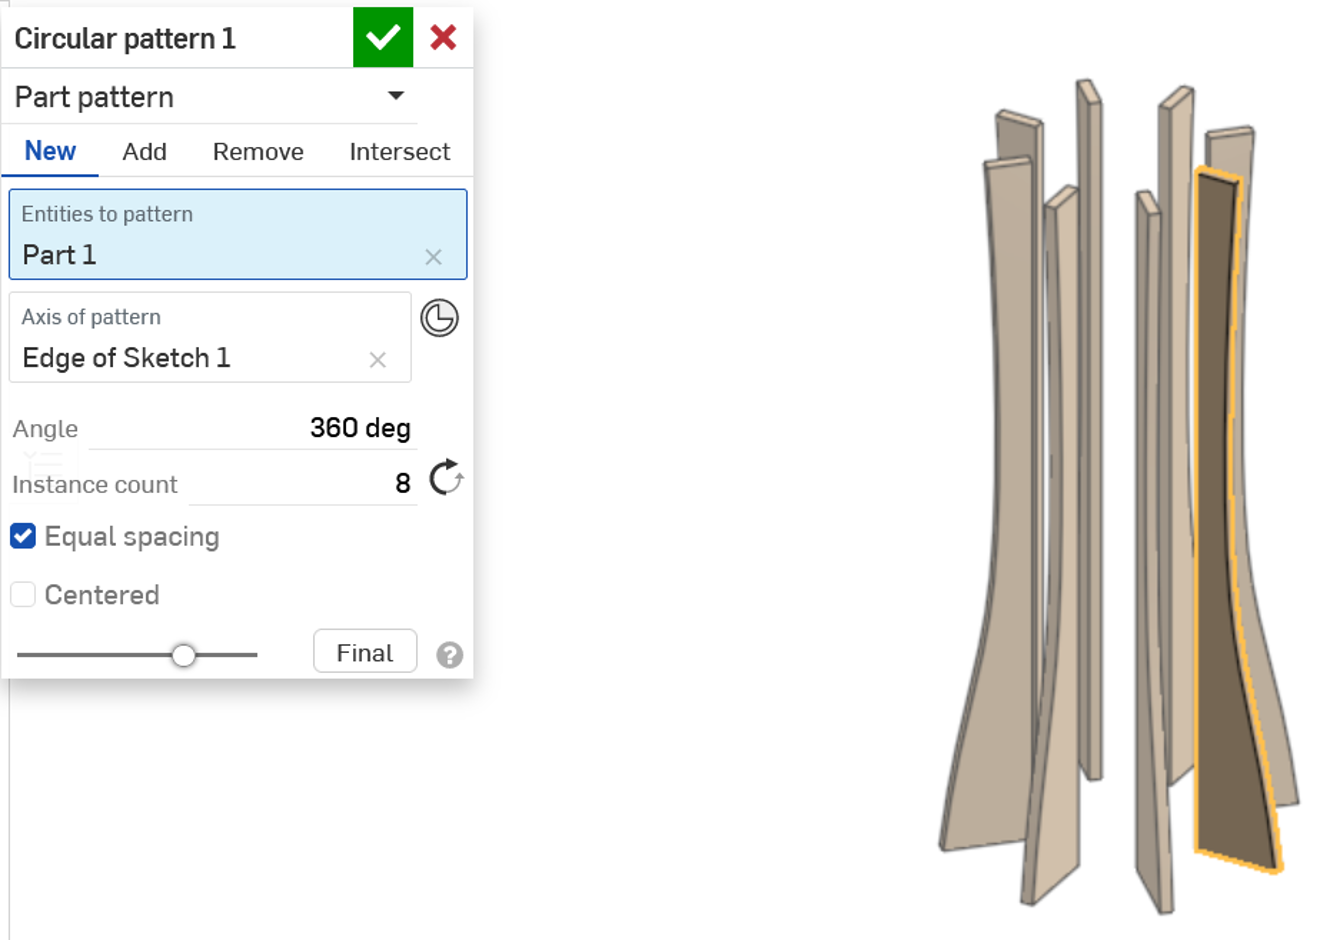
- Select the part you've made, and pick the 'circular pattern' function.
- For the axis of symmetry, select the vertical line you drew in step 2 (the one setting the height of your design).
- Pick the number of copies (instances) you want for your design. Modify this number until you're happy with how thinks look. For my design, 14 copies seemed to look just right.
Tip: at this point, you should have a sense of what the final vase will look like. If you're unhappy with it's shape, go back to the initial sketch, modify it, and everything will update automatically. Once you're pleased with the design, go ahead and move on to the final step of the design process!
These designs do not really have cylindrical symmetry! They obey what is called "discrete rotational symmetry", because our design is symmetric with respect to discrete rotations rather than continuous ones!
Create a Skeleton


At this point we have a bunch of individual parts (14 in my case), but we still need to connect them. For that, we'll make a skeleton to hold everything together. Lucky for us, that's easy too!
- Hide all the extruded parts (for clarity), and show only the initial sketch with the section of the vase drawn on it.
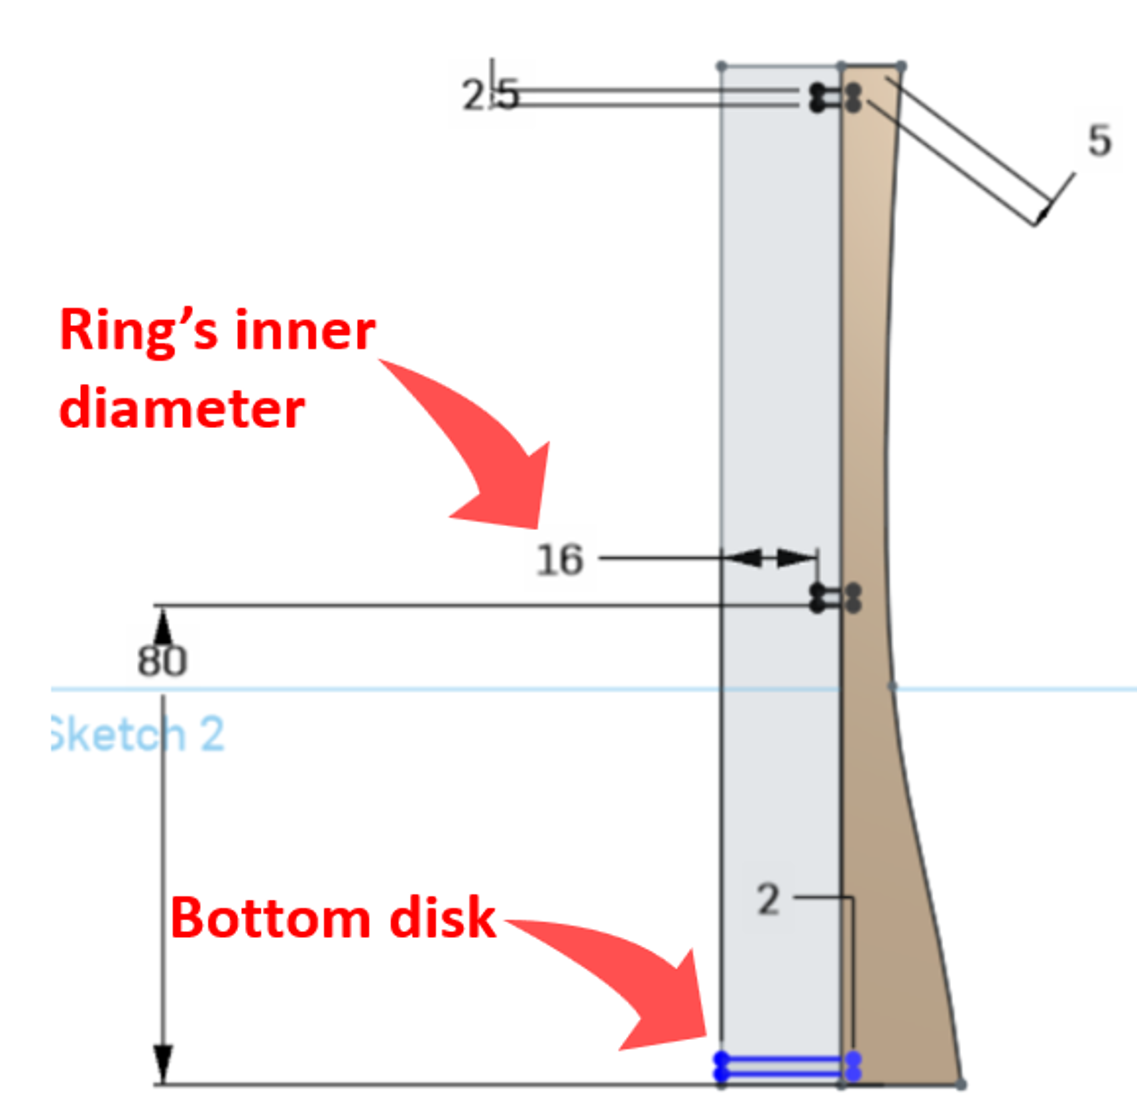
- Draw 3 rectangles. The bottom one will form the floor of our vase, so make sure one of it's edges align with the axis of symmetry. This way, it'll form a filled disk when we rotate it.
- The rectangles should slightly penetrate the section of the vase. We'll be using this to make joints later. For this design, I found that 2mm was perfectly fine.
- Make sure the height of these rectangles match the thickness of your wood.
- The upper 2 rectangles must hold all the outer faces (the sections we made earlier), but also allow flowers into the vase. So these should form rings rather than disks. Set the distance between the edge of the rectangle to the axis of symmetry to set the inner radius of these rings.
- Use the 'revolve' function to rotate these rectangles around the axis of symmetry.
The second image shows the desired result.
Add Joints


Okay, so we have the outer faces and the skeleton (the 2 rings and a disk we made in step 5). It's time to make joints. We need to remove the intersection between the skeleton and the outer faces off of all of them.
- Duplicate the skeleton (2 rings & disk, see first GIF).
- Using the Boolean function, subtract the 14 outer faces from the skeleton. Make sure you keep tools, so you don't delete the outer faces (see second GIF).
Now you should have grooves in the skeleton. Repeat the same steps to create grooves in the outer faces:
- Using the Boolean function, subtract the copies we made for the skeleton (the ones without grooves in them) from the outer faces (see third GIF).
- This time, we don't need to keep tools (we have no use for the extra copies of the skeleton).
And that's how we make joints :)
Export and & Cut


That's it! We're done with the design: we have the outer faces and a skeleton to hold everything together, and all the parts have grooves in them for jointing. Export your design as a DXF or SVG files for laser cutting. To do that, select a surface you want to export, right click, and press 'Export as DXF'. In different software you may need to do something else, but in any case, it'll be similar: pick a surface and export it.
Once you exported one copy of each part, import them into LightBurn (or whatever software you use for your laser), make copies of all the parts you need to cut, and set the kerf offset (if you don't know what that is, google it ASAP! it's important :).
Go ahead and cut everything.
Assemble


Assembly is straightforward in all of these designs. Attach the outer faces to the skeleton one by one, adding some glue if necessary. I found that this part is really fun and simple, so if you're planning on giving these as a gift or if you're selling your products, you can give these disassembled too.
I also added a quick GIF of the assembly of a table lamp - notice how the assembly step is similar :)
Some Results (& Free Files)


I made a bunch of vases of different sizes and shapes this way (files below!). I also made some lamp shades and a table lamp (here's an instructable about the table lamp - files included there to avoid duplicates).
I hope you enjoyed reading and that some of this article inspired you to make something of your own!
If you like my instructable and want to see more, you're welcome
to visit my instructables page, my website, or the collection of my laser-cut projects
And if you want to support my work (for free), visit my YouTube channel, see if you like what I've done so far, and consider subscribing! See you soon :)