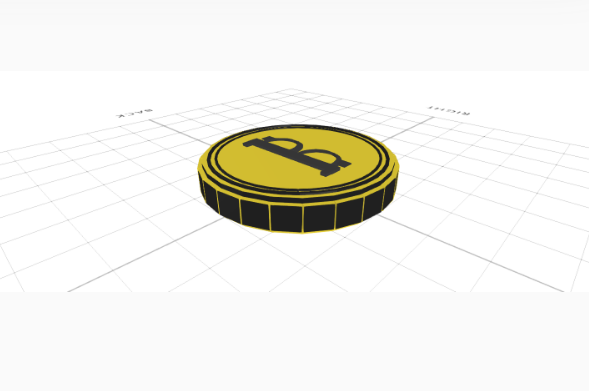
How to Design the Bitcoin Using 3D CAD Software
by Julie80 in Design > Digital Graphics
103 Views, 0 Favorites, 0 Comments
How to Design the Bitcoin Using 3D CAD Software

Learn How to Design the Bitcoin Using 3D CAD Software with the help of this article
How to Design the Bitcoin Using 3D CAD Software
The Bitcoin logo has become an iconic symbol of innovation, representing the rise of decentralized finance and the digital economy. Its sleek design—a bold "B" with vertical strokes within a coin-like shape—captures the essence of modernity and simplicity. Recreating this symbol in a 3D format offers an exciting opportunity to merge artistic creativity with technical skills.
In this article, we will guide you through the process of designing the Bitcoin logo using SelfCAD, a powerful and user-friendly 3D modeling software. By exploring key features such as shape creation, extrusion, and detailed finishing techniques, we will demonstrate how to transform this digital emblem into a visually striking 3D model. Whether you're a cryptocurrency enthusiast, a designer looking for a creative challenge, or a newcomer to 3D designing, this step-by-step tutorial will help you master the art of designing the Bitcoin logo with precision and flair
To access the interactive tutorial to this article, check out https://www.selfcad.com/tutorials/3so6n451f33q6a593y932g3e604240lf1c50
Once you’ve launched the editor;
From the 3D Shapes category on the toolbar choose cylinder; set top radius to 100, bottom radius to 100, height to 25
Click to finalize cylinder
From the modify category on the toolbar choose extrusion.
Click to finalize extrusion
Click highlighted part on selection cube to turn off region selection
From the 3D Shapes category on the toolbar choose cube, set width to 11, height to 4, depth to 60, position x to -11, position y to 34, position z to 38
Click to finalize cube
From the 3D Shapes category on the toolbar choose torus; set ring radius to 23, tube radius to 4, tubular segments to 3, arc to 200, position x to 6, position y to 31, position z to 35, rotation y to 99, rotation z to 1
Click to finalize torus
From the 3D Shapes category on the toolbar choose cube, set width to 10, height to 3, depth to 13, position x to 6, position y to 33, position z to 61
Click to finalize cube
From the 3D Shapes category on the toolbar choose cube, set width to 11, height to 5, depth to 7, position x to -18, position y to 33, position z to 64
Click to finalize cube
Click on mesh 12, mesh 8, mesh 16 to select
From the utilities category on the toolbar choose mirror; set create copy to true, set direction to back,
Click to finalize mirror
Click on mesh 12(1), mesh 8(1), mesh 16(1), mesh 20(1) to select it
Click stitch & scoop on the toolbar; from the tool panel choose union.
Click to finalize union
Click color picker button to change color of object; click black.
Click ok
Click scale on the toolbar, set x to 52.8.
Click ‘x’ to close transformation panel
Click on mesh 4 to select it. Click on union 1 to deselect
Click color picker button to change color of object; click yellow
Click ok
Click to activate polygon selection; click on highlighted region to select it
Click color picker button to change color of object; click black
Click ok, click on highlighted region to deselect it
Click highlighted part on selection cube to turn off region selection
From the 3D Shapes category on the toolbar choose torus; set ring radius to 93, tube radius to 2, radial segments to 37, position y to 33,
Click to finalize torus
From the 3D Shapes category on the toolbar choose torus; set ring radius to 86, tube radius to 2, radial segments to 42, position y to 32,
Click to finalize torus
Click on mesh 24 to select it
Click color picker button to change color of object; click black
Click ok
Click on union 1 to select it. Click on mesh 28, mesh 24 to deselect
Click move on the toolbar, set z to 0.
Click ‘x’ to close transformation panel
As you continue honing your design skills, remember that SelfCAD offers a wealth of resources to support your learning journey. To deepen your understanding and explore more advanced features, consider checking out the interactive tutorials (https://www.selfcad.com/tutorials) available on the SelfCAD website. The tutorials page provides a treasure trove of guides, tips, and tricks that cater to designers of all levels.
More structured learning experience can also be accessed at the SelfCAD Academy (https://www.selfcad.com/academy/curriculum/), https://www.youtube.com/@3dmodeling101, and 3D Modeling 101 series (https://www.youtube.com/playlist?list=PL74nFNT8yS9DcE1UlUUdiR1wFGv9DDfTB). This comprehensive resource offers in-depth courses taught by industry experts, allowing you to master the intricacies of SelfCAD at your own pace