How to Make a Custom Car Mouse!
by Printerforge in Workshop > 3D Printing
657 Views, 2 Favorites, 0 Comments
How to Make a Custom Car Mouse!


This is a very cool mouse that you can make and customize the shell. Make it a Corvette, Bugatti, or a Porsche 911. You can make whatever shell you want and have it interchangable. You may not be able to afford the real size dream car, but you can afford a mini one!
Hi, my name is Ben and I’m 14 years old currently enrolled in Parkway Christian School. I saw this as a cool challenge and read it as finding something big and making it small. I decided to make a cool and funny project and you’ll love it if you’re interested in cars! This is a very simple project. All you need is a mouse kit, Tinkercad (a free amazing app by Autodesk!), and a 3d printer.
This Instructable will take you through the assembly, how to customize your car using tinkercad, problems and how to fix them, and how to add lighting.
Table of Contents
- (Steps 1-3) Assembly.
- This will be how to assemble the mouse and change the car shell.
- It only takes 3 very simple steps to change the car shell.
- (Steps 4-9) Making your own car
- This is where you can make your own car with Tinkercad
- (Step 10) Problems
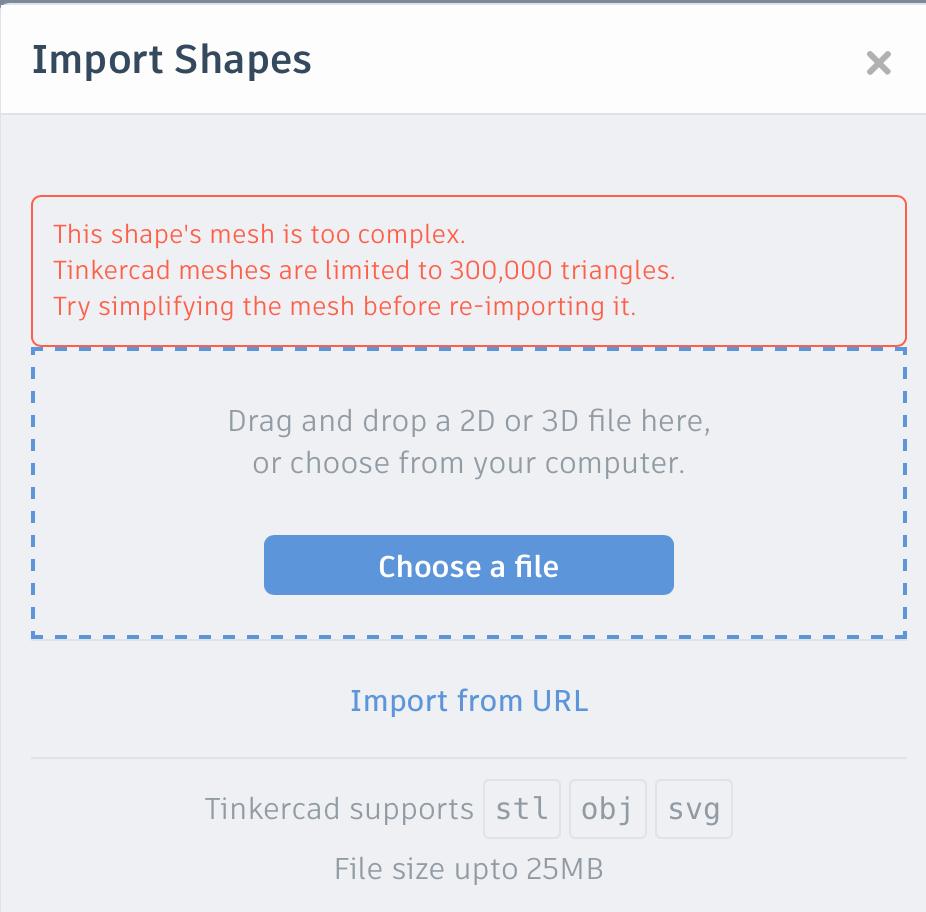
- There can be a few problems when making the car. Some include the car file being too large, corrupted, or too many triangles.
- (Steps 11-14) Lights (Optional)
- This is how you can wire lights to make your car even cooler!
- (step 15) Thank you note.
Supplies

Parts List:
Mouse kit - $12
Pla filament - $14
Total = $26
Optional Parts for Lighting:
5mm LEDs with resistors - $10 (I decided to solder my own. If you have a solder kit I recommend soldering the LEDs yourselves)
boost converter - $8
wire - $10
Total = $28
Tools Required:
Wire stripper (for LEDs only)
Electrical tape (for LEDs only)
3d Printer
NOTE: I also recommend a Wrist support to help with ergonomics for any mouse, not just this one!
Car Files
Get car shells here (There are too many files to post here, so they will be in this collection)
sadly I cannot provide the cut mouse file for free but you can get it for just $3 here.
Background-model Print


So why didn’t I use an Arduino?
At first I really wanted to make my own mouse with an Arduino, but I realized that you can't really buy a mouse sensor and that it wouldn’t be Bluetooth. (I really wanted the mouse to be Bluetooth.) I also noticed that the DIY mouses were a bit large and bulky. That’s when I noticed a kit that Bambu Labs made and I heard it was really good. (and cheap!!)
Slicing the Model
First you need to download the files. You can find my entire premade gallery of car shells in the supplies list. Sadly, to 3d print this you’ll need a bit of supports. This is due to the shape being curvy and irregular for a 3d printer to print. I also have custom slicer settings that should work.
Assemble Electronics

There's a pdf at the bottom with pictures or you can watch this video here by Bambu Labs.
Changing Car Shell

This is how to change each shell. It is very simple and only needs 3 steps!
- Unscrew the 2 screws with the Allen wrench in the kit.
- Slide out the model the correct way like the picture (back side out first)
- Slide the model front first in and screw the 2 screws in with the Allen wrench (redo everything in reverse for the other car)
Grabbing Your Files

Now that I showed you how to make my car shells, Lets make your DREAM car!
First you need a car file. You can go to some of these websites to find cars.
https://thangs.com/?sort=trending
Seach for your dream car and download the files.
Tinkercad

Next we need to import them into Tinkercad. Tinkercad is made by Autodesk (maker of Instructables) and is an amazing software because of how simple it is to use and that it's free! On browser you can use it here or download the app. First you need to sign in. You can use a personal account to sign/login.
I recommend visiting this website here: Tinkercad getting started
Tinkercad Instructions (summarizes 7-9)


Now that you have imported the models you probably need to wait a little while for it to import. I’ve always felt that I follow instructions better with videos and not by text. I like videos because they give more detail. That’s why I made a video to explain it better.
I also recommend that you watch a simple tutorial if this is your first time.
Once its imported, watch the detailed video at the top.
Main points:
- DO NOT CHANGE THE HOLLOW MOUSE SIZE
- You can change the size of the car model, but you can’t change the hollow mouse size or else the mouse won't fit.
- Don’t try and edit the model when it's in red
- When the model becomes highlighted in red that means it is processing. Wait for it to finish or else your file could become corrupted.
- Read all the instructions in the video
- I will leave comments on what to do and not to do. You can simply follow the instructions.
Importing Stls to Tinkercad


This is very simple. First you need to hit the import button (there are pictures on the top). You're going to want to import my hollow mouse and whatever car shell you want. If there are any problems move to step 10 where you can read about common problems and how to fix them. You will get some information about stl and its size. You don’t have to worry about that and just need to hit import. It's really that simple! (Like I said for more information visit this website here: Tinkercad getting started)
Finishing Touches


Now you can grab some of the shapes if you want and add or remove things.
Some common things to modify:
- Lights
- Get the cylinder and add a hole in the lights to be able to add lights in your assembly.
- Remove the side mirrors
- Get the cylinder and place it onto the car. It will try to create a plane and it should remove it without removing much detail. Side mirrors can be hard to print and uncomfortable for your fingers.
- Side button
- You can use the cube and make a cut to add a side button
- Others
- Feel free to do whatever you want. That's the fun of making it yourself! Remember, this is YOUR Dream Car!!
Exporting It

Exporting is much simpler than importing the model. Simply select what you want to export by selecting the model you want. (If you're exporting more models, then you can see the photo or double tap to get window select which will select everything in the model) Now you just need to hit stl and name it whatever you want. (Like I said, for more information visit this website here: Tinkercad)
Problems


Sadly, there can be problems with customizing your car to print. Most of them are the file's fault and not Tinkercad’s fault. Lucky there are many ways to fix this!
The main 3 problems are:
- Too many triangles
- File too large
- Mesh imported is corrupted / damaged
I recommend you do this whether you need to or not.
- You're going to first want to import your model here: mesh fixer
- This will fix/repair your mesh if there are any problems
If you're getting a problem with the file being too large or that there’s too many triangles, you can go to this website to fix it: file reducer.
Please let me know if you experience any other problems. These were all the problems I had when making my cars, but please let me know if you have different ones, so I can get those fixed!
Lights


As I was making this project, I realized it would look so cool to have lights on the car. But it wasn't as simple as I had hoped.
I realized that the mouse doesn’t run 3v anywhere, so I needed to either boost it or have an external battery. I first thought to use a NPN transistor, but it was more complicated than using a boost converter because you would need a coin cell battery holder and a few resistors. I decided to settle on a 1.5v-5v dc boost module. Lucky this still won't require soldering! (Although it's recommended if you can) Now you can see how I wire it up.
LED Info

!PLEASE READ!
- Make sure the battery is out so you don’t short circuit
- LED's longer leg is positive and the negative is shorter
- Make sure you strip enough wire (if you're soldering you don't need it this long) (view image 5 on step 13 on a good size)
- Make sure that you measure twice and cut once
- Give your wire a little more length than needed (you can always cut later)
- Make sure to cover all the exposed wire
- Red tends to mean positive polarity (+)
- Black tends to mean negative polarity (-)
- you will do a lot of twisting to the wire, although if you twist the metal too much then you may break it.
here's a great instructable that thought me on how to wire LEDs
Remember positive goes to positive and negative to negative. If they touch you will short circuit.
Lights Wiring

First we need to plan what we're going to wire. To do that I decided to use Tinkercad’s circuit projects. You can see the photo at the top.
Wiring Instructions:
- Unplug and pull out the battery connectors.
- Strip the wires. (See where I strip in the middle)
- Get an LED and a resistor and wire them up together (twist each wire up carefully)
- After wiring the resistor, we need to wire the other side of the resistor and the LED
- Now you will need to repeat the process 3 more times (another red - 2 white)
- Follow 6-7 on how to wire it. Fit the stripped wire into the correct hole and wire it by twisting the wire a lot.
- Follow the circuit pinout and wire the battery as input (vi) and wire the LEDs to the output (vo). Then the ground (GND) of the battery to the booster and then to the LEDs
LED Finishing Touches

Next in 8 and 9 we tape it. Triple check that everything has been covered besides the battery holders.
!WARNING!
On picture 9 you can see that there’s a little gap between the positive and negative and it isn’t protected. Make sure to cover it fully.
Thanks

I would love if you shared and say you made this model! Show me all the DREAM CARS you make and if you did design it yourself, I would love to see it!
I want to give a huge thanks to Autodesk for creating an amazing software - Tinkercad. I also want to thank all the people who made the cars as they probably put many hours in for the design. I hope that this design inspires you to at least try Tinkercad or make your own car mouse.
Like always I love when you guys ask for improvements, questions, or other ideas for the future!