How to Program ATtiny2313
by AJ_Smoothie in Circuits > Microcontrollers
85111 Views, 100 Favorites, 0 Comments
How to Program ATtiny2313

Howdy folks!
When I first got my ATtiny2313 it took me the better part of 4 hours to finally get it programmed. I went through countless tutorials online that were old and outdated. I was never able to get the correct files from one website. I had to combine the files from several websites before I was finally able to program my ATtiny.
NOTE: With the recent update of the Arduino IDE I can't figure out how to get the boards to show up in the list. I'm sure it's easy and I'll figure it out in a bit. For now you are still going to have to use the old version of arduino for programming any ATtiny chips.
The goal of my (Current and Updated!!!) series is to find tutorials online that are old, outdated, or nonworking and make a new tutorial that I have tested and used myself.
My first i'ble in this series is how to use IR remotes to control your Arduino.
I will keep updating my i'bles in this series to work with new Arduino boards, IDEs and the like.
Now I've never tested this process on a windows but I know that it works on a mac. It should be the same for windows, just delete any mac content in the zip.
Download the Files

First you need to download the boards information for the Arduino IDE. This file will need to be downloaded in order to program a ATtiny2313. http://www.mediafire.com/download/ju012s124w4gbl2/tiny.zip
Once you have downloaded that you will need to extract the 'tiny' folder to your Arduino hardware folder. Now if you don't know where that is or if you don't have it here are the steps.
- Go to your Arduino documents. This is where all the sketches are saved (by default).
- For mac users it's Macintosh HD>Users>username>documents>Arduino.
- Create a new folder and name it "hardware", just like that. Into this folder you will put the 'tiny' folder that you downloaded.
- For PC users Program Files(x86)=>Arduino=>hardware. Copy the 'tiny' folder into it and restart the Arduino IDE.Delete the extra mac content.
Upload the ArduinoISP


- Connect your Arduino to your computer.
- Open up the ArduinoISP sketch which is with the other example sketches.
- Upload it.
Connecting the ATtiny2313 to the Arduino
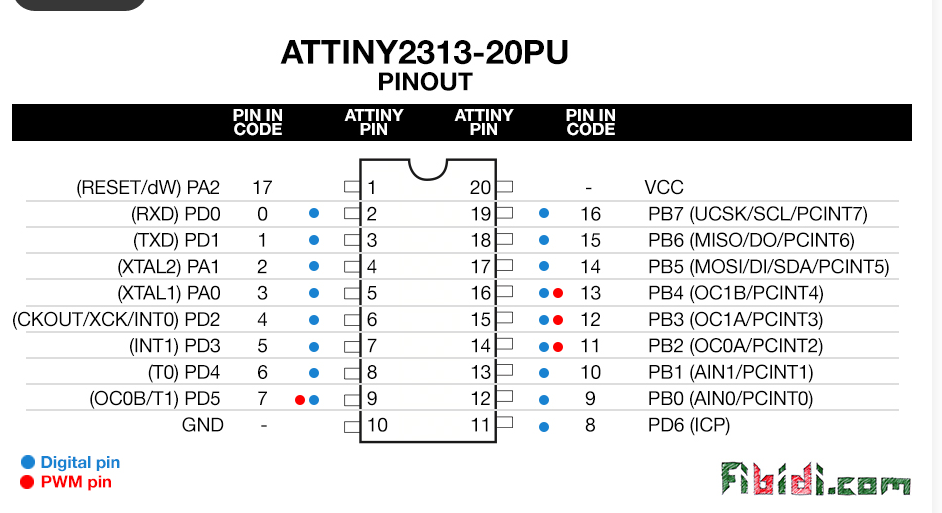

Arduino--------Attiny2313
| |
13------------>19
12------------>18
11------------>17
10------------>1
5v------------>20 VCC
GND-------->10 GND
Also add an LED with a resistor on the pin (#7) right next to the GND on the ATtiny2313
Uploading and Enjoying!


- First make sure that you have already uploaded the ArduinoISP to the Arduino.
- Select the (ATtiny2313@1MHz) board. When you go to boards you will notice that you will have a lot more options to use. This is because that 'tiny' folder that we put in the 'hardware' folder gave the Arduino program more board options.
- Under 'programmer' select 'Arduino as ISP'.
- Open the blink sketch and change the led pin 13 to pin 7.
- Click the upload button and pray!
After upload your LED should start blinking! Congrats! You now know how to program your ATtiny2313.
Troubleshooting:
- LED does not blink
Make sure that you have connected the LED to the proper pins.
Make sure that in the blink sketch you change the 13 to '7'.
Replace the LED and try with another one. - Unable to program
Make sure you have properly download, unzipped, and placed the 'tiny' folder.
Make sure your 'hardware' folder is in the correct place.
Make sure that you have selected 'Arduino as ISP' under 'programmer'.
Make sure that you have selected the correct board. The correct board is the 'ATtiny2313@1MGz.
Conclusion
Please give it a vote for the microcontroller contest!
and. . .
Don't forget to favorite and subscribe!