How to Serve Html Files From SD Card on ESP32
by iamrachelle in Circuits > Arduino
9110 Views, 12 Favorites, 0 Comments
How to Serve Html Files From SD Card on ESP32
In this tutorial, we will setup the ESP32 as a server which can be accessed by going to its IP address.
SOFTWARE:
Supplies
Ready Your HTML File

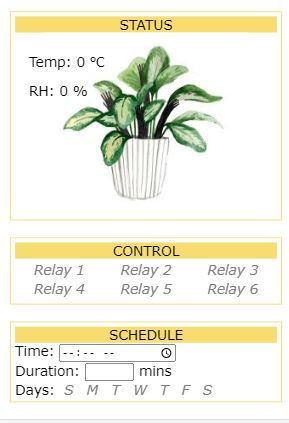
Ready your HTML file on any text editor you use. I use VSCODE and here's the html I used. The image tag <img> source (src) should be "/" + path . For example, to show the image named "plants.jpg", the image tag is as follows:<img class="picture" style="max-width:100%;" src="/plants.jpg">. Change all source tags to be similar to your path.
<!DOCTYPE html>
<head>
<meta charset="utf-8">
<meta http-equiv="X-UA-Compatible" content="IE=edge">
<title>Greenhouse</title>
<meta name="description" content="Greenhouse">
<meta name="viewport" content="width=device-width, initial-scale=1.0">
<style>
.center {
margin: auto;
text-align: center;
}
.left {
float: left;
}
.right {
float: right;
}
.card {
border-style: solid;
border-width: 1px;
border-color: #F7DC6F;
padding: 5px;
margin: 20px;
}
.container {
position: relative;
}
.top-left {
position: absolute;
top: 8px;
left: 16px;
text-align: left;
}
.hide {
position: absolute;
opacity: 0;
}
input[type=checkbox]+label {
color: rgb(129, 129, 129);
font-style: italic;
padding: 5px;
}
input[type=checkbox]:checked+label {
color: #000000;
font-style: normal;
padding: 5px;
}
</style>
</head>
<body class="center" onload="onload()" style="font-family: Verdana, Geneva, Tahoma, sans-serif;">
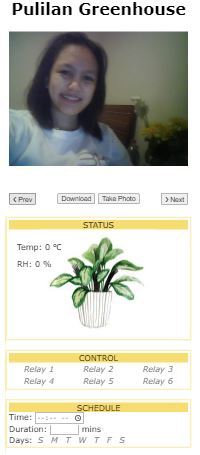
<h1 class="center">Pulilan Greenhouse</h1>
<div class=card style="border-color: #ffffff;">
<img class="picture" id="slideshow" src="/picture/1.jpg" style="max-width:100%;">
<p> </p>
<button class="left" id="prev">❮ Prev</button>
<button class="right" id="next">❯ Next</button>
<button href="/picture/1.jpg" download id="download">Download</button>
<button id="take_photo">Take Photo</button>
</div>
<div class=card>
<div style="background-color:#F7DC6F;">
STATUS
</div>
<div class="container">
<img class="picture" style="max-width:100%;" src="/plants.jpg">
<div class="top-left">
<p id="temp"> Temp: 0 ℃ </p>
<p id="RH"> RH: 0 % </p>
</div>
</div>
</div>
<div class=card>
<div style="background-color:#F7DC6F;">
CONTROL
</div>
<table style="width: 100%;">
<tbody>
<tr>
<td>
<input class="hide" type="checkbox" onchange="relay(this.id)" id="1">
<label for="1">Relay 1</label>
</td>
<td>
<input class="hide" type="checkbox" onchange="relay(this.id)" id="2">
<label for="2">Relay 2</label>
</td>
<td>
<input class="hide" type="checkbox" onchange="relay(this.id)" id="3">
<label for="3">Relay 3</label>
</td>
</tr>
<tr>
<td>
<input class="hide" type="checkbox" onchange="relay(this.id)" id="4">
<label for="4">Relay 4</label>
</td>
<td>
<input class="hide" type="checkbox" onchange="relay(this.id)" id="5">
<label for="5">Relay 5</label>
</td>
<td>
<input class="hide" type="checkbox" onchange="relay(this.id)" id="6">
<label for="6">Relay 6</label>
</td>
</tr>
</tbody>
</table>
</div>
<div class=card>
<div style="background-color:#F7DC6F;text-align: center;">
SCHEDULE
</div>
<div class="container" style="text-align: left;">
Time: <input type="time"><br>
Duration: <input type="number" style=" width:50px;"> mins <br>
Days: <span class="days">
<input class="hide" onchange="day_selection(this.id)" id="sun" name="sun" type="checkbox" value="0">
<label for="sun">S</label>
<input class="hide" onchange="day_selection(this.id)" id="mon" type="checkbox" value="0">
<label for="mon">M</label>
<input class="hide" onchange="day_selection(this.id)" id="tue" type="checkbox" value="0">
<label for="tue">T</label>
<input class="hide" onchange="day_selection(this.id)" id="wed" type="checkbox" value="0">
<label for="wed">W</label>
<input class="hide" onchange="day_selection(this.id)" id="thur" type="checkbox" value="0">
<label for="thur">T</label>
<input class="hide" onchange="day_selection(this.id)" id="fri" type="checkbox" value="0">
<label for="fri">F</label>
<input class="hide" onchange="day_selection(this.id)" id="sat" type="checkbox" value="0">
<label for="sat">S</label>
</span>
</div>
</div>
<script>
function onload() {
console.log("loaded");}
var picture = 1;
var next = document.getElementById("next");
next.addEventListener("click", function () {
picture += 1;
console.log("picture", picture);
document.getElementById("slideshow").src = "/picture/" + picture + ".jpg";
});
var download = document.getElementById("download");
download.addEventListener("click", function () {
console.log("downlaod", document.getElementById("slideshow").src);
window.open(document.getElementById("slideshow").src)
});
var prev = document.getElementById("prev");
prev.addEventListener("click", function () {
picture -= 1;
console.log("picture", picture);
document.getElementById("slideshow").src = "/picture/" + picture + ".jpg";;
});
var take_photo = document.getElementById("take_photo");
take_photo.addEventListener("click",function(){
});
function relay(id) {
console.log(id, document.getElementById(id).checked);
}
function day_selection(id) {
console.log("id", id, document.getElementById(id).value);
}
</script>
</body>
</html>
Prepare Your SD Card


- Format your sd card as shown in the picture
- Place Your index.html file and pictures. Ensure the picture filenames are the same that is included in your html file.
ESP32 Web Server Code


This Code serves HTML File from the SD Card built in with the ESP32 Dev Module I'm using. Upload it on your ESP32 and go to the ip address displayed on your serial monitor. While uploading press the flash button continuously and reset button once while connecting until it starts writing (uploading).
//Load necessaries libraries from https://github.com/espressif/arduino-esp32/blob/master/libraries/WiFi/src/WiFi.h
#include <WiFi.h>             // Add Wifi Capabilities
#include <WebServer.h>        //To make a simple webserver that accomodates only one simultaneous client

#include "FS.h"              //To access the file system
#include "SD_MMC.h"          //To access the SD Card

//replace with your network credentials
#ifndef STASSID
#define STASSID "replace_with_your_ssid"<br>#define STAPSK  "replace_with_your_ssid_pass"<br>
#endif

const char* ssid = STASSID;
const char* password = STAPSK;


WebServer server(80); //Set the server at port 80


void setup() {
  Serial.begin(115200); //Set the baud rate for serial communication with ESP


  /////////////////sdcard
  if (!SD_MMC.begin()) { //initialize SD Card
    Serial.println("SD Card Mount Failed");
    return;
  }
  uint8_t cardType = SD_MMC.cardType();  //get sd card type
  if (cardType == CARD_NONE) { //check if the sd card presence
    Serial.println("No SD Card attached");
    return;
  }

  ////////////////Wifi
  WiFi.mode(WIFI_STA); //Connect it to a wifi Network
  WiFi.begin(ssid, password); //with the ssid and password defined earlier
  Serial.println("");

  while (WiFi.status() != WL_CONNECTED) {// Wait for connection
    delay(500);
    Serial.print(".");
  }
  Serial.println("");
  Serial.print("Connected to ");
  Serial.println(ssid);
  Serial.print("IP address: ");
  Serial.println(WiFi.localIP()); //prints the local ip given to the esp by the router

  ////////////////Server
  server.onNotFound(handleRoot); //Calls the function handleRoot regardless of the server uri ex.(192.168.100.110/edit server uri is "/edit")
  server.begin();//starts the server
  Serial.println("HTTP server started");
}


void handleRoot() {

  /* SD_MMC pertains to the sd card "memory". It is save as a
    variable at the same address given to fs in the fs library
    with "FS" class to enable the file system wrapper to make
    changes on the sd cards memory */
  fs::FS &fs = SD_MMC;
  String path = server.uri(); //saves the to a string server uri ex.(192.168.100.110/edit server uri is "/edit")
  Serial.print("path ");  Serial.println(path);

  //To send the index.html when the serves uri is "/"
  if (path.endsWith("/")) {
    path += "index.html";
  }

  //gets the extension name and its corresponding content type
  String contentType = getContentType(path);
  Serial.print("contentType ");
  Serial.println(contentType);
  File file = fs.open(path, "r"); //Open the File with file name = to path with intention to read it. For other modes see <a href="https://arduino-esp8266.readthedocs.io/en/latest/filesystem.html" style="font-size: 13.5px;"> https://arduino-esp8266.readthedocs.io/en/latest/...</a>
  size_t sent = server.streamFile(file, contentType); //sends the file to the server references from <a href="https://github.com/espressif/arduino-esp32/blob/master/libraries/WebServer/src/WebServer.h" style="font-size: 13.5px;"> https://arduino-esp8266.readthedocs.io/en/latest/...</a>
  file.close(); //Close the file
}


//This functions returns a String of content type
String getContentType(String filename) {
  if (server.hasArg("download")) { // check if the parameter "download" exists
    return "application/octet-stream";
  } else if (filename.endsWith(".htm")) { //check if the string filename ends with ".htm"
    return "text/html";
  } else if (filename.endsWith(".html")) {
    return "text/html";
  } else if (filename.endsWith(".css")) {
    return "text/css";
  } else if (filename.endsWith(".js")) {
    return "application/javascript";
  } else if (filename.endsWith(".png")) {
    return "image/png";
  } else if (filename.endsWith(".gif")) {
    return "image/gif";
  } else if (filename.endsWith(".jpg")) {
    return "image/jpeg";
  } else if (filename.endsWith(".ico")) {
    return "image/x-icon";
  } else if (filename.endsWith(".xml")) {
    return "text/xml";
  } else if (filename.endsWith(".pdf")) {
    return "application/x-pdf";
  } else if (filename.endsWith(".zip")) {
    return "application/x-zip";
  } else if (filename.endsWith(".gz")) {
    return "application/x-gzip";
  }
  return "text/plain";
}

void loop() {
  /*Waits For connection on the server and is responsible for
    sending and receivingdata request on server uri from the client*/
  server.handleClient();
}
Next Steps

In this tutorial, I’ve shown you how to build a web server with the ESP32. In combination with the websockest library for arduino, I've used this to take make a Dashboard that shows ESP32 CAM pictures and sensors data fro my greenhouse. Hope it worked fro you! Feel free to ask for questions! Good luck makers! :)