Fun Arduino Project - How to Monitor a Night Eater and Try to Stop Him?
by idobosmi in Circuits > Arduino
386 Views, 0 Favorites, 0 Comments
Fun Arduino Project - How to Monitor a Night Eater and Try to Stop Him?


Greetings everyone!
We are Ido and Roee, students of computer science and entrepreneurship at Reichman University in Israel. This year, we had the opportunity to participate in an IoT course led by a robotics expert. Through this course, we gained valuable knowledge about controllers, Arduino, and how to integrate the internet with physical objects (Internet of Things).
Our final project for the course was to create something that was intentionally not useful but could showcase our creativity. We hope that we have succeeded in doing so! In this project, we will demonstrate a step-by-step process in which a diligent night watchman endeavors to prevent a persistent nibbler from engaging in destructive behavior.
In this guide, we will provide detailed instructions that will enable you to replicate our work or create your own version. We recommend that you start by watching our video, which demonstrates the real-world implementation of our code, to gain a better understanding of the context and the story behind our creation.
We hope you enjoy reading and learning from our guide as much as we enjoyed creating it!
Supplies
You will need the following materials:
- 3 Circuit Playground Express boards
- 3 ESP8266
- Laptop
- TV
- HDMI cable
- 5 crocodile clips
- Cartoon Box
- Foil
- 5 coins
- Duct tape
- Pencil
- Scissors
- Markers
Understanding the Structure

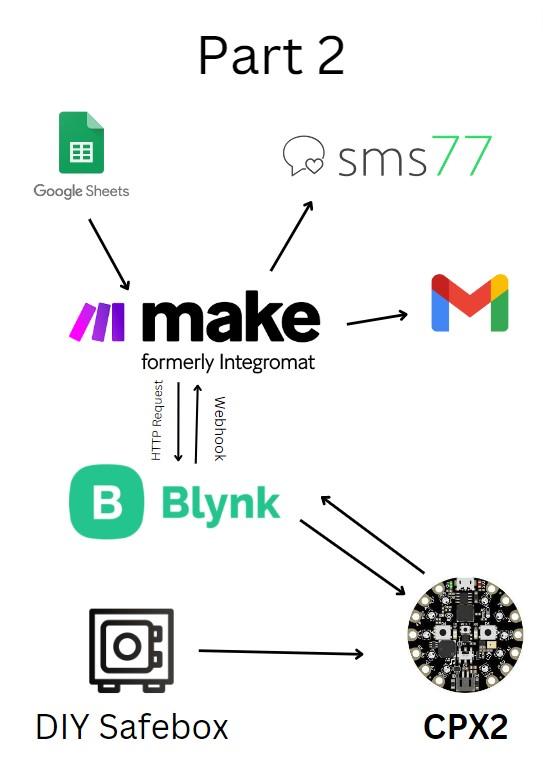
Our system consists of physical and digital components, which can be divided into two main parts.
The First Part:
The first part is responsible for the process that happens until the moment the night eater leaves to the kitchen.
This part includes 5 components:
- CPX1
- CPX2
- Blynk device.
- a TV
- a laptop
How it works:
CPX1 is located on the bedroom door, while CPX2 is located on the guard's desk. Both CPX1 and CPX2 are connected to the same Blynk device using the same token.
When CPX1 detects a light in the room, it sends an update to CPX2 via Blynk. CPX2 then starts listening. When CPX2 detects a loud sound, it informs CPX1, which turns on the TV in the eater's room using IR and waits for the eater to open the door. Once the night eater opens the door, CPX1 sends an update to CPX2, which alerts the guard with led lights.
The Second Part:
The second part is responsible for the process from the moment the guard changes the password in the Google Sheet file.
This part includes 7 components:
- CPX3
- DIY Safebox
- Blynk device 2
- Google Sheets sheet
- SMS77 acount
- Gmail
- Integromat.
Once the guard changes the password in the Google Sheet file, a scenario in Integromat is triggerd. This scenario updates the value of the password on our Blynk device according to the code entered in Google Sheets (Using a HTTP request). CPX3 receives the new password from the Blynk device and updates the variable that stores the current password. When the eater arrives in the kitchen, he can try to open the Safebox, which is accompanied by lights when coins are pressed and an error message if a mistake is made. To receive the code, the eater must enter the Blynk device application and play the Simon game.
The Simon game works with CPX3 and plays relevant sounds according to the touches in the application. Once the eater finishes the third stage, CPX3 sends the value "1" to datastream V8 in Blynk that activates the hook defined in the Blink with the value action=1. The webhook activates a scenario in Integromat that performs an action depending on the Action value. In this case, the action is to send an email to the eater's email with the password to the box. Once the eater enters the correct password, CPX3 changes the value of the Datastream to 2. This activates the same webhook with Action=2, which sends an SMS to the guard's phone with a dismissal message.
Connecting the CPX's to the ESP8266
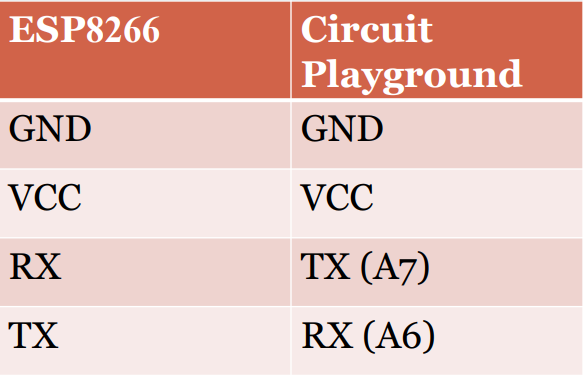
To make sure all of our CPX's can talk to each other, we need to connect them to the internet. We'll be using 3 ESP8266 components, one for each CPX, to get them online.
Here's what you need to do:
- Install the Arduino IDE and open it (Arduino IDE).
- Go to the "Tools" menu, select "Board", and then "Boards Manager".
- In the search bar, type "ESP8266" and select the board package by ESP8266 Community.
- Click "Install" and wait for the package to download and install (The ESP8266 board package for Arduino).
- Connect the CPX and ESP8266 boards together using jumper wires. Connect the following pins:
- CPX GND to ESP8266 GND
- CPX RX to ESP8266 TX (A7)
- CPX TX to ESP8266 RX (A6)
6. Connect the CPX to your computer with a micro USB cable.
7. Go to the "Tools" menu, select "Board", and choose "Adafruit Circuit Playground Express".
8. Go to the "Tools" menu again, select "Port", and choose the port corresponding to the CPX board.
9. Open a new sketch in the Arduino IDE and copy the attached code.
10. Verify and upload the sketch to the CPX by clicking on the "Verify" and "Upload" buttons.
11. Open the Serial Monitor in the Arduino IDE by clicking on the magnifying glass icon on the top right corner.
12. Set the baud rate of the Serial Monitor to 9600 baud.
13. Send some text to the CPX by typing it in the Serial Monitor and pressing "Send". You should see the same text appear in the Serial Monitor again, indicating that the ESP8266 received the data and forwarded it to the CPX.
14. Test the connection further by sending and receiving data between the CPX and ESP8266 using the Serial Monitor and your code.
That's it! With these steps, you should be able to connect an ESP8266 to a CPX using the Arduino IDE.
Downloads
Create a Blynk Account
Go to Blynk website and create an account
Setting Up Your TV

We would like the TV to show a message on the screen once it is turned on. Follow these steps:
- Grab your laptop and open a new Word document.
- Write the message you want to display on the TV, such as "It's not snack time! Go back to sleep".
- Connect your laptop to the TV using an HDMI cable.
- Turn on the TV and voila! Your message should now be displayed on the screen.
- Now turn your TV off. It is now ready to receive the command from CPX1.
Building the First Blynk Device - "connector Blynk"


- To begin, we will create a new template called "Connector Blynk".
- Next, we will navigate to the "Datastreams" window and create 6 new datastreams, the 6 datastreams that are shown in the picture (all of them are virtuals pins).
- Once the datastreams have been created, we will move to the "Automation" window inside the template to define the appropriate condition for each datastream based on the image.
- After setting the conditions, we will save the template and navigate to the "Automations" window located in the toolbar on the left side of the page.
- From there, we will create three new automations, each corresponding to its respective image.
- Moving on to the "Search" window, we will create a new device from the tempalte we have created and save.
- Go to "Device Info" and copy the BLYNK_TEMPLATE_ID, BLYNK_TEMPLATE_NAME, and BLYNK_AUTH_TOKEN, we will need this in the next steps.
CPX1
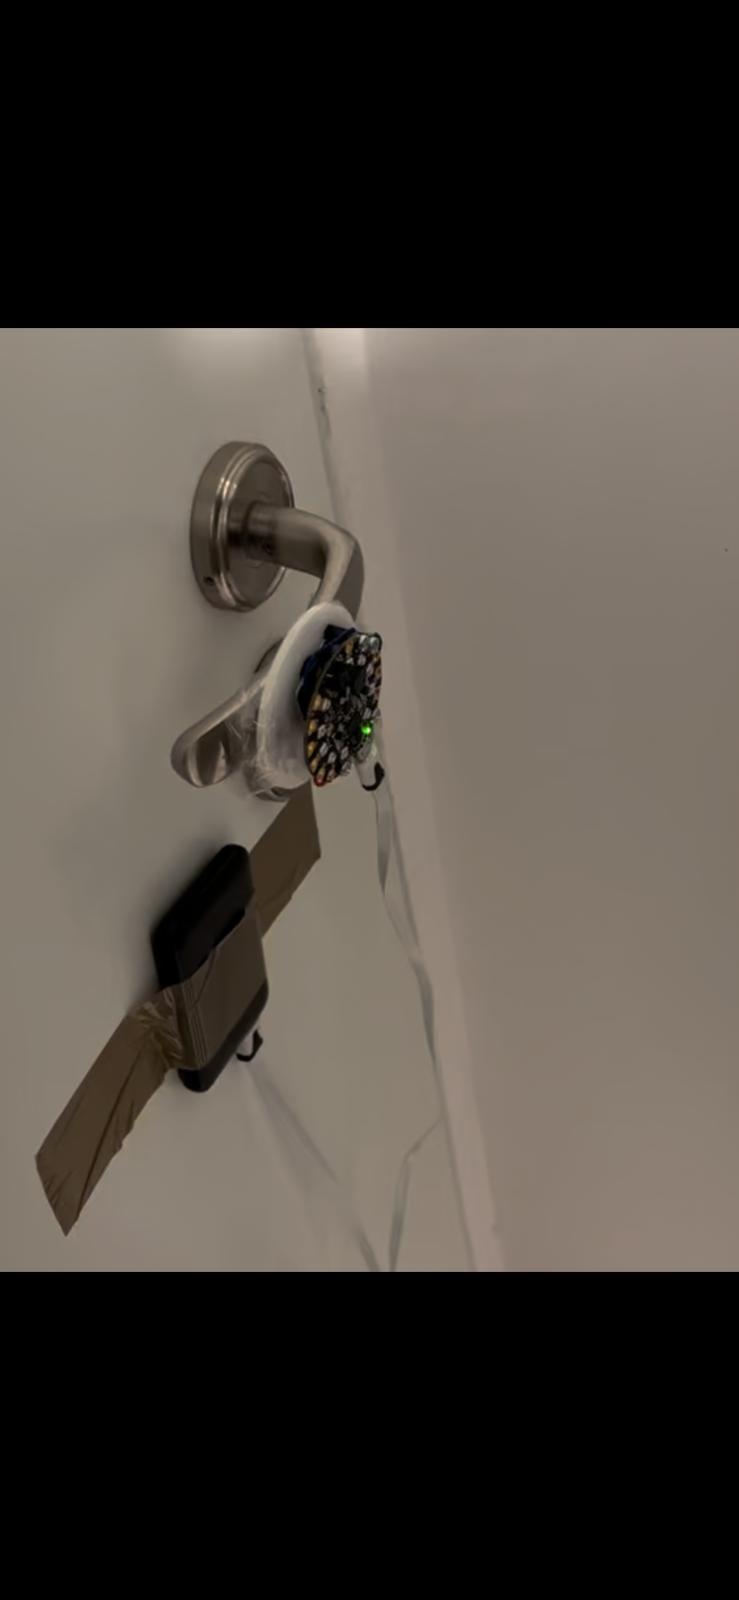
To get started, you'll need to upload this code to your 1st CPX device. Before you do that, let's make a few changes to the code first:
- Head over to your "Connector Blynk" device in Blynk and locate the "device info" section. Copy the BLYNK_TEMPLATE_ID, BLYNK_TEMPLATE_NAME, and BLYNK_AUTH_TOKEN and paste them into the appropriate spots in the code.
- If you're using a Samsung TV, you can skip this step. Otherwise, you'll need to change the MY_POWER code to match your TV. Here's a link that can help you find the right code.
- Lastly, don't forget to insert your Wifi network name and password in the relevant place.
Once you've made those changes, go ahead and upload the code to your CPX. Then, grab some batteries or a portable charger and use some duck tape to attach the CPX to your door handle (just like in the picture). And voila! You're all set.
Downloads
CPX2 Code
Great work so far! Now it's time to upload the code to your 2nd CPX device. But before we do that, let's make a few changes to the code:
- Head over to your "Connector Blynk" device in Blynk and find the "device info" section. You'll need to copy the BLYNK_TEMPLATE_ID, BLYNK_TEMPLATE_NAME, and BLYNK_AUTH_TOKEN and paste them in the correct spot in the code.
- Don't forget to insert your Wifi network name and password in the relevant place too!
Now that you've made those changes, go ahead and upload the code to your CPX. Once it's uploaded, you can either connect a portable charger or some batteries to the CPX, or connect it to a computer for power. Finally, place the CPX on the desk where the guard will be sitting during the night.
Great job! You're all set.
Downloads
Starting Part 2 - Building the Safe Box
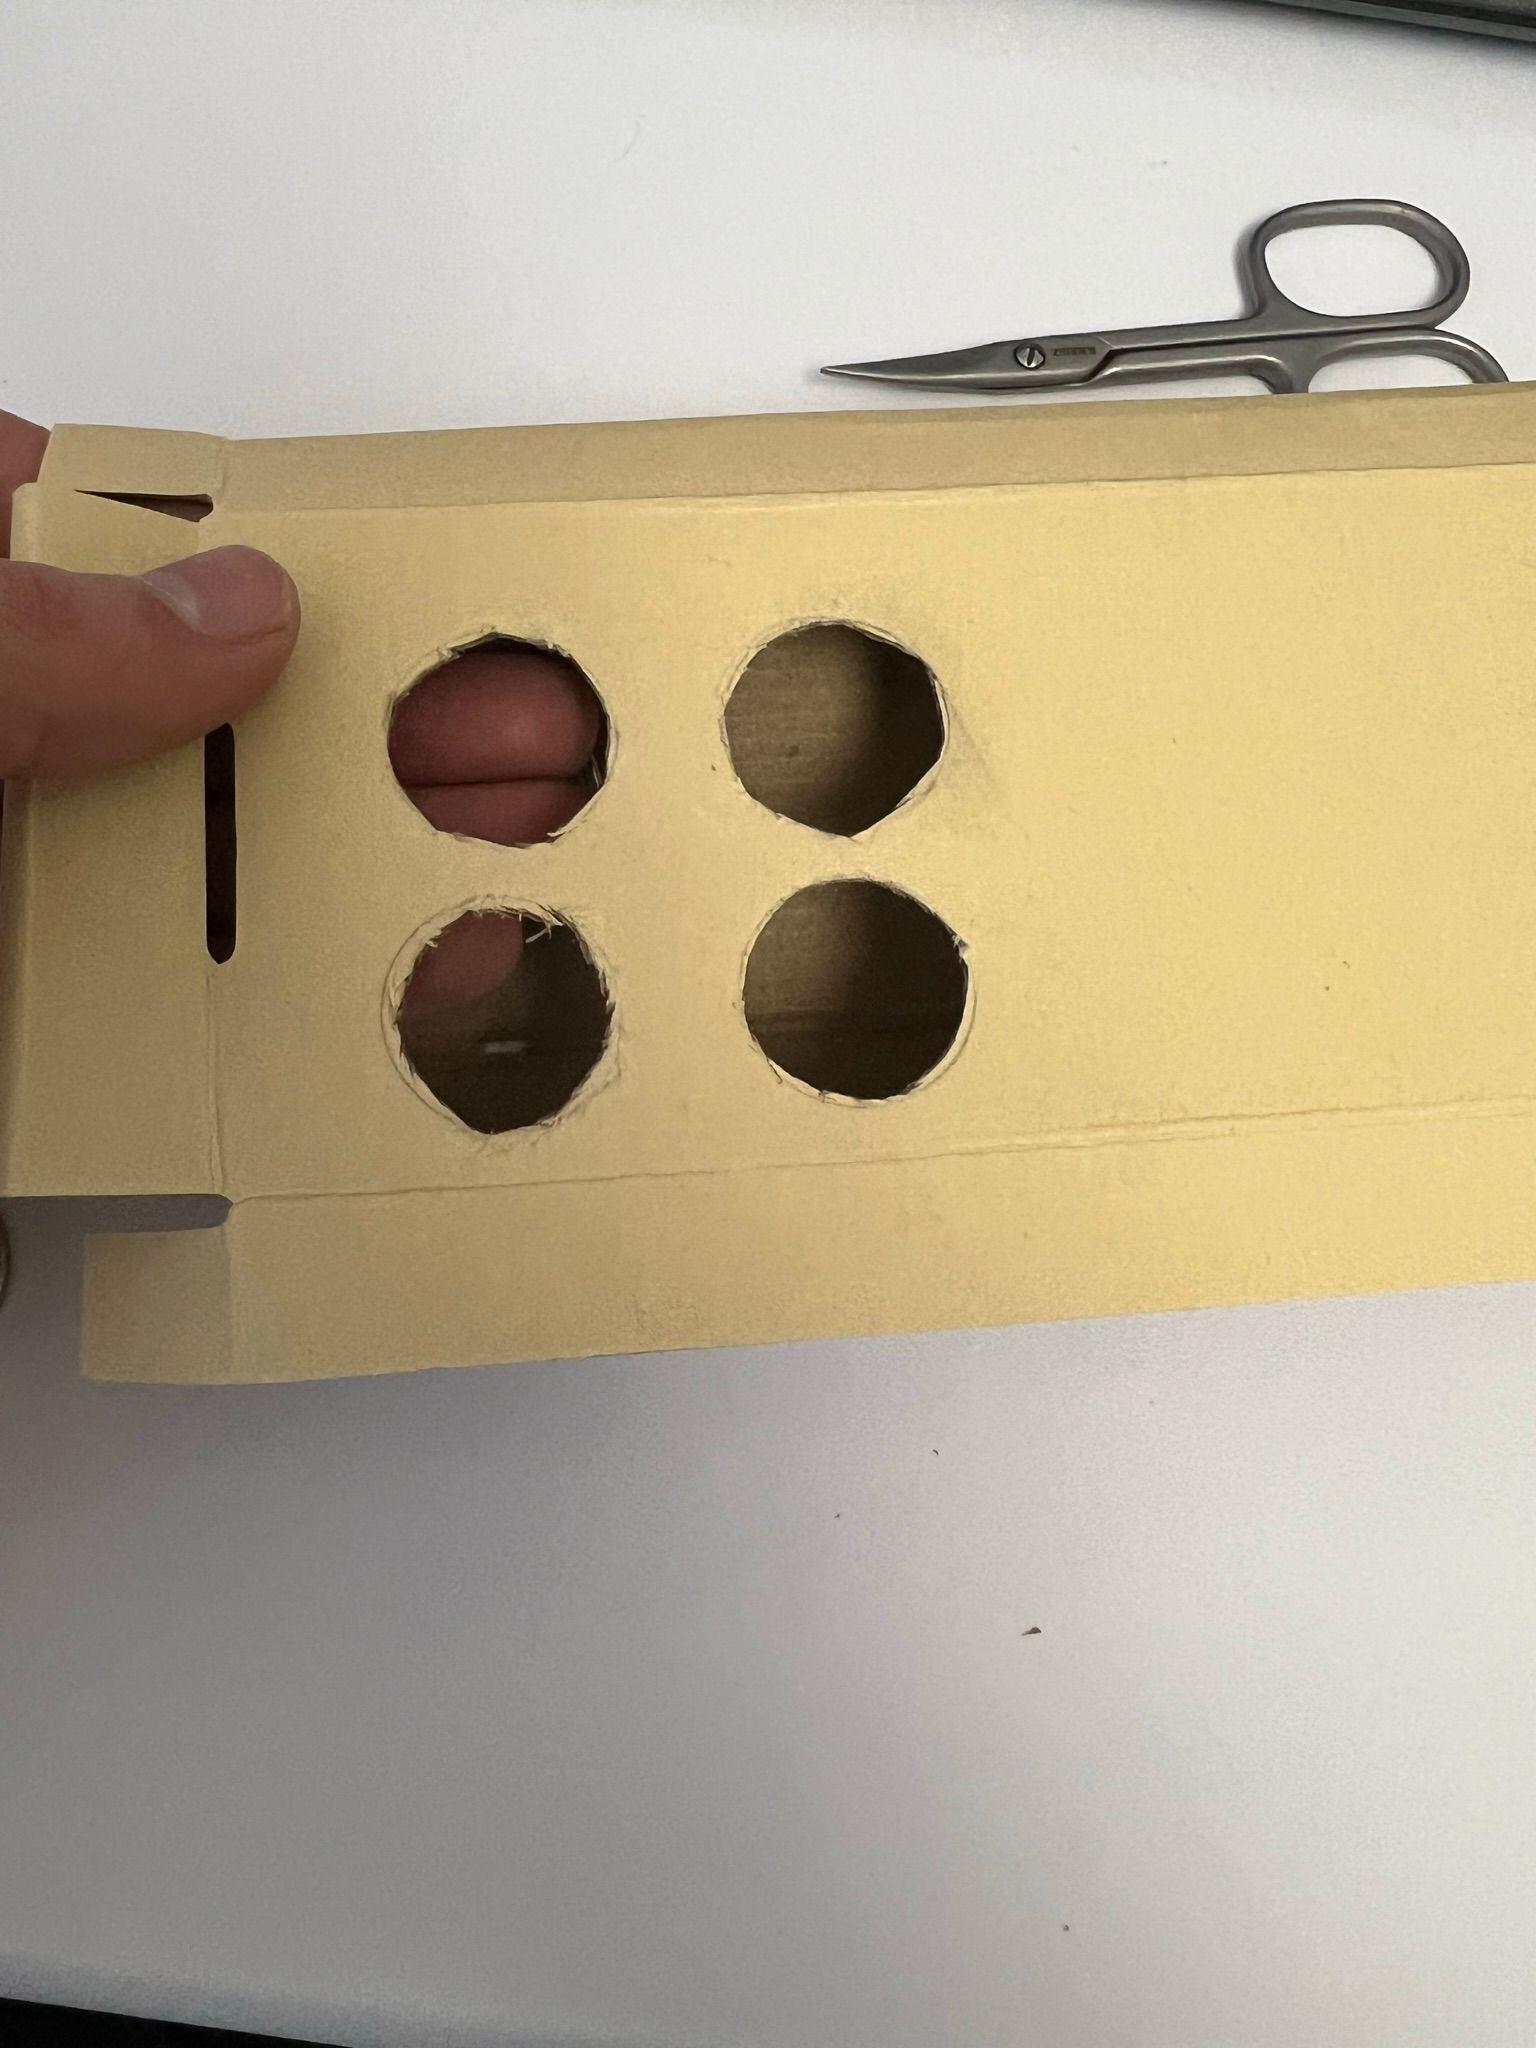


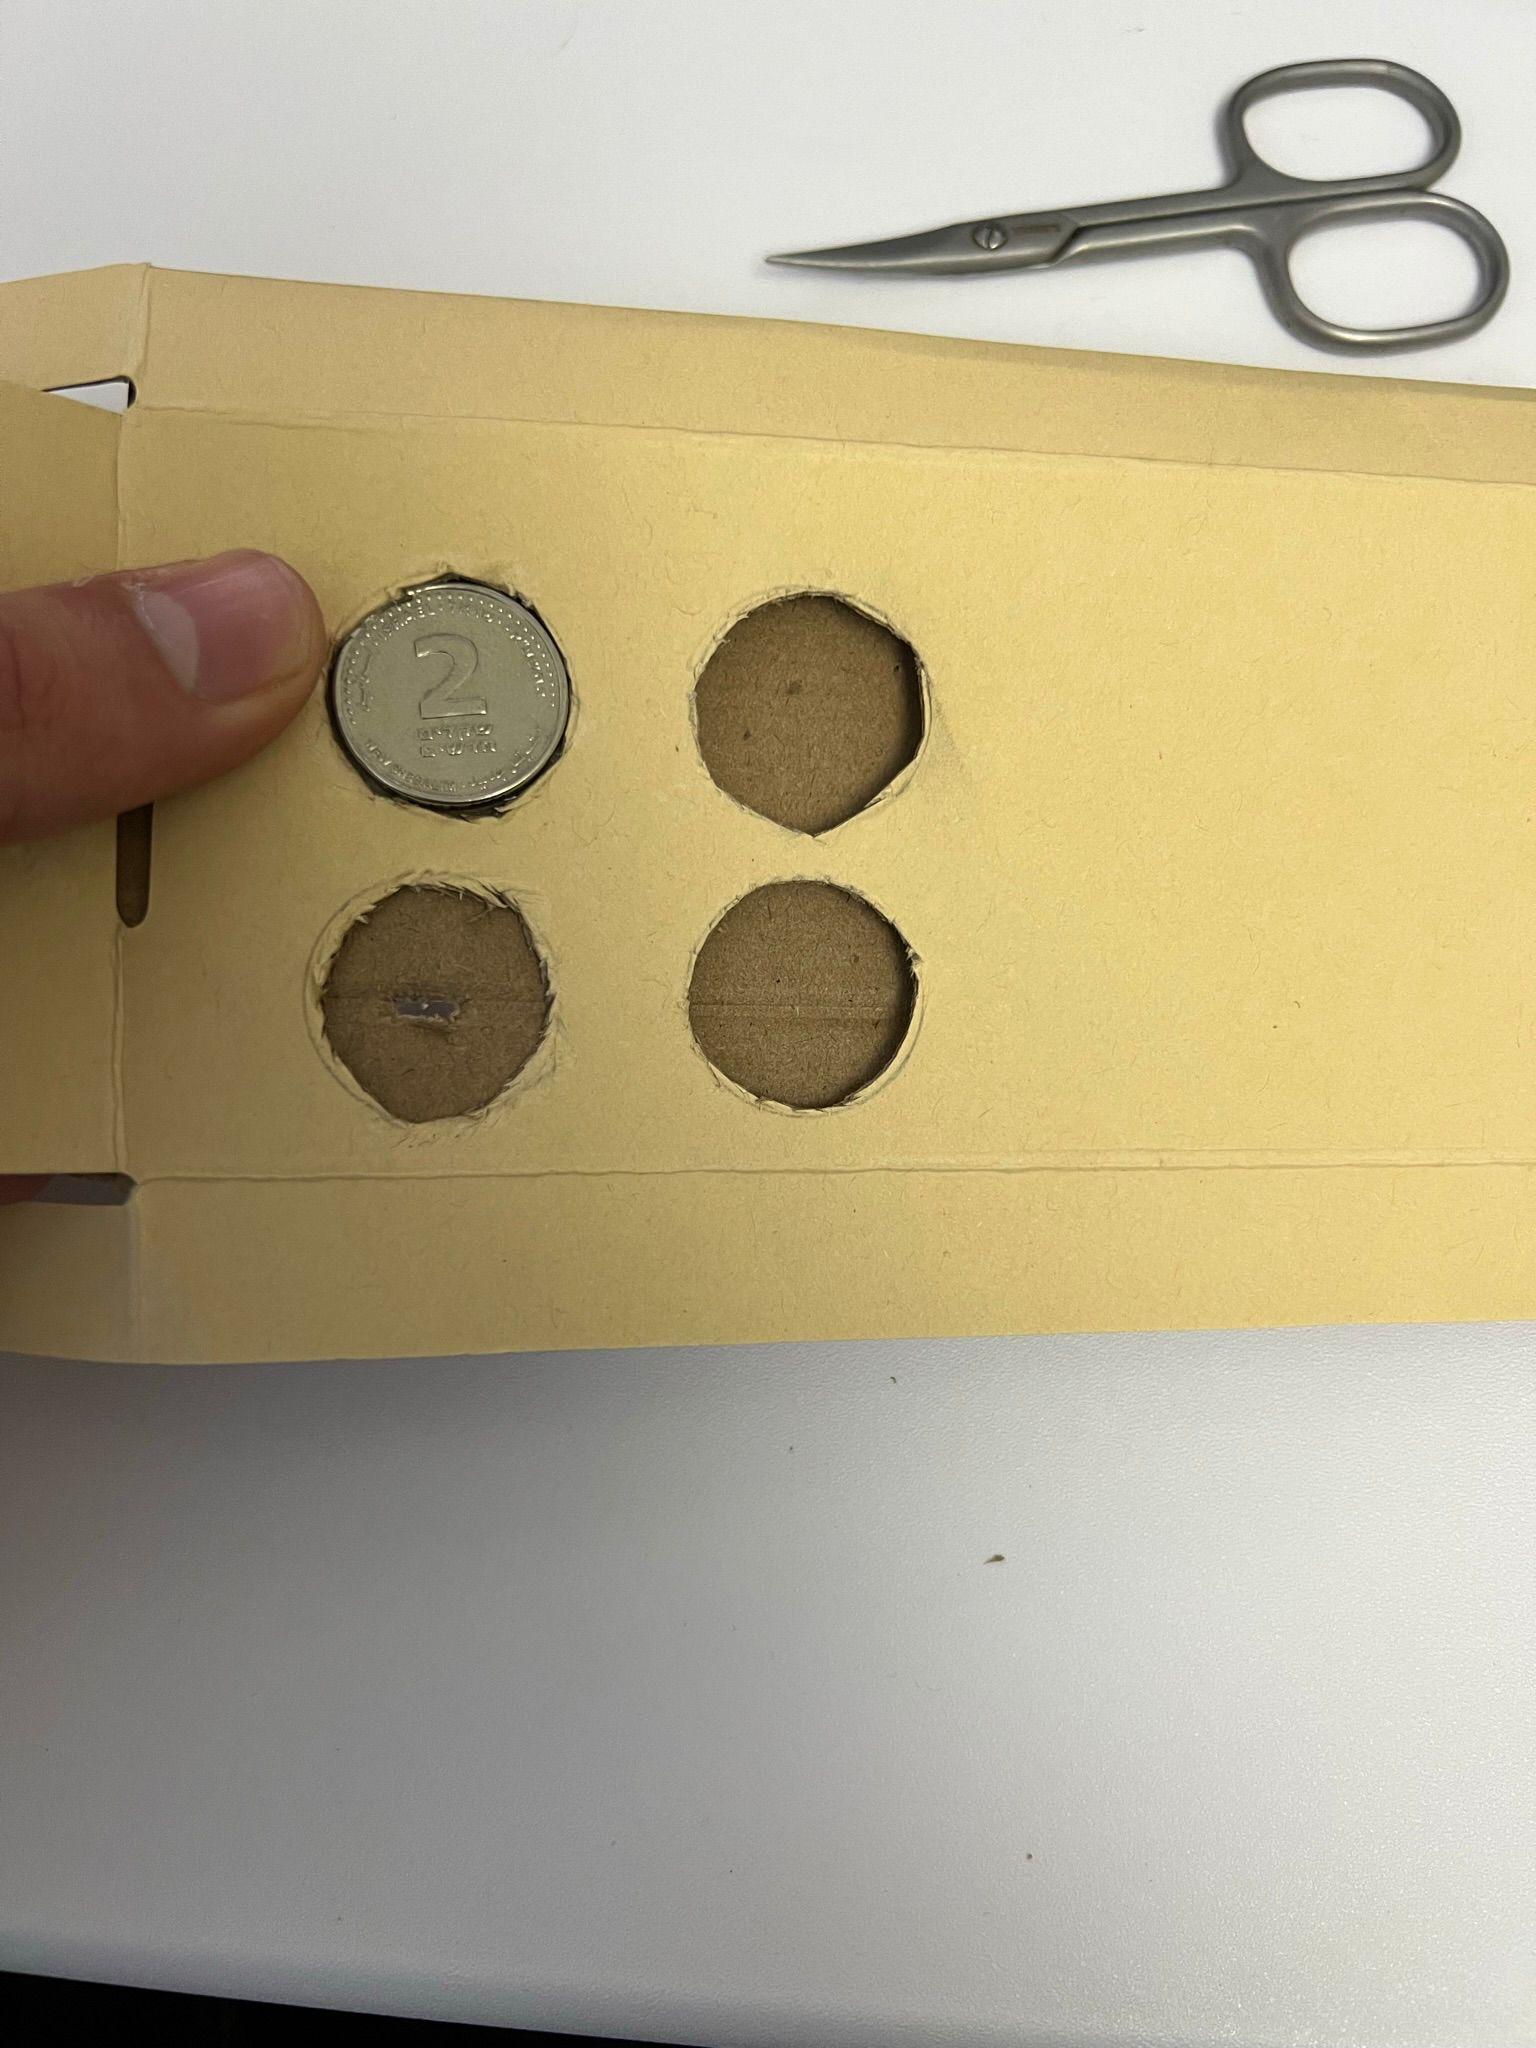


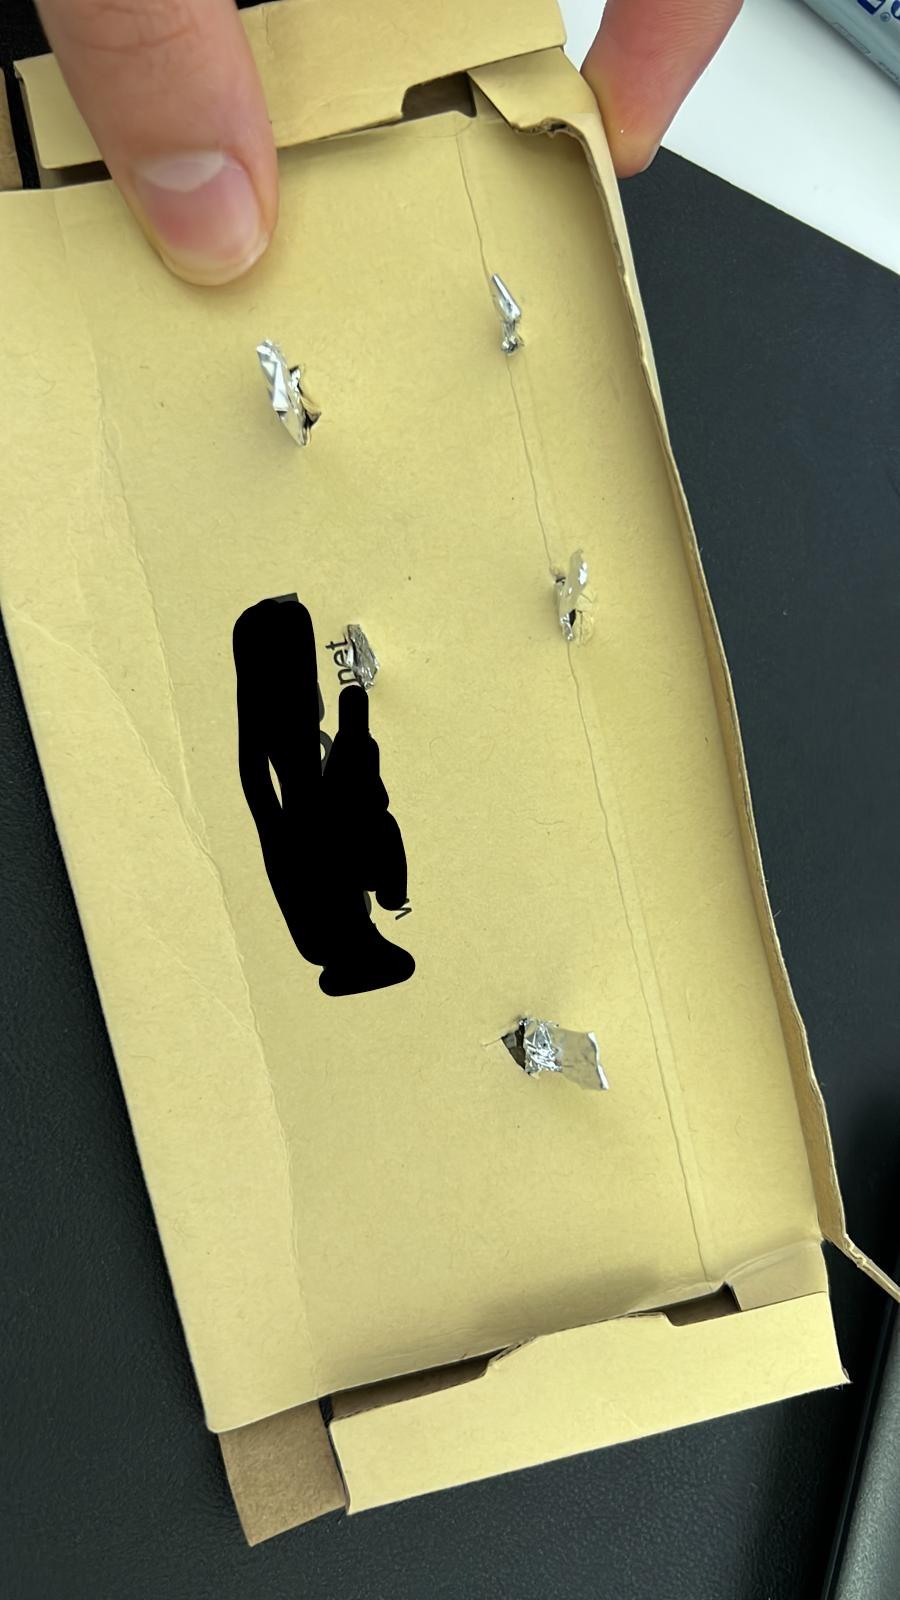
Before we get started, let's gather all the components we'll need: a box, 5 coins, foil, duct tape, scissors, markers, and a pencil.
Next, we'll need to determine where to place the "buttons" on the box. To do this, take your 5 coins and position them on the box. Use a pencil to mark the location of each coin.
Using scissors, carefully cut holes in the top of the box according to the marked circles. Remember to only cut the top part of the box, just like in the picture. On the opposite side of the box, cut a small hole as shown.
Now, cut 5 pieces of foil that are around 3 centimeters long and 5-6 centimeters wide. Fold each piece until it's 3 centimeters long and 1 centimeters wide (This will make them thicker and easier to attach to the coins.). Then, attach each piece of foil to a coin using duct tape.
Place each coin into the corresponding hole on the box and pass the pieces of foil through the small hole you cut earlier.
Next, use a marker to draw a number next to each coin to signify the value it represents. Choose one coin to serve as the SUBMIT button.
Finally, attach a crocodile clip to each piece of foil, which will later be connected to CPX3.
Keep in mind that by using 5 coins, you can create a password consisting of 4 predetermined numbers (one of which must be the submit button). If you want to increase the number of possible characters in the password, you can add additional coins. You can even use characters other than numbers, like letters or other keyboard inputs. However, if you do this, you'll need to make a few changes to your CPX3 code (we'll cover that later).
Creating SMS77 Account

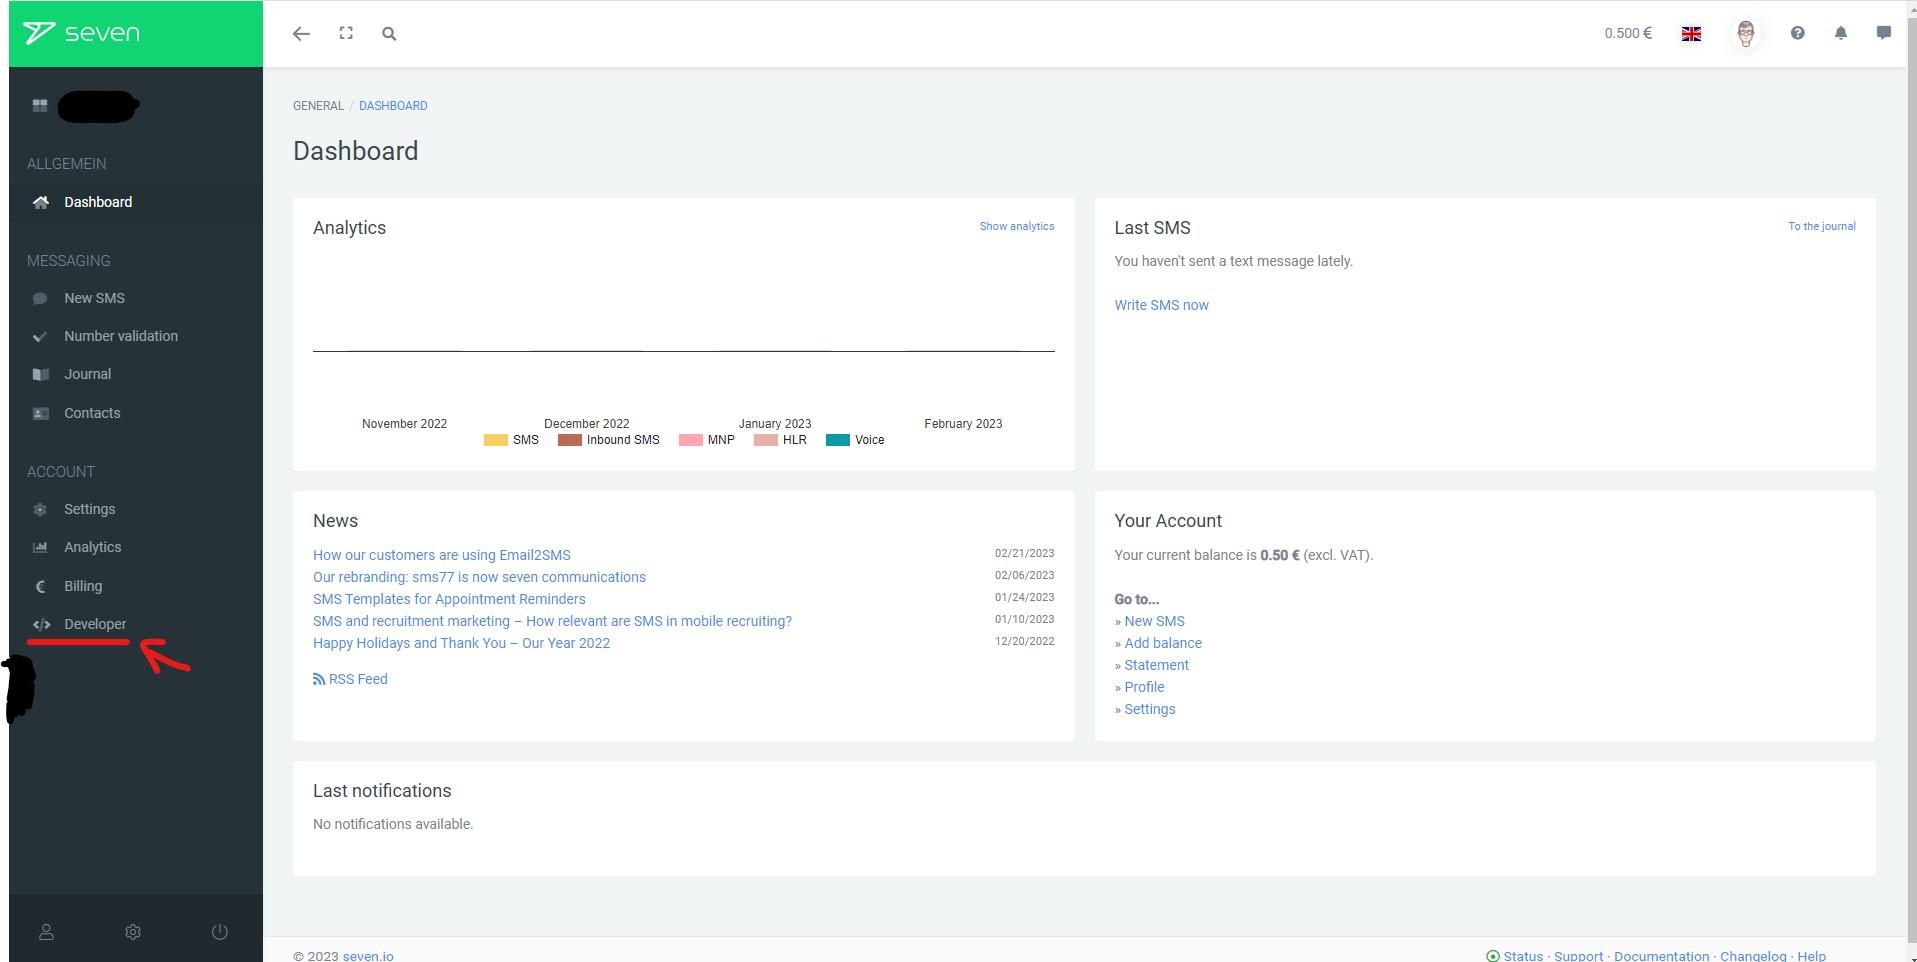
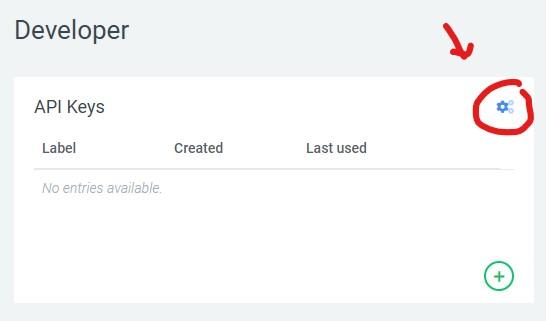

To get started, go to https://app.seven.io/ and sign up for an account.
After signing up, make sure to verify your email address.
Now, enter your password and log in to your account.
In the toolbar at the top of the screen, click on "Developer."
Next, in the API keys segment, click on the settings button.
Click on "Show Key" and then click on the key to copy it. We'll need this key later, so make sure to keep it handy!
Google Account
To complete this project, we will need to use the Gmail module and the Google Sheet module. In order to use these modules, you will need to have a Google account.
If you already have a Google account, that's fantastic! Just keep in mind that we will need to give Integromat permission to send emails on your behalf and access your Google Sheet account.
If you don't have a Google account yet, or would like to create a new one for this project please create one before proceeding to the next steps.
Open a Google Sheet File

Let's create a new Google sheet to store your password. Here's how:
- Go to your Google sheet account.
- Click on "New" to create a new file.
- Choose a name for your file - you can use anything you like!
- In cell A2, type "Password:" to indicate that this is where you will store your password. The password itself will be stored in cell B2.
- Now, we need to get the spreadsheet ID from the URL. Open the Google sheet and look at the URL in the address bar. The ID is the long string of characters in the middle of the URL, between "/d/" and "/edit". Copy this ID as we will need it later.
And that's it! You're ready to move on to the next step.
Give Premmisions to the Gmail Account
For this project, we'll be using the Gmail module in Integromat to send an email.
To get started, we'll just need to give Integromat permission to send emails on our behalf. Don't worry, it's an easy process!
Simply follow the instructions provided in this link to grant the necessary permissions to Integromat. Let's get started!
Creating Integromat Account
Go to https://www.integromat.com/en/login and sign in using the google account you used in the previous steps.
Creating Our 1st Scenario in Integromat - Google Sheet Scenario
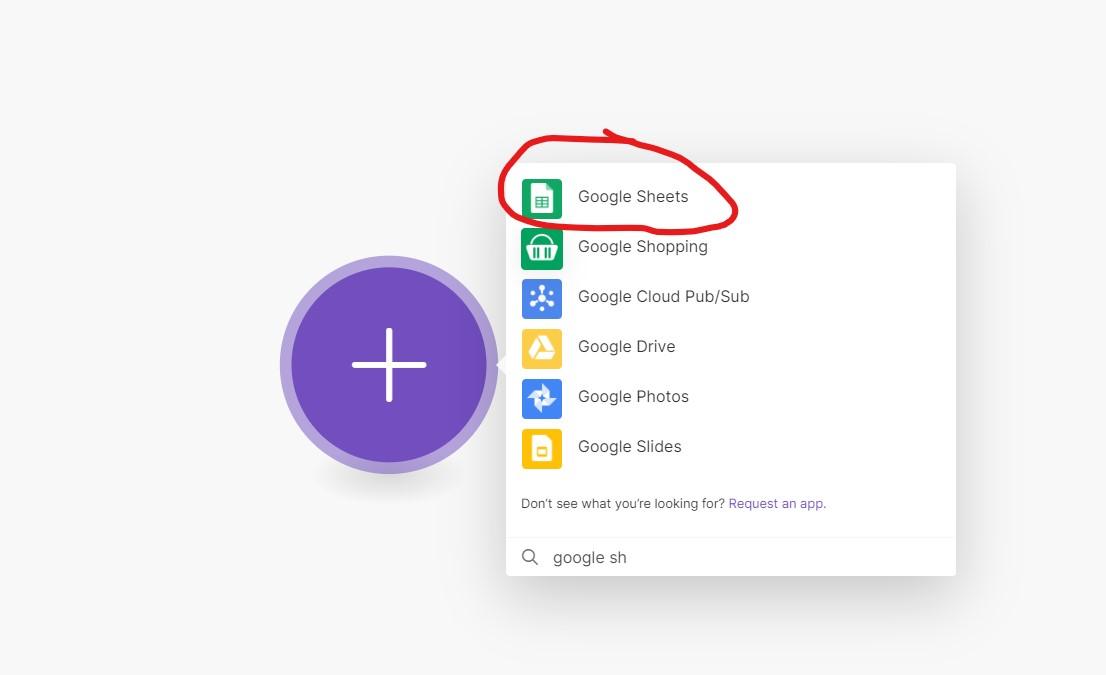

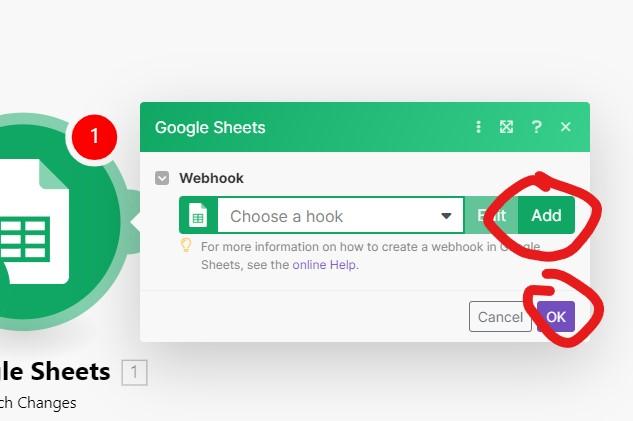
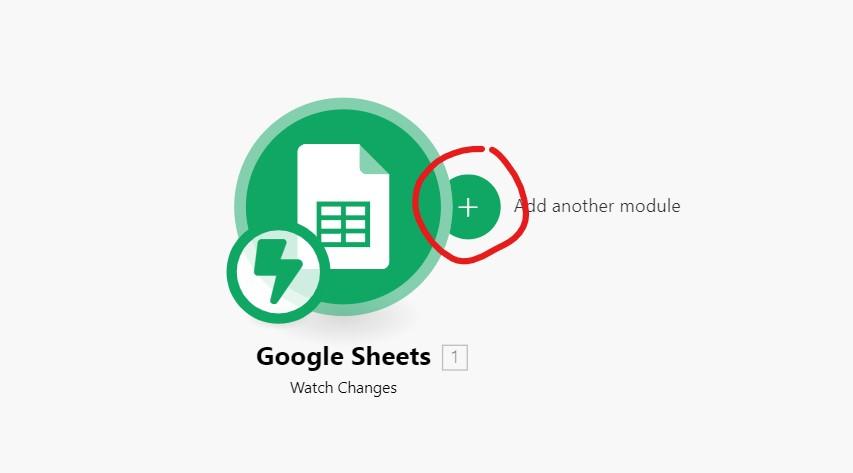
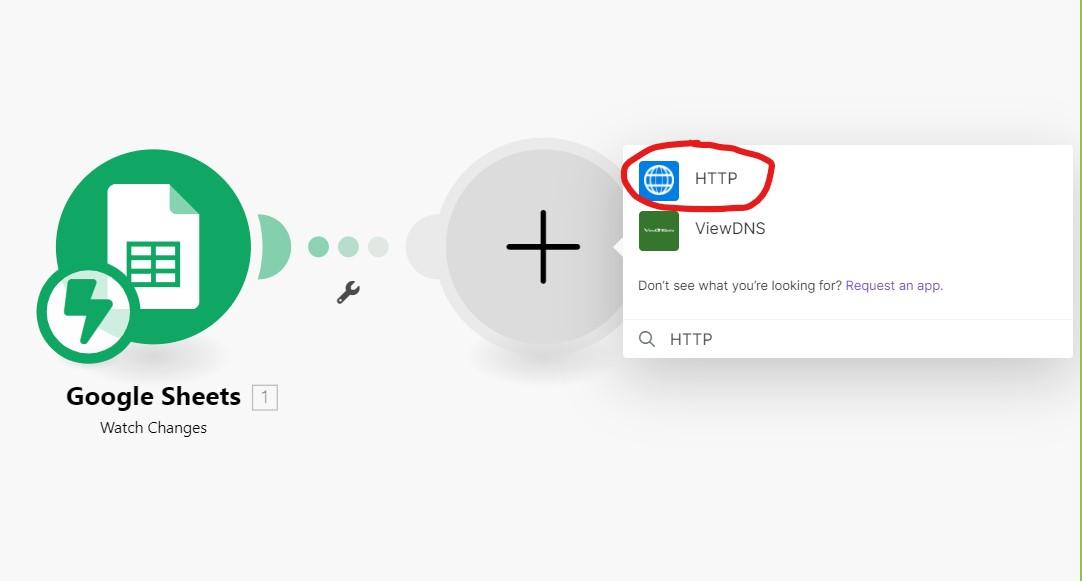

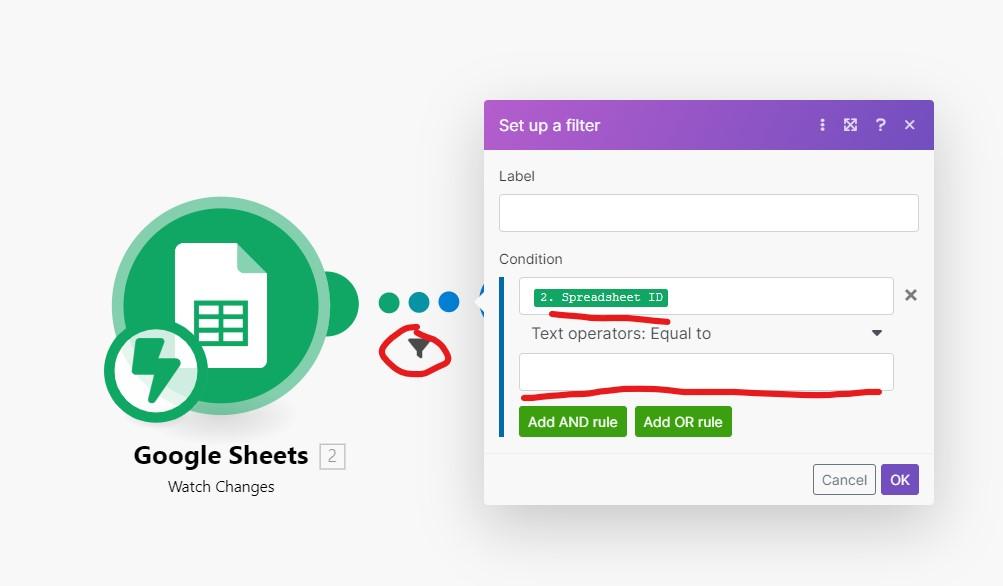
First, look for the big plus sign in the middle of the screen and click on it. Then, search for "Google Sheets" and select it from the options. Then, select "Watch Changes".
Click on the Google Sheets moudle, simply click on "add", "save", and "ok" to confirm your choice.
Next, let's add another module to our scenario. Look for the "Add another module" button and click on it. From there, search for "HTTP" and choose it.
Click on the gear icon between the two modules. Then, select the option to set up a new filter. Under the condition field, choose "Spreadsheet ID". In the next field, paste the spreadsheet ID that you copied in step 11.
Lastly, make sure to save your scenario. We'll be coming back to it later on. Great work so far!
Creating Our 2nd Scenario in Integromat - Messaging Scenario





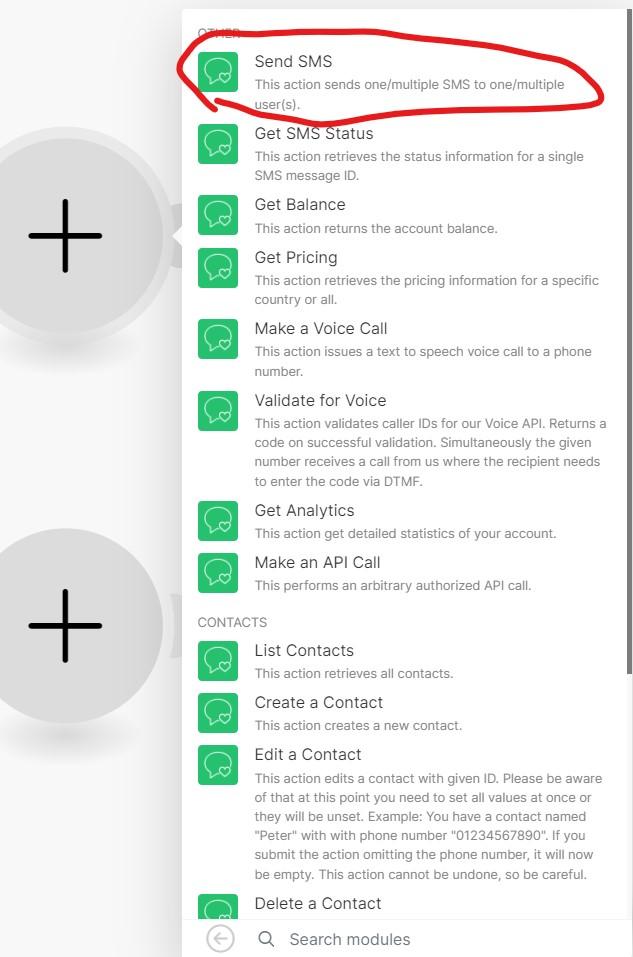

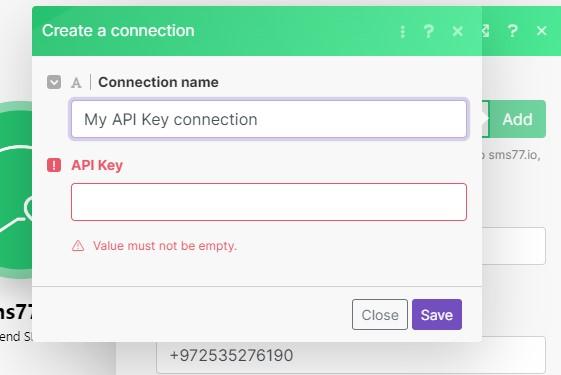

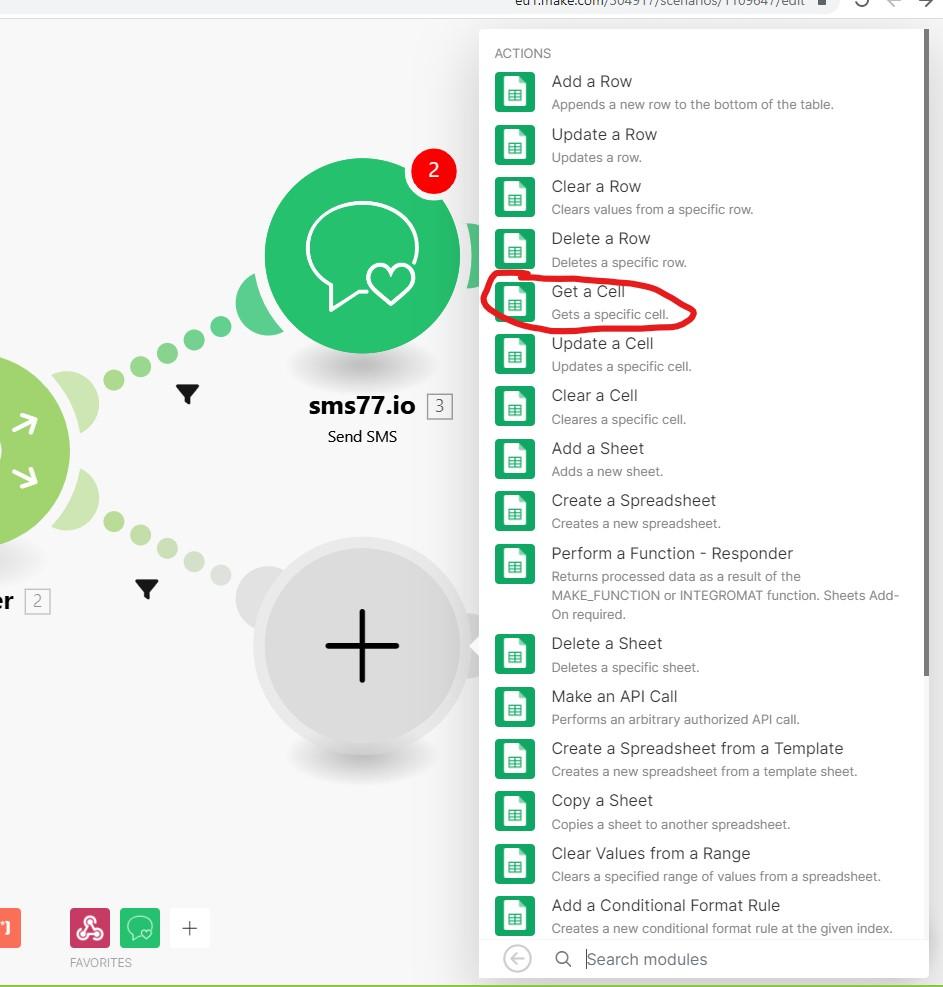


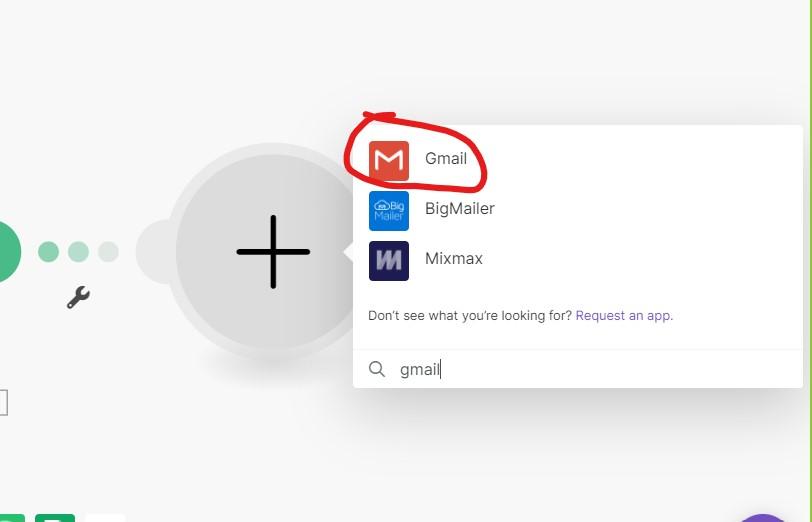
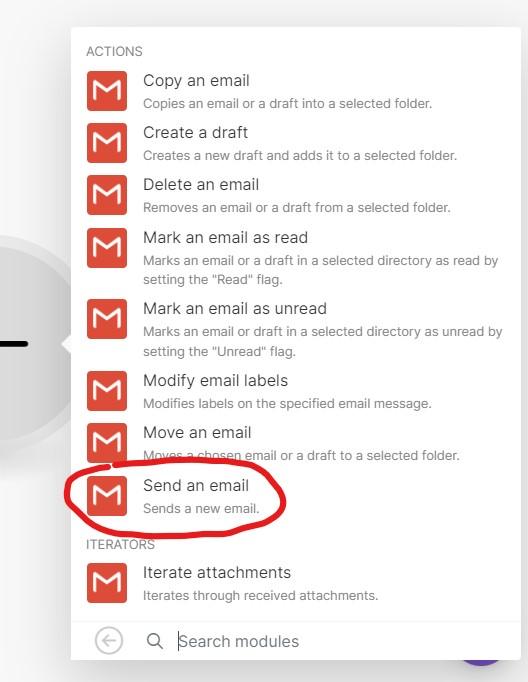
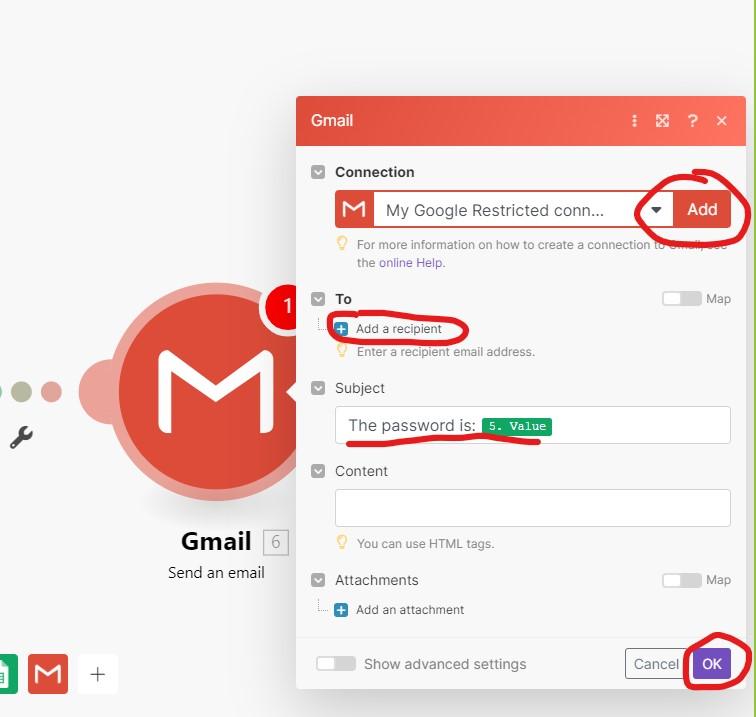
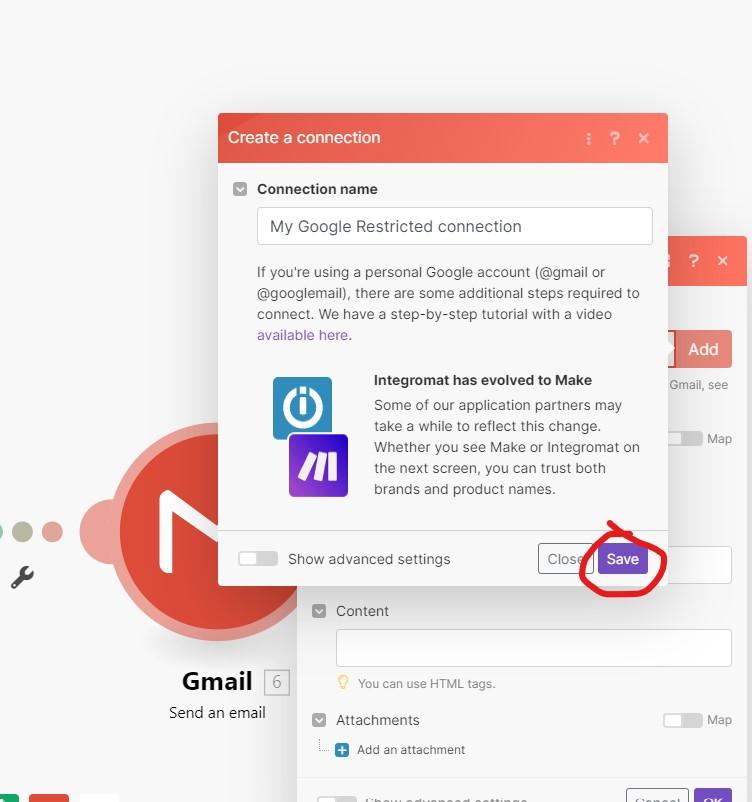
- Go to your Integromat account and open a new scenario.
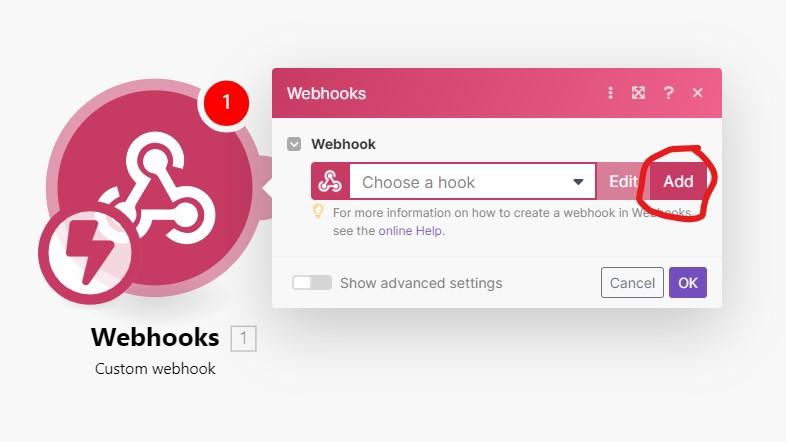
- Click on the big plus sign in the middle of the screen and search for "Webhooks." Choose "Custom Webhook" and click on "Add."
- Give your webhook a name and click on "Save."
- Copy the blue link that appears and open a new tab in your browser.
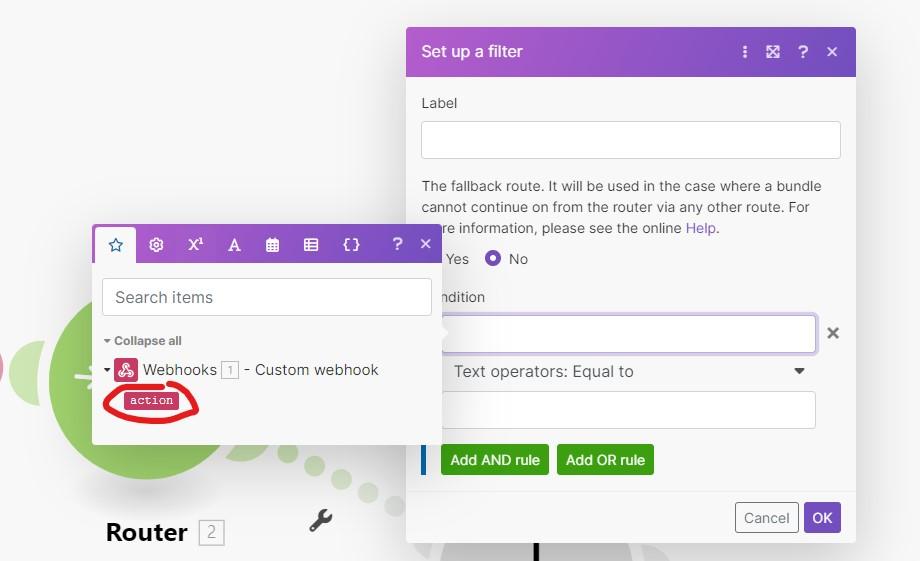
- Paste the link into the address bar and add "?action=1" to the end of it. Press "Enter."
- Go back to your Integromat scenario and click "OK."
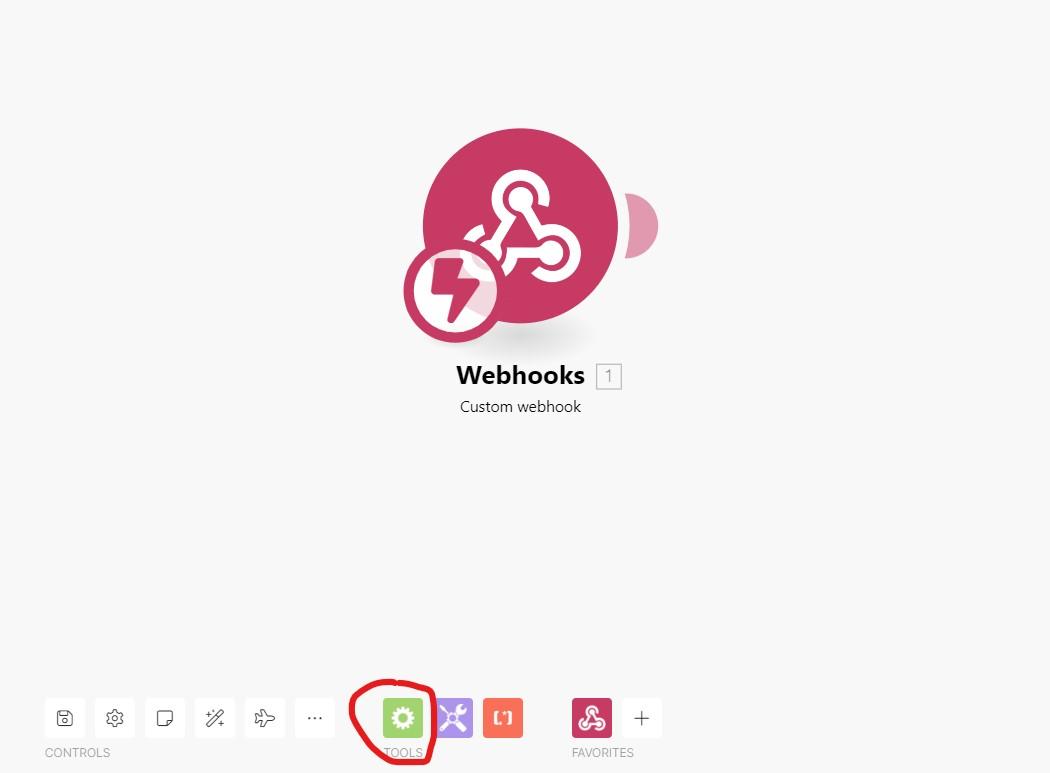
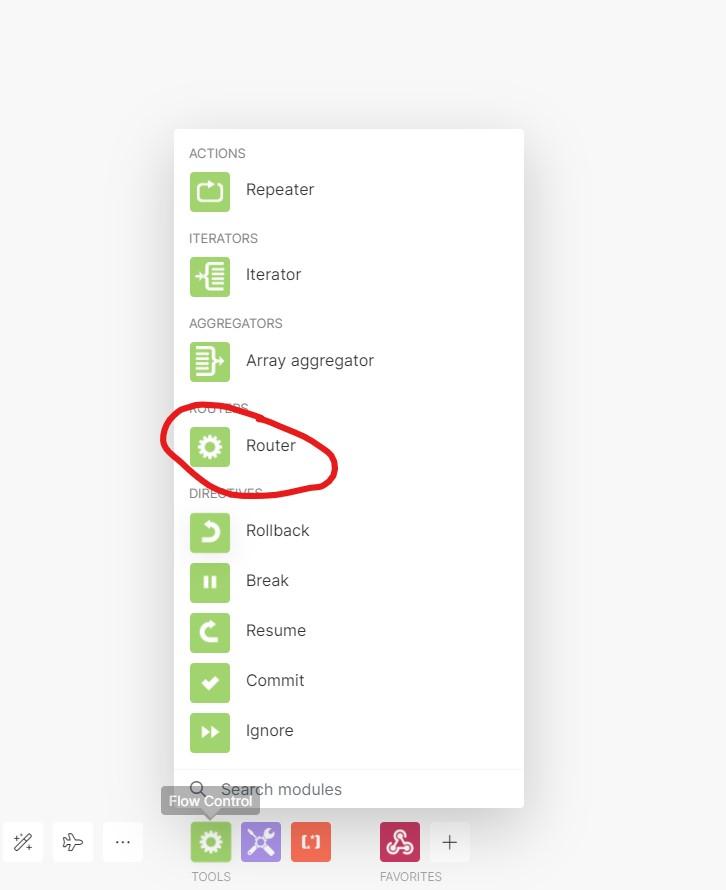
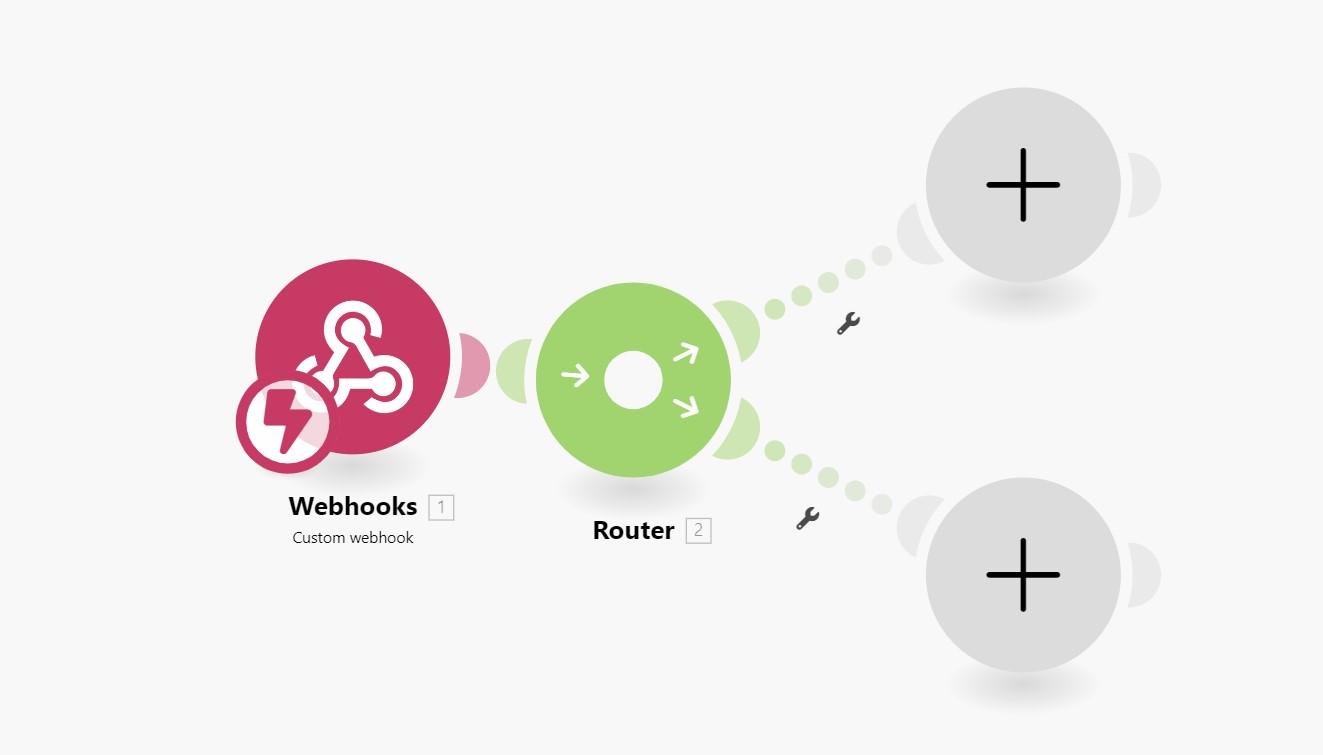
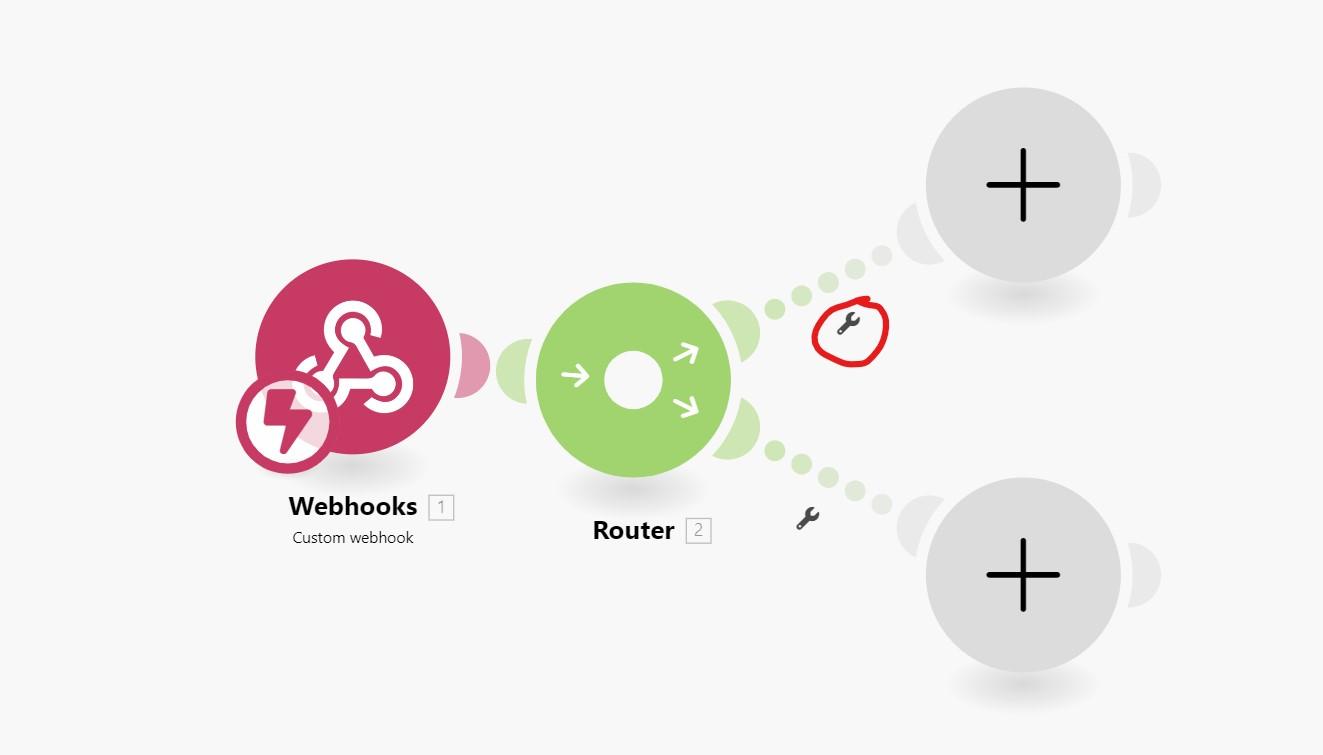
- Click on "Tools" and choose "Router."
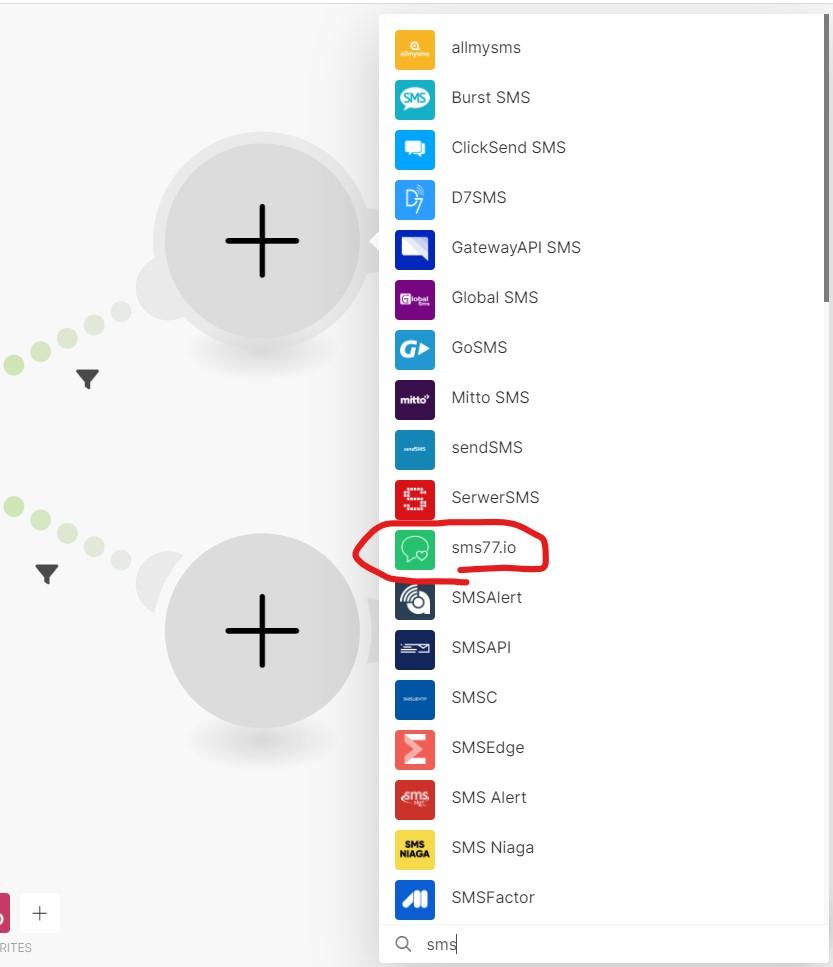
- Click on the router, and two new plus signs will appear. Click on the upper plus sign and search for the "SMS77" module. Choose "Send SMS" and click on "Add."
- Paste your API key from step 9 into the appropriate field.
- Insert the required message and the recipient's phone number, then click "OK."
- Click on the lower plus sign and search for the "Google Sheets" module. Choose "Get a Cell."
- Fill in the details with the spreadsheet ID and name from step 11, and in the "Cell" field, type "B2."
- Click on the "Add a new module" button and search for the "Gmail" module. Choose "Send an email."
- Click "Add" and choose the Google account you worked with in step 10.
- Press "Add a recipient" and fill in the email address you want the email to be sent to.
- In the subject field, type "The password is: {{5.value}}."
- Click "OK" and save the scenario.
Building Our 2nd Blynk Device - "cPX3 Blynk"


Awesome, let's get started on setting up our CPX3 Blynk template and device!
First, let's create a new template called "CPX3 Blynk". Then, navigate to the "Datastreams" window and create 9 new datastreams, just like the ones shown in the picture (All of them are virtuals pins).
Once that's done, let's head over to the "Search" window and create a new device using the template we just created. Be sure to save your changes!
Next, download the Blynk app on your mobile phone and log in to your account. Find the device we just created and click on it. From there, click on the gear icon at the top of the page and then the plus sign in the upper right corner. Add 6 buttons and 1 Labeled Value widget, and place them in the template as shown in the picture.
Don't forget to attach each widget to its corresponding datastream.
Now, let's head back to the web version of Blynk. In the toolbar, go to settings and click on "webhooks". Create a new webhook with the following details, making sure to choose the correct device and to include the webhook link (without our addition of "?action=1") in the Webhook URL. Don't forget to save your changes!
Great job so far, keep it up!
CPX3 Code
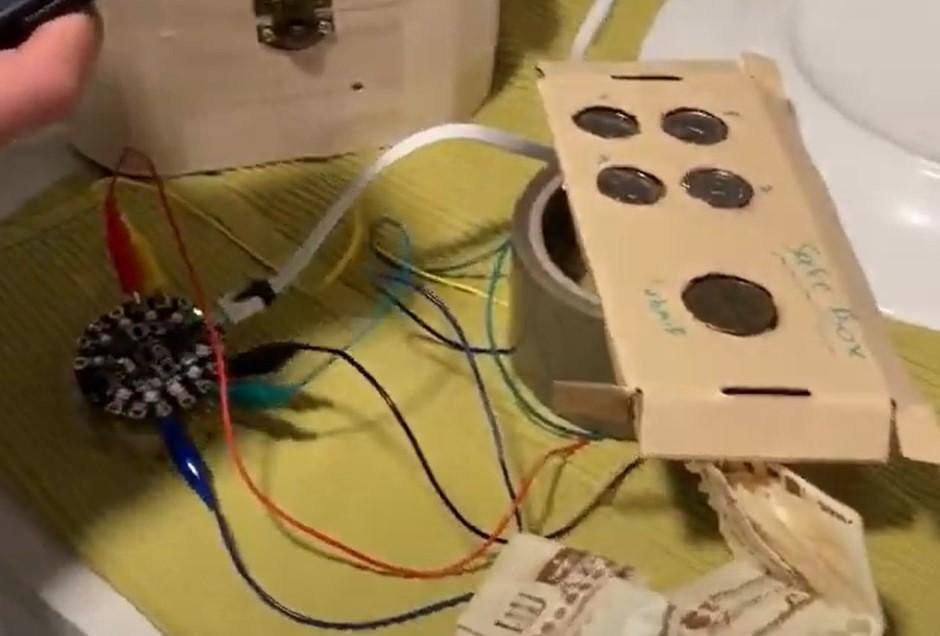
Here is the code you'll need to upload to the third CPX. But first, let's make a few changes:
- Head over to your "Connector Blynk" device in Blynk and find the "device info" section. Copy the BLYNK_TEMPLATE_ID, BLYNK_TEMPLATE_NAME, and BLYNK_AUTH_TOKEN, and paste them in the corresponding locations in the code.
- Don't forget to insert your Wifi network name and password in the relevant place too!
- If you changed the input characters, change the relevant number in the loop function to the character you chose. For example, if you chose to use the letters a,b,c,d as the optional characters in the password, change the number 1 in the code to "a", and so on.
- If you added more coins (buttons), add more "if" statements accordingly.
Once you've made the necessary changes to the code, upload it to the CPX. Then, connect the 5 crocodile clips from the Safe Box to the CPX, making sure to attach each crocodile clip to the correct pin in the CPX. In our code, we connected it like this:
- The button that represents 1 is connected to pin #6
- The button that represents 2 is connected to pin #9
- The button that represents 3 is connected to pin #2
- The button that represents 4 is connected to pin #3
- The button that represents SUBMIT is connected to pin #10
You can connect them however you want, just make sure to change your code accordingly.
For example, if you want to connect pin #10 to the button that represents the number 3, your "if" statement should look like this:
if(CircuitPlayground.readCap(10) > 1000) // If the button that represents 3 was pressed
{
input = input + "3"; // Add 1 to the current input
for(int i=0; i<10; i++) // Go over all the newPixels
{
CircuitPlayground.setPixelColor(i, 255, 255, 255); // Color the current neoPixel white.
}
delay(300);
CircuitPlayground.clearPixels(); // Turn off all the neoPixels.
}
Finally, after connecting all the crocodile clips, connect the CPX to a power source (such as a portable charger, batteries, or a computer), and you're all set!
Downloads
Completing Our 1st Integromat Scenario
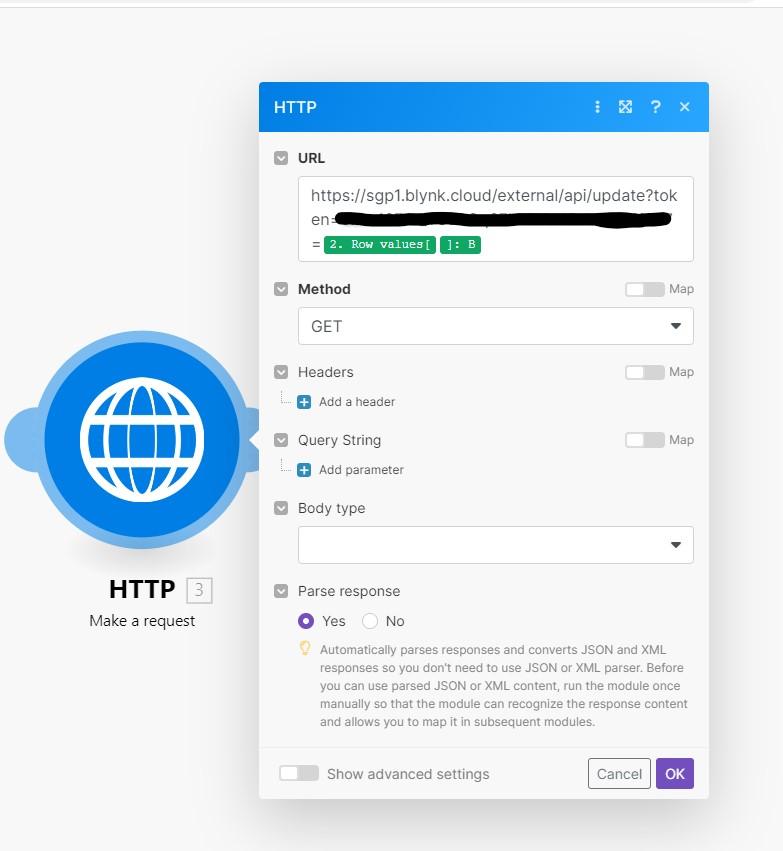

Let's head back to the scenario we were working on earlier (Step 14).
In the HTTP module, insert the following link in the URL field:
https://sgp1.blynk.cloud/external/api/update?token={YOUR_TOKEN}&V7={{2.rowValues[].`1`}}
Be sure to replace {YOUR_TOKEN} with your CPX3 Blynk device token.
Under the "Parse response" section, select "yes" and click "OK" to confirm your changes.
Finally, turn on the scenario and you're all set!