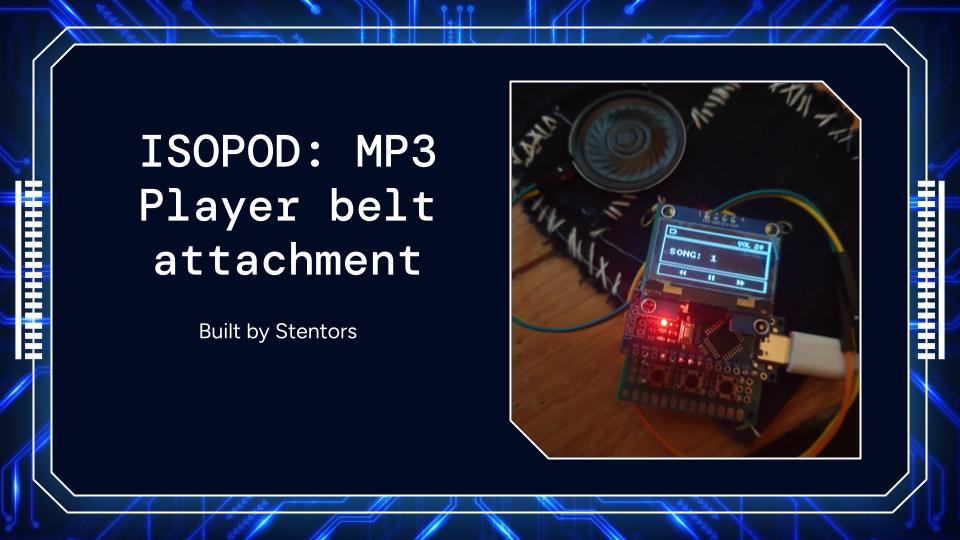
ISOPOD - Upcycled MP3 Player Tamagotchi Belt Attachment
by STENTOR in Circuits > Wearables
649 Views, 9 Favorites, 0 Comments
ISOPOD - Upcycled MP3 Player Tamagotchi Belt Attachment
.jpg)
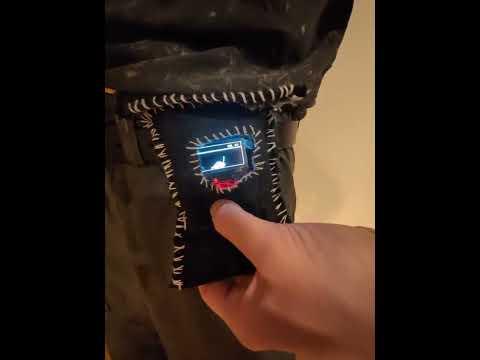
This project—ISOPOD—is a wearable MP3 player and Tamagotchi-style belt attachment built using an Arduino Nano, DFPlayer Mini, and a small OLED screen. Everything is housed in a handmade case. The audio plays through upcycled Bluetooth headphones/retro intercom system phone, rewired for a direct connection to the player.
The goal was to create something fun, portable, and sustainable, using mostly reused parts.
The Tamagotchi style game is shown after double-clicking the middle button to activate an isopod pet that dances to the music and sleeps when its paused - using animated bitmaps!
Supplies

Electronics:
- Double Side Protoboard 4*6
- Arduino Nano
- DFPlayer Mini MP3 Module
- Micro SD card
- 1.3" OLED Display
- push buttons (x3)
- LiPo battery with charging circuit
- Boost Converter 3.7 from lipo to 5v
- Jumper wires
- Broken over-ear headphones
Tools:
- Soldering Iron
- Solder
- Multimeter for testing
- Breadboard for prototyping and testing
Utility Belt:
- Small metal hooks and clips for belt attachment
- Cardboard and duck tape to create container
- Denim (old clothes to cut it from) and sewing machine/needle and thread
Mp3 Player Functionality

Start by connecting the DFPlayer Mini to the Arduino Nano on a breadboard.
Wiring:
Connect an external speaker (8Ω, 2W) to the DFPlayer:
Upload your music files to the micro SD card and insert it into the DFPlayer.
Then upload a basic test script (attached below) using the Arduino IDE to check that everything works. The DFPlayer’s onboard LED should light up when music is playing.
Downloads
Connect Display and Inputs


OLED Display (1.3", I2C)
Next, wire up the OLED screen and the control buttons.
Push Buttons
Connect the buttons to digital pins (D2, D3, D4) and ground, using pull-down resistors if necessary. These will serve as inputs for Play/Pause, Next, and Previous controls.
The button controls will be:
- Left Button:
- Single click = Previous track
- Long press = Volume up
- Middle Button:
- Single click = Play/Pause
- Double click = Enter game mode
- Right Button:
- Single click = Next track
- Long press = Volume down
Power
.jpg)
To make this project portable, I will be adding a 3.7V Lipo battery, however ardunio nanos would require around over 5V so ill connect a 3.7v to 5v boost converter. Then a usb-c charging module so that it can be easily recharged - with over charge & discharge protection (This is vital to protect the circuit and battery).
Connect Everything
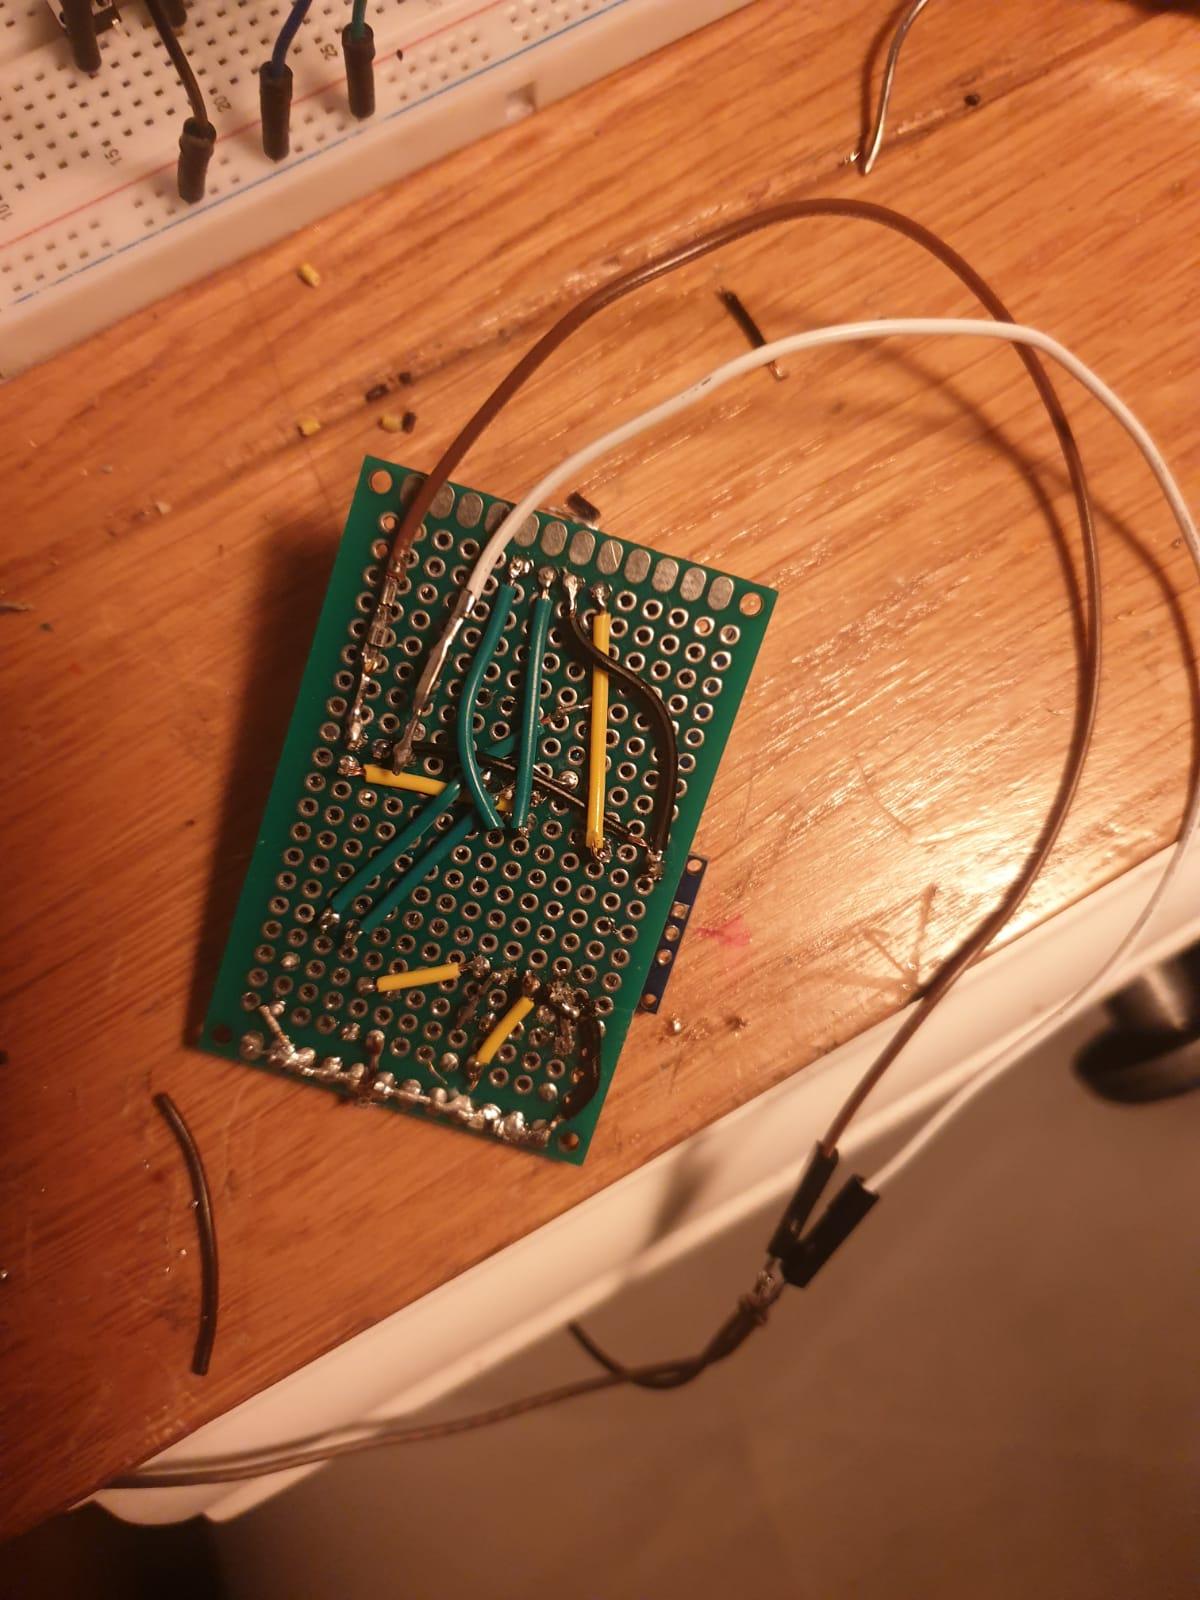

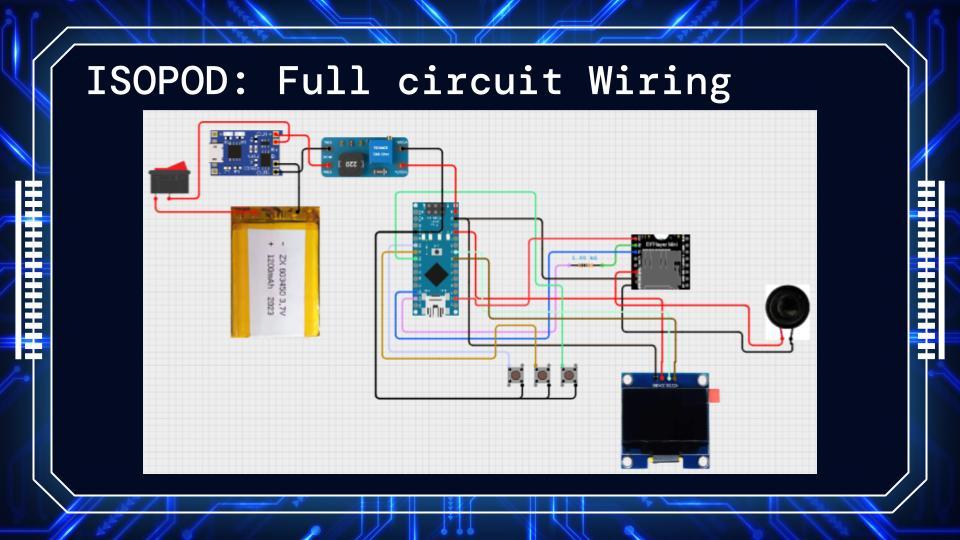
To then connect everything together, from the breadboard to a permanent circuit board, place the Arduino nano, DFPlayer 1K resistor and buttons onto the perforated circuit board and move around the location until it all fits (the display will go over the DFPlayer due to the limited space).
Fold over or remove the pins on the Arduino nano and DFPlayer that will not be used to make it process more clear. Then solder the 3 buttons into place and the Arduino above the buttons, add a Ground rail with a jumper wire along the bottom of the circuit direct to the ground pin on the Arduino to connect all the buttons to.
Then place the DFPlayer above the Arduino (make sure the side with the SD card is close to the edge to make it ease to access) and solder the needed pins, then with jumper wires cut to size, create the connections across the parts based on the above pinouts.
Then place the OLED over the DFPlayer and solder all 4 pins onto the board then using jumper wire connect it to the needed pins.
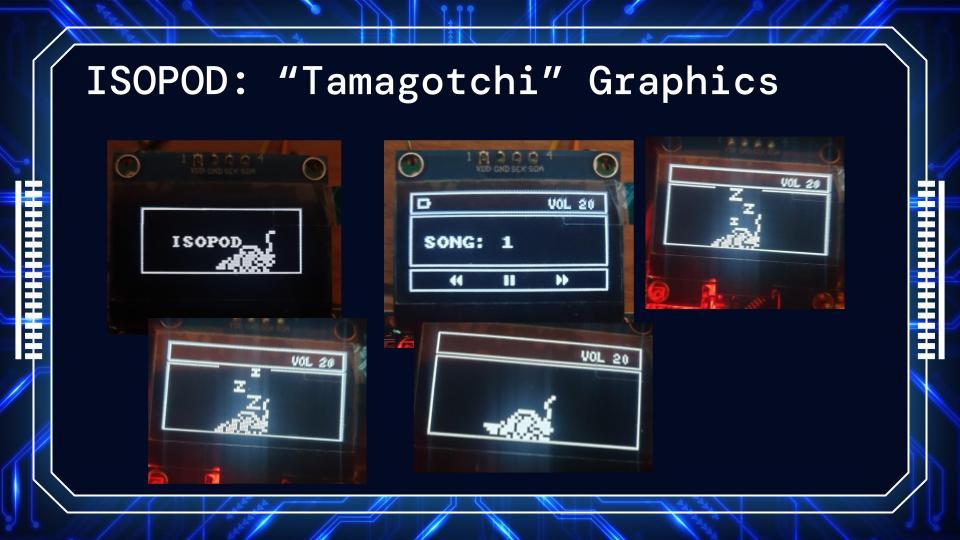
Full Software - Tamagotchi
.jpg)
Upload software
Then depending on the specific boards port (my nano has a usb-c port) connect it to a computer with the arduino IDE installed. And upload the attached file, or you can find the code on my GitHub: ISOPOD GitHub.
Full code file is also attached below!
This code:
- Checks the button inputs for music and sound control
- displays the battery, volume level and track number
- Double click for game mode: isopod character dances if there is music, is idle during time out and sleeps after 5s with no music.
The ISOPOD graphics are stored as bitmaps within the file. If you want to use other graphics, websites like: https://javl.github.io/image2cpp/ can be used to covert images to bitmaps. (Remember to set the correct width and height within the code and when converting the image)
Bitmap example:
Downloads
Utility Belt
.jpg)
.jpg)
.jpg)
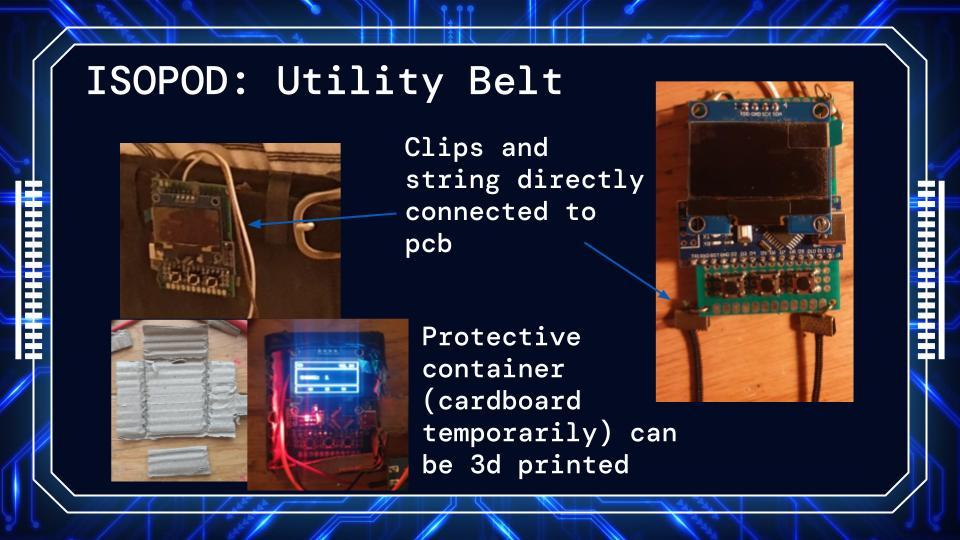
Direct Circuit to belt
With the metal clips and string, attach the connectors to the holes on the edge of the PCB.
- This will be one connection method to a belt, however, this is less secure and safe for the device as the components are exposed.
- So, along with this, I will also create a casing with cardboard and duck tape, then a dedicated utility belt with a space for the mp3 player.
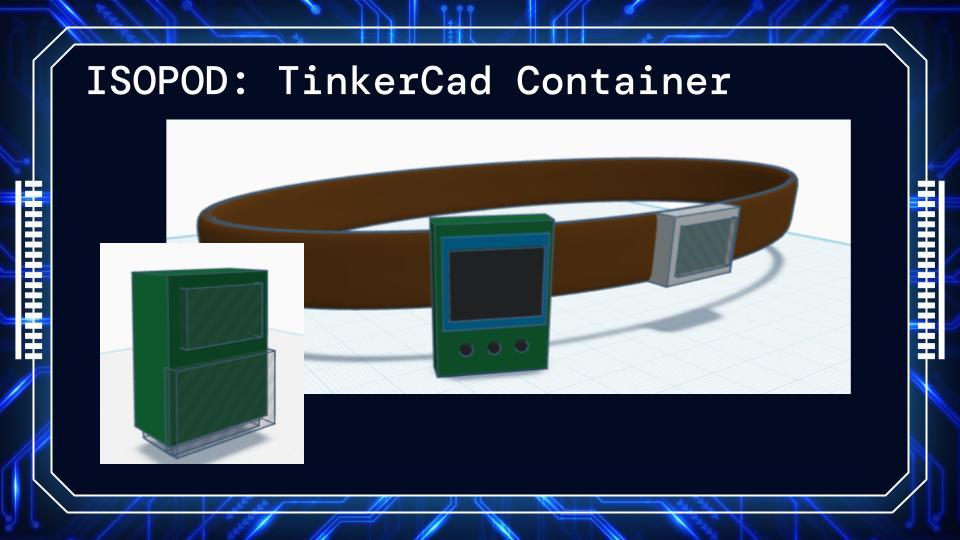
ISOPOD Container
TinkerCad 3D design Files: Container File and Prototype File
In the future I could also 3D print a stronger case from the above container files.
Based on the designs I have reused a shoe box's cardboard to create a simple container with duck tape.
Utility Belt
For a way to store the container on a belt I am using scrap fabric to create a utility belt specifically for the ISOPODs container. The stages for making it is shown in the images.
Connecting the Output Device
.jpg)
.jpg)
Upcycled Headphones
After taking apart my broken Bluetooth headphones (Bluetooth modal no longer works) I was able to see the SPK1 and SPK2 connector where I will be rewiring it to the mp3 player so i can make use of the functional speakers and structure.
- Drill a small hole in the headphone casing to allow the wire to go through clean.
- Solder two wires to the SPK 1 and 2 connectors on the headphones Making sure to run them through the whole.
- Then connect the ends to an audio jack.
- Make sure the two outputs for the mp3 player have been connected to an audio port - which will allow me to connect any output device.
- Or you could directly wire the headphones to the MP3 Player but it will make it hard to replace.
Final Notes
.jpg)
I have found a broken intercom system and will also be temporally rewiring the output to the mp3 player because it looks quite funny and can fit well in the utility belt, (not a permanent solution but why not)
mp3 player inspired by: @Neutrino1
All images, diagrams and code attached has been created by me.
I created all circuit diagrams with cirkitdesigner, my project link.