Integrating a DHT12 Sensor, ESP32, and Relay to Automate Exhaust Control in the Greenhouse
by EkanshAgarwal01 in Circuits > Arduino
447 Views, 2 Favorites, 0 Comments
Integrating a DHT12 Sensor, ESP32, and Relay to Automate Exhaust Control in the Greenhouse
.png)
Maintaining optimal temperature and humidity levels in a greenhouse is crucial for plant growth and productivity. To achieve this efficiently, automation is key. By integrating a DHT12 sensor, ESP32 microcontroller, and a relay, you can create a smart exhaust control system that automatically adjusts the ventilation based on real-time environmental data. This system will help ensure that your greenhouse maintains the perfect climate for your plants, reducing the need for manual intervention and enhancing overall productivity. In this guide, we’ll walk you through the process of setting up this automation, enabling you to optimize the growing conditions in your greenhouse with ease.
Supplies
- DHT12 Sensor: Measures temperature and humidity.
- ESP32 Microcontroller: Handles data processing and controls the relay.
- Relay Module: Triggers the exhaust fan based on temperature/humidity readings.
- Exhaust Fan: Solar-powered fan for ventilation.
- Power Supply: Power bank or a DC adapter for the ESP32 (can be powered by solar).
- Jumper Wires and Breadboard: For connections.
- Software Requirements: Arduino IDE for programming.
Wiring the Components

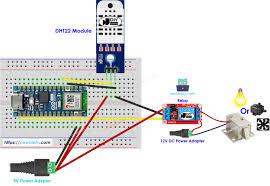
DHT12 to ESP32:
- SDA (Data) → ESP32 GPIO21.
- SCL (Clock) → ESP32 GPIO22.
- VCC → 3.3V pin on ESP32.
- GND → GND pin on ESP32.
Relay to ESP32:
- IN (Signal) → ESP32 GPIO23.
- VCC → 3.3V pin on ESP32.
- GND → GND pin on ESP32.
- NO (Normally Open) and COM (Common) → Connect to the exhaust fan circuit.
Exhaust Fan:
- Connect fan power supply to the relay's NO and COM terminals.
Setting Up the ESP32
- Install Arduino IDE:
- Download and install Arduino IDE.
- Add the ESP32 board package by following this guide.
- Libraries to Install:
- Install the DHT sensor library in Arduino IDE (e.g., "Adafruit Unified Sensor" and "Adafruit DHT").
- Install the WiFi library if you want remote monitoring (optional).
Add This Code
#include <Wire.h>
#include <Adafruit_Sensor.h>
#include <DHT.h>
#include <DHT_U.h>
#define DHTPIN 21 // GPIO pin for DHT12 data
#define DHTTYPE DHT12
#define RELAYPIN 23 // GPIO pin for relay control
DHT dht(DHTPIN, DHTTYPE);
void setup() {
Serial.begin(115200);
dht.begin();
pinMode(RELAYPIN, OUTPUT);
digitalWrite(RELAYPIN, LOW); // Start with fan off
}
void loop() {
float temperature = dht.readTemperature();
float humidity = dht.readHumidity();
if (isnan(temperature) || isnan(humidity)) {
Serial.println("Failed to read from DHT sensor!");
return;
}
Serial.print("Temperature: ");
Serial.print(temperature);
Serial.println("°C");
Serial.print("Humidity: ");
Serial.print(humidity);
Serial.println("%");
// Trigger fan if temperature exceeds 30°C or humidity exceeds 70%
if (temperature > 30.0 || humidity > 70.0) {
digitalWrite(RELAYPIN, HIGH); // Turn on the fan
Serial.println("Fan ON");
} else {
digitalWrite(RELAYPIN, LOW); // Turn off the fan
Serial.println("Fan OFF");
}
delay(2000); // Wait 2 seconds before next reading
}
Deploying the System
Upload the Code:
- Connect the ESP32 to your computer via USB and upload the code using Arduino IDE.
Test the System:
- Monitor the serial output to ensure the DHT12 readings are accurate.
- Check if the relay triggers the fan based on the temperature and humidity thresholds.
Optional Features
- Remote Monitoring:
- Use the ESP32’s Wi-Fi capability to send data to a cloud service (e.g., ThingSpeak or Firebase).
- Add a small OLED screen to display temperature and humidity locally.
- Adjustable Thresholds:
- Modify the temperature/humidity thresholds in the code for your specific greenhouse needs.
Integrating With the Solar System
Power the ESP32:
- Use a solar-powered battery pack to supply 5V power to the ESP32.
Relay and Fan Power:
- Connect the exhaust fan and relay to the solar battery.