Interactive Flowerpot Project Build Guide
by kf21667 in Workshop > 3D Printing
148 Views, 1 Favorites, 0 Comments
Interactive Flowerpot Project Build Guide

The Flowerpot is a desktop productivity device designed to help users maintain focus while working or studying. It takes the form of a plant that "grows" or "wilts" in response to the user's behavior. By providing a visual representation of work progress, it encourages users to stay on task for a predetermined period.
Supplies
Before you begin, make sure you have the following components ready:
Component List
- Raspberry Pi Zero and associated camera cable
- Raspberry Pi Camera module 2
- Nema 17 Stepper Motor x2
- A4988 stepper motor driver x2
- 6V peristaltic liquid pump with associated tubing
- DRI0044 2x1.2A DC Motor Driver TB6612FNG or equivalent for the pump
- Syringe
- Toothed drive belt ISO5296 at least 40cm in length/circumference
- M2.5 x 8mm screws x8
Hardware/Tools
- Soldering iron
- 3D-printer with PLA filament
- Stanley Knife
- 6V DC power supply
3D Printing All Required Parts

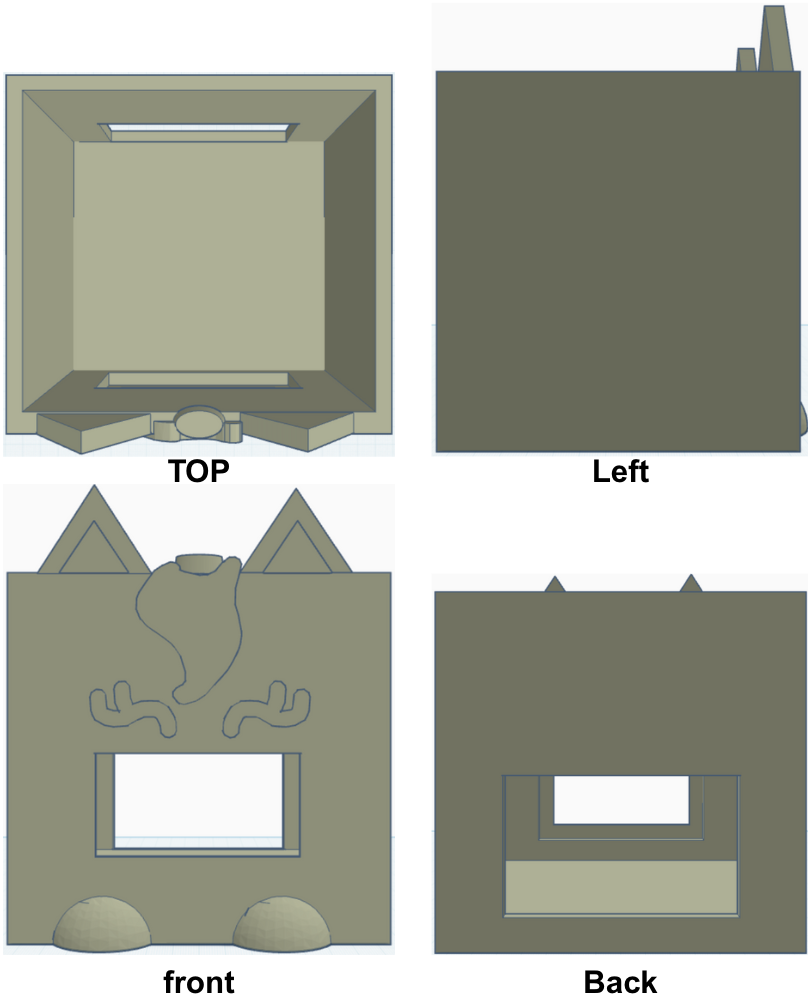
1.1 Flower Parts:
- Download STL files from GitHub: Flower Files
- Parts to print:
- 5 × Shaft A
- 5 × Shaft B
- 5 × Buckles
- 5 × Bearings
- 1 × Circular Base Disk
- 1 × Circular (middle disc)
- 1 × Circular Top
1.2 Leaf Molds:
- Download the mold STL files from GitHub: Leaf Mold Files
1.3 Flowerpot:
- Download STL files for the pot: Flowerpot Files
- Suggested dimensions: Width ~150mm, Height ~180mm
- Print using PLA filament (may take 25–30 hours depending on printer).
Assembling the Flower Structure
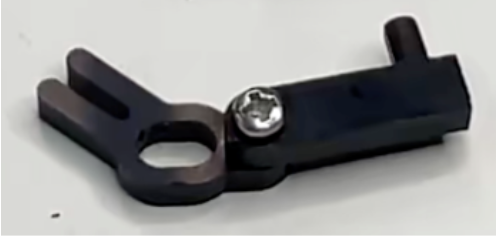


- Place the circular base disk on the 28/42 stepper motor and secure it with two M2.5 screws
- Use M2.5 screws to connect Axis A and Axis B. The hole of axis A is 2.2mm and the hole of axis B is 2.5mm, so the screws can be tapped directly. The picture below shows how they connected, make sure the joint can move freely when tightening the screws.
- After assembling the 5 joints, put them into the slots on the circular base disk. Use 3D printed bearings and screws as bearing fixation.
- After fixing the 5 joints, open them to the maximum and put the circular in (align the D hole of the disc with the D axis of the motor)
- Next, make the support part of the petals. Take a transparent PVC card, draw the shape of 5 petals on the card, and cut them out.
- To fix the card, first gently place the buckle into the slot of the joint. After inserting the card, insert the buckle to the bottom.
- The last step is to add the origami flower. First, insert a long M3 screw into the hole of circular top to fix the flower. Then insert the three legs of the circular top into the slots on the circular base. The whole flower is assembled.
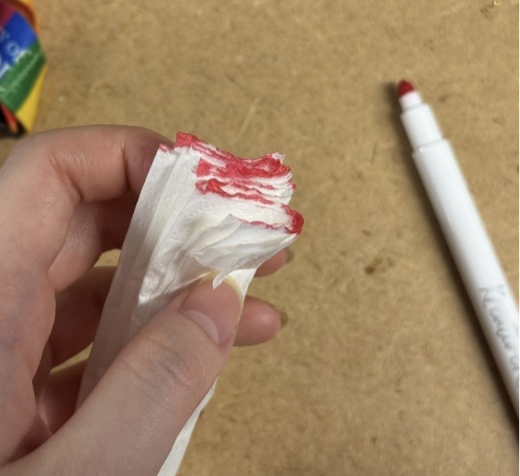
Origami Tutorials
- Take a few longer tissues and overlap them.
- Fold forward and backward repeatedly into a long strip.
- Use wire or rubber band to fix the middle.
- Use colored pencils to paint the edges with nice colors
- Unfold each layer of paper carefully. Origami flower done.
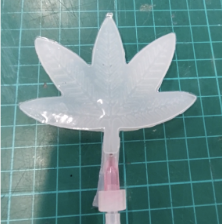
Making the Silicone Leaf
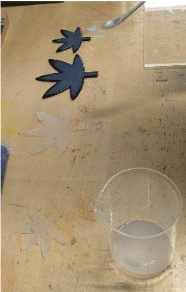


1. 3D print the molds
First 3D print the moulds for the leaf, using the files in the “instructables files” folder on the GitHub repo. Once the molds have cooled, remove them and make sure to clean off any excess material of fibres that could get stuck in the silicone.
2. Prepare the workspace and materials
While making the leaf, make sure to wear latex or nitrile gloves to avoid staining, and tie back/remove any long hair or loose jewellery to avoid contamination. Find a flat, smooth, clean area to work. You will also need a pane of smooth, flat and clean material, preferably acrylic to hold the molds closed and avoid air bubbles. The materials for the silicone can be found at https://www.smooth-on.com/products/ecoflex-00-30/. Place a ~5kg weight to the side to be used when making the leaf.
3. Preparing the silicone
Remove part A and part B (they are labelled) from the ecoflex kit and remove their lids – making careful note of which is which. You want to avoid any cross-contamination, so always use different tools for each. Using a different stirrer for each, thoroughly but slowly stir the contents of the bottles. Using a balance and separate spoons, measure out 15g of each part into a single beaker, then remove the stirrers and replace the lids. Using a fresh stirrer, thoroughly but slowly mix the two parts together in the beaker. (You can use one of the previous stirrers, but it cannot be re-used with either part without washing and drying). Mixing the slowly prevents air bubbles from forming, which can interfere with the behaviour of the leaf.
4. Pouring the leaf
Place the molds next to each other with the “stems” facing you in the middle of the workspace. Carefully spoon the mixture into each mold. Start by spooning it into the middle, and slowly moving outwards. By letting the silicone spread, it helps reduce air bubbles. You should expect both molds to overflow with excess silicone, to prevent air bubble or holes. Continue until both molds, and their stems are overflowing with silicone. Leave any excess material in the beaker to cure, it can be easily removed like the leaves once solid.
5. Sealing the molds
Place the acrylic pane over the molds. Start by placing it on its side behind the molds, then lower it towards you, so that the far side of the molds is pressed down first, moving towards you. This will prevent any large air bubbles from forming, and the air and excess silicone will be forced out through the stem. Place the weight on top of the acrylic to hold it in place. Leave the molds alone for at least two and a half hours to cure.
6. Removing the leaf from the mold
Once the leaf parts have cured, carefully remove them from the molds. The flat part can be removed by just slowly pulling it out. To remove the part with grooves, repeatedly tug the tips of the leaflets outwards to “unhook” them, and work inwards. Clean and dry the acrylic and set off to the side, as you will need it later.
7. Sealing the leaf
To glue the two halves together, repeat the process from step 3 with 5g of each part this time. Place the large flat leaf part down with the stem facing you, and spoon a small amount of silicone into the centre of the leaf. Spread this out with the spoon to produce a thin, solid film over the surface of the flat leaf. Place the smaller leaf half in the middle of the large, flat half with the grooves facing down. Start by letting the top leaflets rest on the base, and lower the rest down, not dissimilar to the acrylic. Once in place, use a small spoon to carefully smooth the remaining silicone around the boundary of the two leaf halves. You should expect it to seal the end of the air channel between the stems. Once sealed, place the acrylic back on top again, and place the weight on top to keep it in place. Leave for another two and a half hours to cure.
8. Final touches
Once cured, use a stanley knife or scalpel to carefully cut away any excess silicone around the leaf. Once the leaf in clean, insert the syringe into the air channel in the stem. The leaf is now complete, and can be added to the flower.
Assembling the Flowerpot
- Mount the Raspberry Pi and motor assembly into the 3D-printed flowerpot.
- Ensure cable management to allow clean movement of the flower and leaf.
Setting Up Electronics
- Connect stepper motors to A4988 drivers.
- Connect the liquid pump to DRI0044 motor driver.
- Connect the Camera Module to the Raspberry Pi.
Power everything with a 6V DC power supply.
Installing and Running the Code
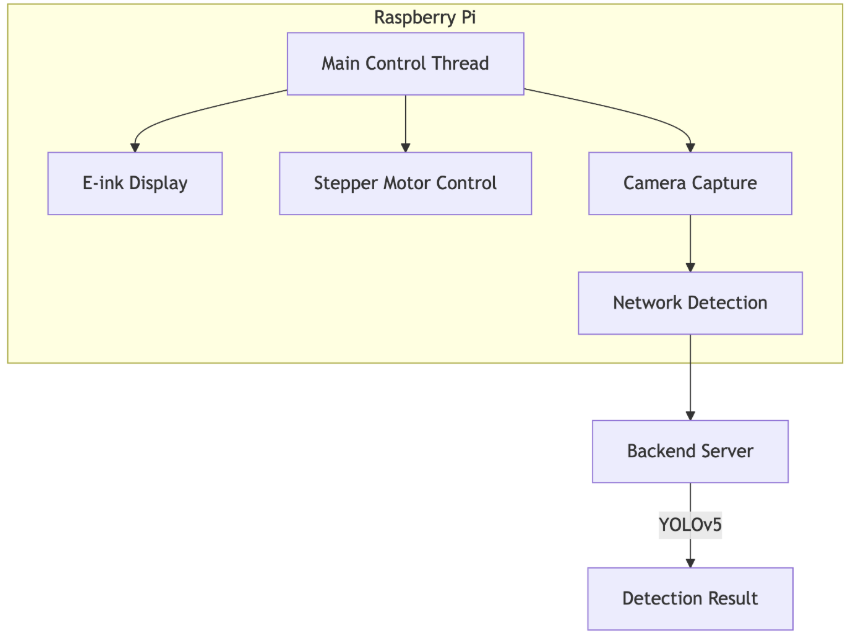
Raspberry Pi 4B
- Main Control Thread: Coordinates module operations (main.py)
- E-ink Display: Renders dynamic clock/expressions (uses epd3in7 driver)
- Motor Control: Synchronizes 3 motors (RPi.GPIO implementation)
- Camera Capture: Acquires 240×180 images via libcamera-jpeg
- Network Detection: HTTP POST to backend (detection_loop() function)
Backend Server
- YOLOv5: Optimized ONNX model (320×320 input)
- Detection Result: Returns binary "yes"/"no" response
Code Repository: https://github.com/UoB-Interactive-Devices/ID25-TeamM-The-MasterMinds.git
Running the Flowerpot
1. Power up the Raspberry Pi
Once the assembly process is complete, power up your Raspberry Pi. You can do this by connecting the power supply to the Raspberry Pi's power jack.
2. Verify Functionality
After powering up, take a moment to verify that everything is functioning as expected. This may involve checking the Raspberry Pi's LED indicators and ensuring the Waveshare display turns on.
3. Download Source Code
The next step is to download the source code for the flowerpot application on to your Raspberry Pi. You can download the code from the following GitHub repository: https://github.com/UoB-Interactive-Devices/ID25-TeamM-The-MasterMinds.git
4. Edit the Source Code (server.py & merge.py)
To deploy the system, first connect your computer or host device to the same local network as the Raspberry Pi. Locate the server.py file on your host machine and modify the host parameter to specify the Raspberry Pi's IP address, while noting the designated port number - this will configure your primary server endpoint for receiving data transmissions. Then access the Raspberry Pi and open the merge.py client script, where you must update the requests.post endpoint URL to match the server's IP address (the address of whichever device is running the server.py instance). This completes the bidirectional network configuration between your Raspberry Pi client and the host machine server.
The complete deployment requires two specific code modifications: in server.py set the host to the Raspberry Pi's IP
and in merge.py update the POST request URL
Verify both devices maintain persistent network connectivity throughout operation, and confirm the specified port remains accessible through any local firewalls.
5. Run the Flowerpot Code