Introduction to Tkinter Python Serial Port Programming Tutorial
by xanthium-enterprises in Circuits > Microcontrollers
281 Views, 0 Favorites, 0 Comments
Introduction to Tkinter Python Serial Port Programming Tutorial
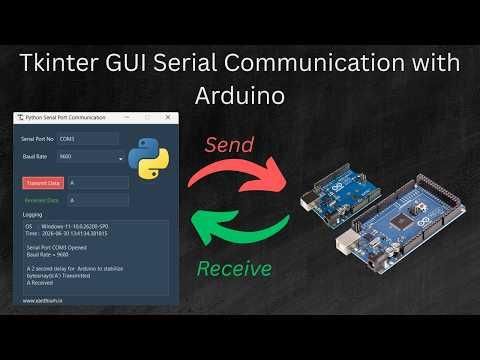
In this Instructable ,
You will learn to create beautiful Cross platform GUI interfaces for your Python Serial Communication program using Tkinter and ttkbootstrap Library.
Usually when we use the Python Serial Communication Library PySerial to communicate with Arduino ,ESP32,RP2040,RP2350 or other microcontrollers , the interface is usually a black and white command line interface.
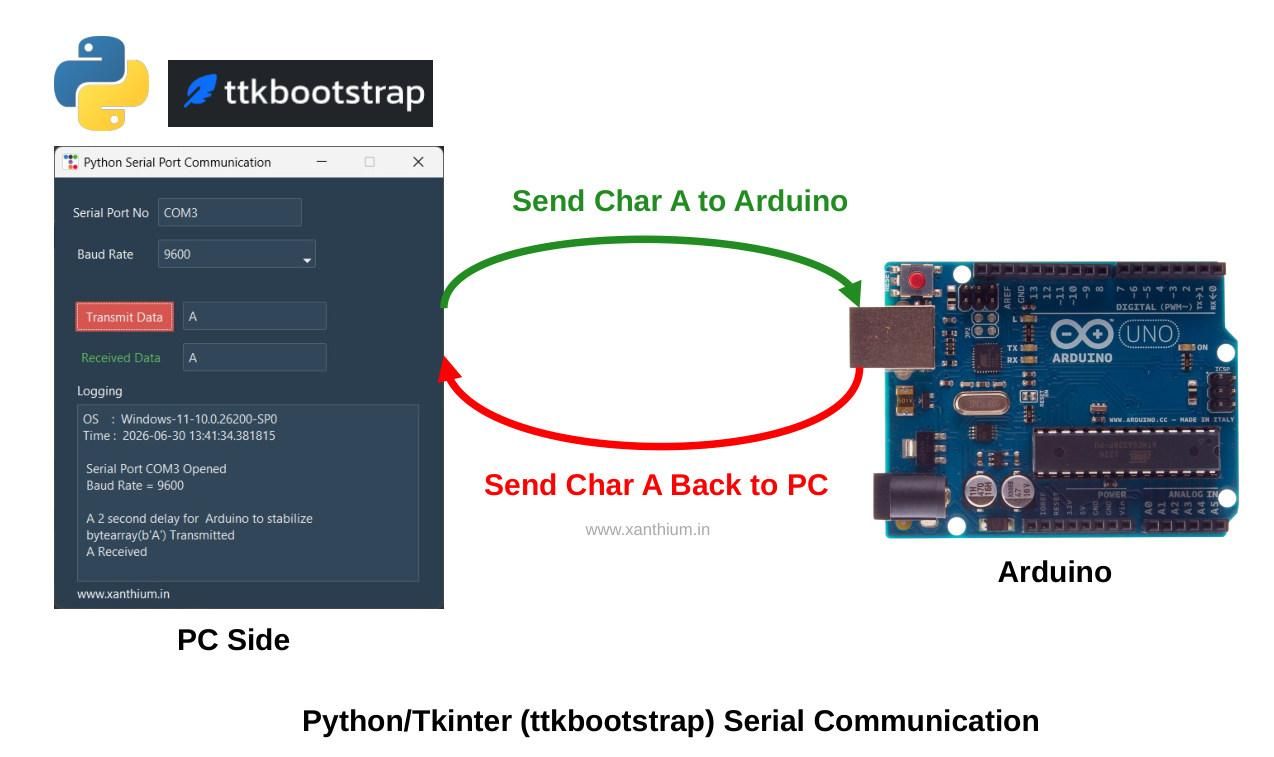
Tkinter Serial Port Program Running on Windows 11 (tutorial below)

If you use the standard Tkinter GUI Library available with the Python Distribution the interface look quite clunky and outdated by modern standards.
Here we will solve both these problems by using the beautiful ttkbootstrap theme extension for Tkinter GUI Library to build a Serial Communication program that sends and receives data from an Arduino.
You can use this Python Tkinter GUI Serial Monitor Program as a basis of building your own Serial Monitoring Program, Serial Port Data Acquisition System etc
Our Tkinter Serial Communication Program is cross platform and will work on Windows (Windows 11,Windows 10) ,Linux OS (Ubuntu ,Linux Mint ) and Mac OS
Tkinter Serial Program Running on Linux

We have included a section on how to install relevant libraries like tkinter, ttkbootstrap and PySerial for running the tkinter serial program on Linux OS (Ubuntu) below to make your life easier.
Supplies
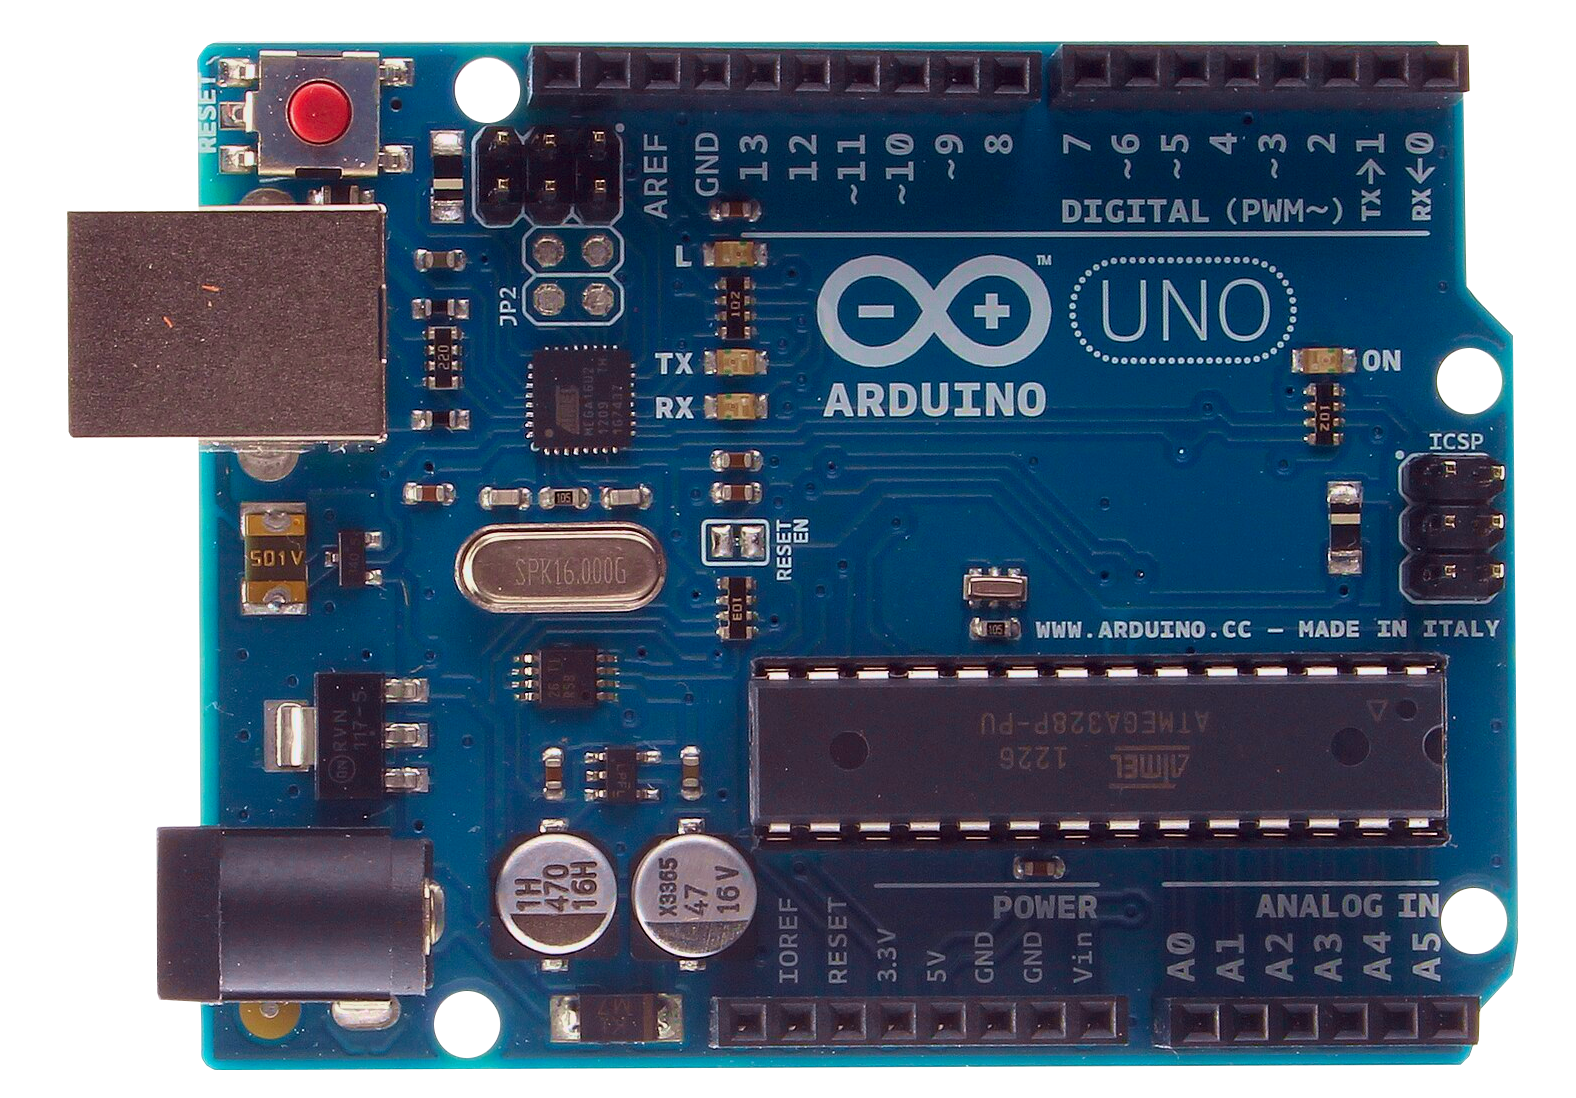


You will need a
- PC /Laptop
- Arduino
- USB Cable
- Python Interpreter
Python /Tkinter Source Codes
All the Source codes can be downloaded from our Website using the below Link
Running the Tkinter Serial Port Program on Linux

This section deals with running and configuring the tkinter serial port communication program on a Linux operating system like Ubuntu or Linux Mint.
You can watch the Youtube Video Below to Find out.
Here we explain How to install the required libraries like Tkinter,ttkbootstrap,pySerial on Debian based Linux systems like Ubuntu, Linux Mint etc.
How to Find out your Serial Port Number on Linux
In Linux, serial ports are generally exposed as device files under /dev directory.
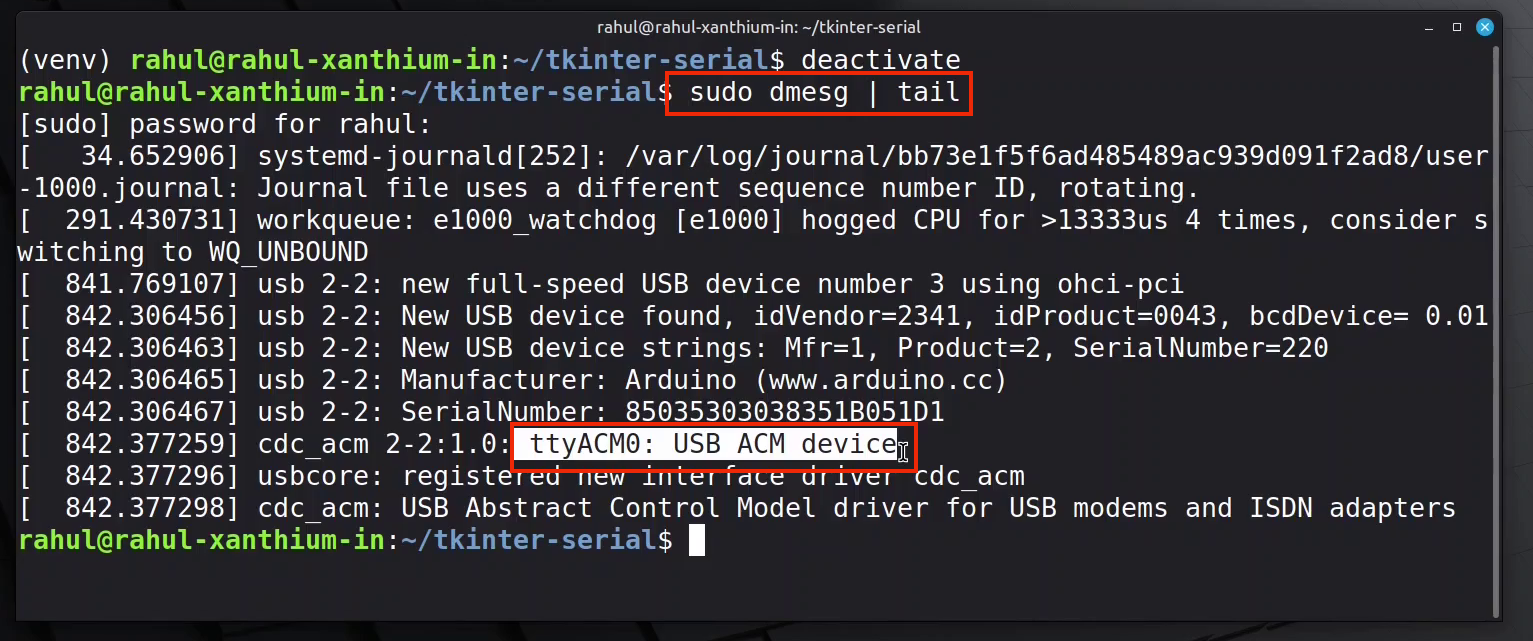
Here we are going to use an Arduino to communicate with a Linux PC ,Most Arduino boards will be implementing the USB CDC ACM interface which will appear as /dev/ttyACM0 or /dev/ttyACM1
You can connect your board to the Linux PC and issue the following command
$sudo dmesg | tail
How to configure the required permissions on Linux
If you try to open a serial port on Linux system,
you may get a “Permission denied” error because your user account does not have permission to access the serial port device.
On many Linux distributions, serial devices are owned by the dialout group. Adding your user account to the dialout group gives you permission to access these serial ports. .
You can add user to dialout using
sudo usermod -a -G dialout $USER
Remember to reboot the system and login again.
Install Python,PySerial and TTKBootstrap on Windows 11
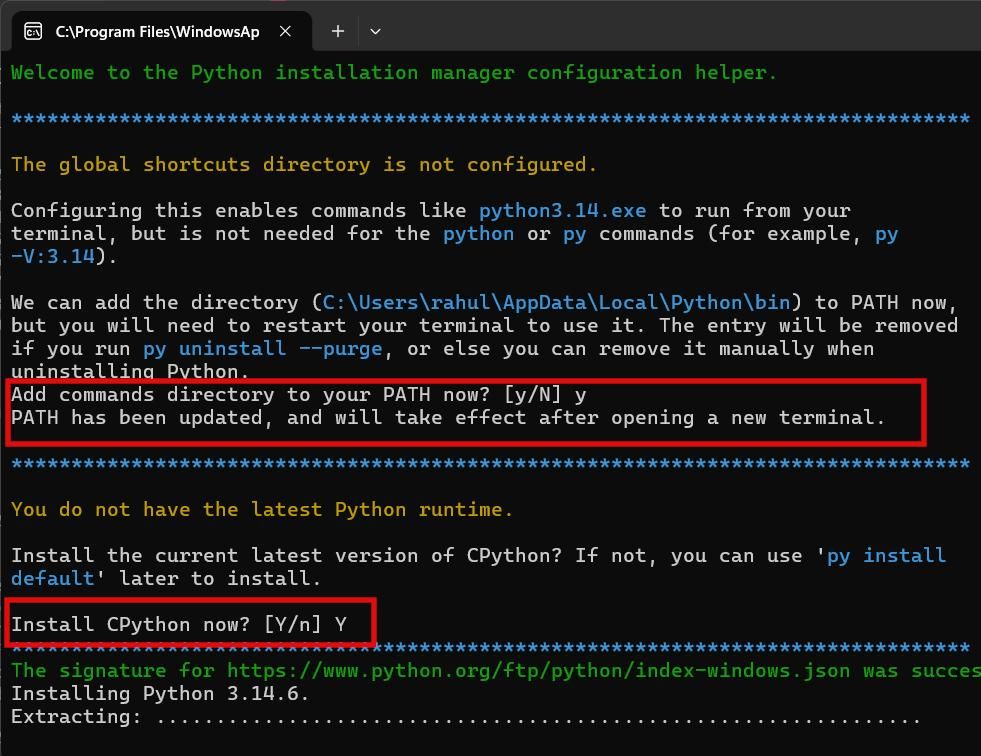
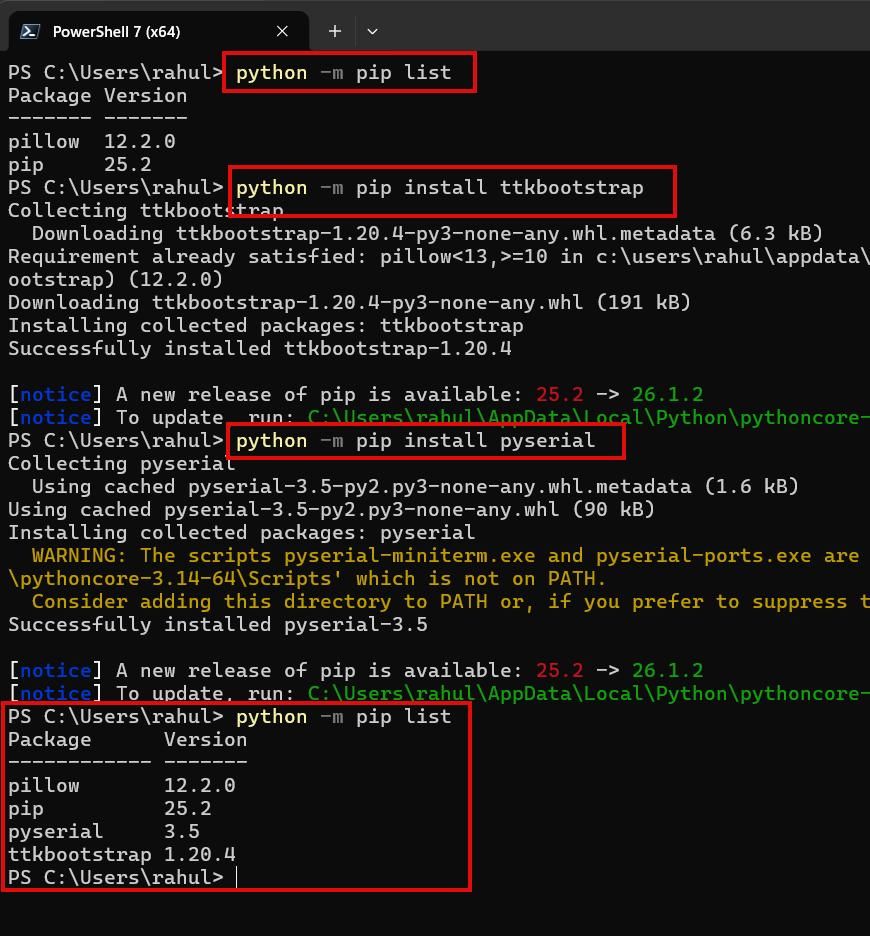
This section Details How to Configure and Install the Required Libraries on a Windows System (Windows11)
Before creating the Python Tkinter (ttkbootstrap) based Serial Monitor application, ensure that the following software and libraries are installed on your Windows 10 or Windows 11 system.
Install Python (Includes Tkinter GUI Library)
Download and install the latest version of Python 3 Interpreter from the official Python website.
The standard Python installation already includes the Tkinter GUI library, so no separate installation is required for Tkinter.
After installation, verify that Python is installed correctly by opening Command Prompt /Power Shell and running.
Install ttkbootstrap Theme Extension using PIP
ttkbootstrap is a modern theme extension for Tkinter that provides attractive, professional looking widgets and several built-in themes.
You can install it using pip
or
Install PySerial
PySerial is the library that enables Python to communicate with Arduino and other microcontrollers over a serial (UART/COM) port.
Install it with pip
Verify All Installations by using
Install TTKbootstrap Using Thonny IDE
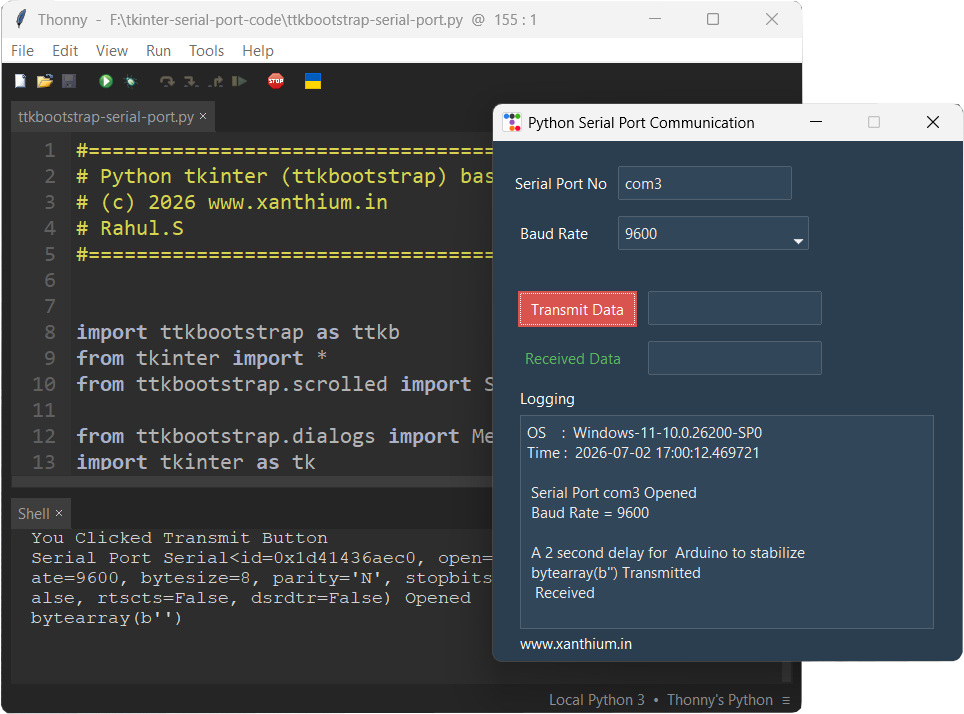
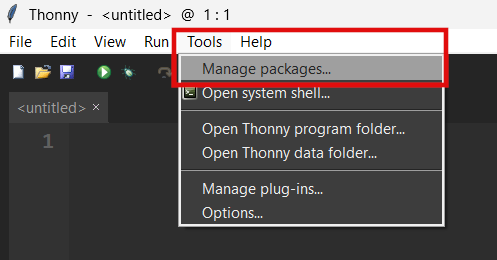
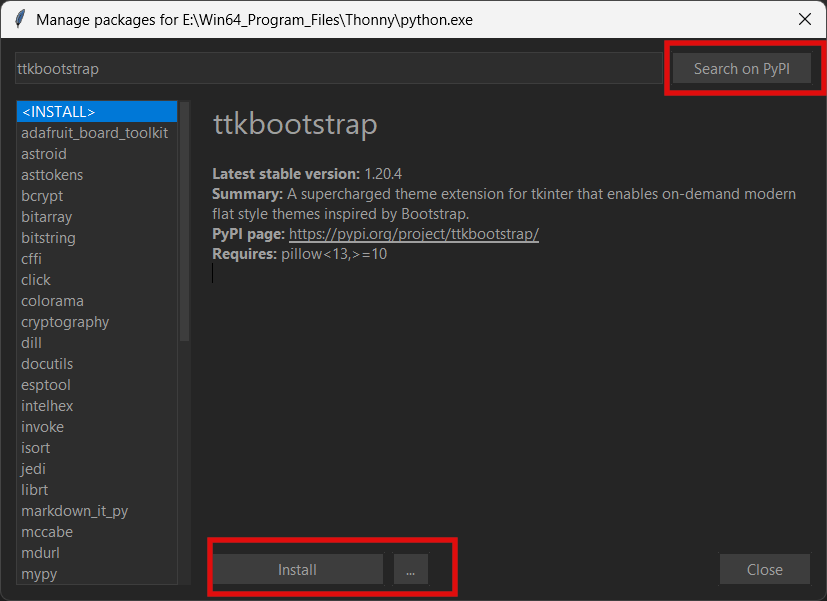
An alternative method for setting up the Python development environment is to install the Thonny IDE, which provides a beginner-friendly, open-source Python programming environment.
Thonny comes bundled with its own Python interpreter, so you do not need to install Python separately on your system. This makes the setup process simpler, especially for beginners who are new to Python programming.
The Thonny IDE also includes the PySerial library by default, allowing you to start working with serial communication projects without manually installing the package.
To install the ttkbootstrap library in Thonny:
- Open Thonny IDE
- Navigate to Tools → Manage Packages...
- In the package search box, enter ttkbootstrap
- Select the package from PyPI
- Click Install to add the library to your Python environment
After completing these steps, your system will be ready for developing Python Tkinter GUI applications with serial communication support.
Connect an Arduino to Tkinter GUI Windows
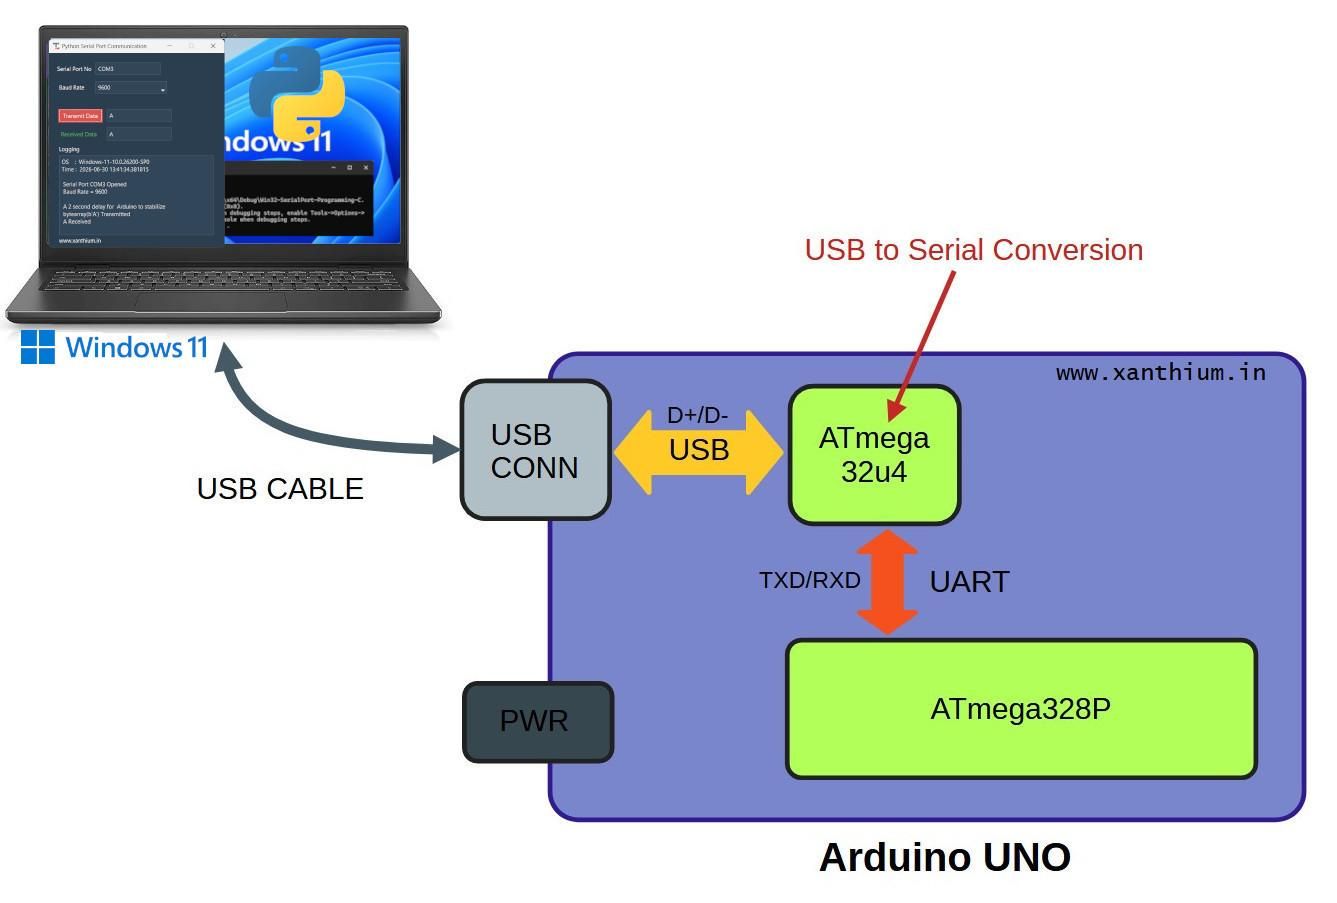
This section explains the hardware setup required to connect an Arduino board to a Windows PC for serial communication using a Python Tkinter (ttkbootstrap) application.
The first step is to connect your Arduino board or USB-to-Serial converter to the Windows PC using a USB cable. Once connected, Windows will detect the device and create a virtual serial communication port.
To identify the assigned COM port number, open Device Manager in Windows and navigate to the Ports (COM & LPT) section.
Locate your Arduino or USB-to-Serial device and note the corresponding COM port number. This COM port will be used by the Python Tkinter serial communication program to establish a connection with the hardware.
After identifying the COM port, you can run the Python/Tkinter Serial Communication application and begin exchanging data with the Arduino.
Make sure that the required Arduino firmware or sketch has already been uploaded to the board before starting communication.
The Python Tkinter application communicates with the Arduino through the virtual COM port created by the USB interface.
Arduino UNO Serial Communication Architecture
The Arduino UNO consists of two microcontrollers that work together to provide USB and serial communication functionality:
- ATmega328P – The main microcontroller responsible for running the Arduino sketch uploaded by the user. It handles the application logic and communicates through its built-in UART interface.
- ATmega16U2 – A secondary microcontroller that functions as a USB-to-Serial converter. It manages communication between the computer's USB interface and the UART interface of the ATmega328P.
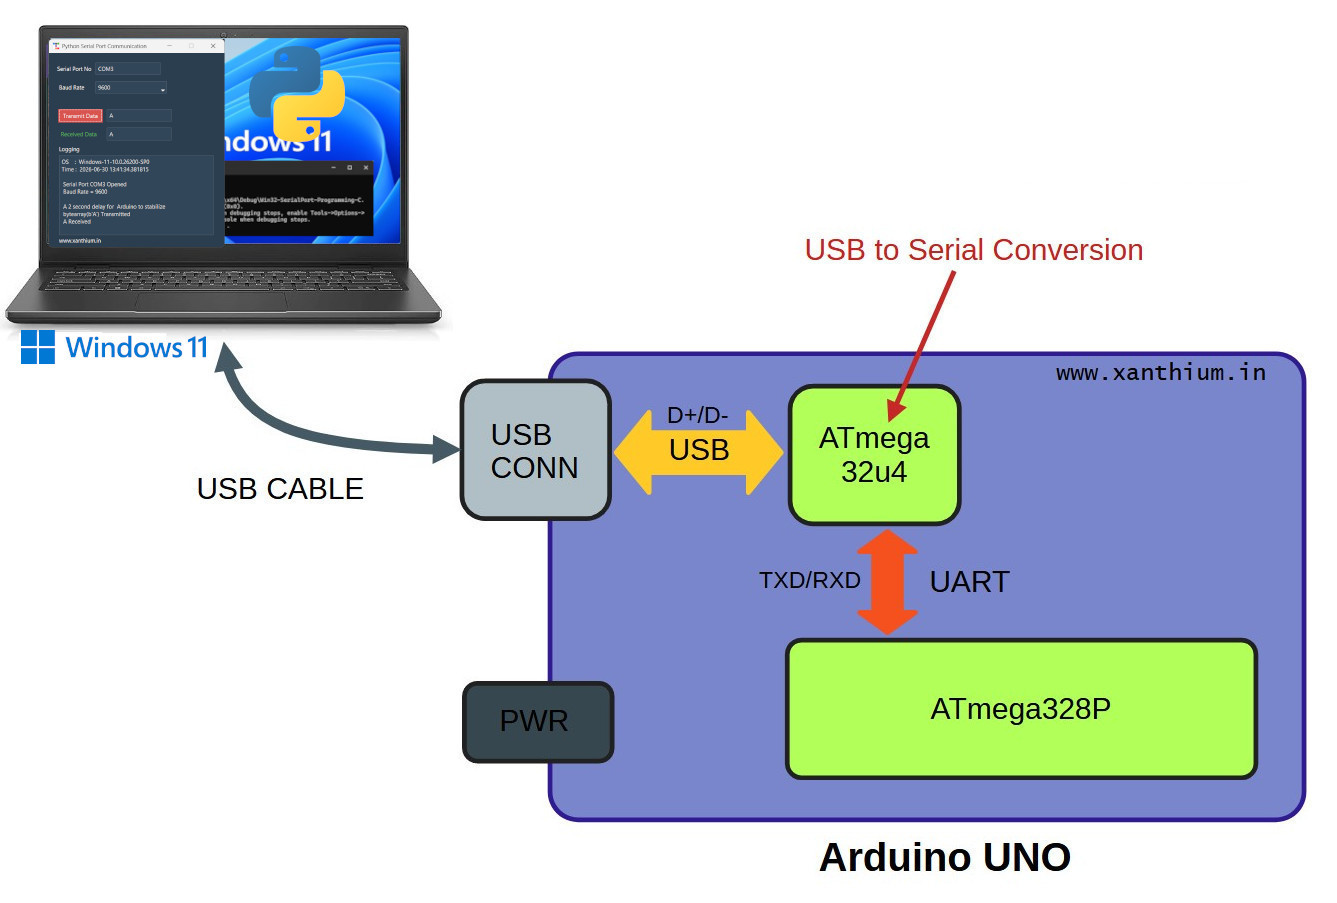
The UART pins of these two microcontrollers are directly connected internally. The TX (Transmit) pin of the ATmega328P is connected to the RX (Receive) pin of the ATmega16U2, while the RX pin of the ATmega328P is connected to the TX pin of the ATmega16U2.
When the Arduino sketch running on the ATmega328P sends serial data, the data is transmitted through its TX pin to the RX pin of the ATmega16U2. The ATmega16U2 converts this UART data into USB data packets and transfers them to the Windows PC through the USB connection.
Similarly, when the Python Tkinter application sends data from the PC, the ATmega16U2 receives the USB packets, converts them back into UART signals, and forwards them to the RX pin of the ATmega328P. The Arduino firmware can then process the received data and perform the required operations.
Interface Microcontroller UART With Tkinter Script on PC
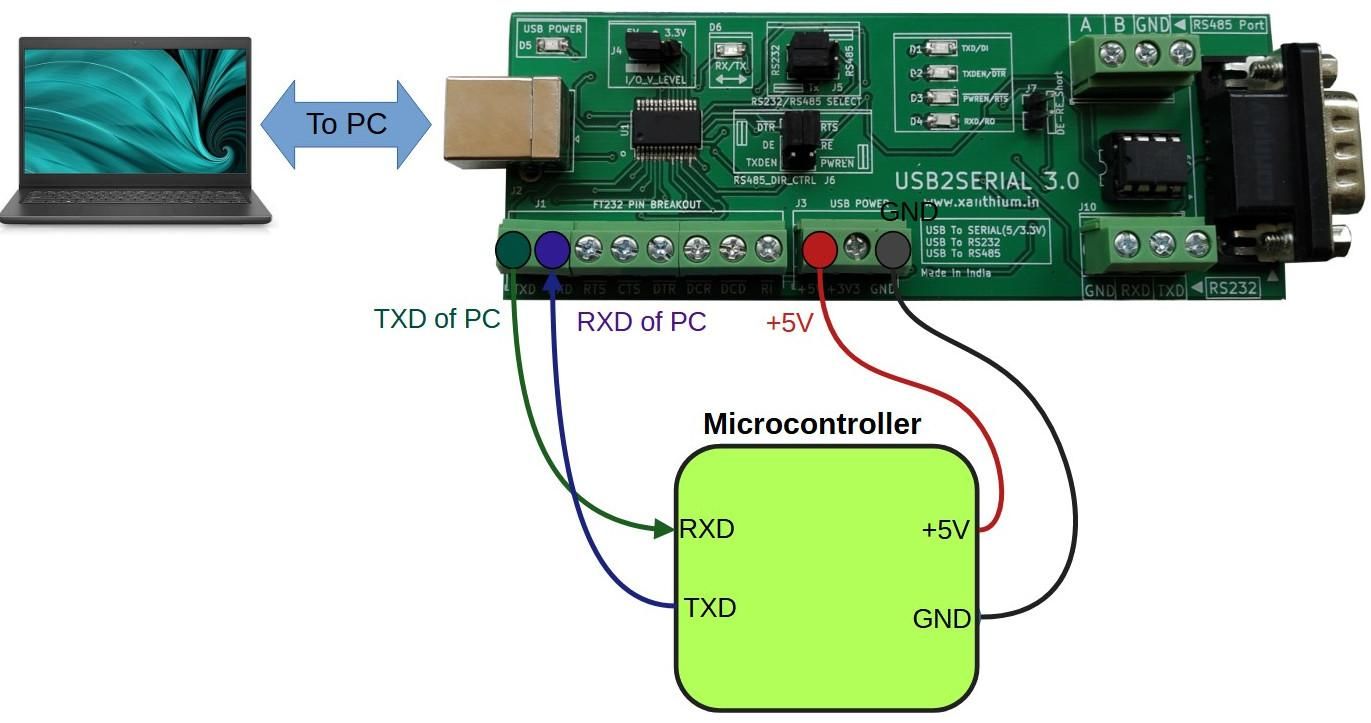
In this section, we will explore how to interface a bare microcontrollers
such as the
- 8051 (AT89S51/W78E052DDG),
- MSP430,
- PIC16F series,
- or ATmega328P
with a Windows PC and exchange data using UART serial communication through a Python Tkinter application.
Unlike Arduino boards, standalone microcontrollers do not usually have a built-in USB interface. They communicate using their native UART (Universal Asynchronous Receiver/Transmitter) peripheral, which requires an additional interface circuit to connect with a modern computer.
Since most modern computers and laptops no longer include traditional RS-232 serial ports and primarily provide USB ports, a USB-to-Serial converter is required.
This converter acts as a bridge between the microcontroller's UART signals and the PC's USB interface, allowing the Python Tkinter application to communicate with the embedded hardware through a virtual COM port.
The basic communication setup consists of:
- A standalone microcontroller with UART support
- A USB-to-Serial converter
- A Windows PC running the Python/Tkinter serial communication application
The USB-to-Serial converter converts the UART TX/RX signals from the microcontroller into USB data packets that can be understood by the computer. Similarly, data sent from the Python application is converted back into UART signals and transmitted to the microcontroller.
Supported Microcontroller Platforms
The same communication method can be used to interface various microcontrollers with a Windows PC, including:
- 8051 family microcontrollers (AT89S51, W78E052DDG, etc.)
- MSP430 microcontrollers
- PIC16F series microcontrollers
- ATmega328P and other AVR microcontrollers
- Other UART-enabled embedded controllers
USB-to-Serial Converter Example
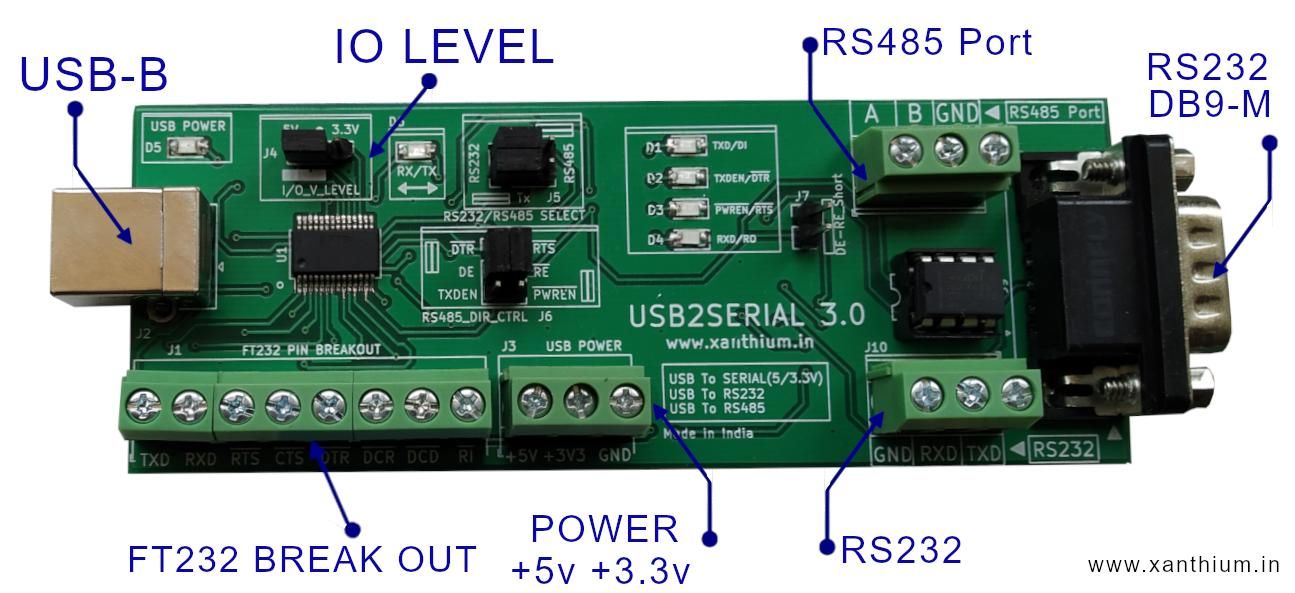
For this setup, a USB-to-Serial converter such as USB2SERIAL V3.0 can be used. This type of converter supports multiple communication standards, including
- USB to TTL UART conversion
- USB to RS232 conversion
- USB to RS485 conversion
These features make it suitable for a wide range of embedded and industrial communication applications.
Electrical Isolation for Industrial Applications
In many industrial and automation environments, microcontrollers are connected to external equipment that may generate voltage spikes, electrical noise, or transient disturbances. These unwanted electrical events can travel through the communication lines and potentially damage the connected computer or USB port.
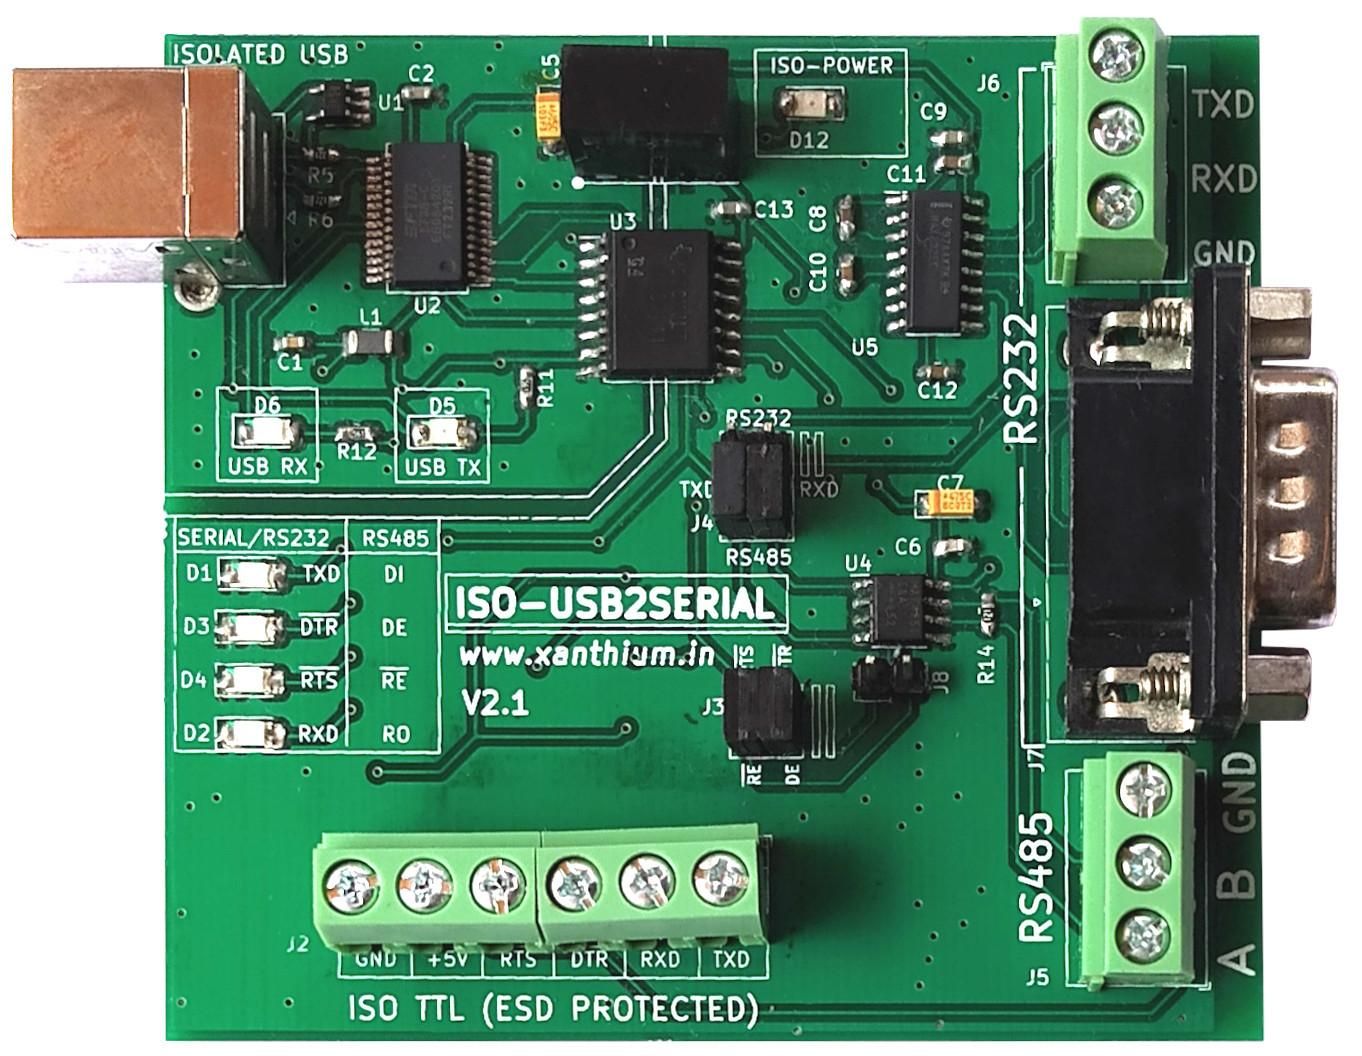
For applications where electrical protection is important, an isolated USB-to-Serial converter is recommended. An isolated converter provides galvanic isolation between the PC and the microcontroller circuit, preventing direct electrical connection and protecting the computer from high-voltage transients and ground-related issues.
For such applications, an isolated USB-to-Serial converter such as ISO-USB2SERIAL V2.0 can be used. These converters typically support:
- Isolated TTL UART communication
- Isolated RS232 communication
- Isolated RS485 communication
They are particularly useful in industrial control systems, automation equipment, data acquisition systems, and embedded applications operating in electrically noisy environments.
System Architecture of a Tkinter Serial Communication Program
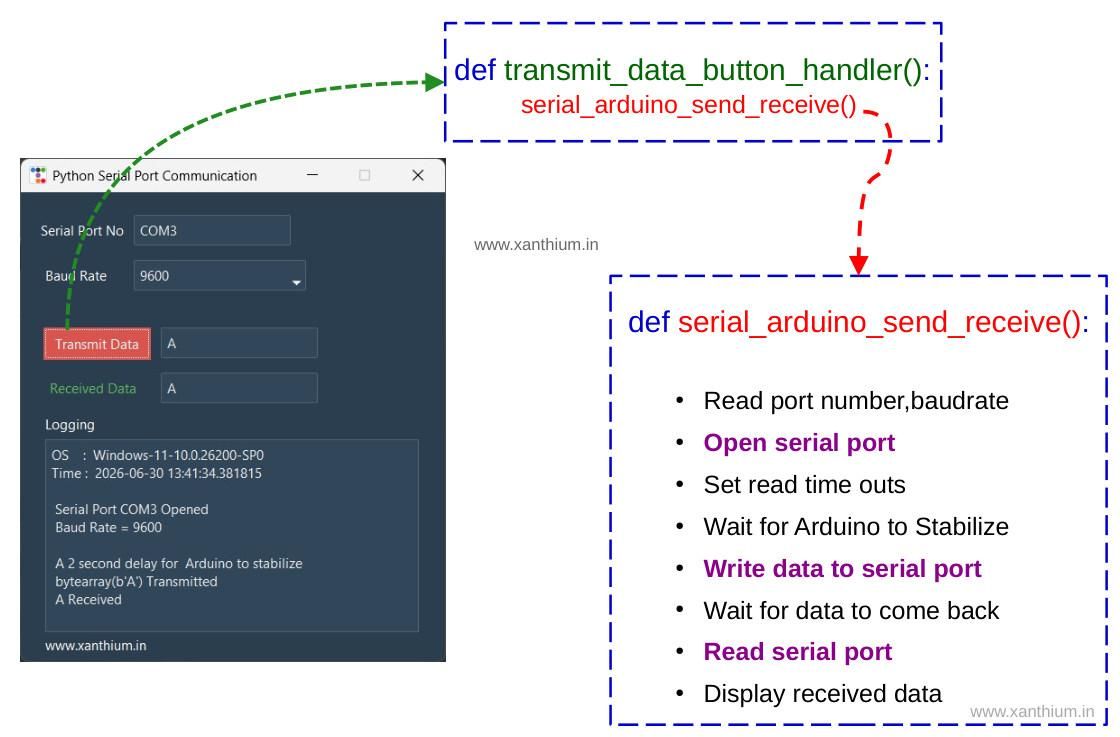
The application begins by creating all the required GUI components inside the main Tkinter window, including entry fields, combo boxes, buttons, and data display areas. Each GUI element is assigned a specific event handler function that is executed when the user interacts with it.
The complete communication process is controlled by the Transmit Data button, as illustrated in the program flow diagram(above)
Before starting communication, the user enters the required serial communication parameters, such as the COM port number, baud rate, and other settings using the input fields and drop-down selection boxes provided in the GUI.
When the user clicks the Transmit Data button, the control is transferred to the button event handler function:
This handler function acts as an intermediate layer and calls the main communication function:
The serial_arduino_send_receive() function performs all the major serial communication tasks. It attempts to establish a connection with the selected serial port using the Serial class from the PySerial library:
The function uses the user-provided COM port number and baud rate values to configure and open the serial connection.
Once the serial port is opened successfully, the program configures the required read timeout parameters. Opening a serial connection using PySerial causes the Arduino board to automatically reset, so the program introduces a short delay to allow the microcontroller to restart and become ready for communication.
After the Arduino is initialized, the Python application sends a character or command to the Arduino using the PySerial write() method. The program then waits for a response from the Arduino.
On the Arduino side, the uploaded firmware continuously monitors the serial port. When it receives data from the PC, it processes the received character and sends a response back through the UART interface.
The Python application receives this response using the readline() function from PySerial. The received serial data is then displayed inside the Received Data display area of the Tkinter GUI window.
Tkinter (ttkbootstrap) GUI Elements Used in Serial Monitor
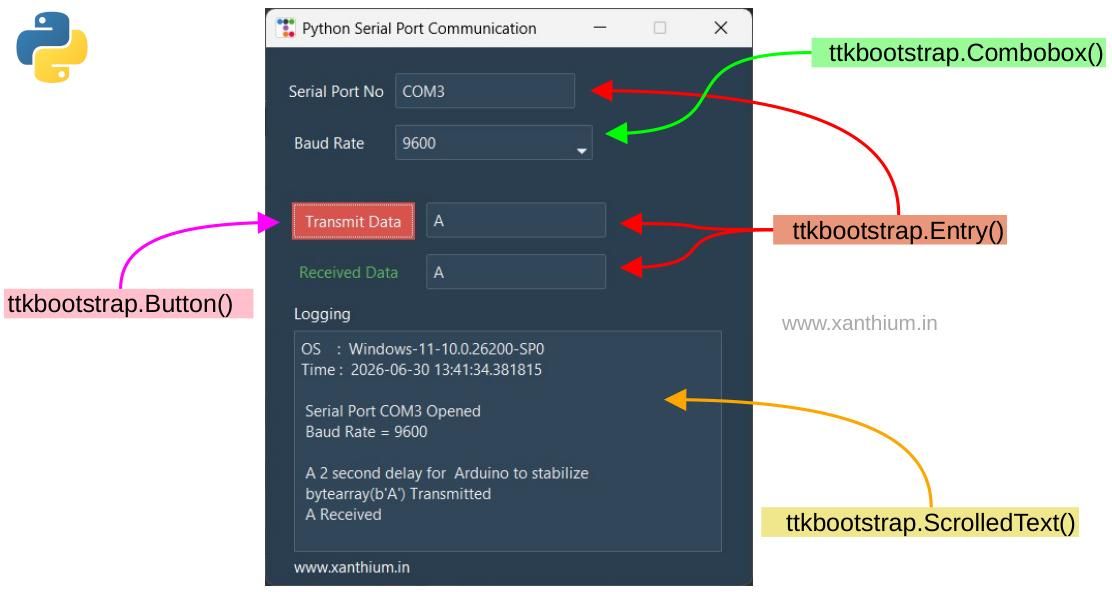
The GUI elements used in this application are responsible for handling user inputs and displaying communication information. Each widget performs a specific task, such as allowing the user to select a COM port, enter a baud rate, transmit data, or display received serial messages.
To keep the program simple and easy to understand, we will focus only on the essential Tkinter/ttkbootstrap widgets required for building this Serial Communication application.
The main GUI elements used in our Python Tkinter Serial Port Communication program are listed below
- Label -> ttkbootstrap.Label() -> Used to display text descriptions, titles, and information next to other GUI controls
- Button -> ttkbootstrap.Button() -> Used to trigger actions such as opening communication, sending data, and starting serial transactions
- Drop Down List -> ttkbootstrap.Combobox() Used to provide selectable options such as available COM ports and baud rate values
- Text Entry Box -> ttkbootstrap.Entry() Used to accept user input such as serial commands, port names, and communication parameters
Sending and Receiving Data Into Serial Port From Tkinter
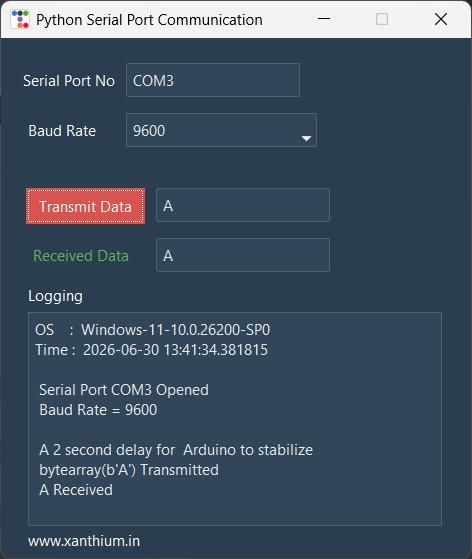
The communication between the Python Tkinter application and Arduino is handled using the PySerial library. The program opens the serial port, sends data entered by the user, receives the Arduino response, and displays the received information.
The serial communication process starts by opening the selected COM port using the serial.Serial() function:
The COM port number and baud rate values are provided by the user through the Tkinter GUI. After opening the port, a read timeout is configured to prevent the application from waiting indefinitely for incoming data.
The data entered in the Tkinter Entry box is first read using the .get() method:
Since PySerial requires data in byte format, the string is converted into a byte array:
When the serial port is opened, the Arduino automatically resets. A short delay is added to allow the Arduino to restart and initialize properly.
The data is then transmitted to the Arduino using the write() method:
The Arduino receives the data through its UART interface, processes it, and sends a response back to the PC.
The Python program reads the incoming serial data using:
The received bytes are converted back into a readable string using decode():
The .strip() function removes extra characters such as carriage return (\r) and newline (\n) added by Arduino when sending data.