Joule Thief LED Circuits


Many of us are interested in the Joule Thief, the common name for a voltage boosting converter which allows a 1.5-volt or lower battery source to operate an LED which requires upwards of 3-volt to light. This circuit uses a single-transistor blocking-oscillator which features a coil with a secondary winding to generate timing signals to maintain oscillations.
Here, in this Instructable, we will give you the basic information on what goes into a Joule Thief, its technical aspects and offer tools to help optimize the design. In future installments, we'll go deeper into the more advanced concepts.
Oh, and yes, the big green thing is a coil - just without the ferrite core. It's called an air-core coil and obviously, it works. In fact, in some ways, it is superior to the ferrite. One advantage is that it is easily duplicated: just take some thin wires and wind it around a form - as long as the number of turns and the size of the coil are the same, it produces the same results.
Ferrite cores, often specified in the making of the JT, depend almost entirely on the material used to make it, and it is impossible to guess its performance at a glance. For example, the first coil on the left is half the size of the larger one to its right, yet it has an impedence (magnetic reactance) 8-times greater, even with the same number of turns on it.
The Setup


To help us decide on the best design it is important to start off on a level playing field, I connected a breadboard to a 1.2v, 3-amp regulated source with additional smoothing (the yellow blob on the left is a 150uF bypassed by a 0.1uF capacitor). For inductors, I have assembled 3 identical coils and they test to 100uH, within 2% of each other. I'm also using binned LEDs from Nichia which limits the color and intensity from variances.
Even so, judging from this picture, it is hard to tell any real differences between the 4 lights - the naked eye is a little better, but that's with all 4 lights side-by-side. How do we check for differences when we are swapping components in and out?
Even so, judging from this picture, it is hard to tell any real differences between the 4 lights - the naked eye is a little better, but that's with all 4 lights side-by-side. How do we check for differences when we are swapping components in and out?
The Test Equipment

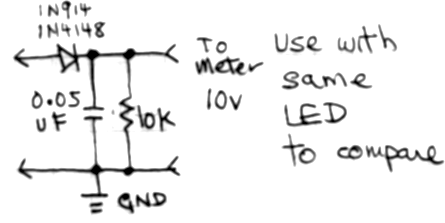


The circuit shown here is a peak-volt sensing filter with some high frequency smoothing. It is used to give a rough representation of the brightness of the LED.
One end of the diode, the cathode (unbanded) side connects to the anode of the LED, while the other end is to an external voltmeter, set to 5 or 10-volts DC. The reading gives a reasonable representation of the information you can get by hooking the circuit to an oscilloscope. To keep everything simple, it only works with similarly constructed JT's and similar LEDs.
Because the diode subtracts around 0.6v from the reading, it is not an absolute voltage, but works well as a simple Quantitative Scale (QS). This allows for a quick readout to compare the effectiveness of your design and any changes you make to it.
Evaluating the Tester


To test the effectiveness of the QS meter, we're going to build some basic JT circuits. Starting with the four lights we used at the beginning. Each circuit consists of an MPS2222 (Motorola's number for the 2N2222 transistor), 1k base drive and Nichia LED. Only the inductor (coil) is changed.
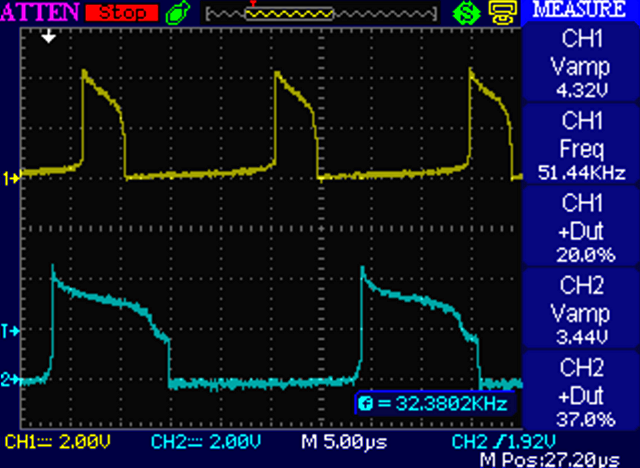
Basic Oscilloscope readouts are included, with the top (CH1 / yellow) trace always displaying the output pulse of the "standard" circuit (#2, which has one of the 'matched' 100uH inductors). The relevant numbers are the V-amp (Amplitude) and +Duty (-cycle); the higher they are, the more light is produced.
#1 810uH coil QS=3.18 (CH2, first graph)
#2 100uH coil QS=3.56
#3 18uH (Air) QS=3.14 (Ch2, 2nd graph)
#4 100uH Driver QS=2.80 (Ch2, 3rd graph)
The last circuit is a faux-JT in that it replaces the secondary winding with a capacitor and another transistor, which lets us use off-the-shelf inductors instead of winding our own. It also illustrates one of the weaknesses of the measuring tool - despite its low QS reading, its output seems very bright. A look at the last Oscilloscope display (CH2, blue) gives us some hints. First, Although V_amp is only 3.52v, its wave-form is a more rounded peak instead of a quick drop. Another hint is the +Duty: it is over 25% longer than the basic JT (34% vs 27%). Remember the tester can only be used to compare similar JT circuits and LEDs!
Some Oddities


The 2 examples shown here should prove to you how easy it is to make a Joule thief.
The first is a tiny coil made from 16 turns over a drinking straw while the second is a hank of wire, about 20 turns, with another, similar chunk placed over it and held in place. They both give reasonable results - and it's EASY!
The first is a tiny coil made from 16 turns over a drinking straw while the second is a hank of wire, about 20 turns, with another, similar chunk placed over it and held in place. They both give reasonable results - and it's EASY!
The 'Impossible' Joule Thief

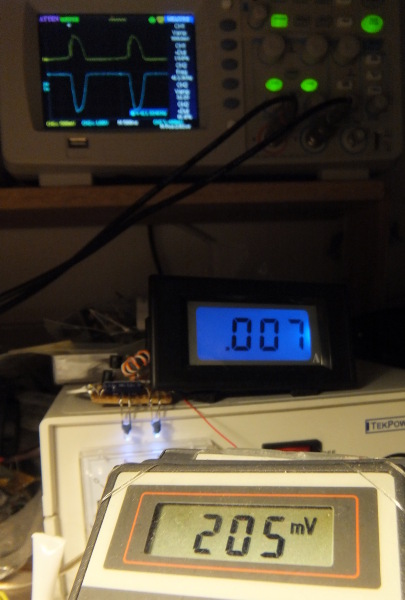

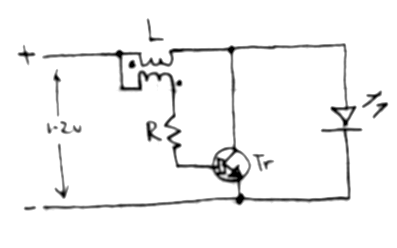
An entry from acmefixer's blog brings us this strange beast - it's a Joule Thief type circuit that runs on 200mV! That's a fifth of a volt! And all it uses is the plain old MPS2222 silicon transistor!
A few changes allow this to happen: First, the coil must have a Secondary with at least 3 times as many turns as the Primary, and the LED is connected between the Base (-) and the Collector (+) of the transistor. The circuit cannot start at this voltage, but, once given a jump (with a 1v jolt), it is very stable, drawing a measly 7-milliAmps from the supply.
A look at the scope's reading tells us how it works. The top (yellow) trace shows the voltage slowly growing, which increases the drive on the Base, forcing the transistor to conduct harder. This stops when the supply cannot drive the coil any more. The base drive disappears, the field collapses, producing the pulse. This induces a negative pulse on the Base (Blue trace) which is 3-times greater. By placing the LED across this, it has enough power to light, if dimly. The falling edge of the pulse pushes the transistor back into conducting mode and the cycle continues.
The Usual Suspects


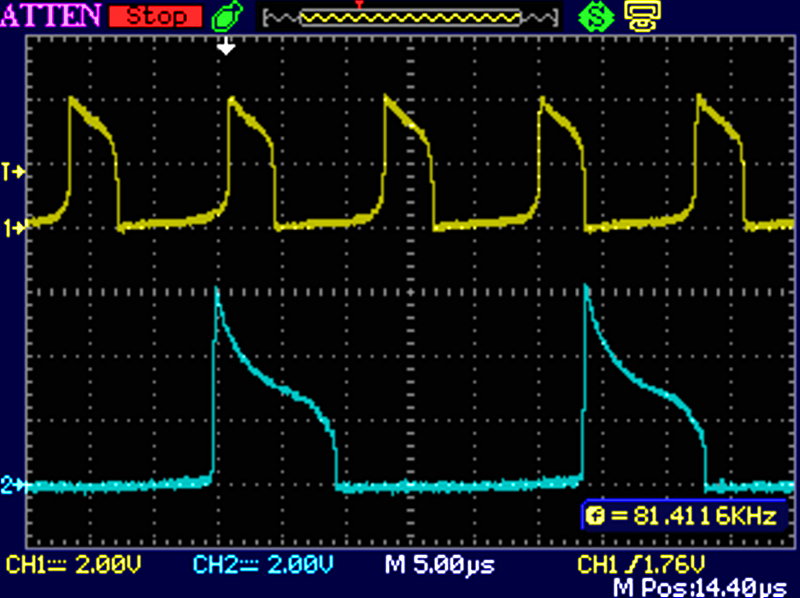


For the Joule Thief to work well, it is important to choose the right transistor; it has to handle relatively high currents and switch quickly on very small signal changes. It will also have to work with low voltages at frequencies beyond the audio spectrum. If you look at the data sheets of the transistors, the key pieces of information will be Ic (or Max Collector Current), HFE (the Signal Gain or Amplification factor), Vce (the Collector-Emitter Voltage drop) and ft (Frequency). Successful candidates should have a low, low Vce (less than 0.2v) and high Ic, HFE and ft.
The following table lists some of the popular makes with graphs for them below. The 2N3904 values are always shown on Ch1, in yellow:
2N3904 QS = 3.14
MPS2222 QS =3.32
2N4401 QS =3.38
BC337-25 QS =3.73
BC337-40 QS =4.02
MPS651 QS =4.12
Dual 2222 QS =4.20
2SC2500 QS =5.00
2SD965 QS =5.17
According to these results, the 2SD965's output should be vastly superior to the 2N3904, and the picture below shows this. It is even more apparent if we put a sheet of paper above the lights, as the second image shows.
Double the Fun

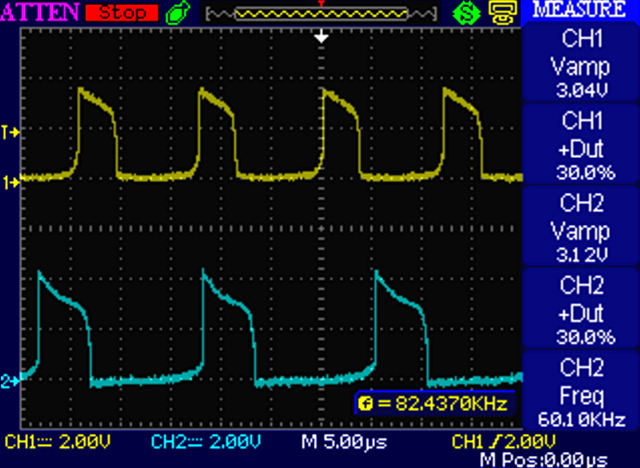
Tucked away at the bottom of the chart above, three from the bottom, is the entry 'Dual 2222'. This means a JT that is made with a second MPS2222 paralleled to the original. It's THAT easy to supersize our Joule Thief - just by slipping another tranny in place!
We have just touched on the basics of what makes a good Joule Thief - another aspect, that of efficiency will be considered in a future installment. Until then, you can find out more about Joule Thiefs on my site.