LED Lamp Out of a Glass Container (Raspberry Pi Pico)
by Nick Programmer in Circuits > Raspberry Pi
3693 Views, 10 Favorites, 0 Comments
LED Lamp Out of a Glass Container (Raspberry Pi Pico)

LED Lamp out of a Glass Container is a Raspberry Pi Pico based LED strip Controller, that has different modes that you can change using only a single button.
I decided to make LED lamp with modes because I got a useless glass container. If you afraid of darkness, LED lamp can help you to fall asleep. LED lamp might be stylish thing in your room.
I added different modes, that you can control using a single button.
- RED;
- GREEN;
- BLUE;
- ORANGE;
- RAINBOW;
It's really better to use something useless than kick it out to trash can.
Supplies

- Raspberry Pi Pico x1;
- Button x1;
- Capacitor 1000uF x1;
- Resistor 4.7k x1;
- Accumulator (Min 1.8v. Max 5.5v) x1;
- RGB LED Strip WS2812b x1;
Install and Configure Arduino IDE *Optional


If you have never used Arduino IDE, you will need to download and install it. We'll need to download and install Arduino IDE to upload the code into a microcontroller.
ATTENSION!!! Do not download 2.x versions, at the moment of 10/6/2023 there are still a lot of bugs. It better to download a 1.8.19 version.
Download it here - https://www.arduino.cc/en/software
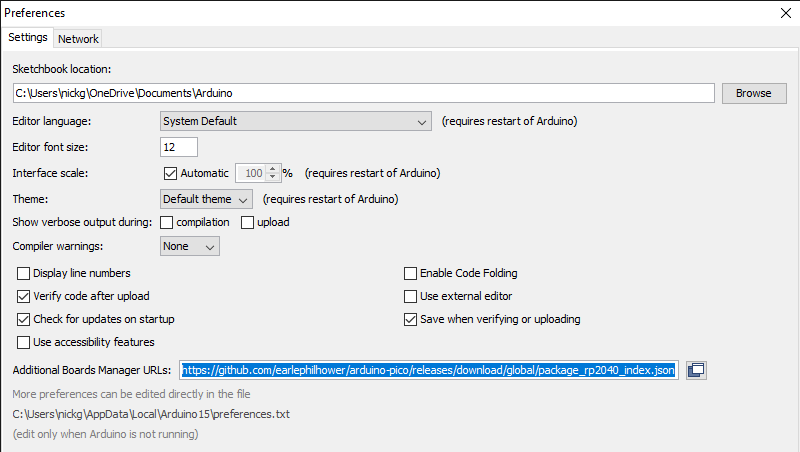
- After Installing, navigate to File > Preferences
- Find Additional Boards Manager URLs, and paste this link into a text field - https://github.com/earlephilhower/arduino-pico/releases/download/global/package_rp2040_index.json
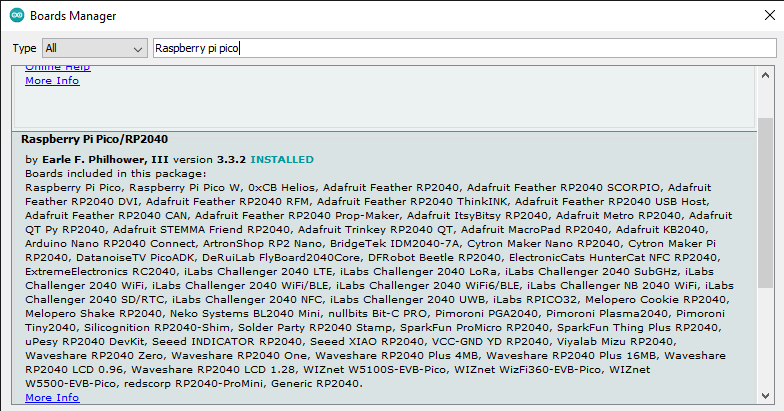
- Then, navigate to Tools > Board: > Boards Manager
- Type the "Raspberry Pi Pico" in a search field, find and Install.
Download and Install Libraries

Install libraries is necessary to work with the microcontrollers, encoders, displays, thermometers, other components, and get the information from there.
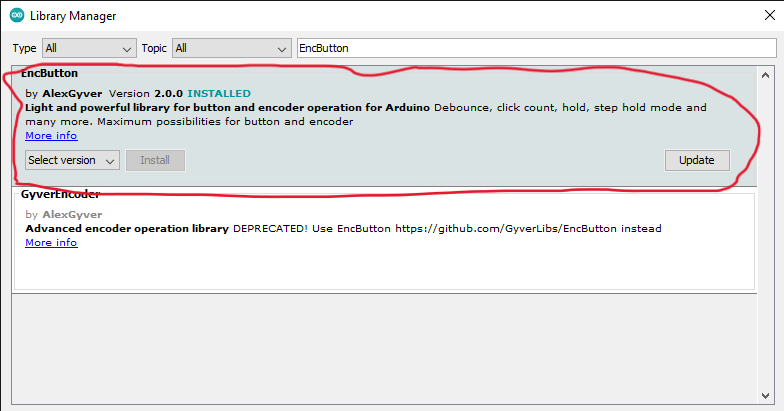
- Navigate to Sketch > Include library > Manage Libraries
- Type every single library one by one and download:
- EncButton
- Adafruit NeoPixel
Download Firmware


The Firmware folder is the main folder of the project because it contains the code, that we'll upload into a microcontroller.
GitHub Repository: https://github.com/NickProgrammerOffical/LED-Lamp-with-different-modes/tree/main/Firmware
- Download the .zip on my GitHub.
- Extract the Firmware folder, then open Firmware.ino file with Arduino IDE.
Install Arduino-pico-littlefs-plugin

The primary purpose of the arduino-pico-littlefs-plugin is to let you upload the files into the RPI's flash memory. In this tutorial, the purpose of this tool is to format the RPI's flash.
Download the file called PicoLittleFS-0.2.0.zip from https://github.com/earlephilhower/arduino-pico-littlefs-plugin/releases/tag/0.2.0
And then extract the content of the archive into the "...\Arduino\Tools\" folder.
After that, restart the Arduino IDE.
Flash the Raspberry Pi Pico


The last step of assembling is upload code into microcontroller.
- Navigate to Tools > Board: > Raspberry Pi RP2040 Boards > Raspberry Pi Pico;
- Hold BOOT button on Raspberry Pi Pico board and plug it to the computer;
(The step is necessary to be able to see the boot port)
- Navigate to Tools > Port > UF2 Board;
- Click upload button in the left top corner;
Assemble the Lamp

It actually takes 2 minutes to assemble.
Assembling is one of the easiest steps of instructable.
Put Everything Into a Glass Container


This step is not the easiest because putting takes a lot of careful work.
Put everything into a container and close it
Enjoy


Congratulations, you made it!
Now, enjoy. Push button to change mode.