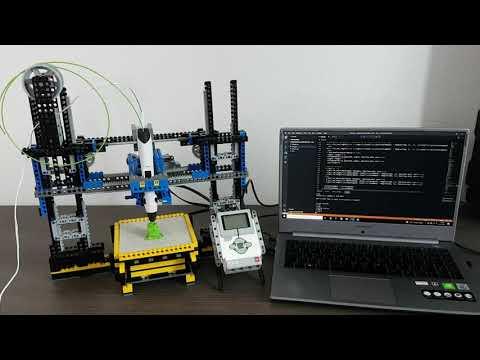
LEGO 3D Printer Using 3D Models
by Creative Mindstorms in Circuits > Robots
5062 Views, 15 Favorites, 0 Comments
LEGO 3D Printer Using 3D Models


This is a guide on how to make your own 3D printer, that can print out any 3D model, in just a few clicks.
It's written in Python (with ev3dev and micropython extension).
Video: https://youtu.be/AXyhm5_saEY
IMPORTANT: I have since made a new version, including building instructions.
Supplies
- Lego
- Lego Mindstorms (+ batteries)
- 4 Lego Mindstorms Motors
- Lot's of Lego bricks
- 3D pen
- micro SD card
- Software
- Visual Studio Code
- balena Etcher
- Slicer/ source of Gcodes
- Downloads
Building the 3D Printer


First you'll need to make a LEGO Mindstorms 3D printer.
If you haven't built your LEGO Mindstorms 3D printer yet, here are some tips:
- Make sure you build a solid structure, because the smallest amount of movement, will make a big difference in the end result.
- Move your platform from two opposite sides per axis. Don't try moving it with just one gear on one side, because the platfom won't move in a straight line, and may get stuck. You can simply make an axle go underneath the platform or above the gear racks and connect it to the platform with some gears. Another option is to move the platform with linear actuators attached to the middle of a side.
- If you work with gears, make a gear transmission that reduces the speed at which the platform moves, in all three directions. I recommend only one transmission on the X and Y axis, and a larger or more reductions on the Z axis, as the platform would go too slow if you made more transmissions.
- Make sure you use two of the same motors with the same transmissions to move in the X and Y direction. The code is programmed to work with two of the same motors, because the medium and large motor rotate at a different speed. When you use two different motors, the code won't work propperly and your prints will fail.
- Build a mechanism that can push the extruderbutton on the 3d pen. It will reduce the amount of loose strings.
Setting Up the Software and Mindstorms


First you need to download all the programs for the Mindstorms 3D printer:
- Visual Studio Code
- balena Etcher
- The EV3 MicroPython micro SD card image
- Code + Files
- Slicer (I recommend Ultimaker Cura)
You first need to flash the SD card with the EV3 MicroPython micro SD card image. You can find instructions on how to do this in the Getting started guide from Mindstorms Education EV3 MicroPython.
After this, you can download Visual Studio Code, and download the required extensions.
Customizing the Code

You can change these variables in the program, to make the code work with your 3D printer:
- :portSelection - You can define the ports in which the motors are put into.
- :startposition - If your 3D printer starts at an offsetpoint, change the numbers to your offsetpoint.
- :degreestomm Give the amount a motor has to turn, in order to move 1mm. (you may have to increase or decrease them a little bit)
- :motorSpeed - The speed at which the motors have to turn. (I recommend putting it low)Scale: 0 - 1000(you should keep the max speed 900)
- :filename - Change this to select which gcode file the program has to read and print.
Add 3D Models

If you want to add new 3D models:
- Add custom 3D printer settings, with the correct layer height and printing space dimensions. (layer height should be arround 1mm)
- Change the printing settings till they seem right.
- Slice your 3D model with your slicer and save the Gcode file.
- Make a new .txt file in the Mindstorms_3D_printer_code - V2.0 folder.
- Copy the entire Gcode text (ctrl. + A, ctrl. + C) and paste it into the new text file (ctrl. + V).
- Change the :filename in main.py to the filename from the file you just added.
Start Printing!

Now you've set everything up, start the program (Click here for instructions).
Your very own 3D printer should now start printing!
Errors and Contact Info


If you've come across any errors, or simply can't figure out how to get your 3D printer to work, feel free to contact me via mail!
If you've succesfully completed your 3D printer, feel free to share it with me as well, as I would love to see your 3D printer in action!
IMPORTANT: Remember the Creative Commons licence
You are allowed to use the downloadable files for personal use, but not for commercial purposes.
If you want to publish your 3d printer using one of the files, please add the following to your publishment:
Code by: Creative Mindstorms - https://youtu.be/AXyhm5_saEY