Laser Cut a Mini Frame Loom and Make a Mini Woven Wall Hanging
by AngelonEmpire in Craft > Fiber Arts
383 Views, 4 Favorites, 0 Comments
Laser Cut a Mini Frame Loom and Make a Mini Woven Wall Hanging

I've been collecting yarn for years because it's just so soft and pretty. When JoAnn's was going out of business, I noticed the very last thing to go was yarn, so I bought up a bunch of it. I added it to the many bags of yarn, threads, and cord I already own, and decided I needed to figure out what to do with all of it!
One thing I have always wanted to try is weaving. I've seen the mini weaving looms in craft stores and pined after them, but ultimately decided I need to reduce the craft supplies I already have before trying something new. Yeah, boring, but my craft room is kinda flowing over.
But now I have excessive yarn and a laser cutter I just broke out of storage! So, that's how the idea for this mini tapestry wall hanging started. I wanted to use my wood scraps to make my own mini weaving loom and a bunch of the pretty new yarn I bought to clear up the overflowing closet in my craft room.
And because I'm the type of person who likes to just wing it, I decided to do this with absolutely no experience at all! Let's see what happens!
Supplies

Materials
- Scrap wood or hardboard (at least 22" x 20" in total)
- Non-stretch cotton cord (at least 11 yards)
- Colorful yarn (try to maintain the same thickness and type if you're a beginner like me)
- Lint-free cloth
- Tacky glue or wood glue
- Clear acrylic sealer (like Polycrylic)
- 2 pieces of letter sized card stock (or use the front of a family-sized cereal box)
- Rubber bumpers
Tools
- Vector drawing program like Adobe Illustrator
- Laser cutter
- The loom, comb, tapestry needle, and hanging rod we'll be cutting
- 220 grit wet/dry sandpaper
- Binder clips
- Scissors
- Fine tipped marker
- Yarn needle
Get an Education
Since the whole point of this project is to use up yarn, it would be best if I do a lot of research on how to make my own loom and how to actually weave to give my tapestry the best chance at survival. I figured I'd "wing it" when it comes to the actual design of the tapestry, but would do my best to learn some basics.
The Loom
A quick search on Amazon showed me two types of mini weaving looms on the first two pages. There is one that is flat and the notches that hold the vertical cords are flat along the same plane (all cut from one flat piece of wood). And there are ones where those notches point upward and lift your weaving project off the surface you're working on.
Both look easily doable on the laser cutter, so before I decided which one I wanted to create, I went to the videos to learn what professional mini weavers use. If a majority of them stick with one kind, I would make that kind.
Weaving
I learned there are more than two types of small weaving looms when I searched "how to use a small weaving loom" on YouTube. The two styles I saw on Amazon are both frame looms, just made differently. Most of the weavers I saw on YouTube used frame looms.
I found plenty of videos to get me started. After watching the first few minutes of some, I found a video titled "How I start EVERY weaving" created by Jenell Flynn of Spruce & Linen, and clicked that. It was very helpful. Jenell uses a frame loom of her own design. The notches on hers lie flat like the first style I saw on Amazon, but hers is made of four sides put together at the corners with screws rather than all one piece.
After watching that video, I looked at the other videos she has available and so many of them are for extreme beginners like myself. It looked like I was going to be learning most of my weaving skills from Jenell.
The rest of my night was spent watching many of her videos and others as well.
What I learned
- Warp and weft: Warp are the vertical cords that are the "bones" of your work. Weft is the horizontal yarns where your design comes into play.
- Setting up warp: Stringing your non-stretch cord up and down over the notches at both ends of your loom. There are different ways to warp your loom and you need to have the right tension to work. Not too tight and not too loose.
- How to start: After you warp your loom, you might want to weave in a piece of cardboard that goes all the way across to help you maintain a straight line as you work. It also helps to put in a twining stitch (more on that later) before you start your actual design to secure the warp and your tapestry when you pull it off the loom. Then if you want fringe on the bottom, you can do that before you start your actual design.
- How to add fringe and how long to make it: It looked pretty easy to add fringe, but deciding the right length is all about creating balance. You don't want the fringe to take away from your tapestry but you don't want it so short or bland that it doesn't really add to it either.
- Plain (or tabby) stitch: This is the most common and oft-used stitch where you just go over and under the warp strings.
- How to finish: Just as important as getting started, when you've finished your tapestry, you want to do another twining stitch on top to lock in the weave and help get the whole piece off your loom so it doesn't slide around. You'll also want to tidy up loose ends by weaving them into the back. Then you want to secure it to a dowel or hanging rod so you can actually display your mini work of woven art.
I also learned there are many designs you can do like landscapes, checkerboard, diamonds, and more. I confirmed that my initial idea was actually doable. I was hoping to create a solid background and then embroider some designs like circles or butterflies on top. I might have to double warp my loom to get the detail I want. But I could just weave designs in from the beginning without doing a background. I didn't really realize this was possible. I knew I could probably do stripes since you're going from side to side, but I didn't know there were many other design options. So, my mind started thinking up designs I could do as a beginner that would involve this kind of weaving because, honestly, I have only embroidered once before in my life.
NOTE: I went back and watched videos often throughout this whole project, so what I learned in this first binge-watching of videos was not everything I needed to know to finish the project. It was just a way to soak in the knowledge.
If you want to watch the videos I found most helpful as a beginner, here's my Weaving Playlist. There are many more that are fun to watch and quite informative, but these will get you started.
Figure Out the Loom and Extras
More than just a frame
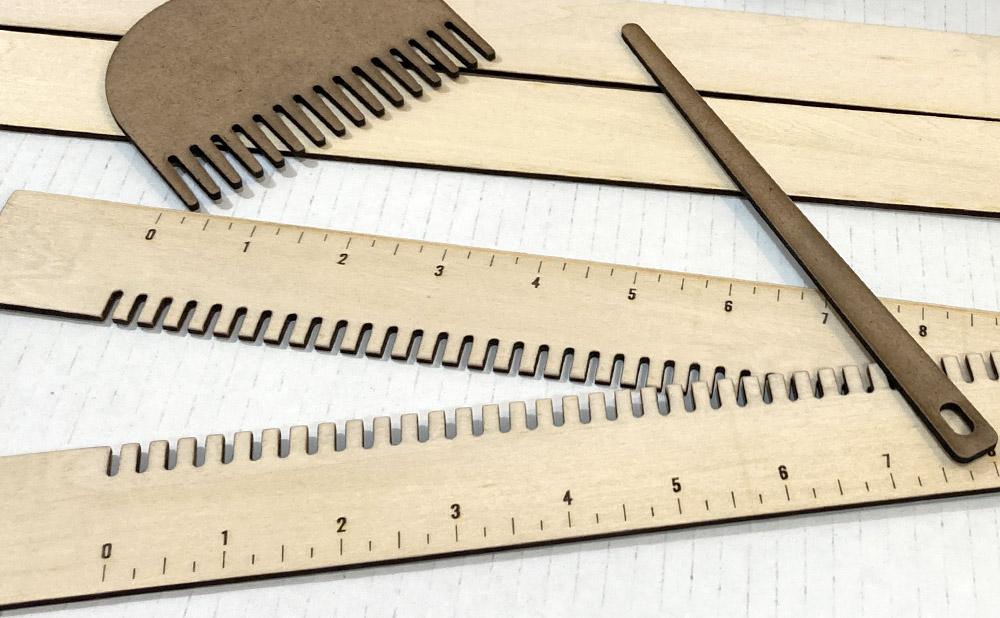
Along with the frame loom, I also needed to create a weaving comb and a tapestry needle to thread the yarn through the warp. And because I'm hanging my new yarn art on the wall, I needed to create a hanging rod with holes on the ends for a cord to hang from. You can just use a dowel as well, but I wanted to use the materials I have already.
All the little details
When I looked closely at the loom Jenell was using, I realized it was a better plan than trying to cut a loom from one giant piece of wood. I would have less waste by cutting 4 rectangles that I pieced together at the corners.
However, the biggest question I had when I was looking at all the frame looms and watching the videos was, "How far apart are those warp notches?" It would be important to know to make sure the weaving I make is strong. I also have to make the comb tines the same distance apart.
Aside from that very important detail, the rest looks pretty simple to create. The loom, as mentioned above, can be four narrow rectangles, with two of those containing the notches needed to set up my warp. I would need to figure out a way to connect the four sides with just laser cut pieces so I don't have to search for very small screws around my house. From watching the videos, I thought the comb looked to be about 1/3 the width of the weaving area with the tines the same distance apart as the warp notches. The tapestry needle would be a long, wood needle pointed on one end and rounded on the other with a hole that would allow even the chunkiest yarn through.
Actual measurements
My research taught me the space between notches on the loom depends on the kind of tapestry I wanted to make. Some people like a looser weave and want more space between their warp strings. This means the weft (or horizontal yarn) shows off more. Some people want a tighter weave so that both the warp and weft show equally. This would also make it easier to embroider designs on top. Mostly I kept seeing 1/4" between. This apparently is more helpful for beginners, too. So, I think I will stick with the 1/4" distance that seems to be most common.
After watching many more videos, I learned this means the loom will be a four EPI (or ends per inch) loom because there's four quarters in one inch. Makes sense. If you double warp, it becomes an eight EPI (because you've doubled the number of warp strings in the inch). Jenell described it like the resolution of a photo. The higher your DPI (or dots per inch) the more detailed your image, or in the case your weaving. That made much more sense to me as a graphic designer. But, I can also see that the more warp strings you try to squeeze into one inch, the harder it will be to weave. So, now I understand why the four EPI is better for beginners.
My largest scrap piece of wood would allow me to make a very long and wide mini tapestry, especially since I've decided to do 4 rectangles rather than one large piece. However, since this was my very first mini tapestry, I wanted to start small and work my way to larger pieces later. Another thing to keep in mind is that about 2" or more of warp is left at the top and bottom of the tapestry so if I wanted to make something that is 8" square, I would want the loom to allow at least another 4" (for a total of 12") vertically in the weaving area.
You can adjust how wide you want your woven masterpiece by not warping the whole width of your loom, but the vertical length is fixed. What if I make something too long and find it hard to work with while it's sitting on a table? That's when I thought I could just make a few different lengths for the sides since I'll be connecting the four sides rather than cutting one whole piece. That way I could try out different lengths and see what works for me, and when I feel comfortable doing larger pieces, I can change up the sides then. Problem solved!
So, I decided to make the inside width (the weaving area) about 12" so I can make a woven work of art from 1" to 12" wide. The width of each frame section is 1.5" so it's not too flimsy. At first I thought that meant my top and bottom pieces will be 1.5" tall by 15" wide (12 + 1.5 + 1.5) with notches set 1/4" apart in the weaving area and a gap of about 2mm in between the notches to fit the cotton warp cord I have. But after I started trying to create the design in Illustrator (more on that below), I realized I hadn't considered the 2mm gaps on the outer edges of the weaving area. So I would add an extra 1/8" on either side of that to give me room to put my tapestry needle in at the edges when I one day make a 12" wide tapestry. And, as I was thinking about tapestry width, I thought I should add an engraved ruler above and below the weaving area so I can more accurately gauge the size of my work.
I had enough scrap to cut 3 different lengths, so I decided to do one for an 8" long tapestry (this means I will actually need to cut this piece 15" long because I'm adding the extra 2" of warp that goes on top and bottom of the tapestry plus the combined 3" height of the top and bottom pieces of the loom); 12" (a total of 19" long piece of wood) and 14" (a total of 21" long piece of wood). I decided to only cut the shortest one for now because since I'm starting small.
Designing in Illustrator


With these measurements in mind, I opened Illustrator and started to draw. Since the top and bottom pieces are the most detailed, I decided to start with those.
Top and bottom pieces of the loom: I drew a rectangle 1.5" tall and 15.25" wide (after discovering, as mentioned above, that I needed that extra gap for the outer edges of the weaving area).
Then I drew a box 1/4" square and used it to create my ruler that marked every quarter inch. I labeled every whole inch mark and made my half-inch marks slightly taller. Then I outlined my text so I could engrave it. I made sure the first and last marks of the ruler were exactly 1.625" from the outer edge of the piece. That's the 1.5" width of the side pieces plus the extra 1/8" gap I added.
Then I drew a rectangle that was 0.08" wide (that's about 2mm) and rounded the bottom corners. I decided the length of the notches should be about 3/8" long to make sure the warp strings don't accidentally slip off while I'm weaving. So I drew another rectangle 0.375" long and aligned that to the top of my top wood piece. I aligned my rounded 2mm rectangle to the bottom of the 3/8" rectangle, and grabbed the nodes on top to pull them up so the shape came off the top of the wood piece (it's easier to cut them in Illustrator if they come off the piece they are cutting).
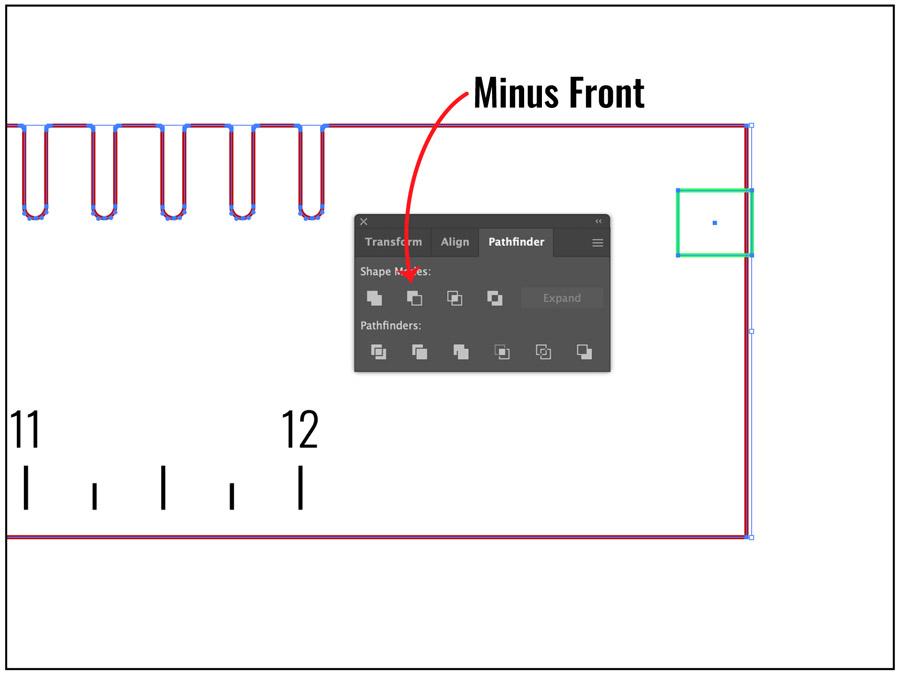
Next, I aligned the rounded rectangle to the left of the ruler marking zero and copy-pasted another one that I aligned to the right of the 12-inch mark. Then I counted all the quarter inch marks between (there are 47) and used the blend tool in Illustrator, selected "Specified Steps" and typed in 47 to create 47 evenly spaced, identical notches between those two (you just click one and then the other to complete this step). Then, with those still selected, I went to Object>Expand.
Before I cut those out of the rectangle, I copy-pasted the whole thing and flipped the notches (using the Reflect tool) to face the bottom so I could create the bottom of the loom. I left the ruler at the top of the bottom piece, but moved the numbers below it instead of on top.
Then I used the Pathfinder tool, made sure those notches were in front of the rectangle, and used Minus Front to cut the notches out. I did this for both pieces.
I decided to create the sides first before making any cuts for the connecting feet.
Sides of the loom: This was easier than the top and bottom because there are no notches and no rulers. I just drew three rectangles 1.5" wide and 15", 19" and 21" long. I only drew three for now instead of doubling them, because I know I will be adding the slots for the connecting feet later and those slots will need to be on opposite sides of each other. This wouldn't typically matter since you can just flip what you cut, but the laser cutter tends to singe the bottom and I want all my front-facing pieces to be prettier.
Connecting feet: I wanted to be able to remove these and attach the longer sides when I'm feeling bold enough to do so. So I decided the best way was to make pieces that slide into slots cut into both the sides and top and bottom pieces and also act as feet to raise the whole loom. These feet would protrude down which will make them easier to grab and remove when I take the loom apart. The design for these is simple, but then I needed to go back to the top, bottom, and sides and add the notches that they will slide into. Those notches need to line up perfectly for these to work.
Also, I decided I wanted them to extend further across the bottom of the frame pieces because I thought it might have a better grip on the loom and keep it sturdy. And I realized it might be easier to work if the loom angled up toward me. So I decided the top feet will be longer than the bottom feet. And and, as I was considering this, I thought I needed to make them thicker so I could add rubber bumpers on them to keep the loom from sliding around on the table. Because I'm using 3mm thick wood, I would need to cut two of each set and glue them together.
NOTE: When designing pieces that will fit together, you need to not only consider the ACTUAL thickness of your wood (use digital calipers not the manufacturer's word for how thick the wood is), but also how much you will be removing by laser cutting and sanding the pieces. If your wood is actually 2.8mm instead of 3mm or if you have a really low-powered laser cutter that needs to make several passes to cut the wood, you might design the spaces to work with 2.7mm wood rather than 3 or even 2.8mm. It doesn't seem like much, but every fraction of a millimeter counts if you don't want things to be wobbly. If you are going to make the feet permanent by gluing them in place, an exact fit won't be as necessary, but would be helpful.
So, considering all these details, I first took one of my side rectangles (in a vertical orientation) and aligned it to the top left of my top piece. This wasn't completely necessary but it allowed me to visualize how I want to make the connecting feet. Seeing how the loom will look after the pieces are connected helped me see how far up I should connect the feet and how far over I can extend them above and below the frame pieces.
I knew I needed a slot 6mm deep since I'm gluing two pieces of my 3mm wood together to create each foot. So I created a box .25" wide by .2362" (that's 6mm) tall. The quarter inch measurement is just a random width I came up with that wouldn't interfere with my weaving work but felt wide enough that the feet would securely latch on.
That box will create the slots on all 4 frame pieces that the feet will go over, so I drew another box that I aligned to the top of the top frame piece and made it 6mm tall (just because that felt like a good distance from the top). I aligned my quarter inch box to the left of the top frame piece and below the 6mm box at the top so that the slot that I'm cutting for the feet to slide into is 6mm from the top, 6mm deep, and 1/4" wide. Then I copy-pasted and put that box in the same location on the opposite side of the top, both sides of the bottom (but 6mm from the bottom instead of the top), and on all three of the side pieces (while in a vertical orientation), 6mm from the tops and bottoms.
I used Minus Front in the Pathfinder tool to cut the slots from all the frame pieces. Then I copy-pasted the three side pieces, and used Reflect to create their opposites.
For the actual connecting feet, I drew a box 1.25" wide (since the side frame pieces are 1.5" wide and I don't want the feet to extend past the side edges) and about 1-3/8" tall. That just felt like a good height to me for the top feet. I measured 3mm from the top and put a box .25" wide by 6mm tall under that. That's where the feet will slide into the slots on the frame pieces. I created another box to the right of that one and extended it off the right side and cut it from the big box using Minus Front. I took the top two nodes on the top right and brought them back so they were .5" from the left side. This is the part that will extend over the top of the frame pieces. Then I brought the middle node on the right in a little so that it was about an inch from the left side. This is the part that will extend directly under the frame pieces. (I realized later I didn't have to do this but it's done now, so that's that.) Then I rounded all the corners except for the ones directly touching the frame pieces. I copy-pasted and reflected to create its opposite. Then I copy-pasted those to create their doubles that I will glue together. These are the top connecting feet.
For the bottom connecting feet, I just took copies of the top ones and drew a box over the bottom so that they would be 5/8" tall after I cut them. I cut the feet using Minus Front and then rounded the bottom corners.
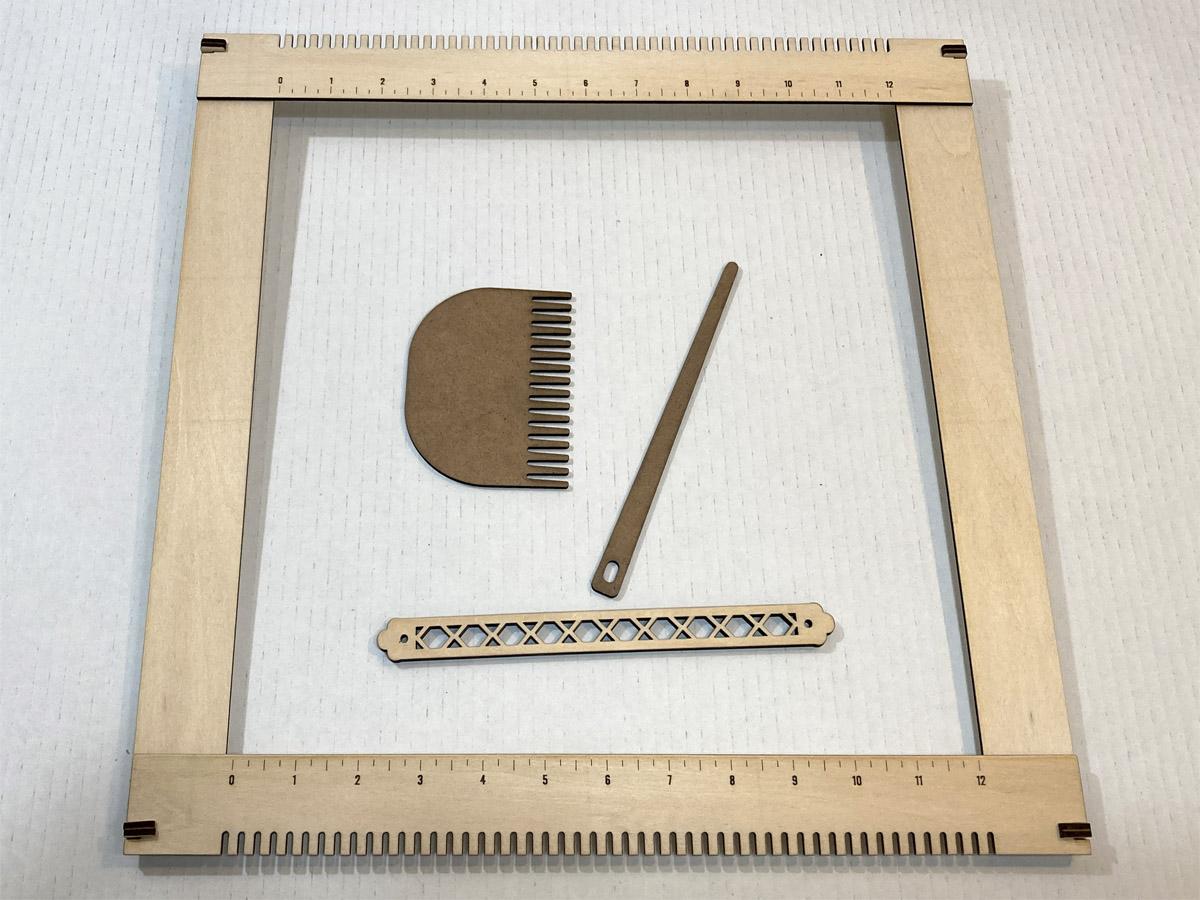
Weaving comb: Using the bottom piece of the loom, I removed the ruler marks, and trimmed off the edges (using a box and the Minus Front option in the Pathfinder tool) to make it about 4" wide. At exactly 4" there was a little bump on each end from cut notches, so I removed those to make the edges smooth.
I grabbed the top two nodes and moved them up to be 2.25" from the tops of the notches. Then I grabbed the lower nodes of the notches and pulled them down to make them .75" long. I rounded the top of the comb to make it more comfortable to hold. The whole comb is now 3" tall.
The most painstaking part of the comb was making the end of each tine narrower than the tops. It wasn't hard, just involved. I selected the nodes at the bottom of one tine, used the scale tool, selected the horizontal only scale, and reduced by 70%. Once you set the percentage, you can just grab the next set of nodes at the bottom of a tine, hit the S key on your keyboard for Scale, and then hit return twice (or enter if you're on a PC). And just keep doing that for each and every tine. Then, I selected all the nodes at the bottom of each tine together and used the dynamic rounding tool to round them off so they aren't sharp.
Tapestry needle: For this I figured a little less than 2/3 of the width of the loom would be good. I didn't want it too long to be hard to handle but not too short that it makes weaving more laborious. So, I drew a rectangle 7" long by .5" wide, narrowed the bottom quite a bit (the same way I did each tine on the comb by using only the horizontal scale option), and rounded off all the sharp corners. Then I drew a rectangle 3/8" long by 5mm wide (to make sure I could fit some chunky yarn in) and centered it vertically with the needle. I rounded all the corners and put it a reasonable distance from the top (I just eyeballed it to make sure it wasn't too close). That was it for this one.
Hanging rod: Honestly this could be just a rectangle with 3mm holes at either end. But I like to make things fancy so I added a cutout interior. I know some of it will get covered by the warp strings when I hang them on the rod, so I didn't do anything too fancy.
Then I watched a video on how to hang your mini tapestry to a hanging rod and decided I could add a tiny bit of detail to the ends without making it too hard to put my tapestry on it.
If you find yourself also wanting to weave but don't want to design the loom, you can buy these laser cut files on my Etsy shop for $6.50. I've created files for 3mm, 4mm, 5mm, and 6mm thick material. I also provided different widths of hanging rods to fit tapestries 6, 8 and 12 inches wide. There are three different designs for the hanging rods as well. All the changes to the loom design I made after working with this first one are included.
Cut the Loom, Finish the Pieces, Put It Together
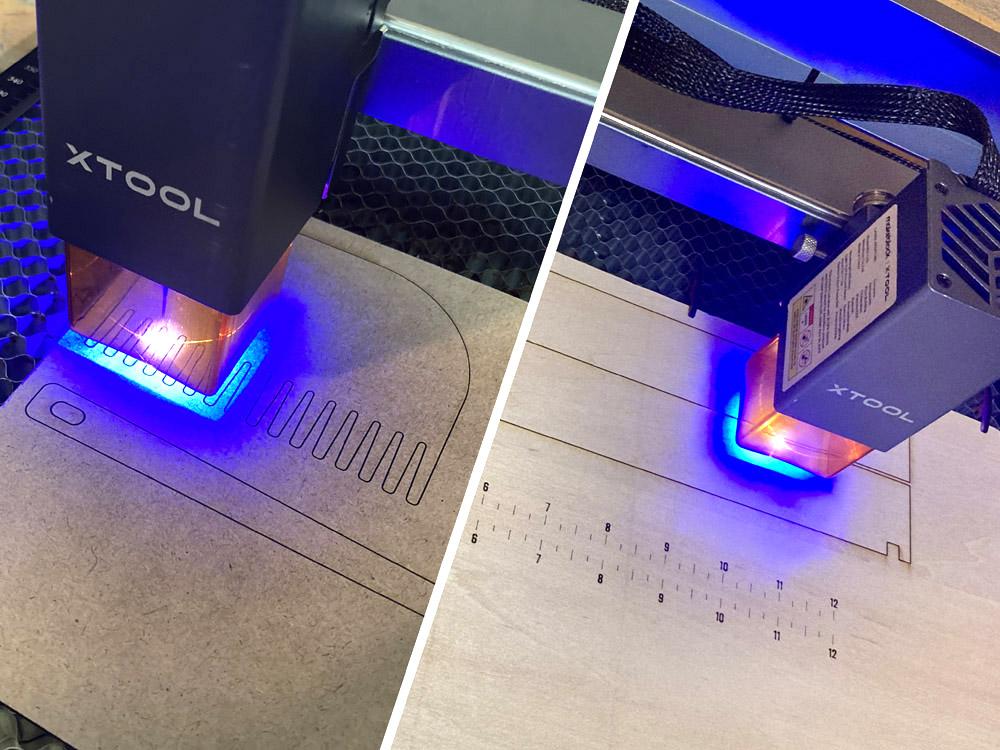

Cut the loom
This part was easy. Open the files, tell the laser to cut. Practice new crochet stitches while I wait.
Seriously, though, my scrap wood is actually hardboard that is 3mm thick. This is what I used at my local maker space with an 80-watt laser cutter. However, I quickly (quite slowly in fact) learned that my very low-powered laser cutter at home wasn't going to cut it (pun intended). I started with a smaller piece and tried cutting just the comb and tapestry needle from it. It took 9 passes.
HERE'S A FUN FACT: The more passes you make with a laser cutter, the more soot you create on the cut edges.
So, after what was literally hours, I switched to the basswood I have. Basswood is considered a soft hardwood. You can actually cut it with an Xacto knife. I use it a lot for many of my laser cut creations because I mostly create decorations, not something to be used in this manner. My concern was that it might snap with the pressure that I expected to put it under. I would suggest you use a harder hardwood if you have it. But as time would tell, the basswood actually held up pretty well.
Since I didn't know how heavy the tapestry would be when I was finished, I decided to cut two of my hanging rods to glue together, hoping that would be strong enough.
Finishing the wood
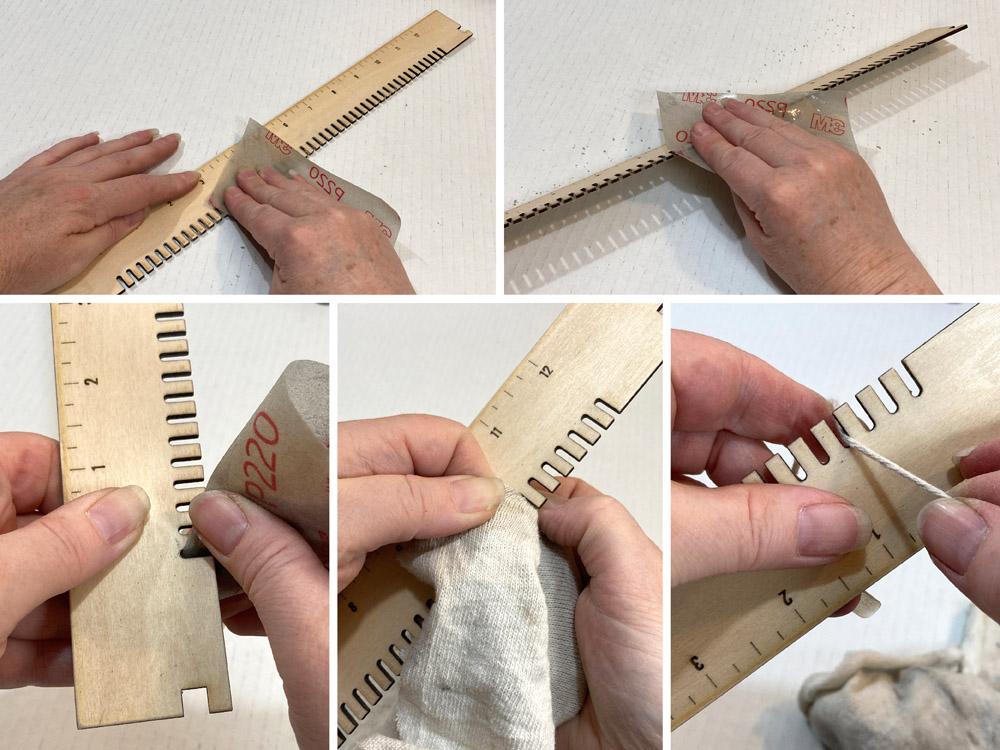
I wasn't really concerned about splinters on the comb and needle that I cut from hardboard, but the amount of soot was unbelievable! And because hardboard is literally compressed cardboard, you can't really wet it too much. I sanded the edges slightly to remove some of the rips from the paper when the laser didn't quite cut through in some areas (after NINE passes!!!). Then, instead of wetting my cloth and wringing it, I wet my hands and dried them on the cloth so it wasn't too damp, then I wiped down all the edges thoroughly several times. To get into the hole in the needle and between the tines on the comb, I twisted and folded the cloth and flossed those areas, pulling the cloth up and down in all directions to make sure I got as much soot as I could.
For the wood, I used my wet/dry 220 grit sandpaper and sanded the charred areas just so it was pretty and then folded the sandpaper over the outer edges to round them off and make them smooth. Then, just like the comb tines, I folded my sandpaper and went in between each notch on the top and bottom pieces to smooth those edges. I was able to use my thumb nail to slide the sandpaper into those grooves to round off the upper and lower sides but it did some damage on my nail. I don't recommend it if you care about the look of your nails. The rulers I engraved on these pieces came in really handy already because after doing 10 or so notches, they all start to look the same and I was loosing count of where I was. It was easier to just make note that I was at the 4" mark and then 4-1/2" and so on.
When I was done sanding, I wiped away the sawdust with my cloth and cut a short piece of my warp string to run between the notches to make sure it didn't snag in any of them.
If you are using a harder wood, you could start with a rotary sander for the outer edges and then move to 220 grit sandpaper if you want your edges really rounded. I didn't want to risk breaking my basswood pieces so I decided against that. But because the wood is so soft, the edges were easily smoothed without much effort.
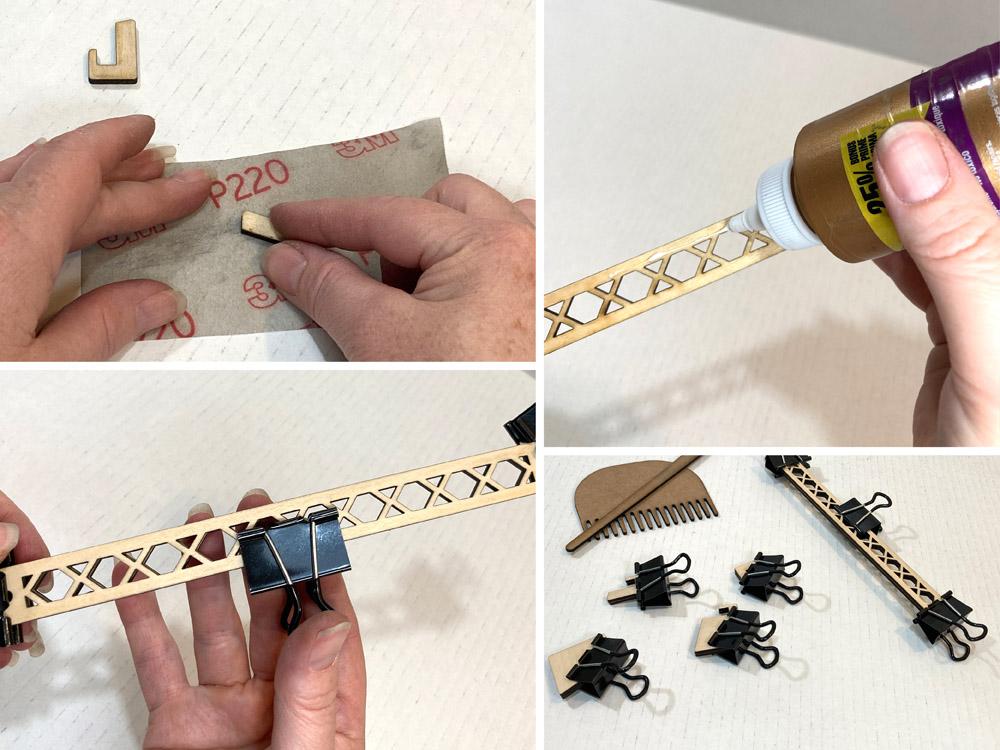
For the smaller connecting feet pieces, I laid the sandpaper down flat on my table and just slid those pieces around on top rather than try to sand them while holding them. It was much easier and faster.
Then I grabbed my two hanging rod pieces and all my connecting feet pieces and glued them. I used binder clips to hold them together while the glue dried. NOTE: When using the binder clips, the pieces may slide, so make sure you nudge them back into place before the glue becomes permanent or they won't work.
When they were ready, I glued rubber bumpers to the bottoms of each of the feet. The rubber bumpers I had on hand are nearly 12mm in diameter, so I cut them in half and glued both halves to the bottom of each foot.
If you have to do this, DO NOT USE YOUR YARN SCISSORS FOR THIS! My mother will yell at you. This is just a common, sometimes unspoken rule in the fiber art world that was taught to me by my mother when I was still mostly a toddler. You have your fabric (or yarn in this case) scissors and paper scissors and you NEVER EVER use your fabric scissors for anything other than cutting fabric, thread, yarn and the like. Likewise, your paper (or in this case rubber) scissors are not sharp enough to cut fabric or yarn and will tear through it rather than make a nice, clean cut.
If you don't have rubber bumpers, you could use anything that creates friction on your surface that won't ruin it. Silicone caulk, electrical tape, or take painter's tape and roll a small section into a backwards loop so that the sticky side is out and stick that to the bottom of the feet and to the table. You'll want to do this right before you warp the loom, however.
Next, I used my damp cloth to wipe away soot and sawdust left on the cut edges. It wasn't as bad as the hardboard, but still worth doing.
Then you could finish every piece with 2 coats of clear acrylic sealer with a light sanding between coats. Make sure to lightly sand between the notches and comb tines, too, because the sealer tends to be a tad rough if not sanded. This not only protects the wood but also the yarn. I opted not to do this at this time because I was eager to get started. I promised myself I would eventually.
However, because I know sealer also keeps the soot in place in case any is left over, I cut another piece of warp string and ran it between all the tines on the comb and the notches on the top and bottom pieces of the loom just to be sure my art won't be tarnished.
Put your loom together
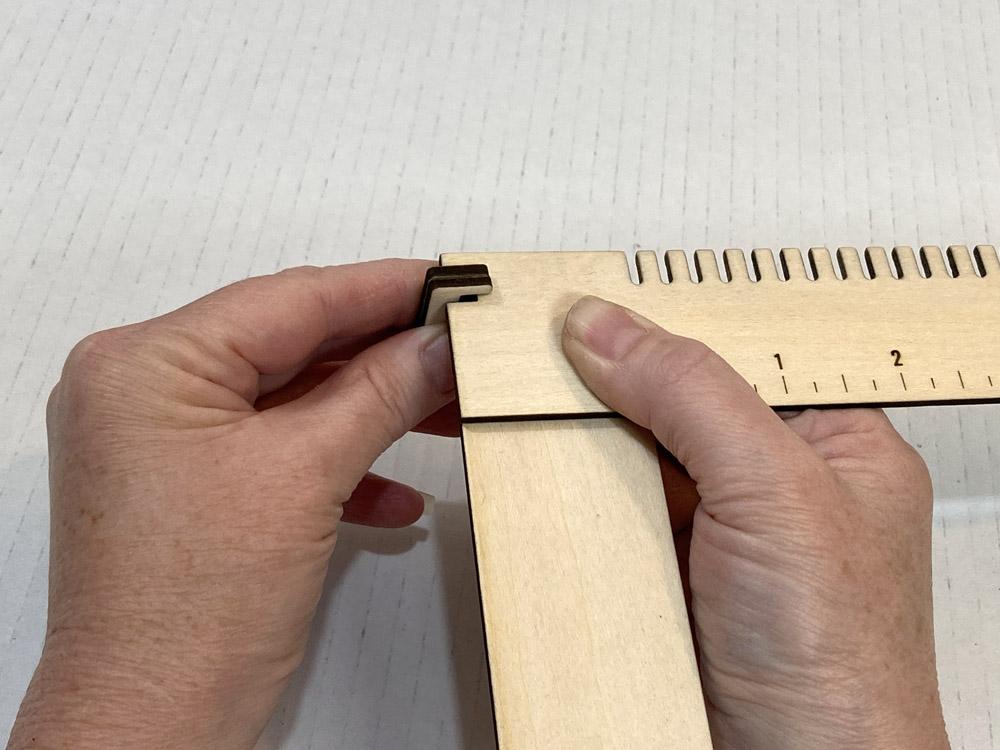
OK, this really is the easy part. Choose the length you want and use the connecting feet to attach the sides to the top and bottom at the corners.
For me, however, things got a little shaky because my basswood is actually 2.8mm and not 3mm like the hardboard. I had measured it, but didn't want to go back and change all files in Illustrator at the time, so I decided I would just glue the whole thing together after I cut it.
It was a good thing too, because I realized I should have added extra feet at the corners to keep the loom square. I did that in the design I'm selling on Etsy. Before I started gluing the loom, it kept skewing to an angled parallelogram instead of a square.
Warp the Loom


What is warp string made of?
The most important part of the warp (at least for beginner weavers) is that it doesn't stretch. Apparently there are times when you do want it to stretch, but I'm not there yet skill-wise.
This means you can use the cotton cord I suggested in the supplies list (I got it at the Dollar Tree), or hemp cord, jute, that green gardening twine you get for tying up your tomato branches that start to sag, and really anything that is thin enough to fit inside the notches at the top and bottom of the loom, strong enough to handle constant tugging and pulling without breaking, and soft enough that you don't hate working with it. As long as it's not stretchy.
Before we can warp
Before I started this project, my plan was to just wing the design, but now that I've educated myself much more on weaving, I realized that's not the best idea. Before you can even warp your loom, you need to know if you are doing a super detailed piece that might require double warping. There are also some really thick fibers you can use to add texture that would require you to warp an even number that divided by 2 is an odd number. And, most importantly, you need to know how wide your project will be to make sure you warp the correct number of strings to get to that width.
And, as I was watching videos on different designs I could do, I realized I need to know which of my many balls of yarn I'm going to use because some are thin and might require double warping and some are really chunky which would allow me plenty of detail with just a single warp. After my buying spree, I ended up with a lot of different kinds of yarn. I needed enough of the same thickness to complete this piece with enough of a variety of colors to create something interesting.
So, before I chose a warp sett (with two T's — that's the technical term), I pulled out all my yarn and determined the best choice was some chunky, solid color yarn that I bought in four colors. They are bright colors, so this will be a bold, modern tapestry.
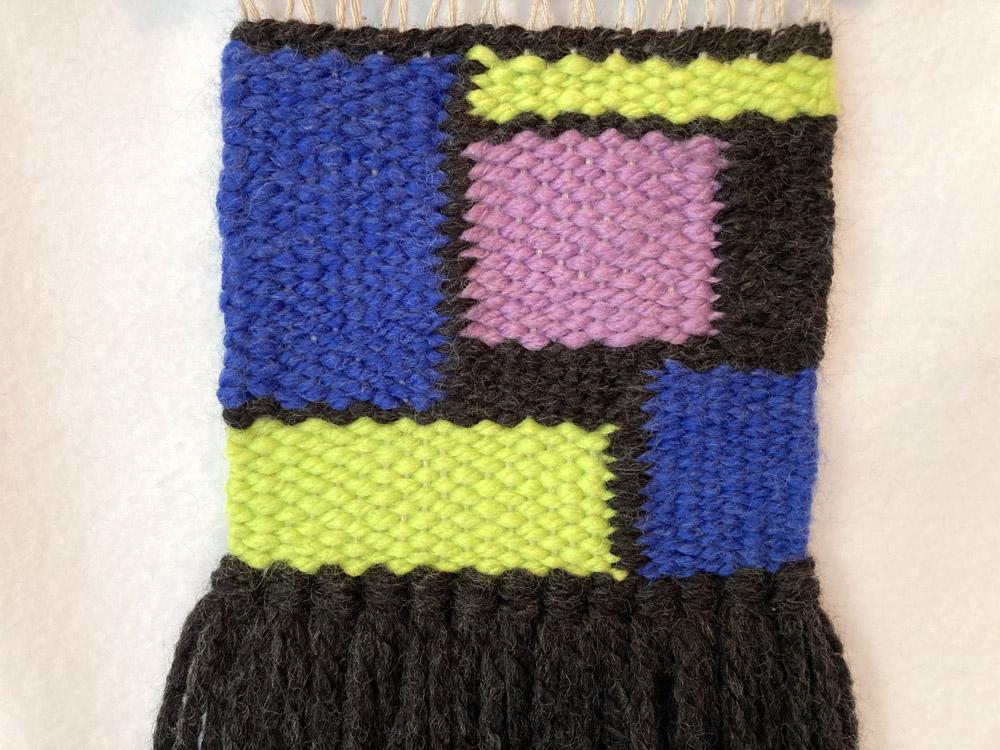
This means I could just single warp my loom. And because I felt confident in doing squares and rectangles (I have high hopes), I decided to do something similar to Piet Mondrian's art but more neon colored. And I looked at a ruler and decided 6" is plenty wide. Eight inches looked a bit intimidating to me.
Here we go!
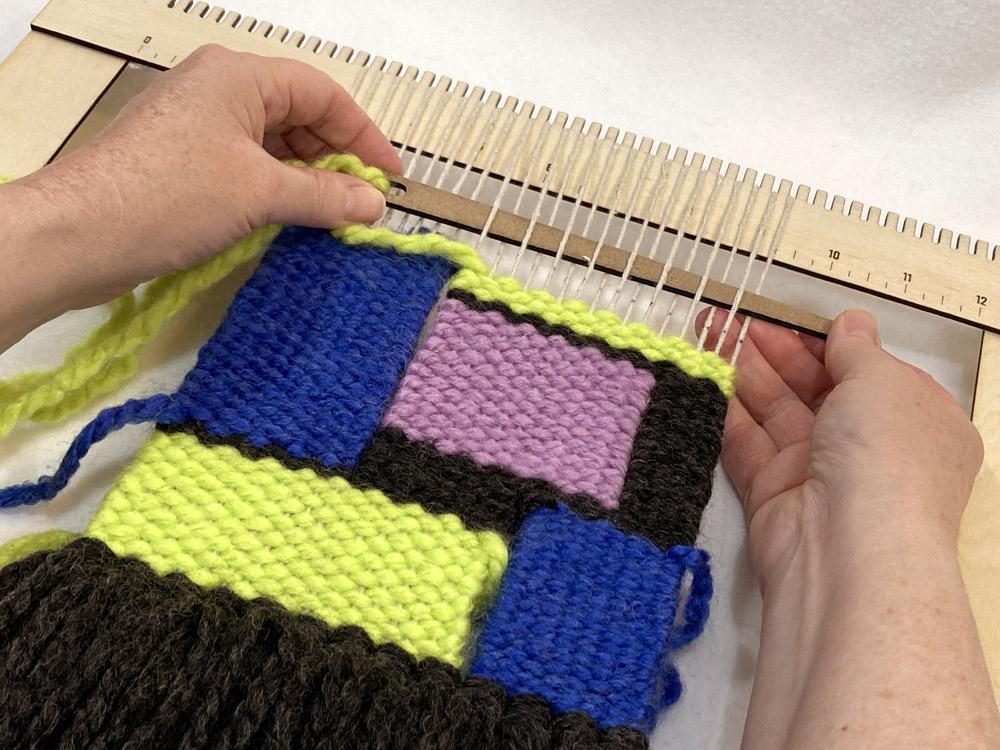
I decided it would be easiest to weave with the tapestry in the center of my loom. That means I will start at the 3" mark and work toward the 9" mark.
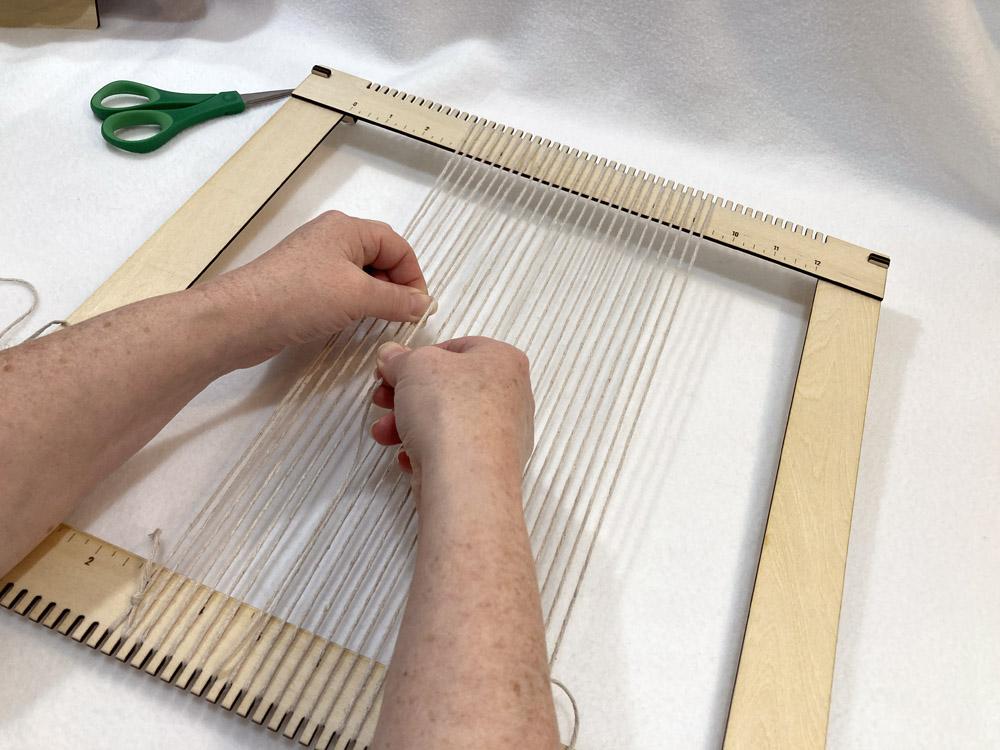
I set my iPad up off to the side of my loom, found the video on warping, took a deep breath, and tied a knot at the end of my warp string. For some reason, I was really nervous.
Anyway, I tied the knot, put it over the notch just under (and to the right of) the 3" mark, then pulled it up. Immediately I wondered, do I put the loop around the notch to the right or the left of the 3" mark at the top? The marks are directly above the spaces between the notches not the notches themselves, so I didn't honestly know which would be the correct notch. In Jenell's video she actually counted the notches (she doesn't have a ruler on her loom) and put it on the same notch on both ends, so I counted the notches up to where my knot was (13 of them) and went to the thirteenth notch on the top and looped around that one. Then I brought the string down. I remembered that Jenell strung the first downward warp over the loop created by the knot, so I went back to the video to watch carefully, and yes, you are putting it over the loop because technically you put your first string on the left side of that loop.
The next steps were easy. However, just to be sure I was creating enough tension, I strummed the warp strings I had already placed and they seemed super loose. I could touch the table and still had some slack. So, before I went any further, I tightened those up by pulling down on the up strings and up on the down strings. Then I tried to keep an even tension as I warped my way toward the 9" mark. To create an even number of warp strings, you will end at the bottom just as you started at the bottom.
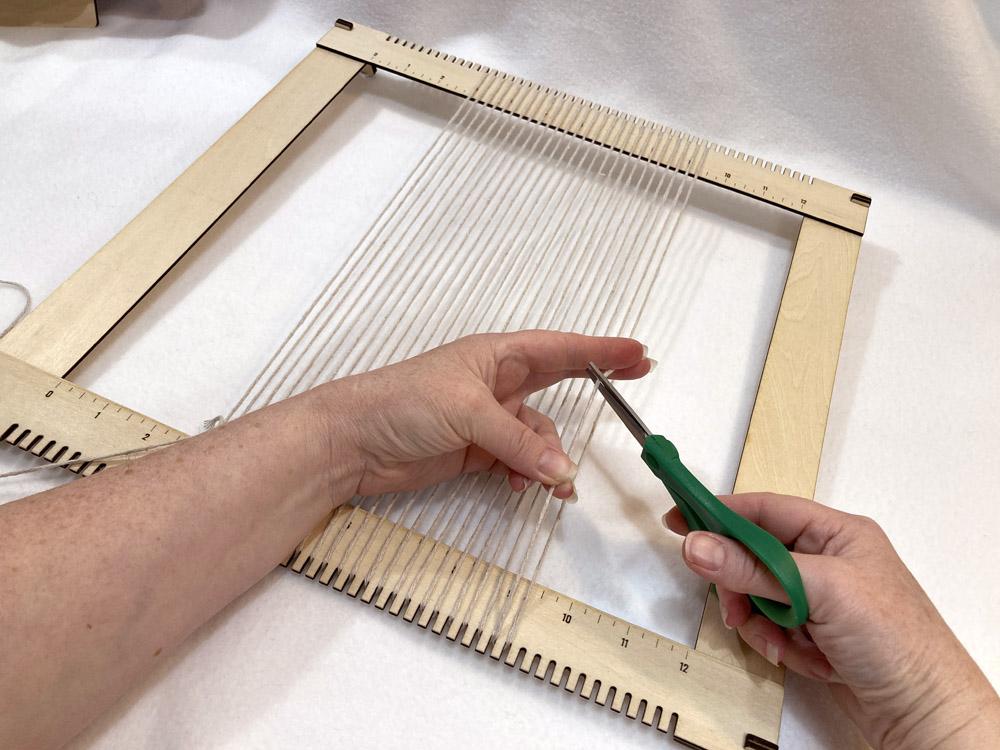
When I got to the end, instead of tying a knot like Jenell suggested, I wrapped the cord around a couple notches a couple times firmly and went back to check the tension on my warp. I did this because of my earlier extremely loose tension. I figured I could fix it now rather than after I tied the knot. I saw someone else do it this way on another video and it made more sense to me as an extreme beginner. I found that I, again, made the tension so very loose (you can see how much slack I have in the string in the third photo above).
After making the tension what seemed to me to be correct (I honestly don't know but I'm going with gut feelings on this one), I tied the knot. But then I divorced the knot because I made that last warp string way too loose in tying the knot. I tried again and was happier with my second attempt.
Create a Base to Beat Down On


Before doing the twining, I needed to construct a piece of card stock to be wide enough to fit through the warp and sit on the edges of the loom. This helps give you an edge to flatten your woven yarn against as you go. You'll weave, then use your comb to beat the yarn down flat against the previous line you wove. The card stock gives you a sturdier edge to beat down on and helps leave you enough warp string at the bottom of your work that you'll use to tie off and keep everything in place after you pull it off your loom.
Since I decided to do a 6" tapestry instead of 8", I needed to make sure my card stock went high enough. The warp left over at the top is what I would be using to hang on my hanging rod. I needed enough to be able to make a lark's head knot over the hanging rod but not too much that there would be a whole lot of empty space between the rod and the tapestry. I took some extra warp string, looped it around and tied an overhand knot at the base so that my loop was 3.5" long. Then I did the lark's head knot like Jenell gives directions on in this video and looped it around my hanging rod. There was way too much string left over, so I measured how much I thought I needed to remove (around 3/4") and created another loop 2.75" long. That looked good to me (see second photo above).
So now I knew my card stock on the bottom needed to be 5.25 inches tall. That's the length of the warp strings (14.25") minus the warp I needed left over at top (2.75") minus my tapestry height (6.25"). SIDE NOTE: I accidentally warped 6.25" wide instead of 6" wide, so I'm going to attempt 6.25" tall for the tapestry.
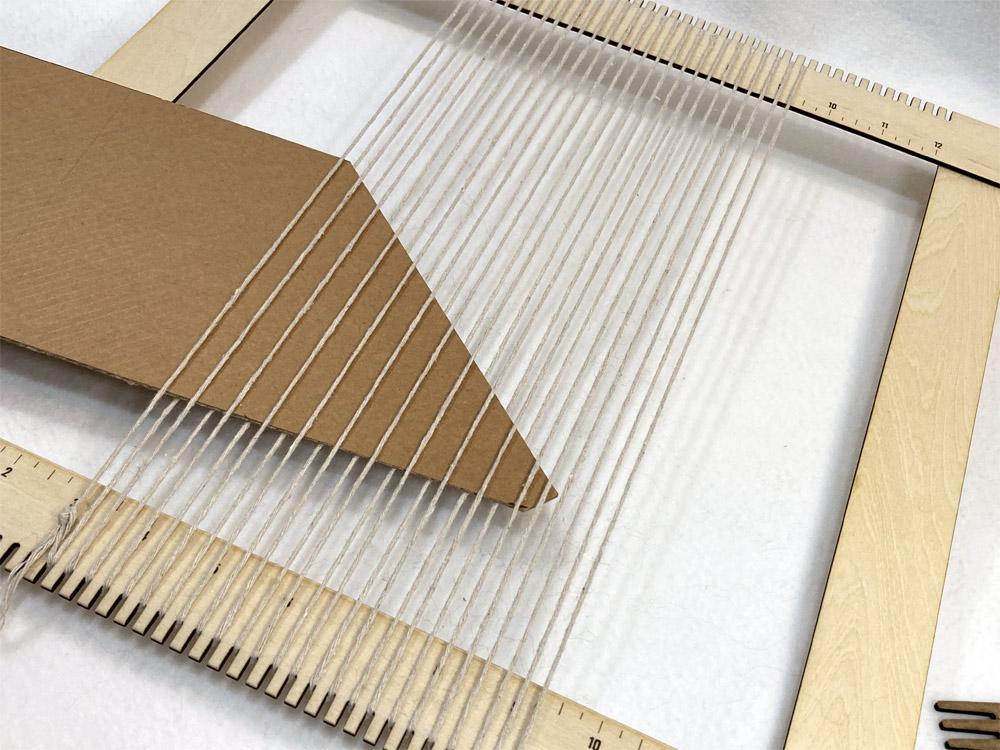
I had a 12" x 12" piece of chipboard that wasn't too thick but obviously wouldn't span the length of my loom. But if I turned it at a 45-degree angle, the measurement between the two corners was almost 17" long. When I found the center of that length and measured up 5.25", the distance between the sides was almost 7" which is more than the 6.25" of my tapestry. I just needed the bottom of this piece to rest on the sides of the loom but the top would be fine as long as it was wider than the tapestry (I hoped). So I measured down a half inch from opposite corners to give myself a little extra and drew a straight line between those dots with my L-square. Then I turned the chipboard 90-degrees and drew a straight line between the opposite set of corners to find my perpendicular middle line. I measured up that line 5.25" (the height I need the cardstock) and made a mark. Then I made similar marks 5.25" from my original line on either side so I could create a straight line that will be what I'm beating my comb against. Then I cut out that whole shape.
If you don't have a long piece of cardboard you can use (like a family-sized cereal box you can cut up), you can cut two pieces of letter-sized card stock the height you need and tape them together to make a width that goes all the way across your loom.
Next, I wove the whole thing through my warp using plain weave (just over and under every warp string), centered it so the edges were on top of the sides of the loom, and pushed it to the bottom snugly.
LIGHT BULB MOMENT: I realized after weaving this chipboard in that the vertical length of my tapestry is not as fixed as I thought earlier. If I want to do a shorter length like I did for this project, I can just add more height to the cardboard insert at the bottom. Also, I learned after watching another video on hanging the tapestry, that the warp strings at the top can just be cut and you can use other methods to hang the tapestry. So if you want to use the same cardboard insert for longer looms but still do a shorter tapestry, you can.
Twining and Some Plain Weave


A twining stitch is a foundation stitch that helps keep your warp strings in place and helps keep your tapestry in place when you go to remove it from the loom. It seems many weavers like to use this one for the tops and bottoms of their tapestries, so it must be important.
Choosing the color
Before I did my twining stitch, I needed to decide what my actual tapestry was going to look like color-wise. Because the twining stitch and the fringe are a part of the design, I needed to decide what color yarn I will use. In most of the videos I watched, people tended toward making a white or off-white fringe and then focusing on color within the tapestry itself. But there were some where people worked the color from their tapestry into the fringe. Plus, Mondrian art has thick black outlines. I had already decided that my twining stitch would probably be made from my black yarn to mimic that look. But did a white fringe or black fringe make more sense? Or do I want to attempt to add more colors into my fringe? Would more colors be gaudy and take away from the art within the tapestry itself? Well, for me, the best way to know is to draw up a quick design in Illustrator and try out a few options to see what I like. That way I'm not undoing more than doing when it comes to the actual weaving (foreshadowing maybe?).
The colors of yarn I have are black, lime green, lavender, and royal blue. I also have white but it's a different yarn type and thickness. Thicker for fringe apparently is the go-to for most weavers but it doesn't have to be that way.
In Illustrator, I created a 6" x 6" document and drew some rectangles at random to create that Mondrian look. Then I drew thick black lines on top of those. Then I just started coloring in the shapes with the colors of yarn I have until I found a color balance I liked.
Then I drew a bunch of 8" long V's at the bottom (more on the length later) to represent the fringe. I tried black, white, and mixed colors. I immediately hated the white fringe because it was too stark. I didn't hate the multi-colored fringe, but I felt like solid black fringe seemed more dignified and made the actual tapestry stand out more.
Twining
With the color decided, I set my iPad up beside my loom and started watching the twining video again.
I pulled out my black yarn and measured five widths of my warp plus some extra for threading into the needle and weaving into the back of the tapestry once it's done.
HINT: It's easier to thread the tapestry needle (and the yarn needle later) if you fold the yarn over and tuck the folded part into the eye of the needle, using your fingernail, another needle, blunt end of scissors or anything firm that will fit into the eye and help shove the yarn through.
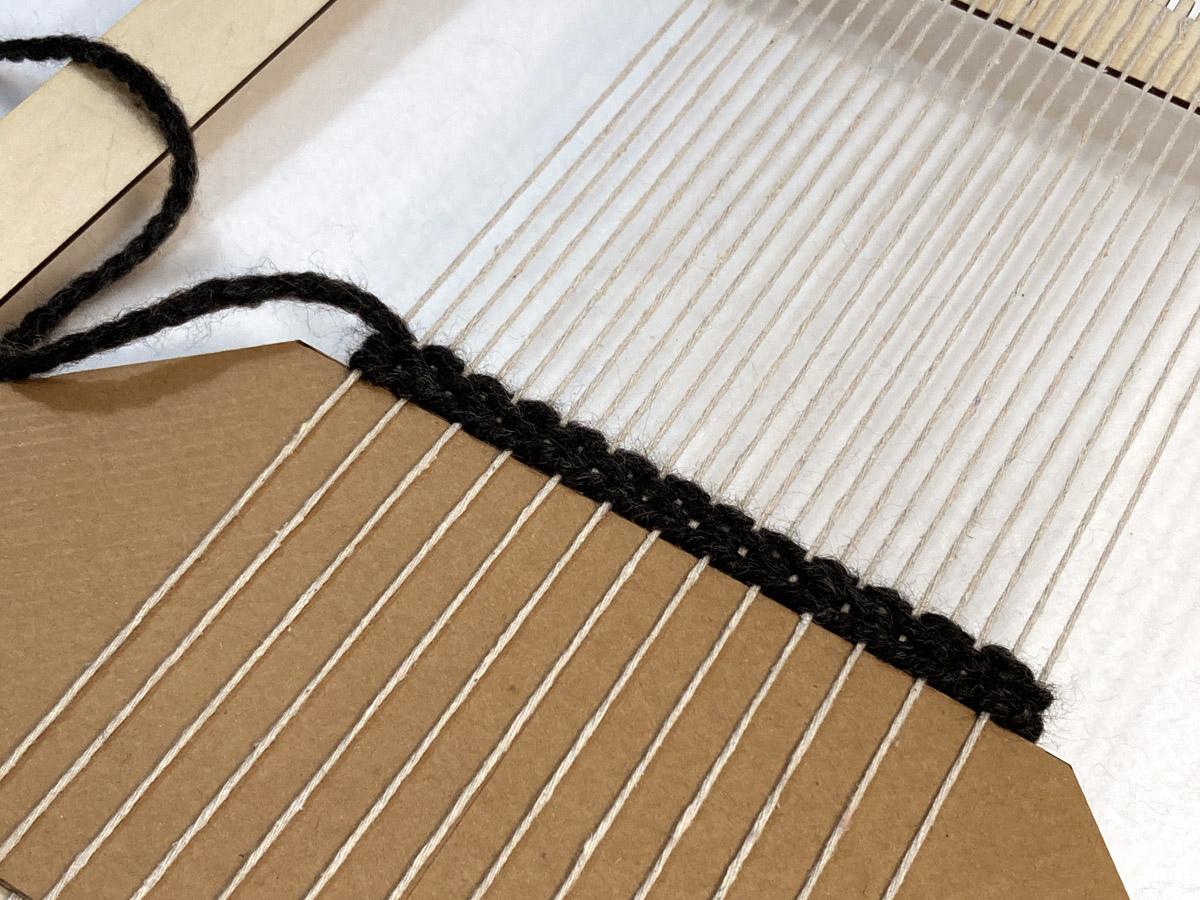
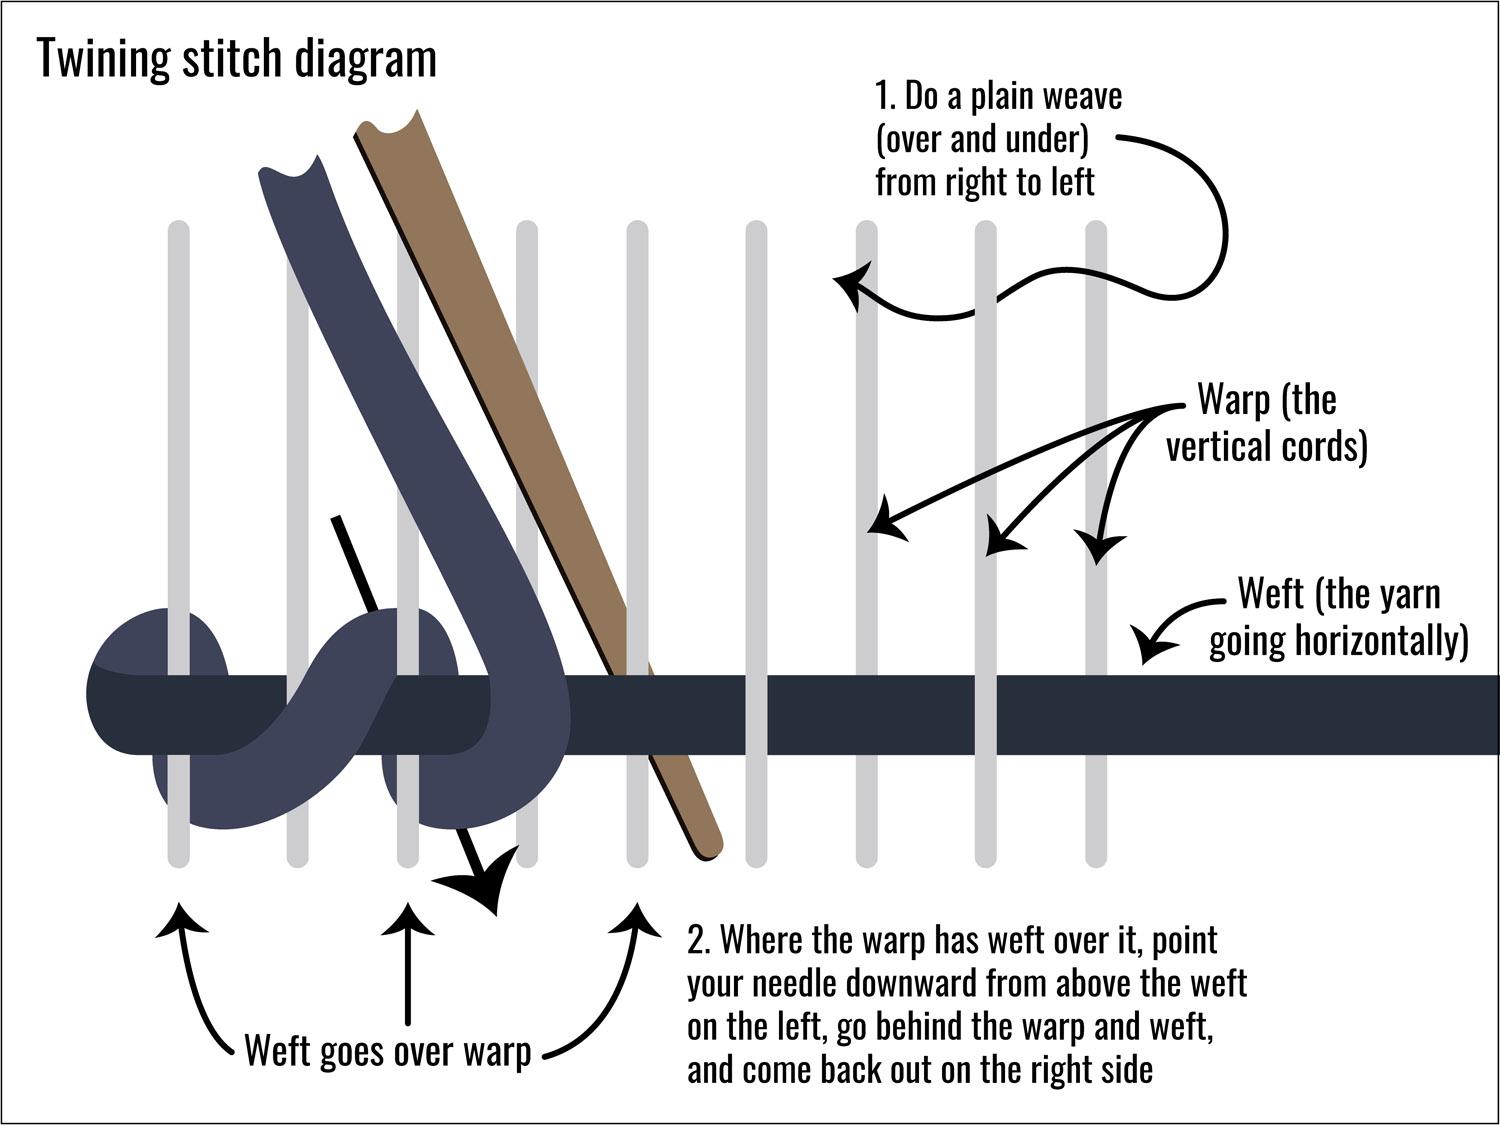
The first step of twining is to do a plain weave (over and under) above the chipboard from right to left, and pull it firmly across the warp. Leave a little tail of about 5" on the right to weave into the back later.
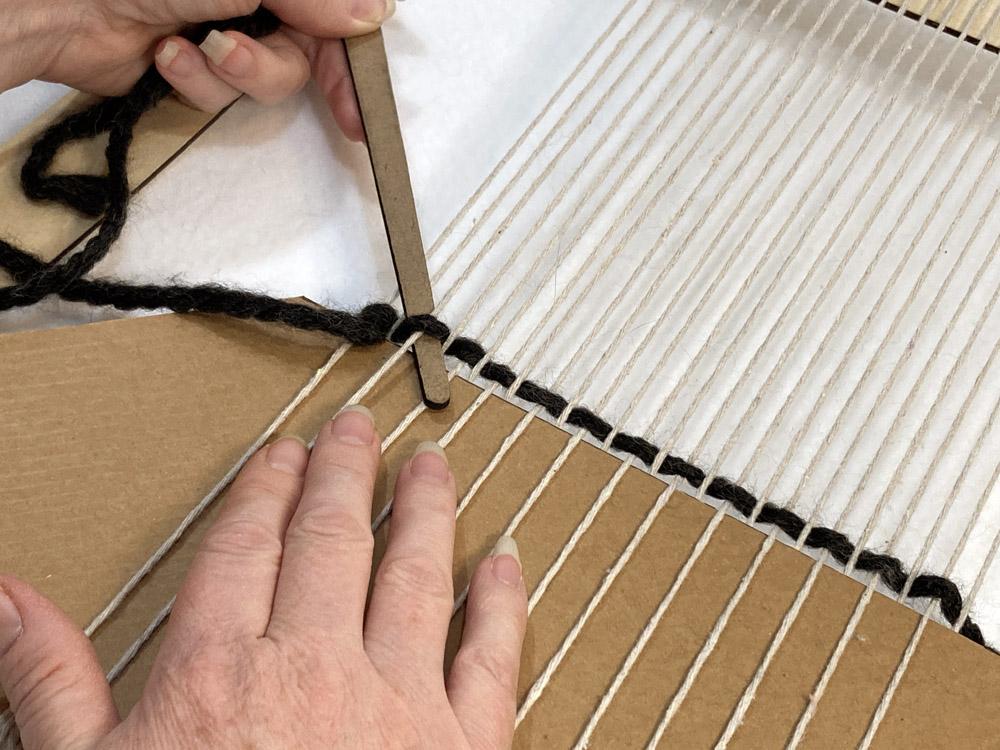
Then I watched the under and through of the first twining stitch Jenell made in the video, paused to attempt my first stitch, unpaused, went back to make sure I did it right, and paused again to attempt it again (and so on for a couple of stitches). By the 4th or 5th stitch, I was feeling confident about it. You basically go to the warp strings that have weft over them, point your needle downward from above the weft on the left, go behind the warp and weft, and come back out on the bottom right side (see diagram above). It kind of looks like a twisted rope braid when you're done.
As I was going, I was tightening the yarn slightly but pinching and holding the far left side so I didn't pull my warp strings in too tight. I also used my comb to push the whole row down against the chipboard as I went.
First rows of plain weave
Then came three rows of plain stitch to secure the twining stitch in place and give the fringe a nice base to sit on. My last twining stitch ended going under the last warp string on the right, so I started my plain weave going back the other direction over that warp string. Then I went under-over-under-over and so on until I got to the end of the left side. To tighten the yarn across the warp but not make it too tight, I pinched it at the beginning of this row on the right side and held it firmly while I pulled the yarn up on the left side at an angle so it was straight. Then I pulled the left side down gently to form an arch over the whole warp. I strummed the warp strings to get them to even out again and tugged both sides out while pinching the yarn on both sides to keep it in place. Then I used my comb to push the arched yarn down in the middle and then down on each side packing the whole thing down against the chipboard.
Then I started my next row of plain weave going back the other direction, going under the first warp string because I ended my first row going over it. I tightened as I did before and packed it down against the chipboard. Then I made my third row of plain weave heading back to the left again. When I was done packing that row down, I cut a long tail and wove a part of that tail back again toward the right under the first four warp cords. It will get covered by the fringe and will be easier to weave into the back later if it's not sticking out the edge.
Adding Fringe

I determined the length of fringe based on a video Jenell Flynn did. Basically, she said she tends to make the fringe slightly longer than the tapestry itself because it seems more balanced than a really short fringe, a really long fringe, or one that is exactly the same length of the tapestry. I did try some other lengths in Illustrator but I agree with her that the slightly longer method looks best.
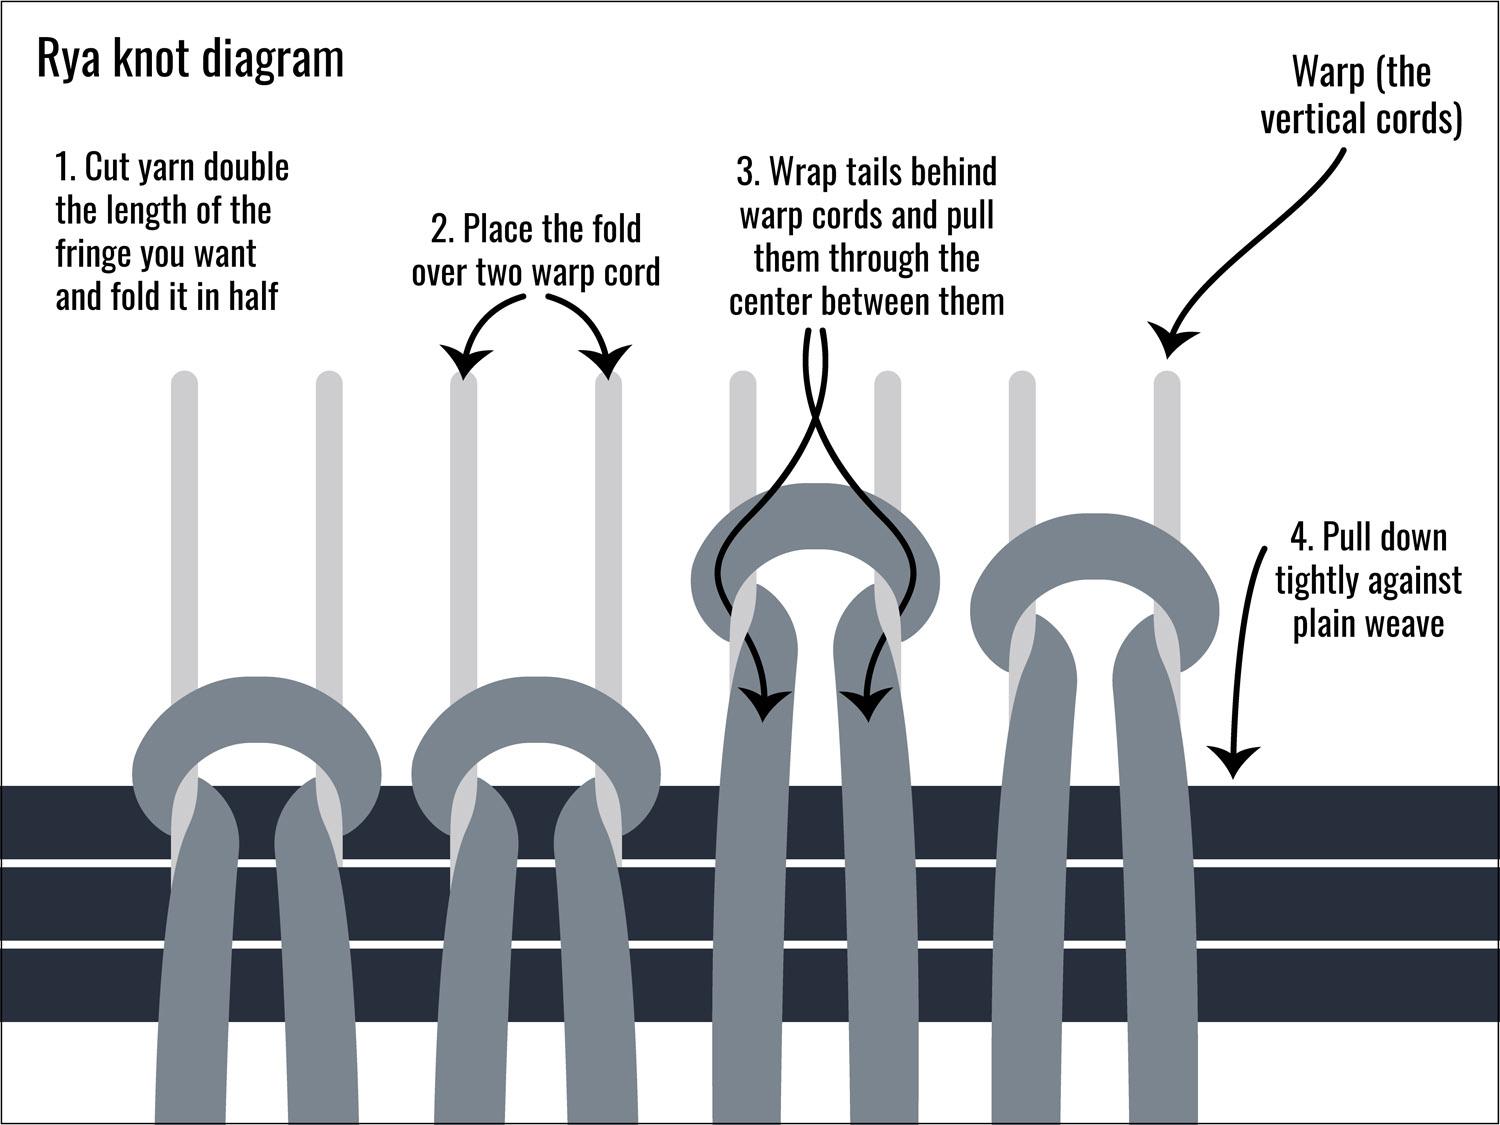
Because my yarn is not super thick, I cut three strands each 16" long for every two warp strings. That's 39 strands of 16" long black yarn.
Next I grabbed three of those strands, evened them out, folded them in half, and draped the middle around the first two warp cords. I tucked the three strands to the right under the warp cord on the right and back up between the two cords. I did the reverse with the strands on the left so that all six of my strands came up through the middle. This is called a Rya knot (see diagram above).
Then I evened up the ends again and pulled down against my plain weave. I did this all the way across until all my fringe was in place. Easy peasy.
Getting Ahead of Myself


OK, I have to admit that I got curious about a plan I had for this tapestry, and so I tested some things before I even attempted the twining and fringe. I had taken a break and started watching some videos to prepare myself for the twining stitch and ended up watching a couple videos on joining shapes. So, of course, an idea popped into my head and I jumped up to go test it.
Since I had already figured out my basic design, I wondered how I was going to add those thick black lines between the shapes. I hadn't seen any weaving videos that showed how to outline shapes (but I didn't look for them either), so this would be something I could wing (YAY!). But before I go and create the whole design and find out the hard way that I didn't do it right in order to do the outlines, I thought it might be best to try out some ideas first.
I saw two ways of joining rectangular shapes in this video. One was weaving from both directions and intertwining the yarns in the middle. The other was creating the shapes on the warp strings you need first, then going from behind and basically sewing those shapes together with your warp cord so that it doesn't show in front. But I thought, I want my big, black yarn showing in front, so what if I create the separate shapes and use my black yarn and sew those shapes together in front?
Not only did this test help me practice my plain weave and working with my comb and tapestry needle, but it also totally worked! You can see in the first photo above the result of that test. I went around both warp strings that were the ends of each shape and created a nice, thick black line.
Draw my design on the warp
When I drew my design in Illustrator before, I hadn't taken into account that the twining stitch, first few rows of plain weave, and fringe would take nearly an inch of space at the bottom. Lesson learned.
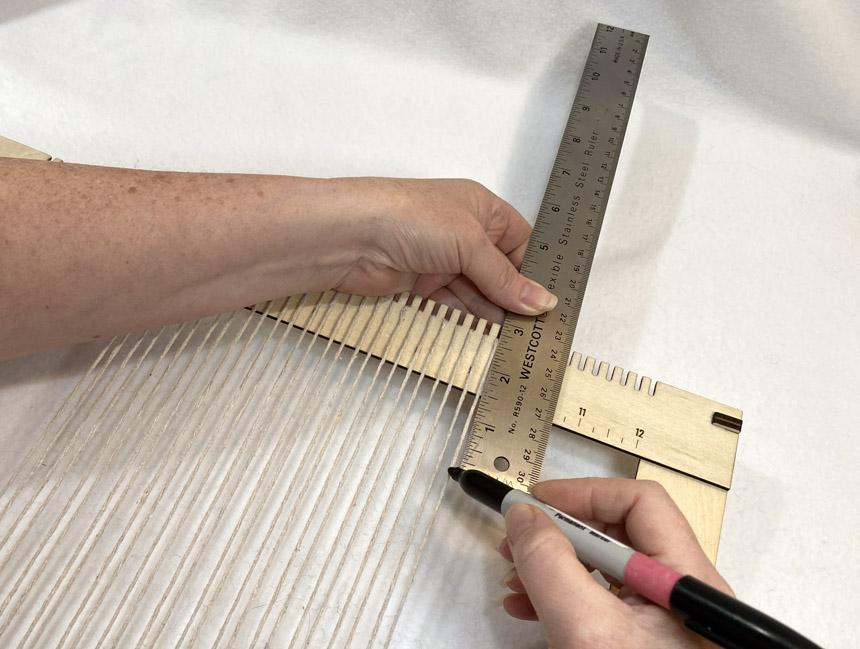
I knew I'd still needed that 2.75" of warp cord at the top to wrap around my hanging rod, so I took a ruler and measured 2-5/8" down from the top (I was hoping the extra cord behind the notches would give me just a little more space to work with). I marked that measurement on both end warp strings and drew a line with my marker across the top so I'll know where to stop weaving. And now I know to make room for the twining stitch at the top too.
So, at this point my tapestry would be 6.25" wide by 5-5/8" tall with 8" of fringe below (minus what would be trimmed so they are even). Could still work.
I printed out my design in black and white, wrote where the colors go in each block, then freehanded the design in the space I have between my fringe and the line at the top with a black marker, using a ruler to make sure my lines were at least straight. I used black because I knew I'd be covering those marks with the black yarn.
Finally Weaving


Green box on the bottom left
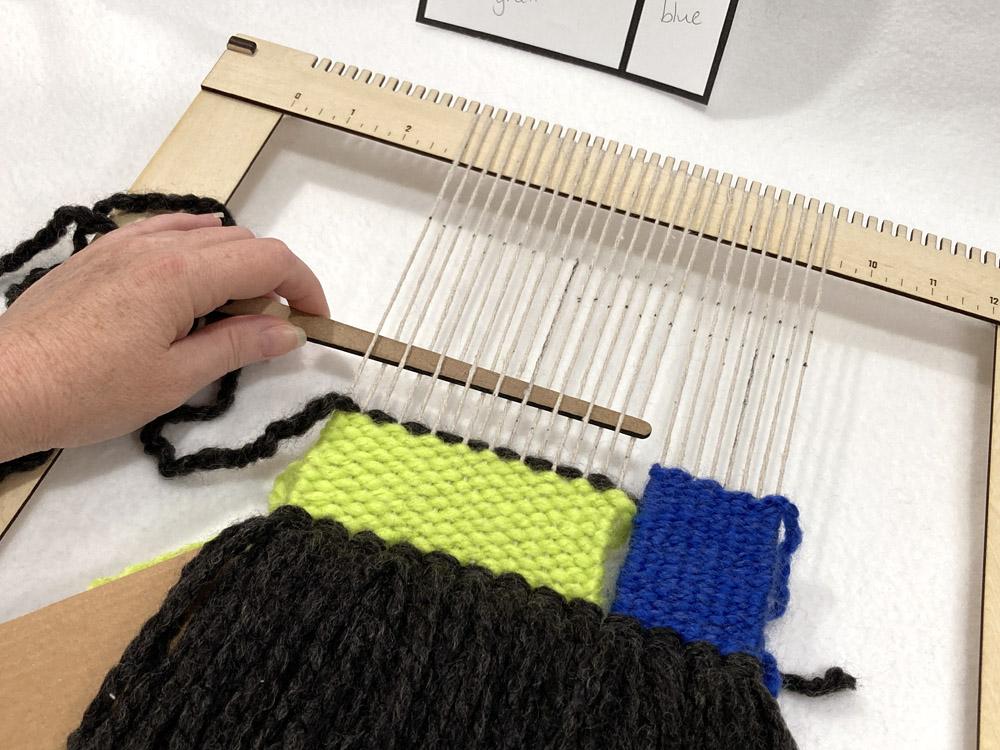
I pulled out three arm-lengths of my lime green yarn (because this is the length Jenell said she found most comfortable to work with) and cut it. I threaded my tapestry needle and started doing plain weave from the left for the lower green box.
I threaded the needle over and under each warp cord until I got to the one I marked with a solid black line (indicating the green box ended there) and pulled the rest of my yarn through, leaving about a 5" tail on the left side. Then I pinched the yarn and the warp cord on the far left so it wouldn't come out any further, and pulled the yarn up tight (but not too tight) at an angle toward the right. This is what I did with the plain weave above the twining to make sure I don't pull the warp cords in but also make sure my weaving is good and secure. Then I formed the arch as before, and packed the yarn down with my comb. Then I turned the tapestry needle around and did plain weave back toward the left. I again pinched the cord and yarn on the right where I started, pulled tight at an angle making sure not to pull the warp cords in from the right, then arched the yarn and packed it down. I continued this until I got to the row of dots along the warp cords that marked the top of my green box. Then I cut the yarn with about 4" left over to weave into the back later. I realized three arm lengths was way too much for this small of a box. But I still have another green box at the top of my design, so I'll use some of it there.
Royal blue box on bottom right
Then I started on the right to work on the royal blue box next to the green box. I did plain weave up to (and including) the empty cord next to the green box, leaving a gap between the two boxes that I will join with my black yarn at the end (just like in my test). I worked my way up to the dotted line marking the top of my blue box and trimmed the yarn, tucking the tail behind the box so I can weave it into the back later. I realized after I was done that I packed it down much tighter than I had the green box and wondered if that would be a problem later because I really didn't want to undo it.
Horizontal black box and lines
Moving on! Up next in my random rectangle shapes was a small black box going over the right side of the green box and level with the top of the blue box. But also, those thick black lines needed to go across the tops of the green and blue boxes. I realized I hadn't thought of how I would do the thick horizontal black lines. I saw that I could do a Z pattern, weave a row all the way across the green box, then fill in the area where the little black box is, then go across the top of the blue box. But would that be thick enough? The thick vertical lines go over two warp cords, so it would probably be best to do more than one horizontal row of black over the color boxes. I crossed my fingers and decided on two rows across them.
So, I threaded my tapestry needle with black yarn, started weaving from the far left, and quickly realized I would have to do three rows if I want to go back to the center and fill in the black box. So, then I pulled out the yarn and started charting a path from the right (but only with my eyes this time) and realized I'd get the same result. Then, an AHA! moment came to me and I realized I could start from the right of the green box, weave to the far left, then turn back in, fill in the black box, weave across the top of the blue box, then turn back to weave to the left side of the little black box. That way I have only two rows above the green and blue boxes and the little black box is filled in.
The rest of the color boxes
After that, I completed the top left blue box, stopping just short of the black line at the top to make sure I had room for the twining stitch.
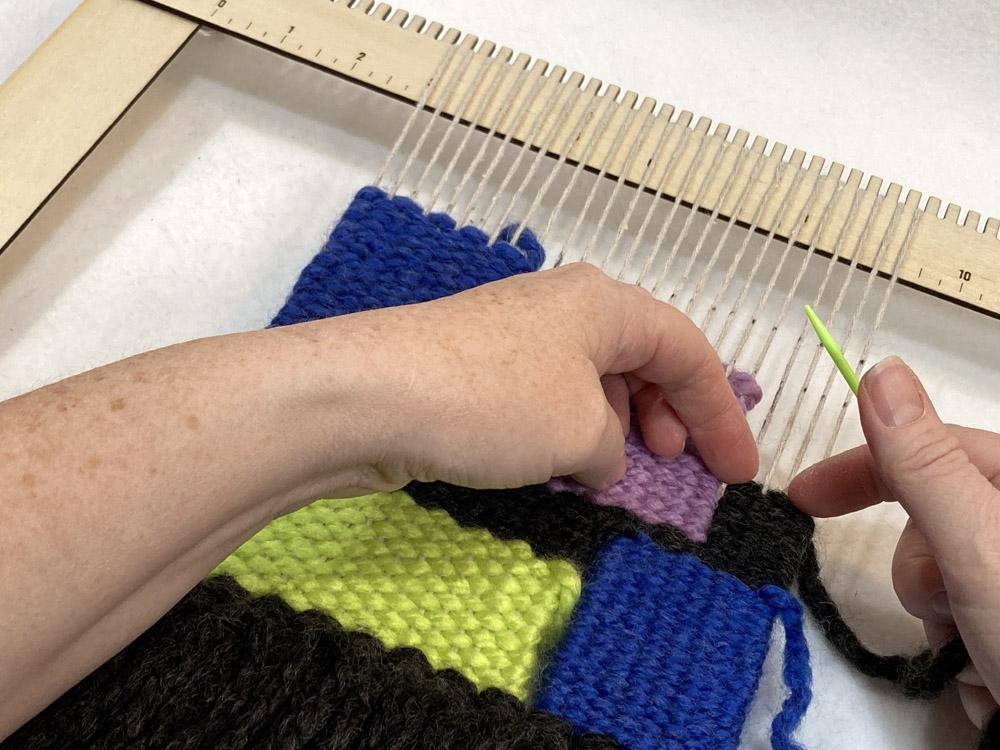
Then I started the lavender box but noticed that when I first started, the warp cords were showing through more than in other areas. I realized I had started going under the first warp cord on the right and that's how the black yarn underneath was too. When I pulled my yarn out and did the opposite of the black yarn, going over where the black yarn was going under, it covered up the warp cords better.
As I worked my way up, I realized if I went all the way to where I drew the line for it to stop, I would only be leaving space for two or three rows for the lime green box on the top right. That's because I would need to stop the lime green box at the same height as the royal blue box on the left to leave room for the twining stitch across the whole top. So, I made the lavender box slightly shorter than my drawing and hoped the black marks on the warp cords get covered by black yarn. At least I didn't have to pull out more yarn again.
Before I started the vertical black box on the right side of the lavender box, I made sure I knew what path I needed to take to get two rows of black above the lavender box. This time, it wasn't so difficult to figure out because I wasn't having to go in a Z formation. But, I kept seeing the warp cord showing between the blue box on the right and the black yarn above it. After what happened when I started the lavender box, I realized why. The black yarn and the blue yarn were woven the same instead of opposite each other. So instead of starting at the bottom right to begin my vertical black box, I threaded my yarn needle — since it's smaller — and went from underneath my tapestry to pull the yarn up at the left side of the blue box and pull it over the warp cord that was showing there. Then I wove in and out over those cords to cover them up. I then started weaving my way up the right side to fill in the vertical black box. I continued to use my yarn needle instead of the tapestry needle because it was such a tight space there. I also packed the yarn down with my fingers instead of the comb for the same reason.
When I got up to the top of the lavender box, I made sure my weave would be opposite of the top row of the lavender box, packed down the black yarn a little more, then worked all the way to the left side of the lavender box, turned around, and wove to the far right again. Then I cut the yarn leaving a tail to weave into the back later.
Finally, I filled in the short green box on the top right, making sure my yarn was weaving the opposite of the black row below. I started from the left to fill in the box so that I wouldn't have two tails to tuck in right next to each other on the right side. I ended up with two tails right next to each other on the left side of the box instead.
Tucking Tails


I had started doing a twining stitch to pack everything down before I did the thick, black vertical lines to join the color boxes, but I got to the right of the large royal blue box, and realized I should have done the vertical lines before doing the twining stitch. It seemed like closing the gap between the boxes would be best before finishing the top of the piece. So I undid that.
Then I decided to tuck in the tails on the back because it looked like they might get in the way.
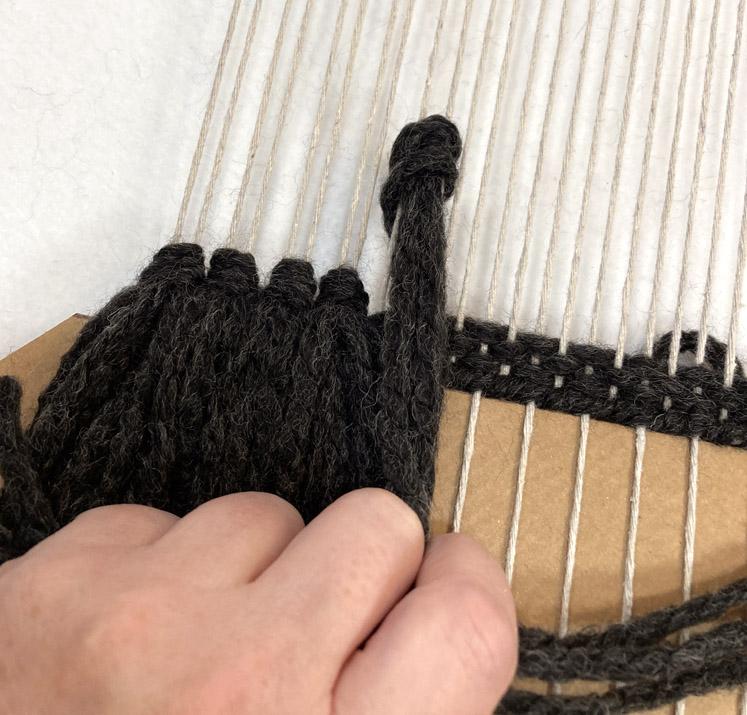
If your tails are long enough, you would thread your yarn needle and weave it through a few close weft channels on the back like I did in the first photo above. You will want to stick with the same color of yarn so there's little chance of it showing through to the front. If the tail is at the bottom of a color box, weave up, and likewise, if it is at the top, weave down.
If you have a short color block like I did with my top lime green box, you will want to weave through one channel of weft, then turn and go the opposite direction through a channel next to it to make sure the yarn is secure and doesn't have a chance to slip out (see second image above).
If your tails are short, you can weave the needle in first like I did with the lime green yarn, then thread it and pull the yarn through. Make sure not to pull too hard so you don't ruin the weaving you've done on the front.
When you cut the tails, it's OK to leave a little stub outside of the last weft it's woven through. It won't show on the front and keeps the yarn from slipping out. Make sure the cut edge ends away from any tapestry edges so that it doesn't accidentally poke out and show on the front.
Thick Black Vertical Lines


I joined all the color blocks vertically as I had in my test by threading a long piece of my black yarn onto my yarn needle and looping it between the weft yarn around both warp strings where the shapes met. I was basically sewing the two blocks together at the edges using a whip stitch.
I started where the royal blue box and lime green box met at the top. I pulled my yarn from underneath the first weft row on the green side, pulled it to the front and went down over the warp and under the first weft on the blue side. I held the tail on the back of the green side and pulled the yarn through snugly. Then I went under the next weft yarn on the green side and so on, making sure to include the warp cords on both sides in each stitch so I could bring them together. As I was sewing, I was also tucking the tail underneath at the same time by sewing around it on the back. I found it easier to hold the loom in my lap while doing this because it made it easier to get to the back to pull the yarn through.
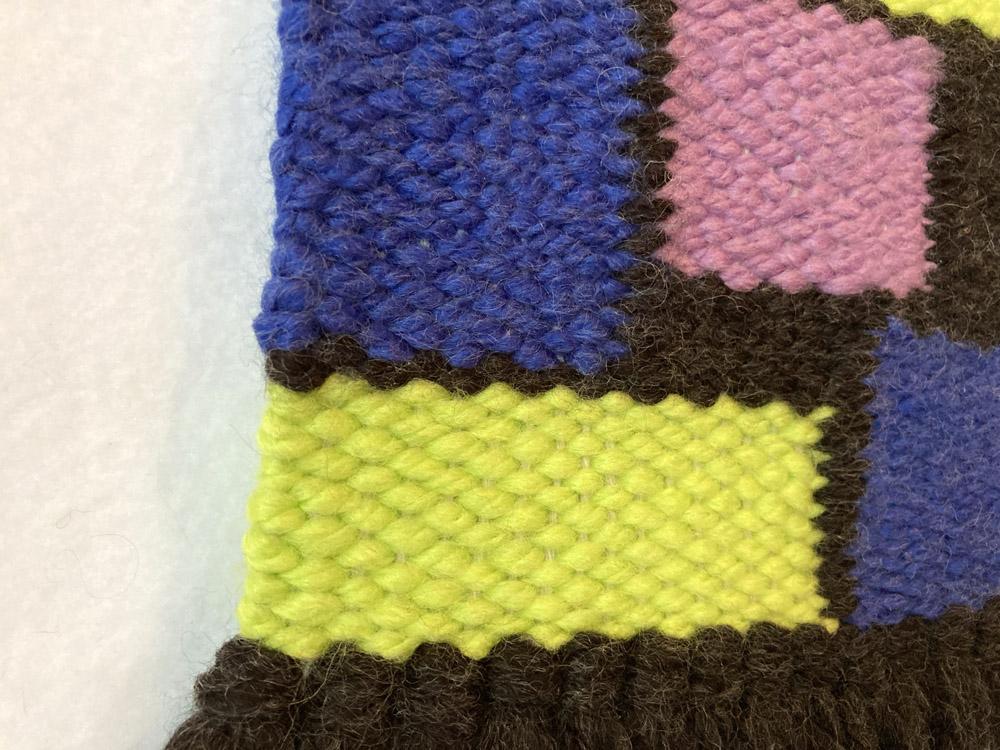
It wasn't looking as good as my test had been and I think that's because I was pulling too firmly to bring the two edges together and so the fluffiness of the yarn was impacted. When I got to the bottom, I had plenty of yarn left on my needle, so I decided to go back up but with less pull to see if I could fill in the gaps. But that made it excessively fluffy and I wasn't happy with that either.
As I was pulling that out, I realized I could just pull the bottom loop out a bit and relax the rest of the stitches all the way up so they were fluffier. It would have been easier to not pull so tightly in the first place, but this worked.
After that, I did the other two vertical lines with less oomph.
Lastly, I decided against doing the vertical black lines on the outer edges of the tapestry. The basic drawing I made in Illustrator made it look more completed with lines going all the way around the outer edges, but after seeing the clean look of the woven edges, I thought trying to go in and add black lines would be excessive and probably mess up the clean lines that are already there.
Then I flipped the loom over and tucked the tails of those vertical lines inside the backs of those same lines.
Final Twining Stitch

Because there's not a lot of space at the top now, I just used my yarn needle for the twining stitch instead of the tapestry needle I had been using for all of my other weaving. I grabbed my black yarn and measured out five widths of the tapestry and then threaded my needle.
My green yarn ended under the warp cord on the far right, so I started my black yarn going over that cord. I did one row of plain weave from the right, pulled it snug, strummed my warp cords to make sure they were spaced evenly and not being pulled in, and packed the yarn down with my comb.
Then I skipped the first cord on the left, and went above the cord next to it where the weft was going over it. I put my needle in at the top, went under the warp cord and pulled the needle out diagonally at the bottom of the weft and up through to the front on the right side. I skipped the next warp and went to the one after that with the weft going over the warp and repeated this step. After I did four twining stitches, I realized I was not taking up any more height like I thought I would. I was packing the yarn down and could still see that line I drew with marker on the top.
So then, I undid those twining stitches and pulled my yarn all the way to the right so I had a short tail on the left this time. I stretched my warp cords so they weren't pulled in, and packed that yarn down again.
Then I switched my yarn needle to the long side of the yarn on the right and did another row of plain weave back to the left. And finally I was able to do the twining stitches as before under the warp cords where the weft was going over them.
When I was done, I cut a long tail and flipped the loom around to tuck both ends in. I was happy that I made that extra plain weave row below the twining stitch because there would have been nowhere to tuck the tails into since I didn't want to tuck them into a brighter color block. What I had to do was weave the tails in and out of that plain weave on the back, ending with the cut ends facing down so they wouldn't stick up over the top.
I flipped the loom back around and packed down the twining stitch again with my fingertips.
Remove the Tapestry and Get It Ready to Hang


By the way, if you weren't counting, I undid my yarn five times while completing the weaving. At least it wasn't more than what I wove into the piece. I think.
Now it was time to remove my woven art from the loom, tuck in the warp cords at the bottom, tie up the cords at the top and wrap them around a hanging rod, and hang my tapestry! I was both nervous and excited.
Remove the tapestry
First I went back and rewatched the video on removing your tapestry from your loom. I knew what I was basically going to be doing, but I wanted a refresher.
As it turns out, my warp was way too tight to lift off the notches at the top. I tried a couple different ways but it wasn't budging. So, I did as Jenell suggested at the beginning of the video and cut the warp cords at the bottom. Then I was easily able to slide the loops off the top.
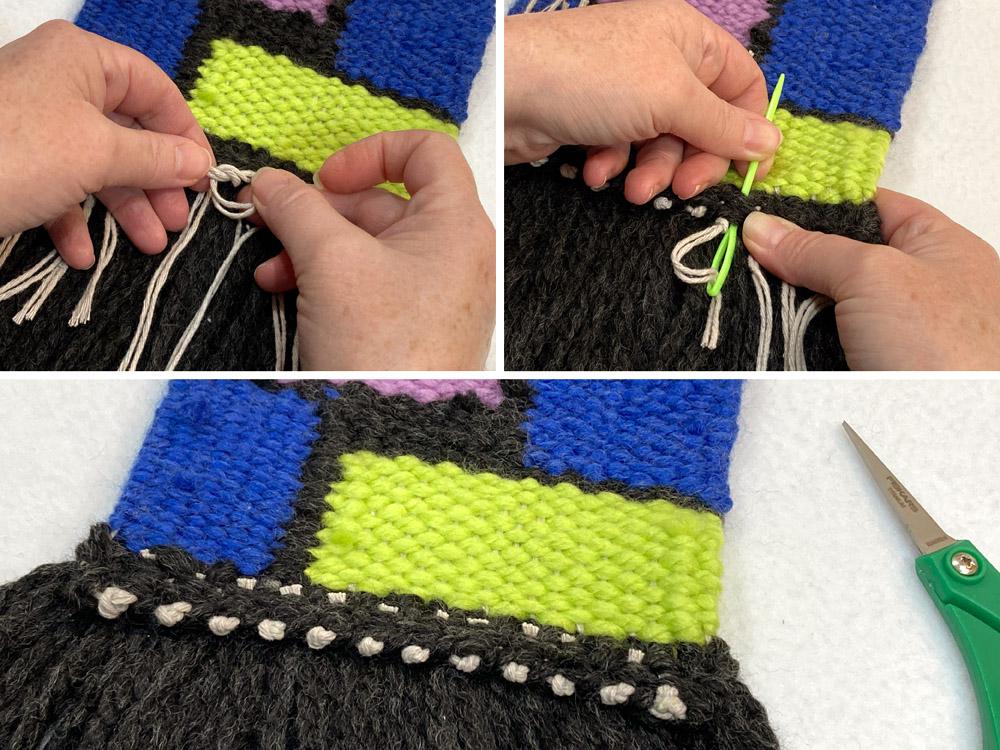
Then I grabbed the first three cords on the left and tied an overhand knot that I pulled in close to the bottom of the twining stitch above it. Then I grabbed the next two and kept tying knots all the way down, doing the last three together just as I had the first three.
Next I grabbed my yarn needle, pushed it through some weft at the base of the weaving, threaded my first set of tied warp cords into it, and pulled them through. I did this all the way down and cut them off when I was done.
Hang the tapestry on the rod
I watched the video again on how to hang a weaving and started doing what Jenell did before I realized it wouldn't work because I have an odd number of loops and can't join them together in pairs. So, (after more undoing of things) I did a lark's head knot on each one individually to hang on my rod.
Usually with a lark's head knot you have one piece of yarn that you fold in half, wrap the folded end over the top of your rod, then take the loose ends, tuck them into the fold from behind, and pull them through. But with the loose ends of the warp already part of your weaving, you'll have to do the lark's head knot in reverse. Or upside down. Something like that.
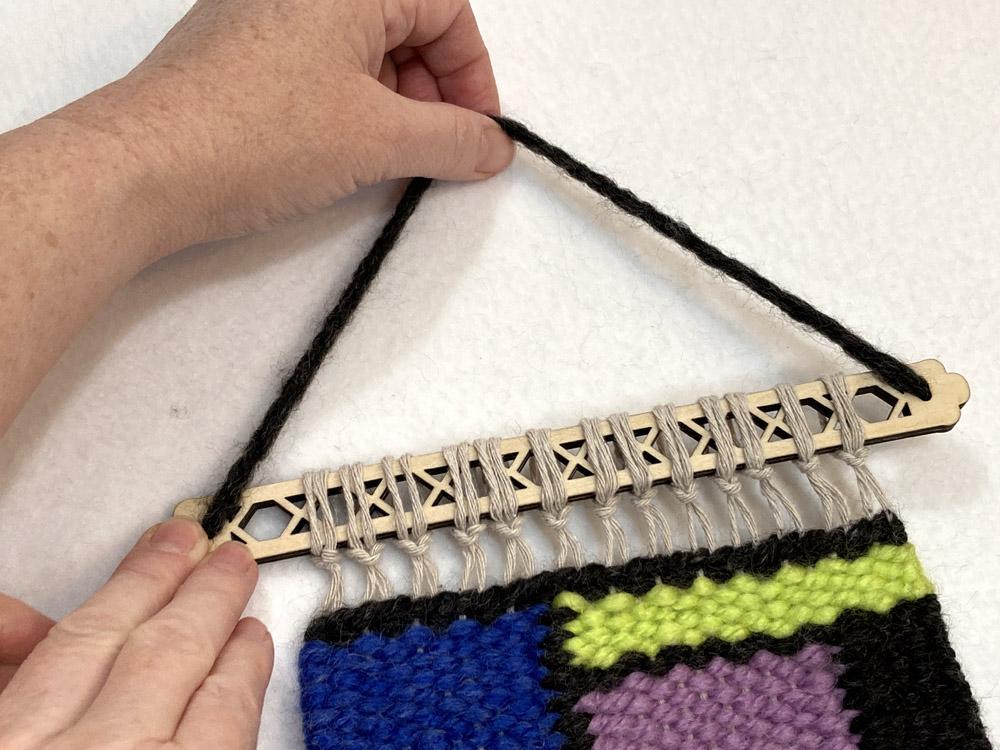
The diagram in the third image above shows the steps on doing the lark's head knot in reverse. With your tapestry upside down, take one loop of warp cord and spread it out wide between your fingers. Twist the top over to touch the bottom where the tapestry is. Then twist it again. Then fold the two loops you now have back toward each other so that the twists stay on top of the cord and the loops are facing back. Then slide those loops over your hanging rod. Slide that one down and do the next one and so on until you've wrapped all of your warp cord loops around your rod.
When I was done putting all of my loops around my hanging rod, I flipped it right side up again, arranged the loops along the rod so they were evenly spaced, and then tugged the knots up toward the rod so the loops were snug around it.
Then, I took a length of my black yarn. I placed one end over one of the holes on the side of the hanging rod, and used my yarn needle to shove it through to the back. I kinda wished I had made the holes 4mm but this worked anyway. Then on the back, I made an overhand knot, and then knotted another knot over that one to make it extra thick. I did the same thing with the other end, but pulled the yarn through until I got a height liked (I didn't want it to be too long) before I tied the double knot on the back of that side. Then I trimmed off the excess yarn in back.
If you don't want to mess with shoving thick yarn through a small hole, you could just tie the yarn around the ends of the hanging rod.
Trim the Fringe


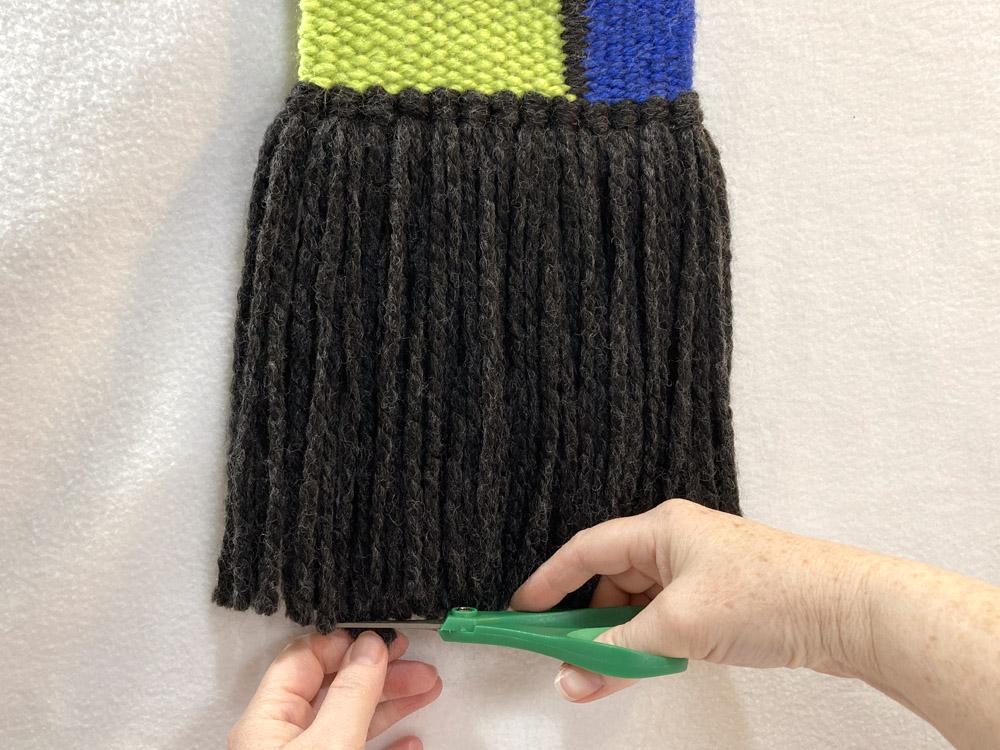
Before the tapestry is totally ready to be displayed, we need to trim up the uneven fringe at the bottom. This sounds a lot easier than it is. I've had to do this with macrame and, well, it's not easy. You could clip at dangling ends until the end of time and it will never be perfect, and you might end up trimming so much off that you wreck the balance created by the length you chose in the first place.
With that said, here are some tips:
- Hang it first so gravity helps. I've tried laying a macrame piece flat, brushing out the cord, and laying my L-square on it to flatten it out so I could trim it with my rolling cutter to make it severely straight. That didn't work. Because when I hung it back up, inevitably there was some strand of thread that got stuck up high and now hung below the cut edge. And it was always several strands, sometimes many.
- Get at eye level with the bottom. If you're standing above the tapestry, you won't see all the ends because the fringe is fluffy and shorter pieces may hide in the middle layer. You'll see them when you hang it up high on a wall to display. So make sure you squat down and look at the fringe bottom at eye level to trim the longest pieces of yarn.
- Comb the strands of yarn down gently with your fingers. First gently shake the tapestry from side to side to get the yarn to open up and fall down. Then very gently comb your fingers through from the top to loosen any that are still clinging up high. Being gentle keeps them from bouncing back up.
- Look at it from a good distance. After you do your first round of trimming, walk back a few feet and look at it from a distance. Better yet, hang it up higher and then go look at it from a distance. You can make note of excessively long ones from farther away but also notice that ones that looked uneven up close don't look so bad from a distance. You don't want to over-trim your fringe.
Display It!


Once you're happy with the fringe, find a great location, put a nail in the wall (or use Command hooks if you don't want to damage your wall), and display your tapestry for all to see!
In looking back, I see where improvements could be made in both the loom design and the weaving. But I'm pretty happy with my first attempt at both. I hope that you'll give weaving a try because it was really fun. I made a few improvements to my loom design after using this first one, and you can download the improved version from my Etsy shop. I included a few different hanging rod designs and created files for 3mm, 4mm, 5mm, and 6mm thick material. Happy weaving!