Legend of Zelda "Karusa Valley" Handmade Miniature Canyon Diorama
by The Wilbury Pigeon in Craft > Cardboard
212 Views, 2 Favorites, 0 Comments
Legend of Zelda "Karusa Valley" Handmade Miniature Canyon Diorama

Hello! Welcome to my first diorama set building project.
This is a Legend of Zelda-inspired build based on the Breath of the Wild video game series. I recreated the desert canyon region, Karusa Valley, which is home to my favorite ninja characters: the Yiga Clan.
This project idea came about when I did an art trade with my friend who made me a figurine based on a Yiga Clan footsoldier ninja. I don't have the figurine pictured here because it's not my work, but I was inspired to create this diorama as a set to photograph it in!
In this diorama, I will attempt to craft a three-dimensional structure from paperboard boxes, create the illusion of forced perspective, and realistically replicate a video game environment.
Let's get started!
Supplies
Reference images
Paperboard
Hot glue + glue sticks
Acrylic caulk
Sculpting tools (metal, plastic, and silicone)
Gesso
Tissue paper
PVA glue
Water
Paintbrushes
Acrylic paint
Polymer clay
Aluminum foil
Hemp cord
Glue stick
Super glue
Molded paper-pulp cup holder
Fine sand granules
Isopropyl alcohol
Newspaper
Floral wire
Canyon Structure
.jpg)
.jpg)
To create the canyon's structure, I began with a single sheet of paperboard as my base, and used hot glue to attach two separate paperboard panels parallel to the base.
With this primitive structure as the canyon's walls, I cut up even more paperboard sheets into irregular shapes, then used my hands to crush and crumple them as a means of adding form and texture.
With several crushed pieces of paperboard, I started to assemble them like a puzzle, eyeballing what pieces would fit nicely together and create a mix of angular slopes, grooves, and smooth surfaces. I also made sure to pad the interior of the walls with packing foam to help block out space between the walls and "rocks"
My canyon isn't directly based on a specific area in the game, but I inspected a lot of reference images for inspiration as to what kinds of curves and formations to incorporate.
To help create forced perspective, I intentionally made the "rock" formations at the front of the set larger and more imposing while gradually narrowing into the vanishing point and incorporating small cliffs towards the back.
This diorama doesn't follow a specific scale, but its overall dimensions measure 10.5" x 7.5" x 6.0" (inches) to accommodate for a 2" figurine (not pictured).
Caulking
.jpg)
.jpg)
.jpg)
.jpg)
.jpg)

With the canyon's rock formations complete, but full of rough hot glue seams, I didn't want to just paint directly over it.
I considered overlaying the entire canyon with air-dry clay and sculpting into it, but I remembered I had a caulking tube that I needed to finish, so I decided to manipulate it as a sculpting medium.
I made sure to use acrylic caulk so that it would be compatible with acrylic paints.
I used my hands (with gloves) and metal sculpting tools to apply a thin layer of caulk all over the canyon structure, but it proved to be difficult because it liked sticking to itself more than smoothly adhering onto the paperboard.
Before the caulk started to set, I used a plastic sculpting tool to indent striated ridges along the walls and structures of the canyon.
I let the caulk cure for about 36 hours after application, and so far I haven't had any visible issues with it shrinking.
Paper Mache
.jpg)


After allowing the caulk to cure, I almost considered painting directly onto the surface with acrylic paints-- but not yet!
I didn't have regular paint primer on hand, so I painted the surface with white gesso to create an even white canvas and provide grip for my next step: paper mache.
I figured that adding layers of paper mache on top of the caulk would help to soften the harsh, ridged texture and provide a better surface for the acrylic paint to adhere to.
To create the glue mixture, I combined 2 parts white PVA glue to 1 part water. I then tore strips of tissue paper, dipped it into the glue mixture, and laid the pieces all over the canyon. I also used a paintbrush to get the paper fitted between the crevices.
(A bit of foreshadowing! :O Using green tissue paper was not a good idea. Saturating the paper in the glue mixture seemed to activate the green dye and it stained my hands-- and later the sand.)
Paint (Prime, Base, Details)
.jpg)
.jpg)
.jpg)
.jpg)
.jpg)
.jpg)

Now we can finally begin to paint!
The caulking material took to the paper mache surprisingly well, and now I could advance to adding a base coat of paint.
I opted to use a light yellow color to create an evenly colored surface, and because I figured it would be a more forgiving color to peek out if I missed any sections in successive paint coats.
After applying several coats of the light yellow (to mask the green paper) I mixed and applied a bold red-orange paint as the true base color for the canyon.
Once this layer had also dried, I started to lightly paint stripes along the ridges of the canyon. I developed a technique of watering down my brighter colors (whites, tans, creams, yellows, reds) so that they'd appear more translucent. I'd then go back and add subtle layers with regular paint application with darker hues of oranges, yellows, and browns.
Between this dance of layering colors, I also went over the whole surface with an orange wash. Normally, washes are used with dark colors to apply shading to crevices, but in this case I used orange to create a cohesive and tinted layer that helped reduce the stark contrast between the stripes.
Lastly, I utilized dry brushing with dark brown/orange paint to slightly grunge up the surface. This way, the rock seems less pristine and more life-like.
Painting the openly spaced front area of the canyon was easy, but it became increasingly difficult to apply the same details towards the back. But I guess that's accurate to detail becoming less visible as you look further into the distance, right?
And with that, the paint job is complete!
Progress Checkpoint


Here's a detailed overview of the canyon's construction and paint job!
Sheikah Frog Statues 1: Sculpting
.jpg)
.jpg)
.jpg)
.jpg)
.jpg)
.jpg)
.jpg)
.jpg)
.jpg)
Although the canyon's structure is finished, there's still so much more detail to add!
Another key feature in Karusa Valley is the presence of frog statues. In the game, the frog statues are a decorative element of the Sheikah tribe. However, the Yiga Clan, being disbanded/rival Sheikah, have literally defaced these statues by concealing their faces with a mask bearing their own crest (the inverted Sheikah eye).
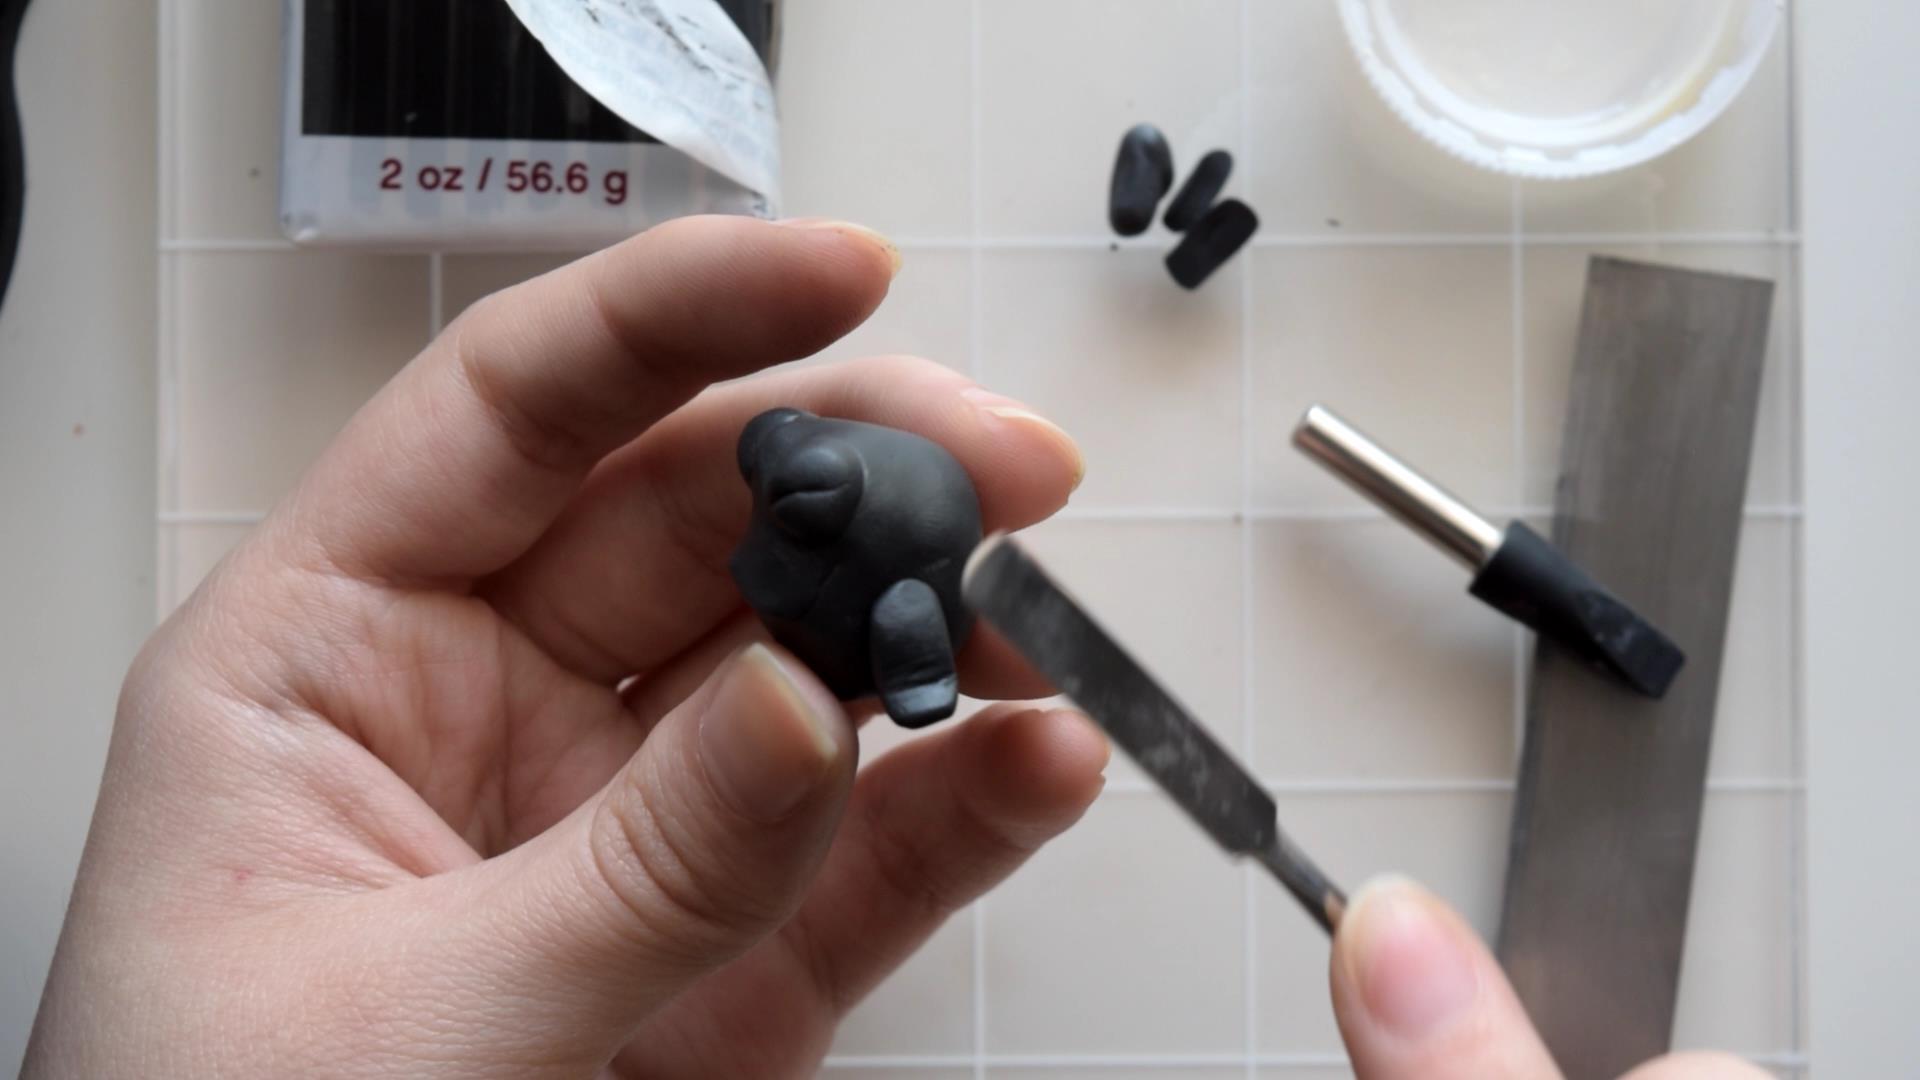
To create the statues, I used black polymer clay (to avoid dust, fingerprints, and adding a base coat), with a crumpled aluminum foil armature.
The sculpting stage was rather simple: I rolled a ball of polymer clay and used my fingers to shape each of the frogs, forming a back hunch and a small belly.
I rolled two smaller balls and placed them on top as the frog's eyes, using silicone sculpting tools to indent the closed eyes.
Then, I shaped two small legs and used my clay cutter to slice off one side to make attaching it to the frog's sides easier.
Isopropyl alcohol has polymer clay-melting properties, and I took advantage of this to meld a thin sliver of clay to form the frog's lip, also blending it in with silicone sculpting tools.
Lastly, I took a flat, metal sculpting tool and used it to gently press and create indents in the clay to resemble a stone surface.
In total, I made 4 frogs: two larger ones to place at the front of the canyon, and two much smaller ones to place near the back to emphasize the imaginary distance.
Sheikah Frog Statues 2: Painting
.jpg)
.jpg)
.jpg)

After curing in the oven, I could now paint the stone-like colors onto the statues.
I used a mix of greys, whites, and earthy tones as the main palette. The key to this step was using a makeup sponge to blot and blend the paints and create an aged-stone appearance.
The black polymer clay beneath cut out most of the shading work for me, but I still went back over with a thin paintbrush and grey paint to clean up the edges.
Although they wouldn't be visible, the frogs have red spots on their backs, so I dotted them on with red acrylic paint as well.
Lastly, the frog statues also have a rudimentary painted Sheikah eye symbol on their front-- a reminder of the Yiga's origin-- so I loosely went in with red acrylic paint on each of the frogs.
Sheikah Frog Statues 3: Masks
.jpg)
.jpg)
.jpg)
.jpg)
.jpg)
.jpg)
.jpg)
To create the frogs' masks, I folded tiny sheets of white tissue paper in half to reduce the transparency while still being delicate enough to mimic a thin cloth.
Then on top, I delicately painted the inverted Sheikah eye with red acrylic paint.
I also wanted these masks to be removable, so I measured a loose fitting piece of hemp cord around the frog and attached it to the mask with a glue stick.
Spiked Plants


Sprinkled throughout the canyon adding splashes of green are unidentified spiky plants-- possibly yellow agave?
I began by repurposing another unfinished miniature plant project, which were snake plant fronds made using paper mache. Rather than using tissue paper, I opted for newspaper, which is much sturdier.
I made these by cutting out several long, leaf-shaped pieces and layered them over a small piece of floral wire as an armature. I used a diluted glue mixture to hold the layers together and let dry.
To adjust the fronds for this project's needs, I removed the floral wire armatures and cut the fronds to size, making sure they're sharply tapered at the tip and cut bluntly at the bottom. I also cut small snippets all along the sides to create the spiky appearance.
After trimming, I painted each frond with a dark green base-coat, followed by a pale green mixed with brown. Layering the dark green undertones beneath the pale green paint added much needed depth and life to the plants.
I painted along the edges with a warm yellow paint, then adding a dash of a dark, muted green on the center of each frond.
Lastly, I used super glue to assemble together the fronds into a complete plant, making sure to place the larger & broader leaves outside and smaller & thinner leaves on the interior.
Hanging Ropes + Cards
.jpg)
.jpg)
.jpg)
.jpg)
.jpg)
.jpg)
.jpg)
.jpg)
With the ground-level decorations complete, it's time to move our focus upwards!
Draped throughout the entire canyon are rope decorations with hanging wooden cards-- reminiscent of chimes, gently rustling in the wind.
To create these, I rolled out a thick slab of red polymer clay and cut them into various-sized rectangles.
I then used a needle sculpting tool to puncture holes into each of the cards, making sure they’re wide enough to slide onto the rope
Upon looking at reference pictures, I noticed a trend of the rectangular cards having grey lower halves while the square cards are painted on their upper half. So I replicated this pattern with dark grey acrylic paint on each of the cards.
After painting, I roped the cards onto some thin hemp cord. I only had enough cards to complete three strands, but I took care in positioning them at angles to appear as though they were in motion from the wind.
I also wanted these to be removable so I could have a regular canyon set if needed, so I strategically placed them in spots where they could be held up with tape.
Sand Prep
.jpg)
.jpg)
.jpg)
Being a valley, the terrain isn’t completely flat, so to add depth to my flat paperboard base, I crumpled several pieces of aluminum foil to create raised levels in the sand.
I then secured these mounds to the base with hot glue, using tweezers to place them and taking caution not to burn myself.
I also ripped apart a paper pulp-molded takeout cup carrier (that's a mouthful) and hot glued the pieces to mask the texture of the foil and add more dimension beneath the sand.
And with that complete, we can move onto the most exciting part! Sand!
Filling It With Sand


I did a lot of research beforehand with other diorama-making videos and online forums on how to best approach adding sand, but I still kind of dove in without really preparing.
To prep the base for sand, I mistakenly painted a layer of diluted PVA glue (one part water and one part glue).
--> Looking back, the right approach would've been to apply a thick layer of undiluted glue, and preferably something more heavy-duty, like Mod Podge.
After this initial glue layer, I used a spoon to help sprinkle in the sand!
After placing the first sand layer, I poured isopropyl alcohol all over the sand, followed by a healthy splash of the diluted glue mixture. Supposedly, the isopropyl alcohol acts to break up the surface tension and help the glue saturate and seal the sand grains.
With this initial application, I made the mistake of trying to smooth things out with a large paintbrush, which disrupted the layers of glue and sand, resulting in a flat and muddy appearance.
I spent a few days after, re-applying sand more efficiently:
- Poured mixture of diluted Mod Podge (one part water and one part glue) over the existing sand layer
- Applied a fresh layer of sand granules
- Poured another generous layer of diluted Mod Podge on top
- Poured a layer of isopropyl alcohol over the diluted glue mix (to help it soak into the sand)
- Used a plastic sculpting tool to lightly indent ridges/waves in the sand --> to add motion and interest; I also wanted to incorporate footprints in the sand, but it wouldn't hold that much detail
- Many tutorials online suggest using a spray bottle for application of the glue and IPA, but it turned out just fine without!
With this re-application, the sand retained its color and texture without turning muddy. It also holds in place nicely and doesn't flake off with ease.
(Note: recalling the use of green tissue paper much earlier... the green dye kept showing through despite me adding even more sand to cover it up. This is probably due to the continued use of glue and water.)
As a finishing touch, I also flecked some sand on the canyon's walls, and went in with a final dry-brushing of acrylic paint to add shading to darker corners and highlights on top of the rock's surfaces.
The Finished Karusa Valley!


Here is the finished diorama of Karusa Valley!
If you enjoyed this Instructable, please consider voting for it in this year's "Fandom" challenge and checking out the entire photoshoot (featuring my friend's awesome figurine) on my Instagram.
If you're into the Yiga Clan or Legend of Zelda video games, please also check out my previous Instructable and YouTube channel on the making of my clay figurine of Sooga from Hyrule Warriors: Age of Calamity.
Thank you so much for reading!