Lightweight Gaming Mouse Frame (with Sacrifices)
by Kazikzz in Workshop > 3D Printing
865 Views, 5 Favorites, 0 Comments
Lightweight Gaming Mouse Frame (with Sacrifices)

I wanted a super lightweight gaming mouse without designing the electronics PCB and figuring out how to make the wizardry work. I took the guts from an ATK Shark X1 Basic edition and slapped it onto an open-design frame with grip points for a fingertip-style grip. Inspired by Optimum Tech's "Zeromouse" and Juskim's "Lightest Wireless Gaming Mouse."
Supplies

Elegoo Neptune 4 Pro
Black Elegoo PLA - $14/kg
ATK Shark X1 (Base edition used) - $39 (at the time)
(Optional)
Random Soldering Iron
63-37 Tin Lead Rosin Core Solder Wire - $9
ATK X1 Disassembly - Shell


Firstly, we must get inside the ATK X1 for the internal main PCB.
To open up the shell, peel off the mouse feet and unscrew the four screws holding the shell together.
When opening up the shell, be careful! There is a ribbon cable that you must detach before you open the shell entirely.
ATK X1 Disassembly - Internals

The battery may be disconnected from the PCB. It is held in by a clip, so make sure to squeeze the clip so that it will release from the PCB as you gently tug on the cable.
The battery may now be peeled from the bottom shell (if you're planning on reusing it).
Take off the screws holding the PCB to the bottom shell and set those to the side as we will be reusing them later.
Mouse Switch Mod (Optional)


I really wanted to try a mouse switch I hadn't tried before, so I sprung for the Kailh Yellow Silent mouse switch.
I desoldered the three contact points for each main mouse switch (M1 and M2) and replaced them with the Kailh Yellow Silent switches. If you're holding the PCB with the charging port pointing up, the new switches only occupy the top two sockets.
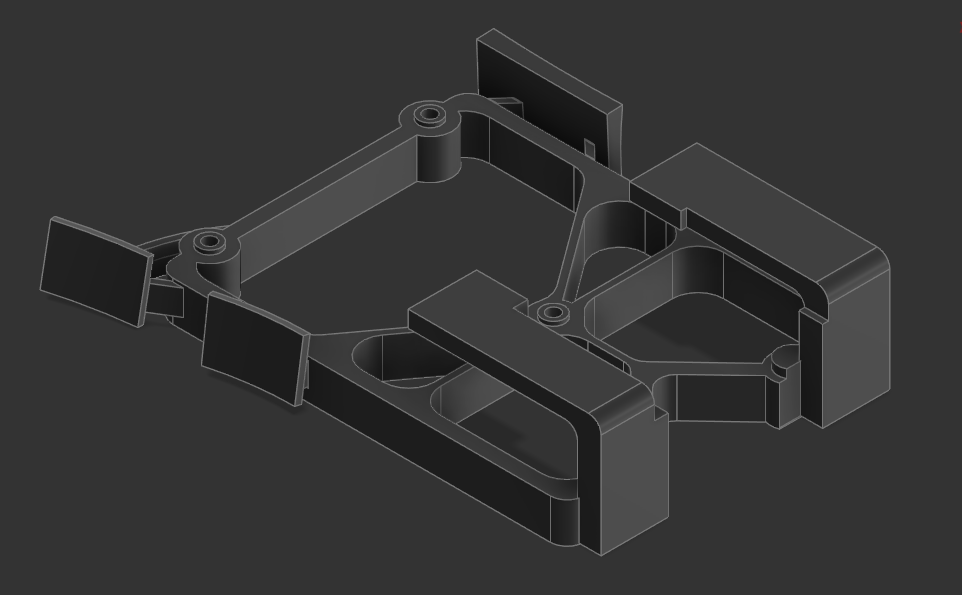
3D Printing
With my Neptune 4 Pro, I wanted to make sure this would print as well as it could by printing it slowly and with tree supports on 50-degree overhangs. Here are my print settings for PLA:
Layer Height - 0.2mm
Line Width - 0.4mm
Wall Line Count - 3
Top/Bottom Thickness - 0.8mm
Print Speed - 80mm/s
Initial Layer Speed - 25m/s
Brim width - 4.0 mm (8 lines)
Infill Density - 15% (Cubic)
Retraction Distance - 0.6mm
Retraction Speed - 45mm/s
Temps:
Nozzle - 210 C
Bed - 65 C
Fans - ON!!!!
You could probably get away with faster speeds and different settings.
Downloads
Assembly


In this step, I'm using an older version than the one supplied above. The only difference is that the thumb grip and mouse buttons are thicker in the newer version so that they wouldn't snap while peeling the supports. However, the screw mounts are the same and the missing mouse buttons make it easier for illustration purposes.
Use the three panhead screws to secure the PCB to the frame. I did only use one, but I lost the other screws despite my earlier instruction above...
Since the battery should still be sticky and has a foam pad on the bottom, I just stuck it on top of the mouse sensor, like so.
FINISH!!!

Congrats. Now you have put together something that will never get past TSA.
Other notes:
I would also put Superglide Dots on the bottom under where the screws mount. The battery also needs a holder, so I will make that when I get around to this project again.
Thanks for stopping by!