Loudspeaker Resonator Guitar -Model Z8.4
518 Views, 6 Favorites, 0 Comments
Loudspeaker Resonator Guitar -Model Z8.4
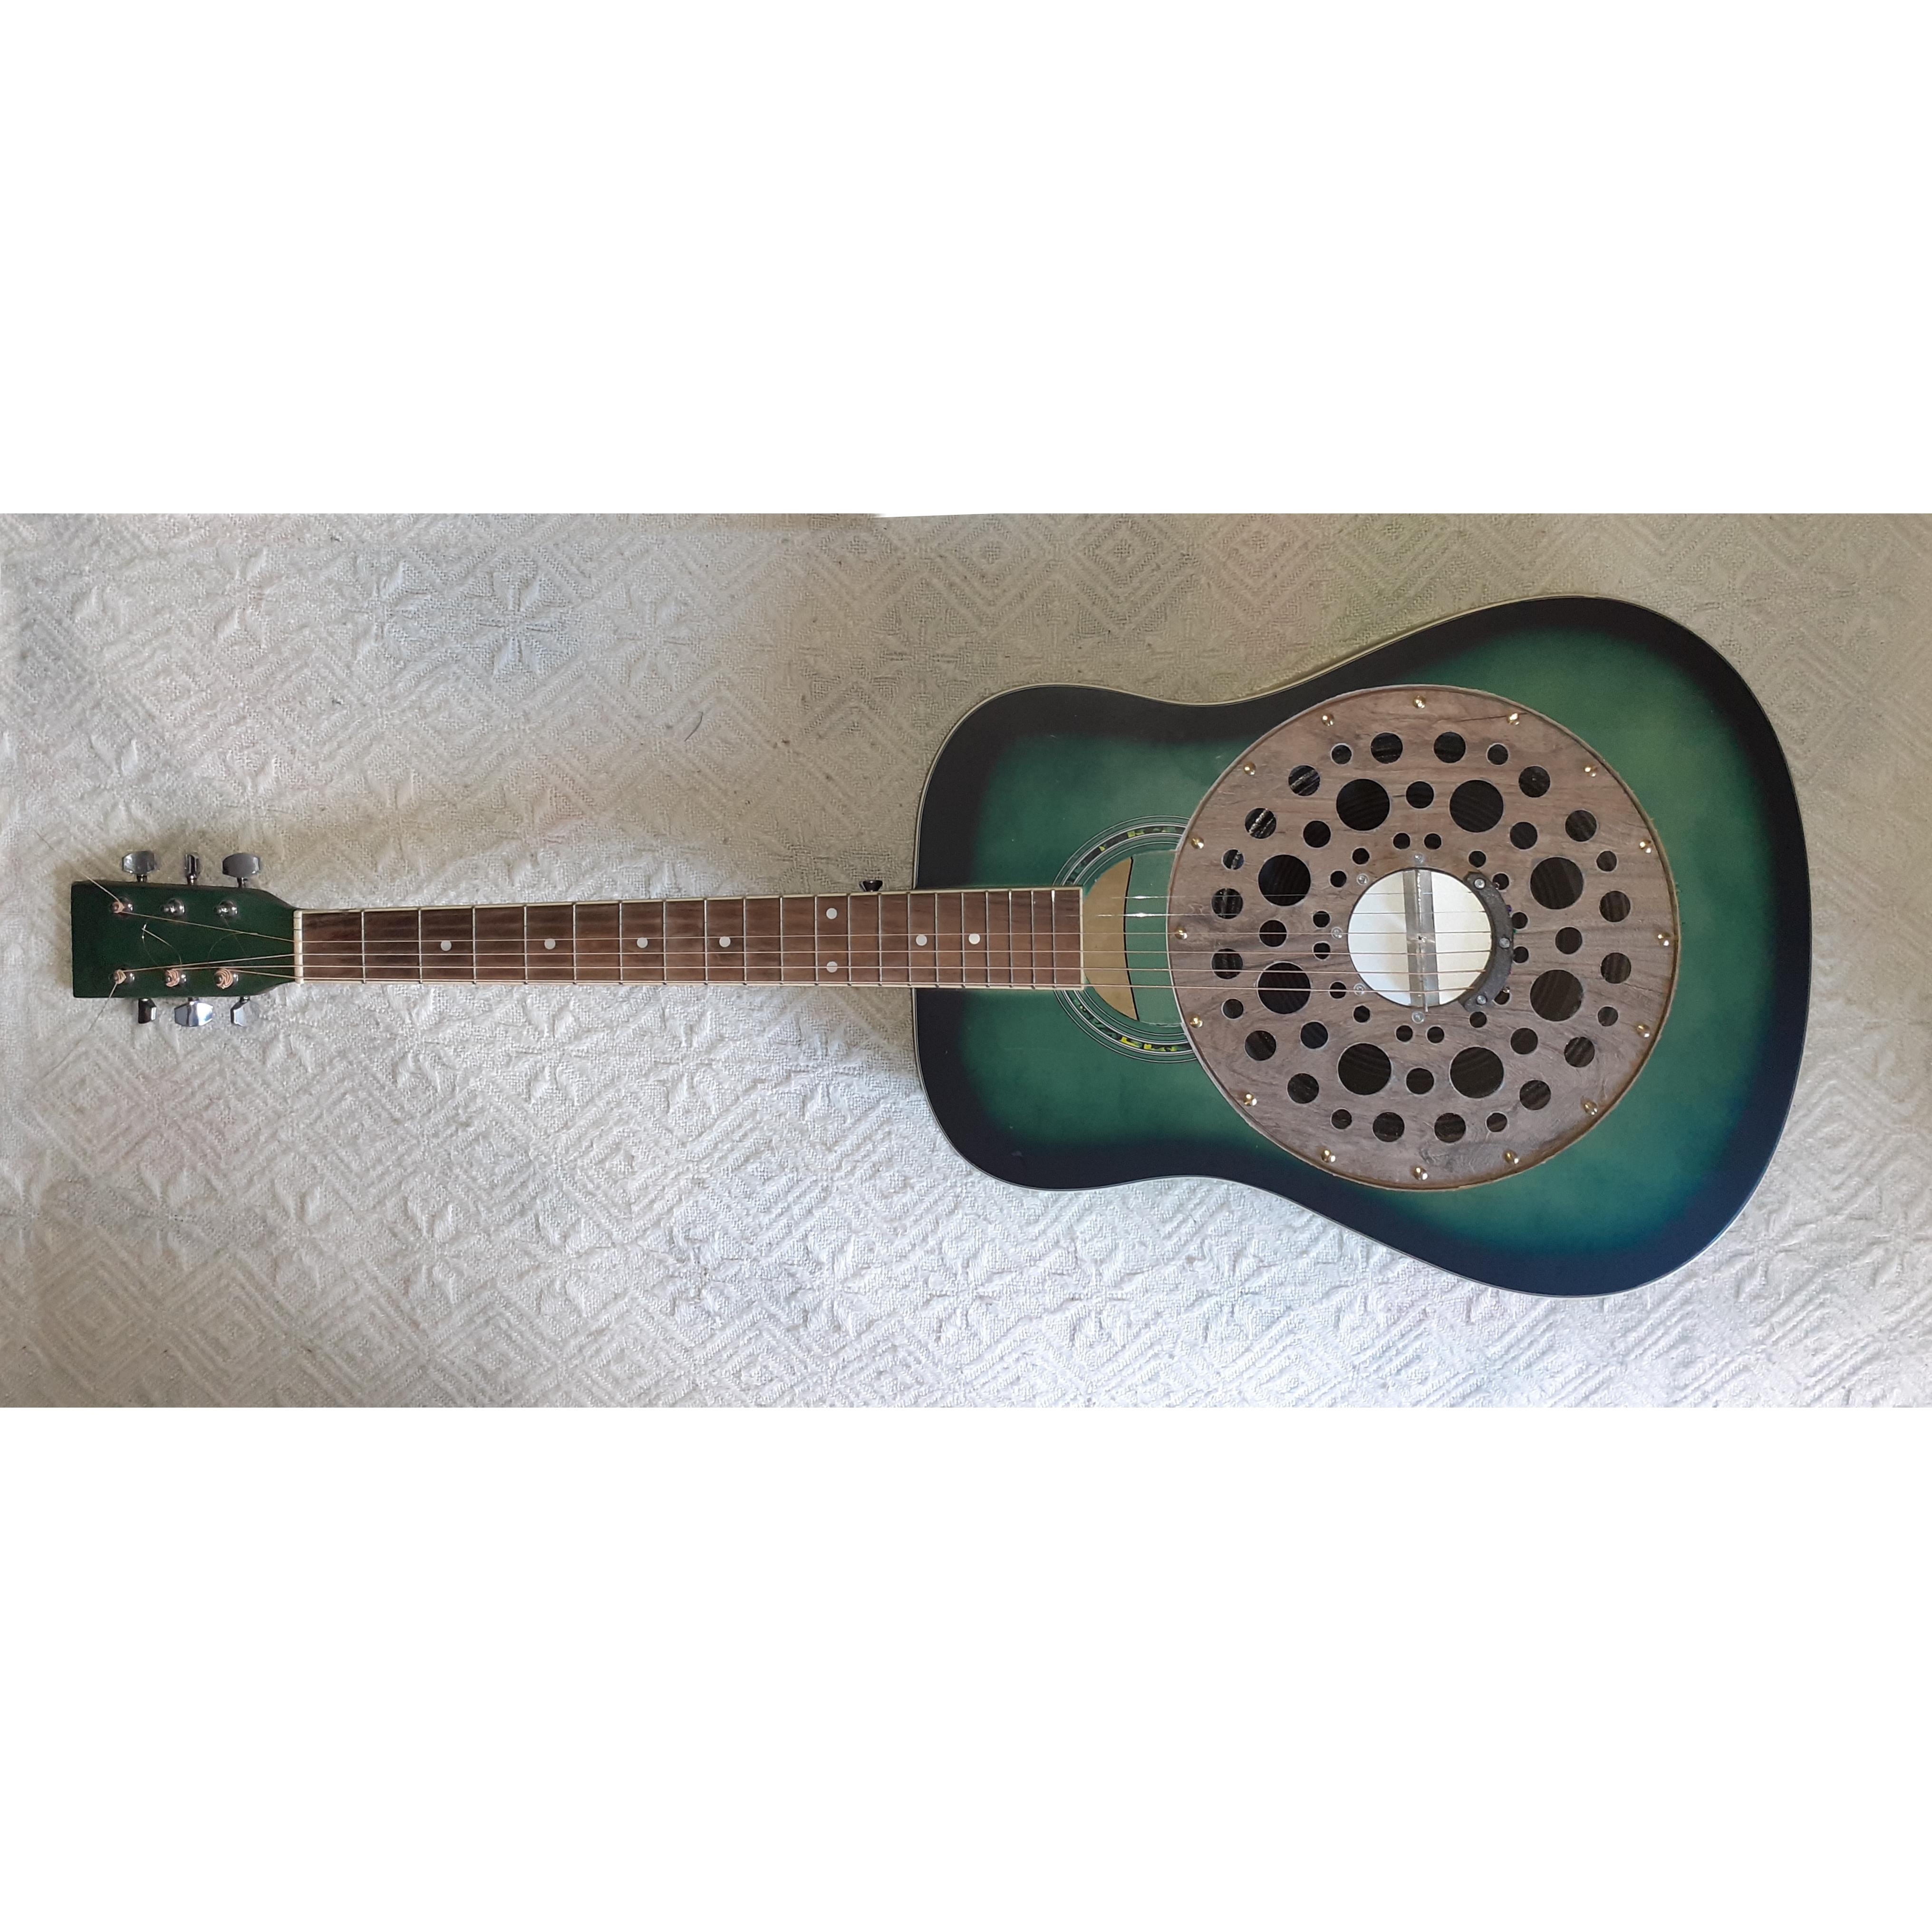
My pleasure lies in experimenting with new ways of producing sound with guitars. I find particularly interesting the approach of producing a sound from a bridge vibrating directly above the center of a speaker: the sound is very powerful, the notes are pure, and their sustain is long and deep. I began experimenting with this principle with the Z8.x series, specifically the Z8.1, Z8.2 (and the Z8.3, and the Z8.3, which was stolen in my workshop)).
However, regarding the Z8.1 and Z8.2, I must admit that mounting the speaker inside the guitar body proved very tricky, and the question of improving this mounting obsessed me until I built a Dobro Z11, which was missing from my collection.
In a Dobro guitar, a cone is placed in a ring attached to the soundboard. A support, called a "spider," is mounted on this ring to support the bridge; This support is slightly flexible. Since the bridge and cone are connected by a screw, the bridge's vibrations are transmitted to the cone. It is the metal diaphragm that gives the Dobro its characteristic sound.
For the Z8.4, I use the same sound production principle as for the Dobro (diaphragm and flexible suspension), but because the diaphragm is made of paper and the suspension is non-metallic, the sound is warmer, rounder, and less harsh.
Supplies
A folk guitar with a truss rod
A 10" speaker
A fiberglass cafeteria tray (for the spider)
Some slightly rigid plastic foam (like thermal insulation foam)
Standard DIY tools (drill press, band saw, etc.), screws (2 x M3 x 20mm long nuts), glue, wood filler
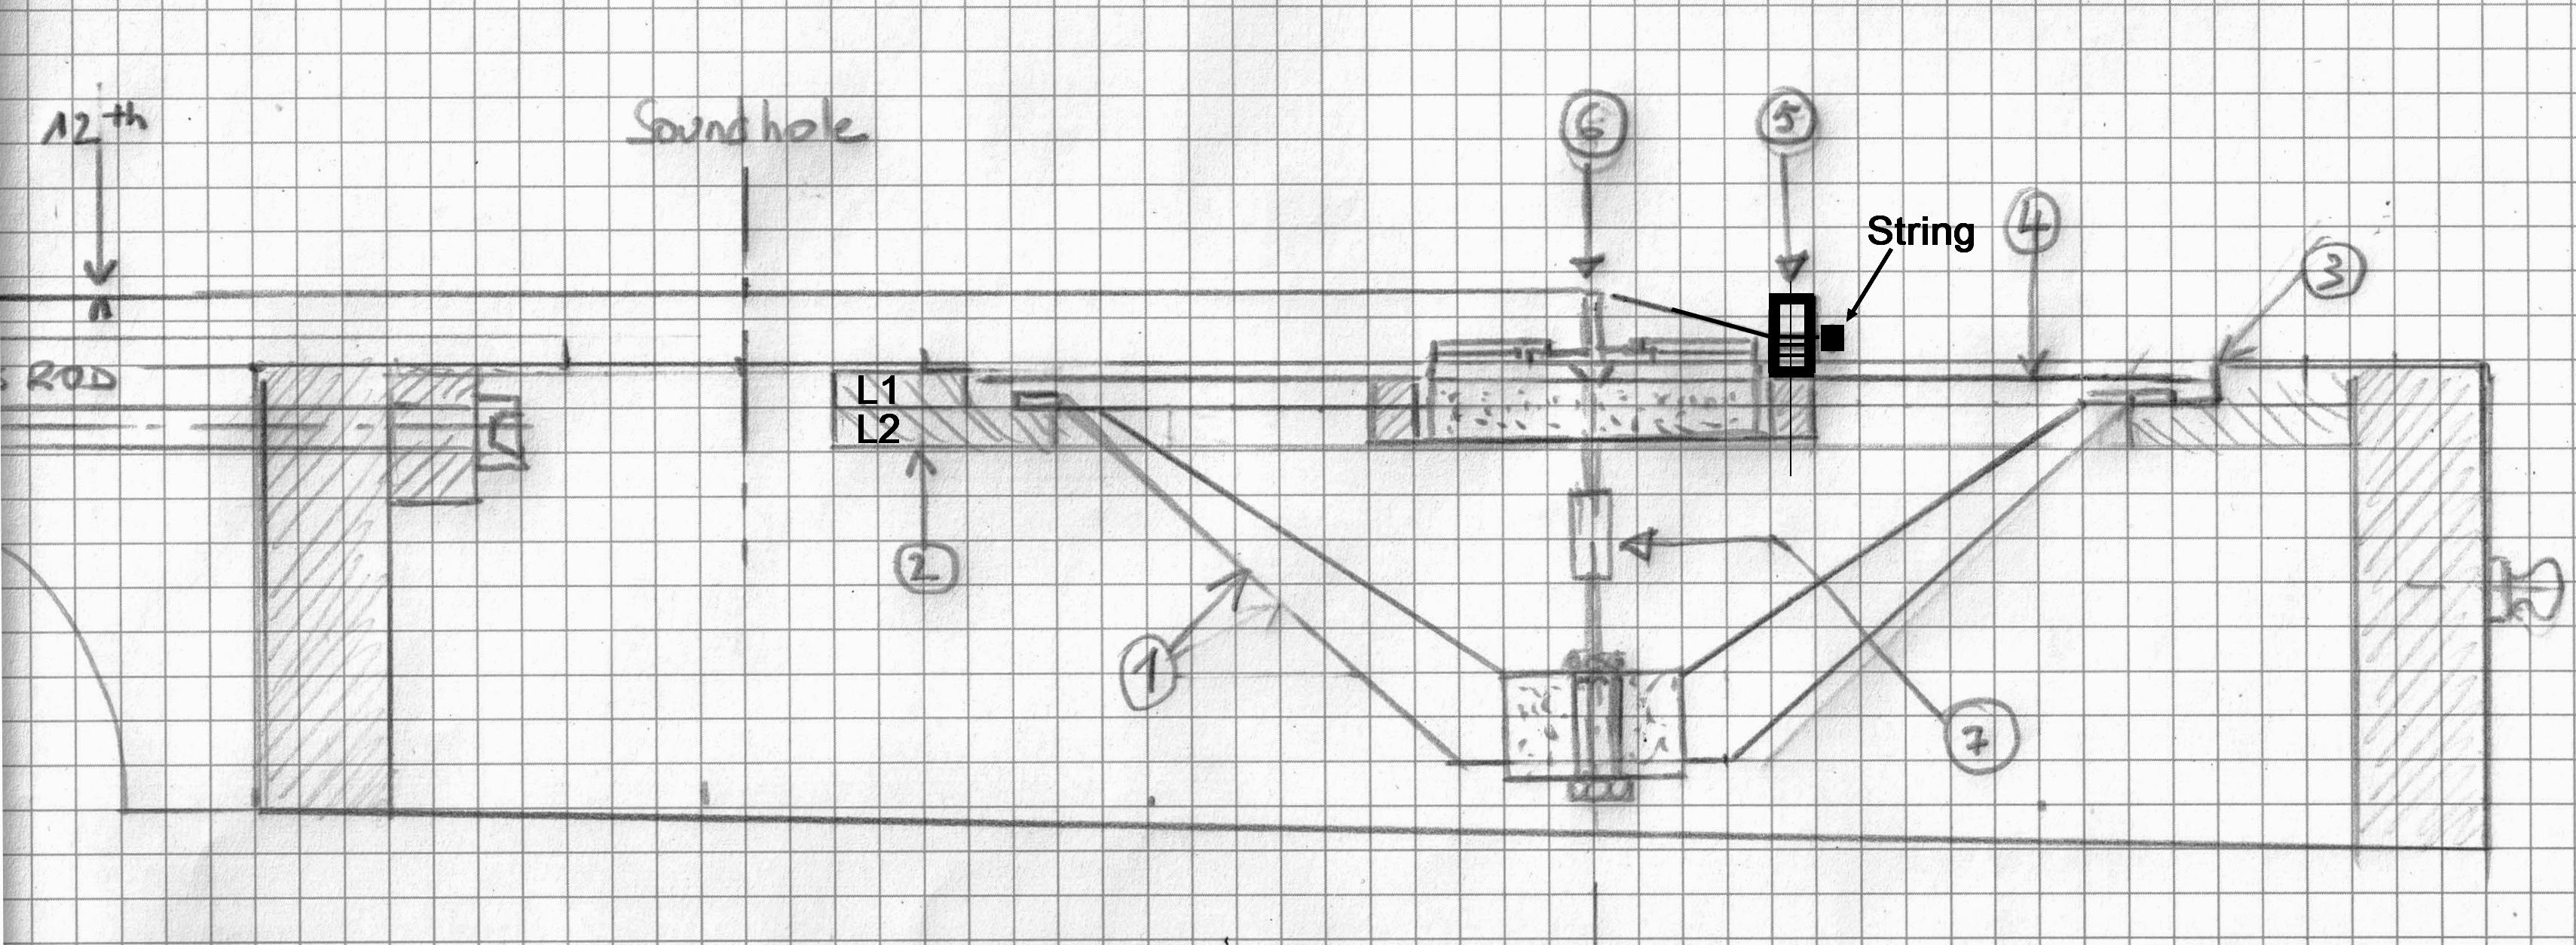
Overview
- Loudspeaker 10"
- Loudspeaker support
- Soundbox
- spider
- Tail piece
- Bridge
- acoustic connection
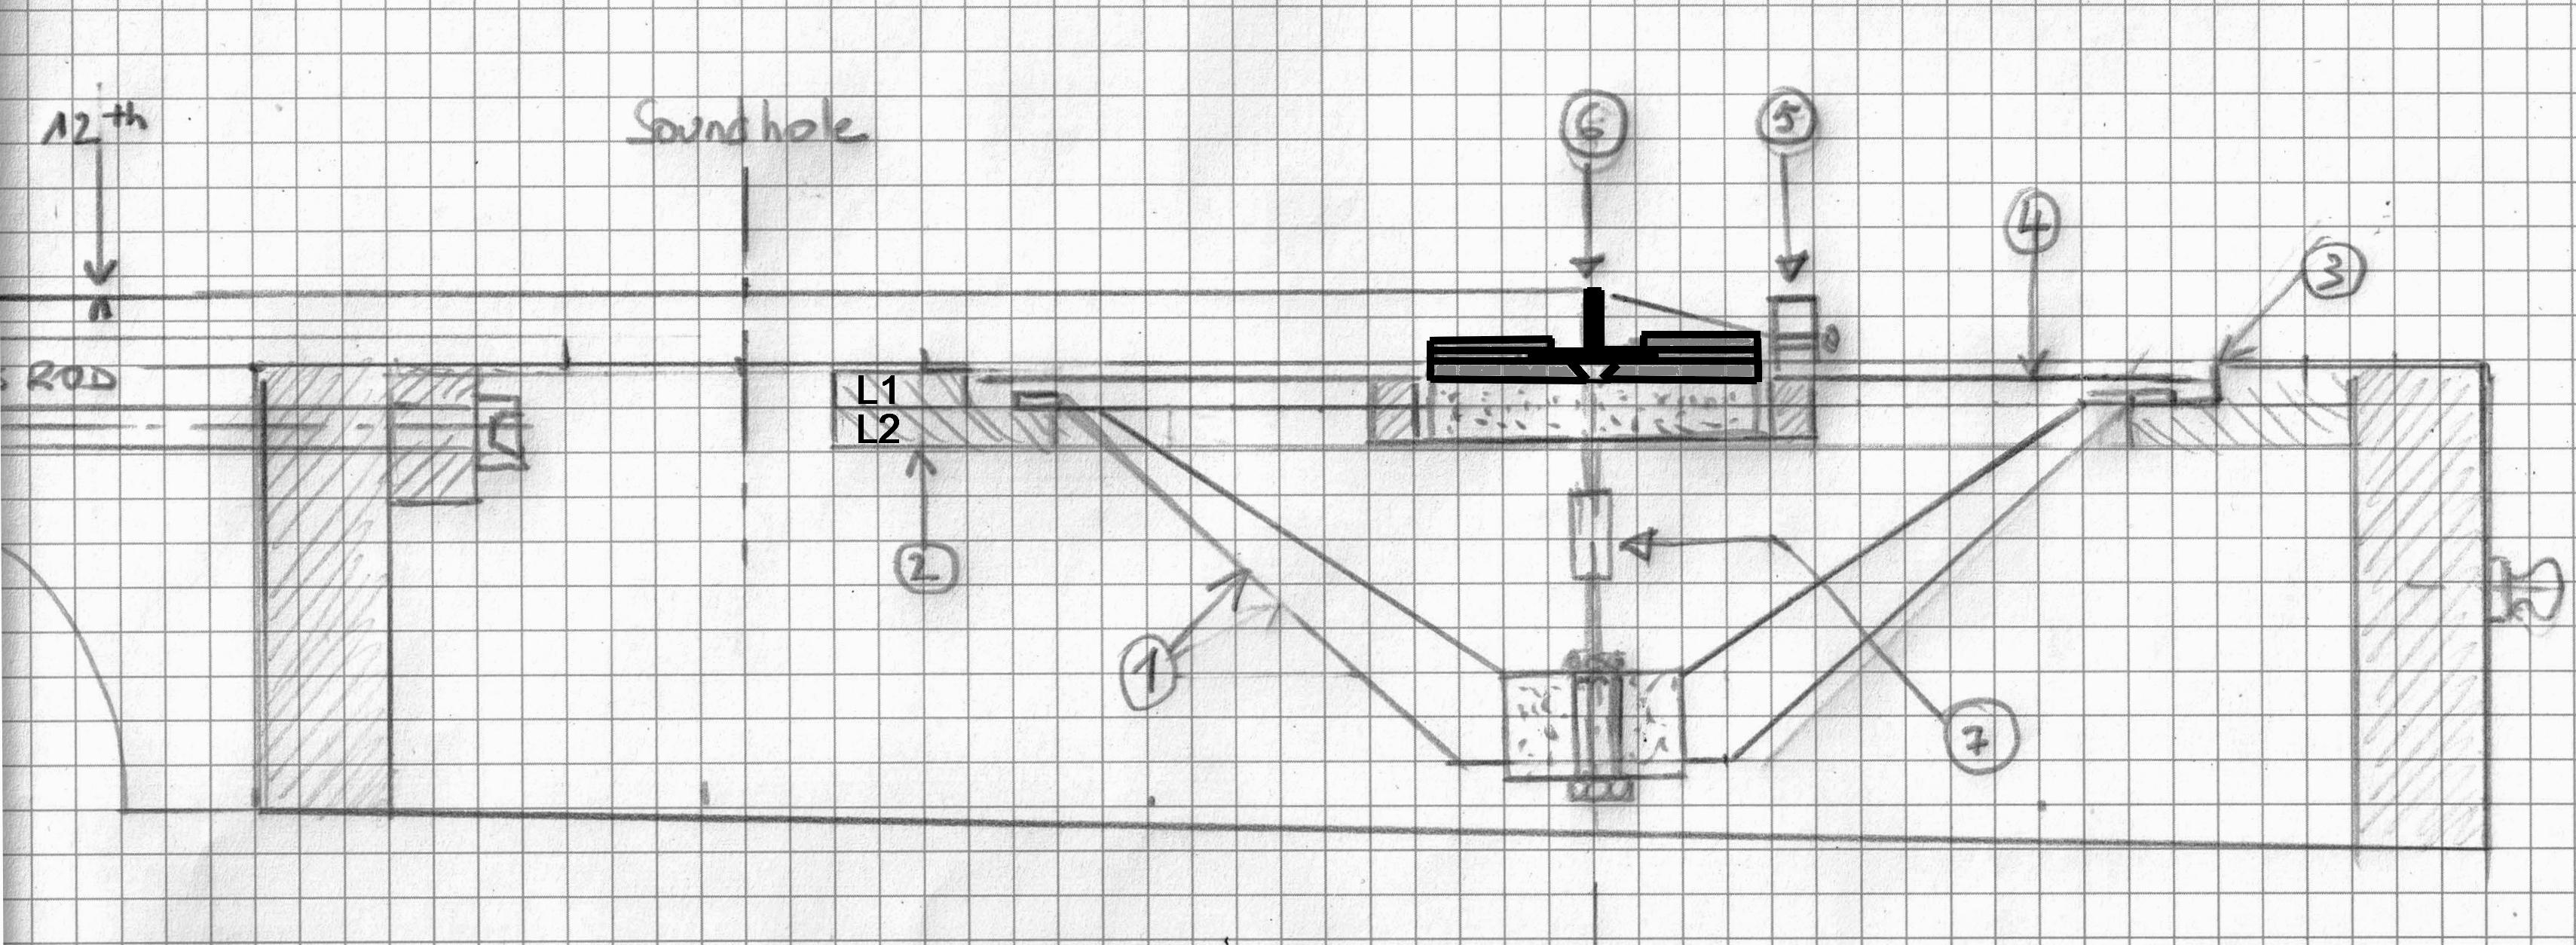
Loudspeaker
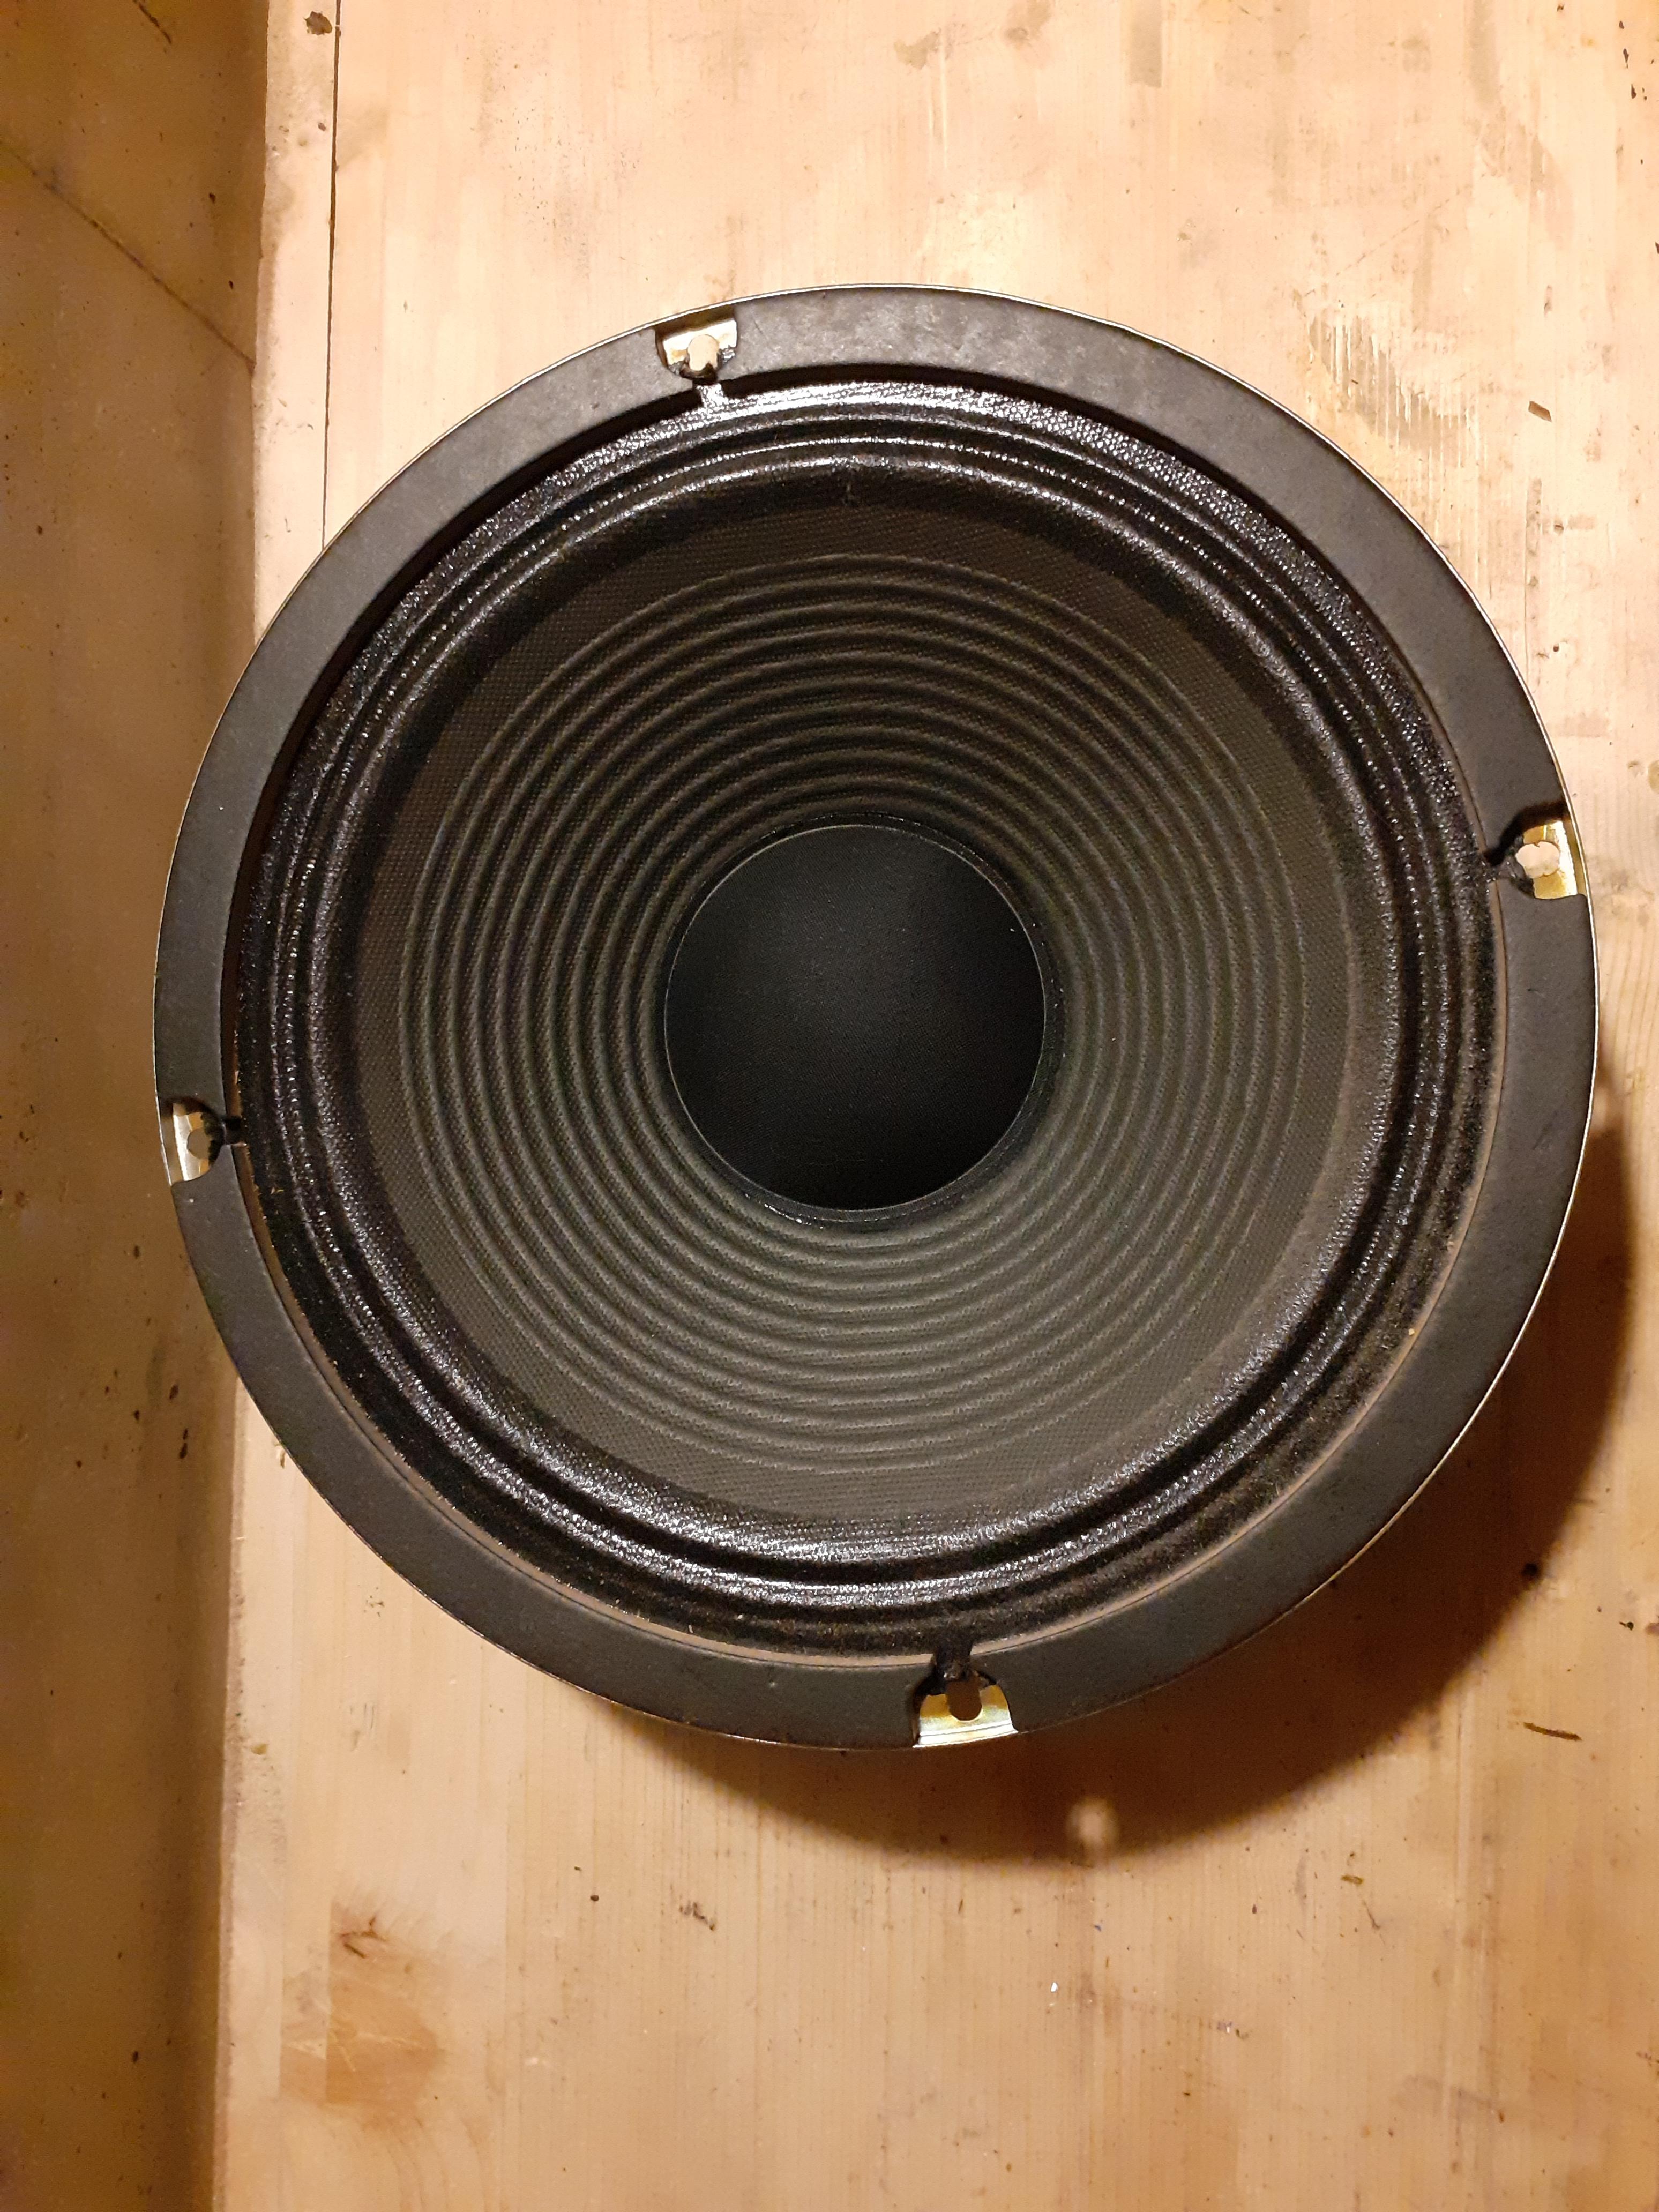

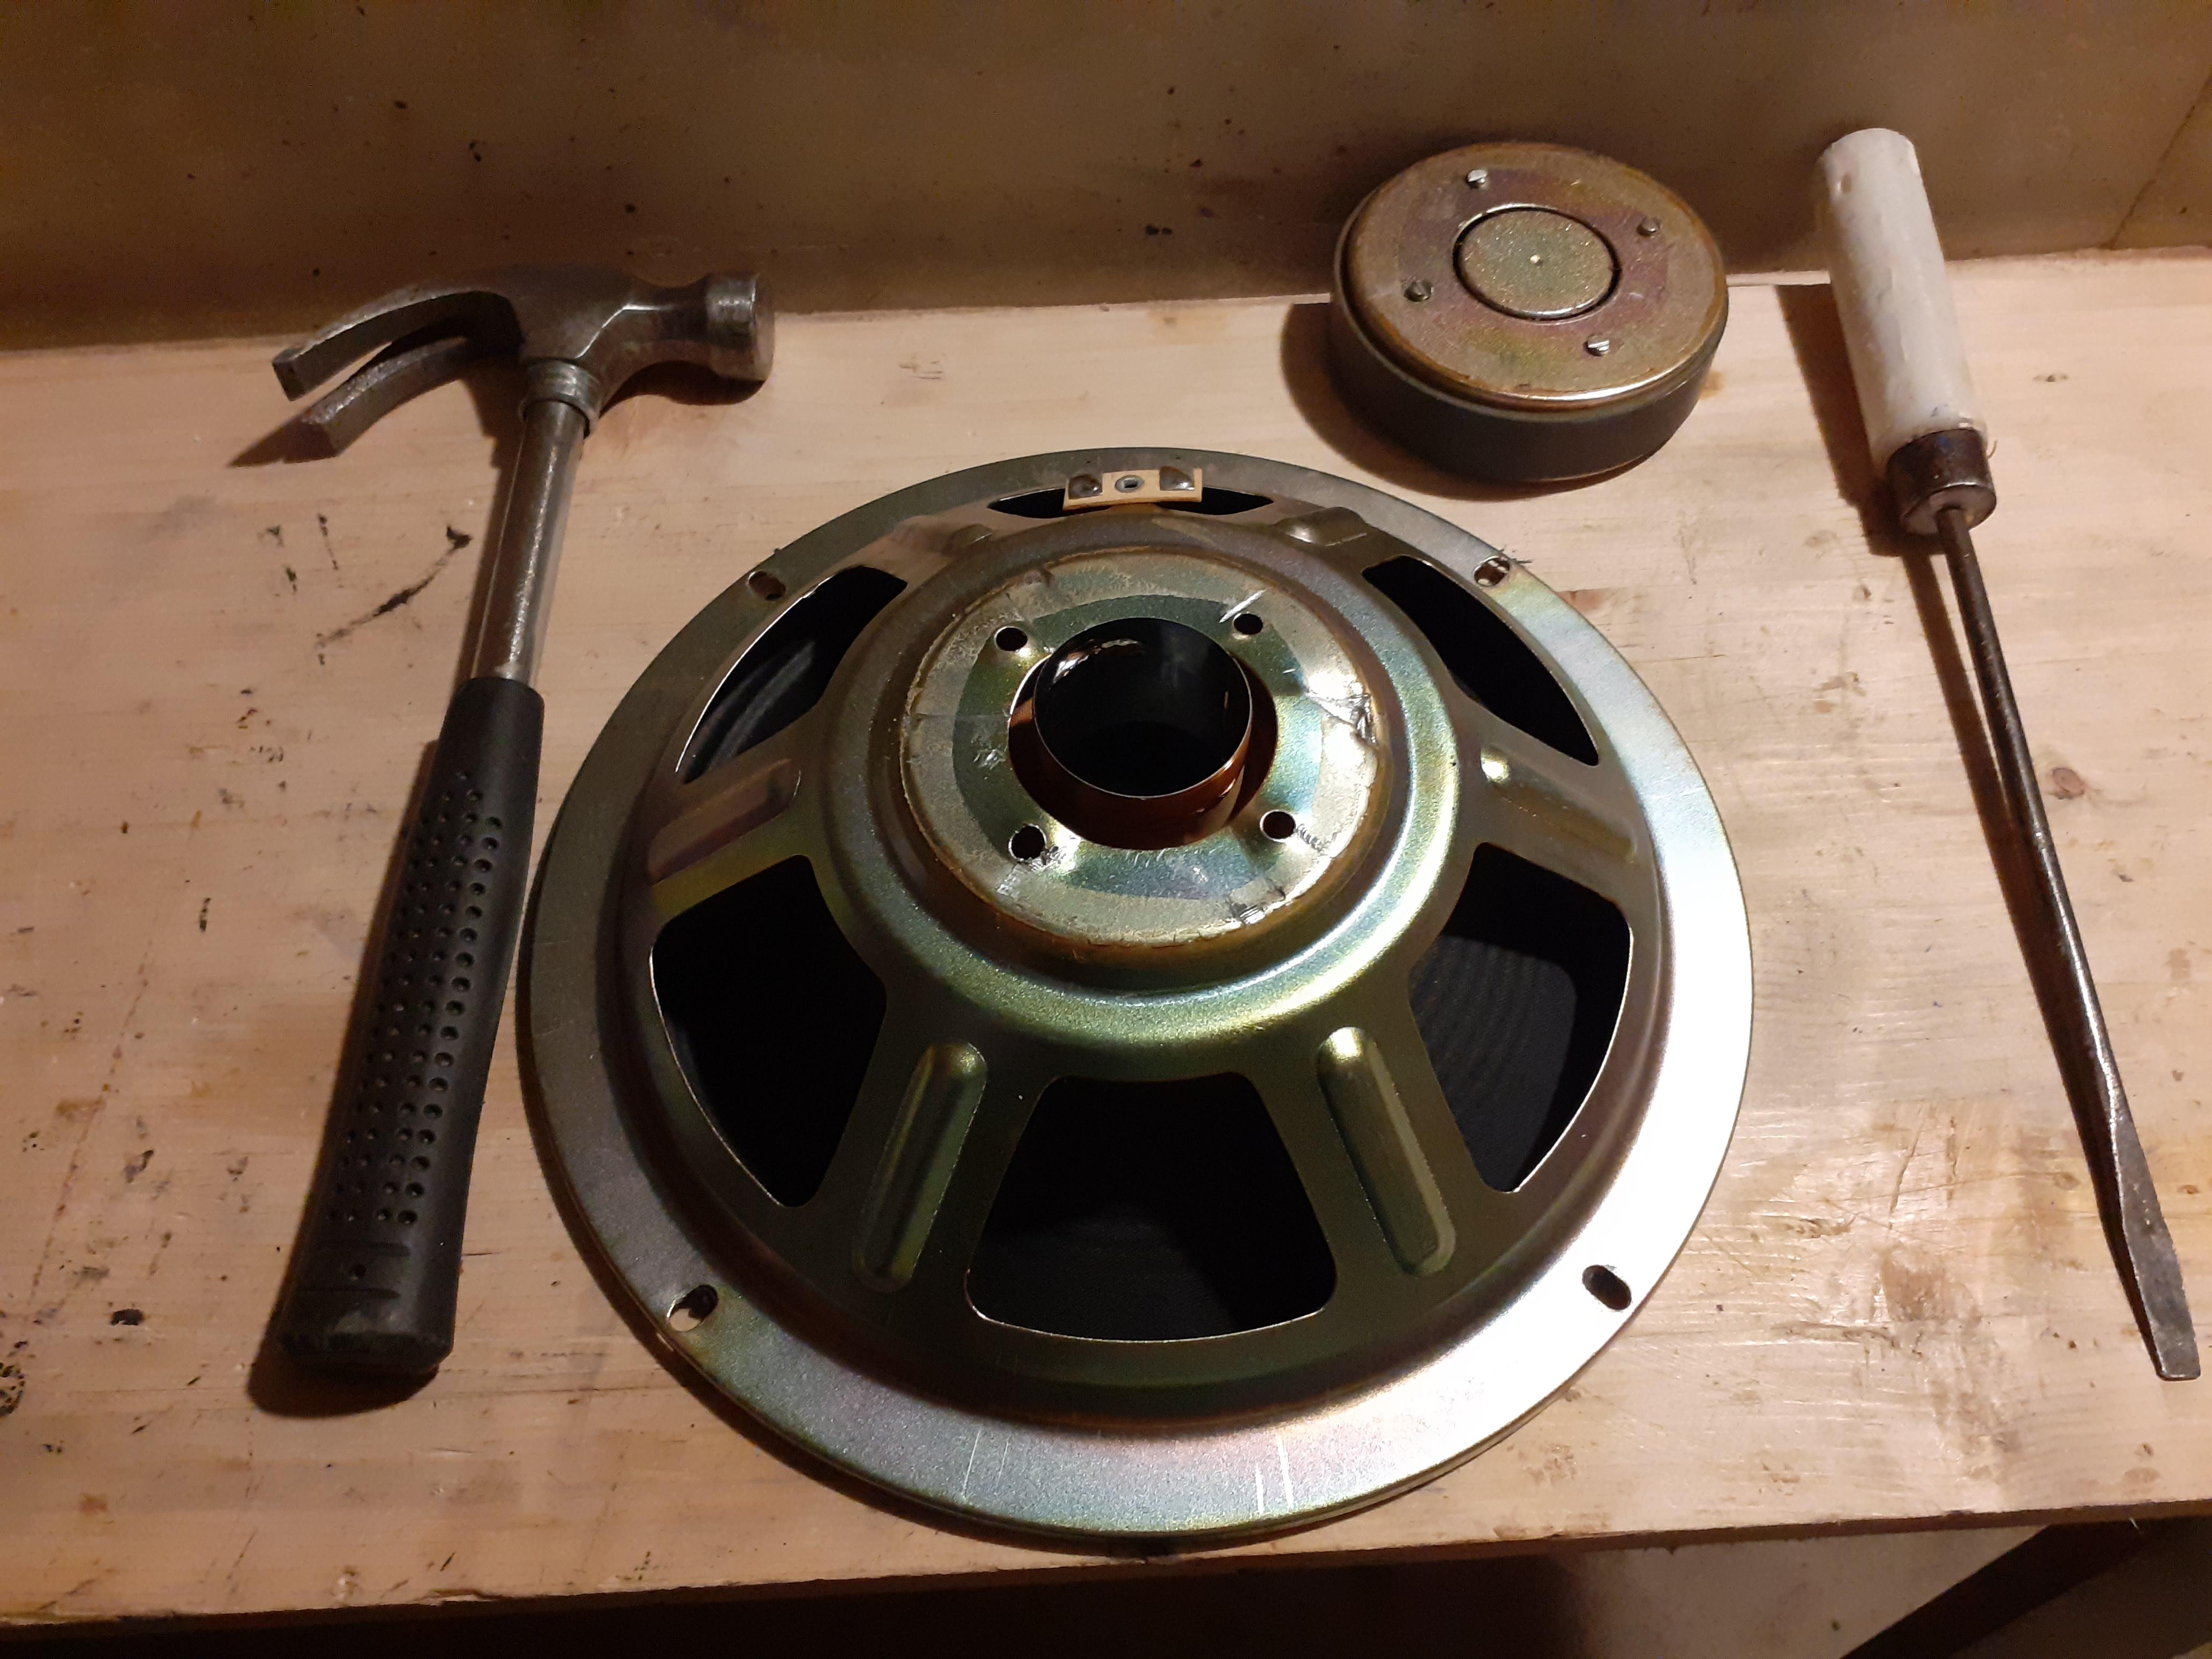
I bought a used 10" speaker.
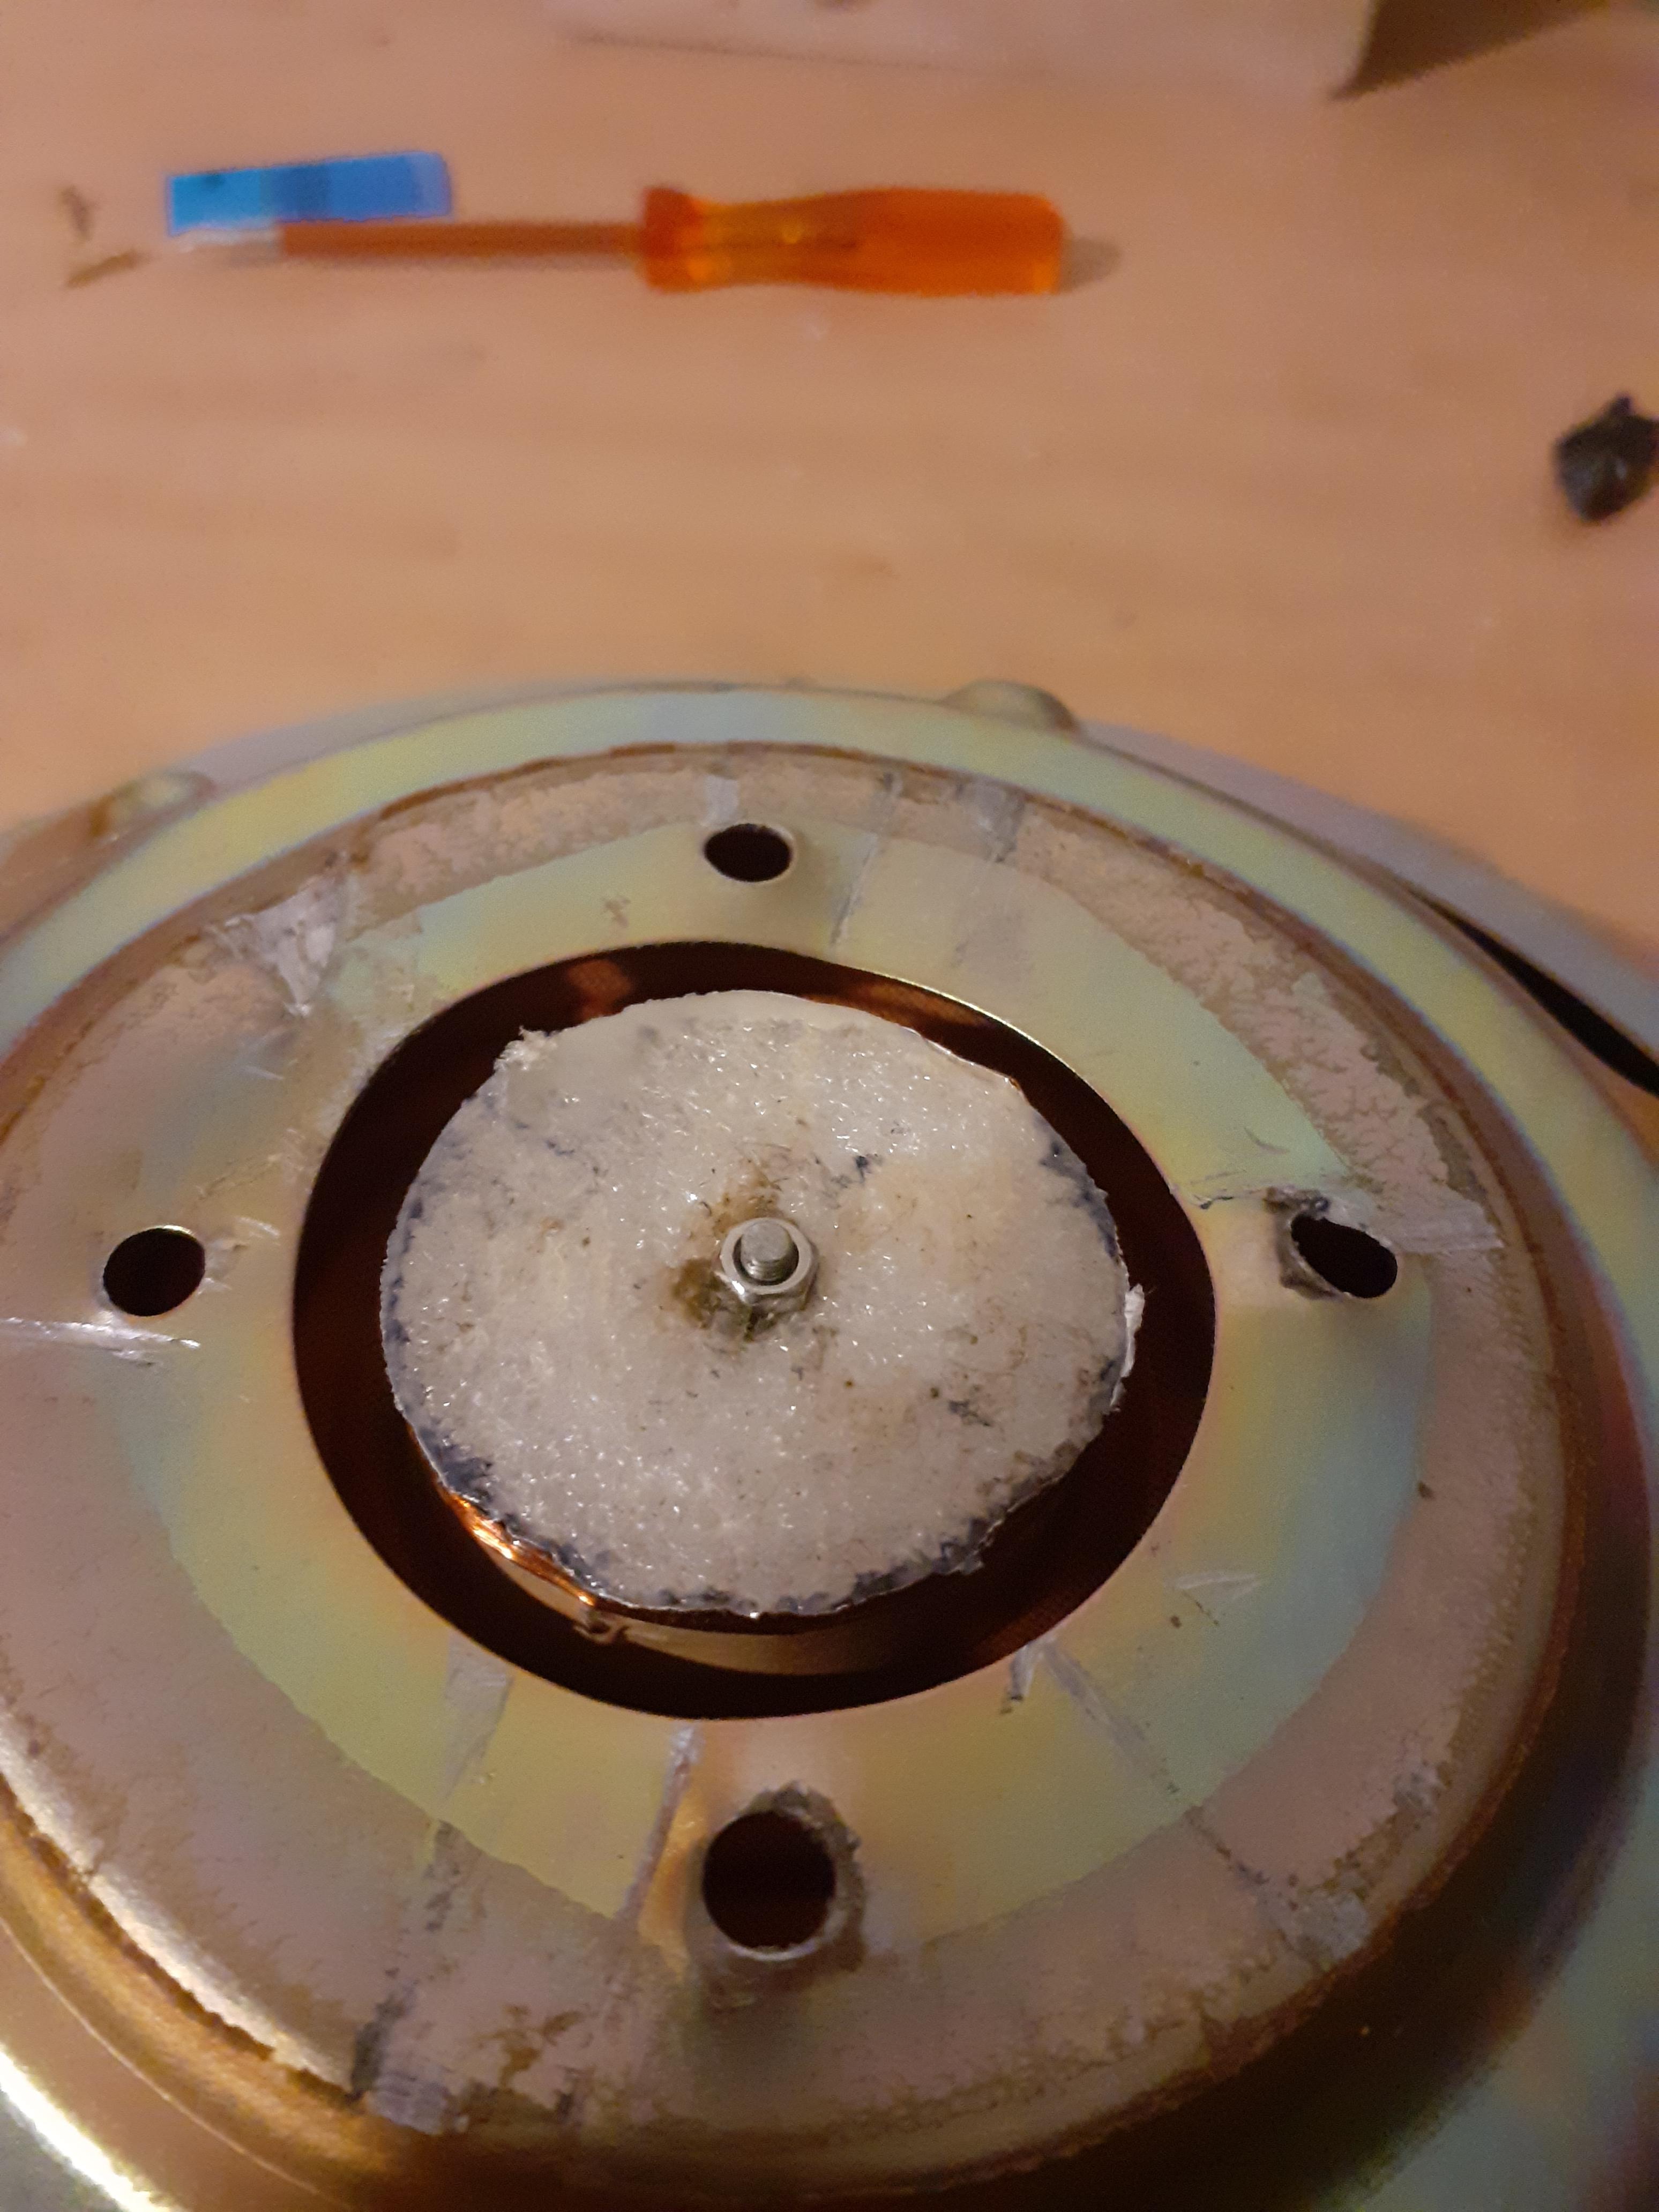
I removed the magnet from the back (using a hammer, chisel, screwdriver, and hacksaw), being careful not to deform the mount.
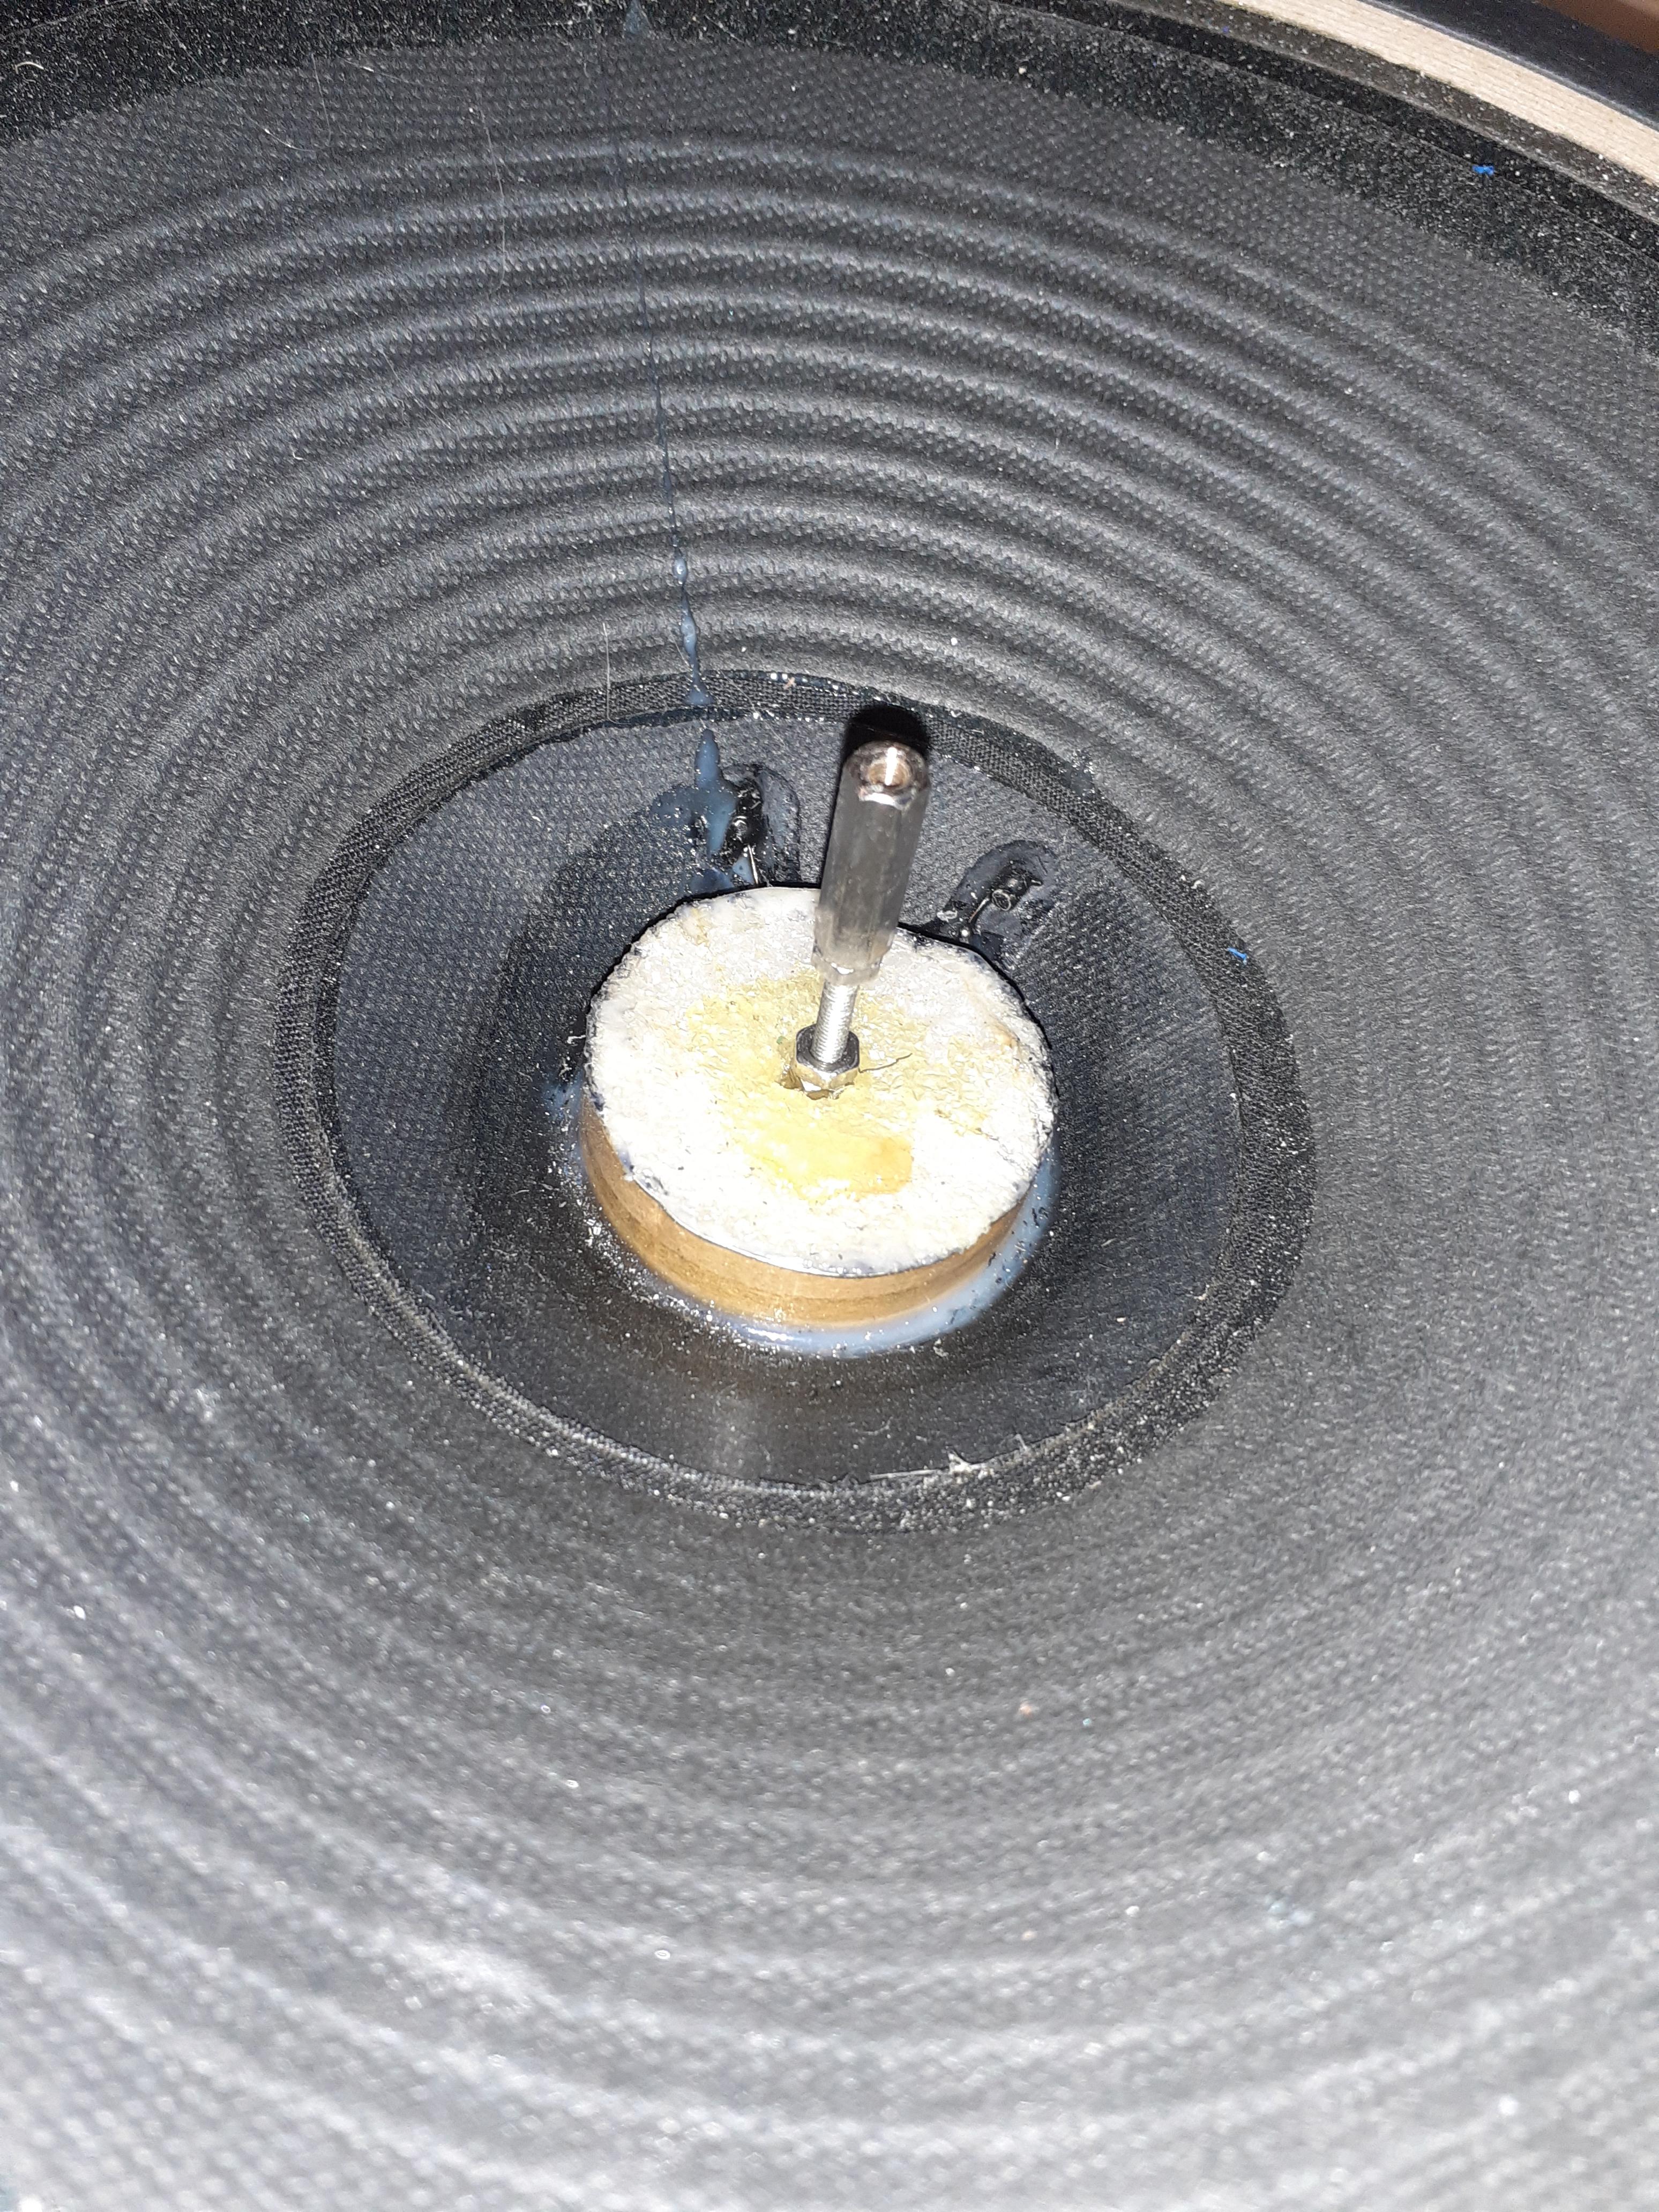
I machined a cylinder (the same diameter as the speaker's voice coil) from a lightweight but rigid material. Ideally, I would have used a piece of balsa wood. Since I didn't have any, I used very dense foam.
I drilled a 5mm diameter hole precisely through its center lengthwise.
In this hole, I crimped and glued a long M3x20mm nut. This long nut will later be used to make the acoustic connection to the bridge. In the photo, you can see the rod that makes this connection.
I then glued this foam cylinder into the speaker's voice coil with epoxy glue.
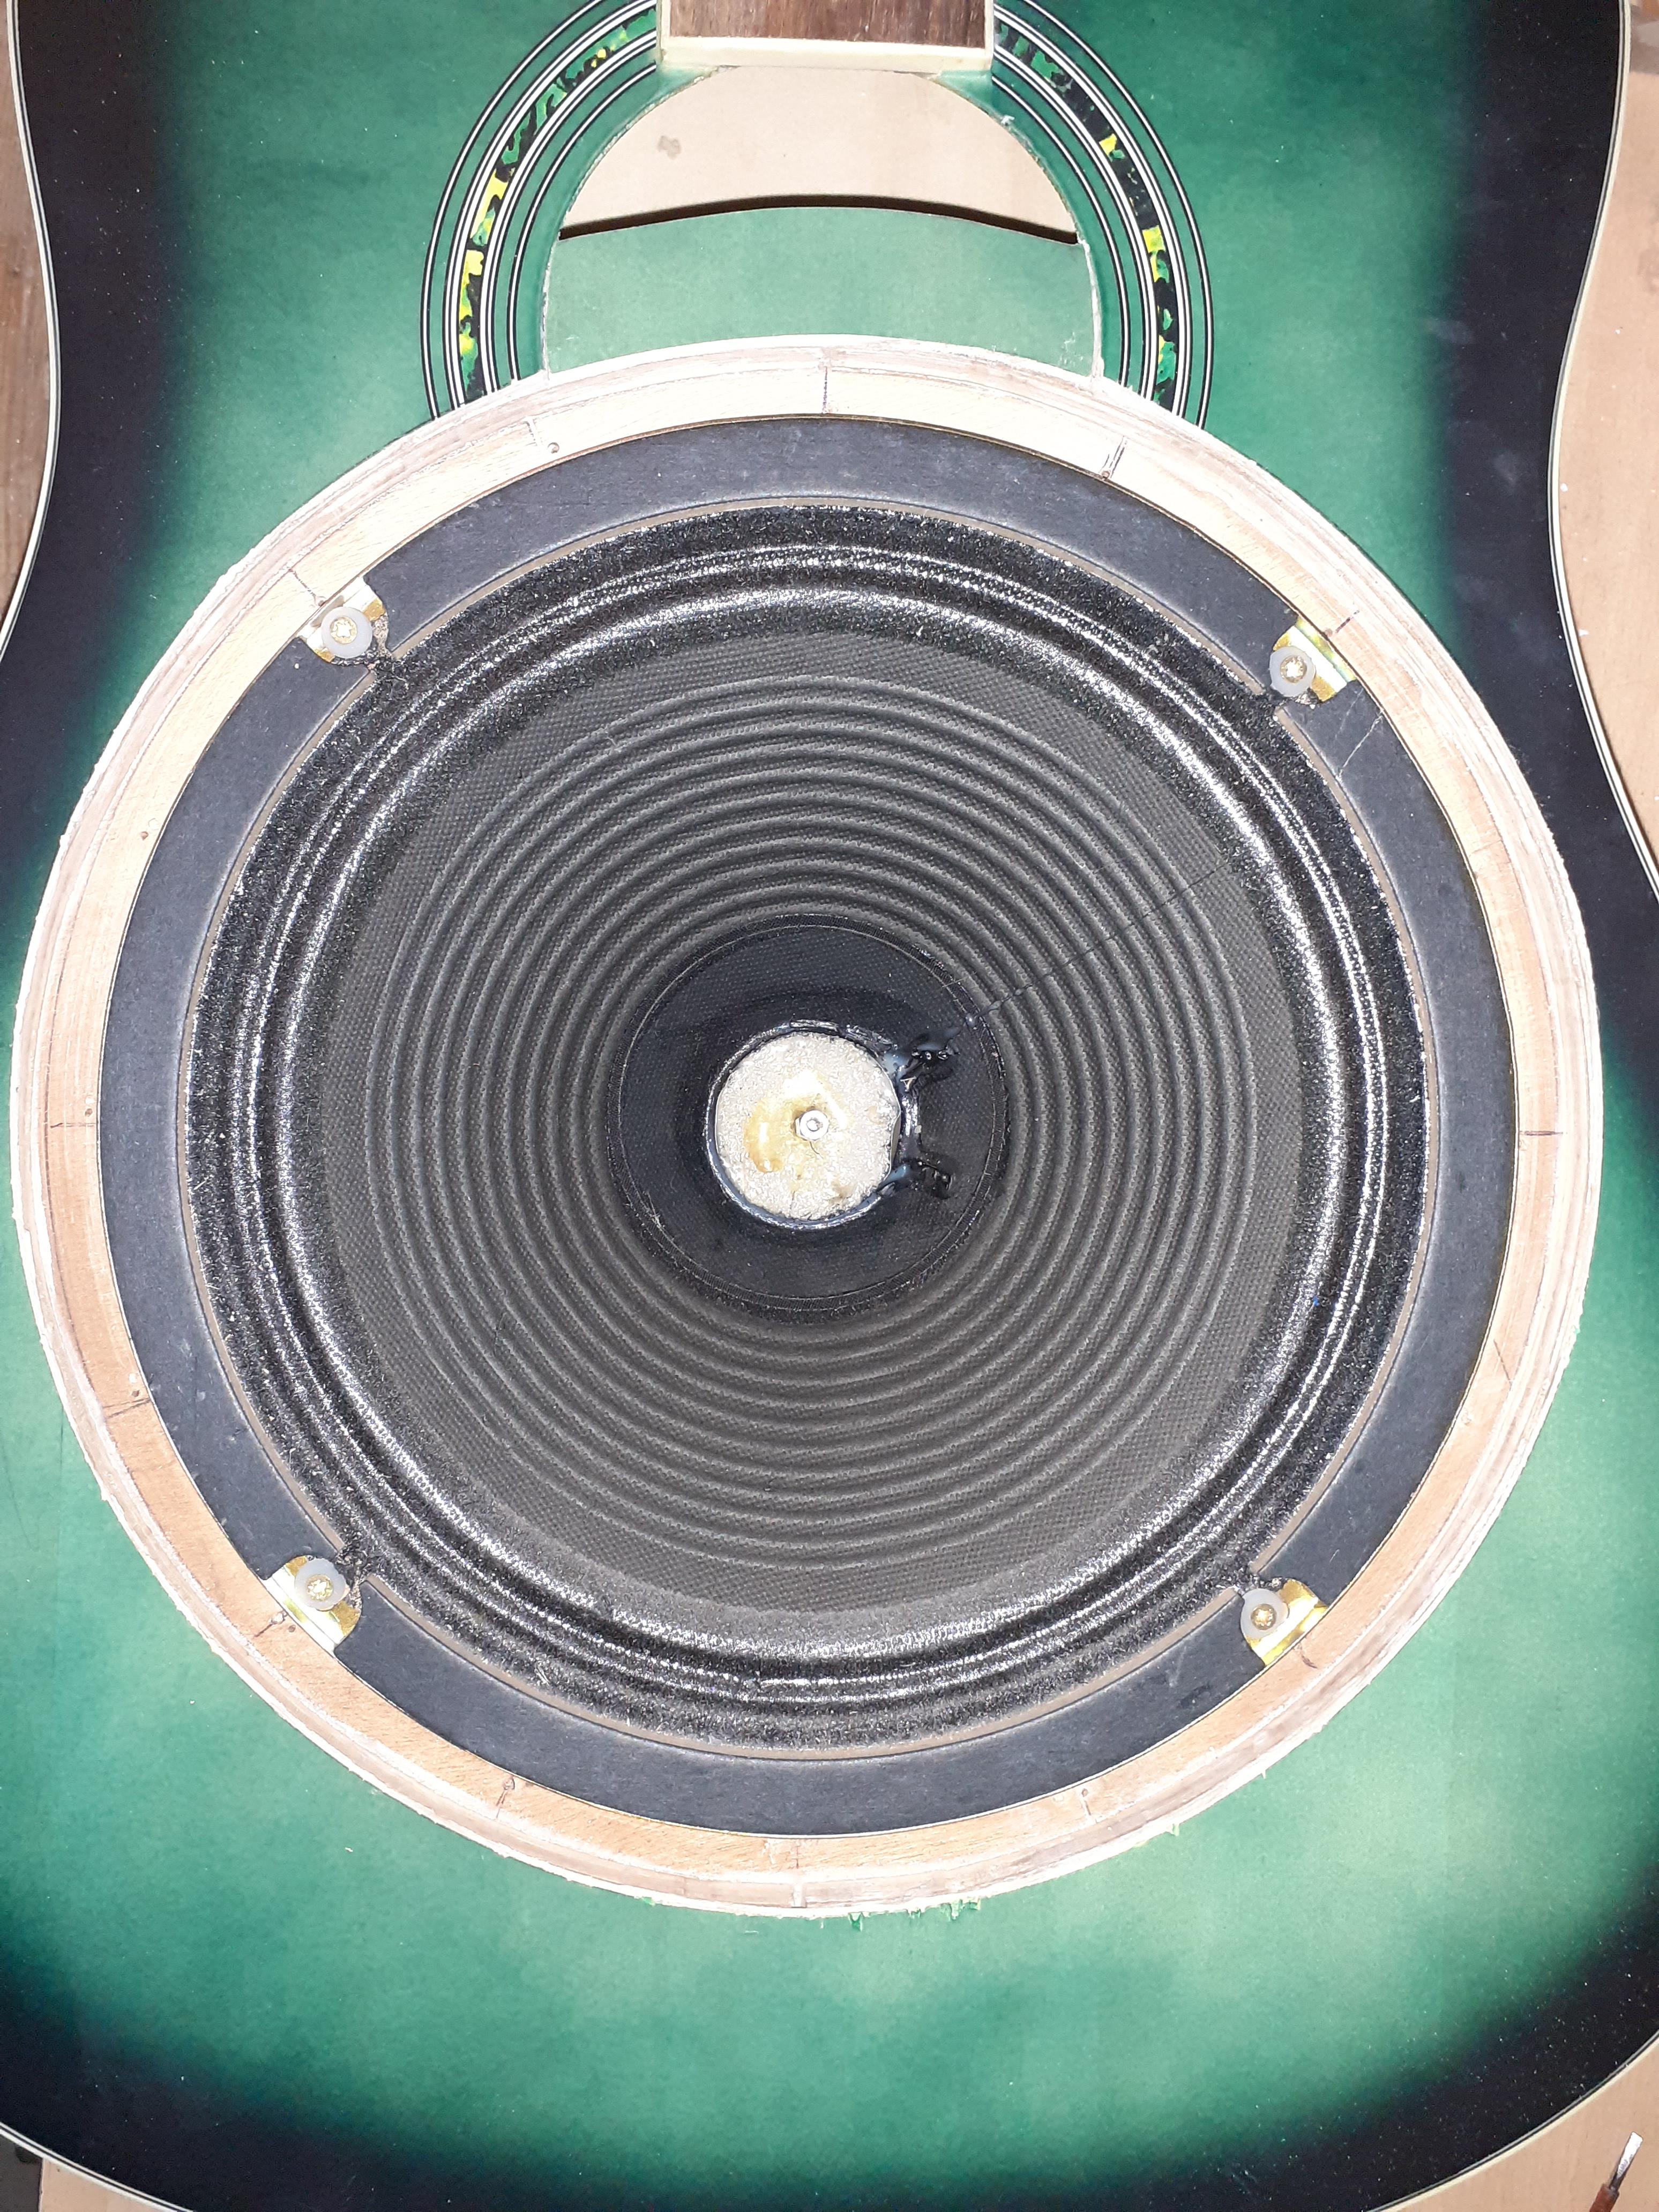
Soundbox
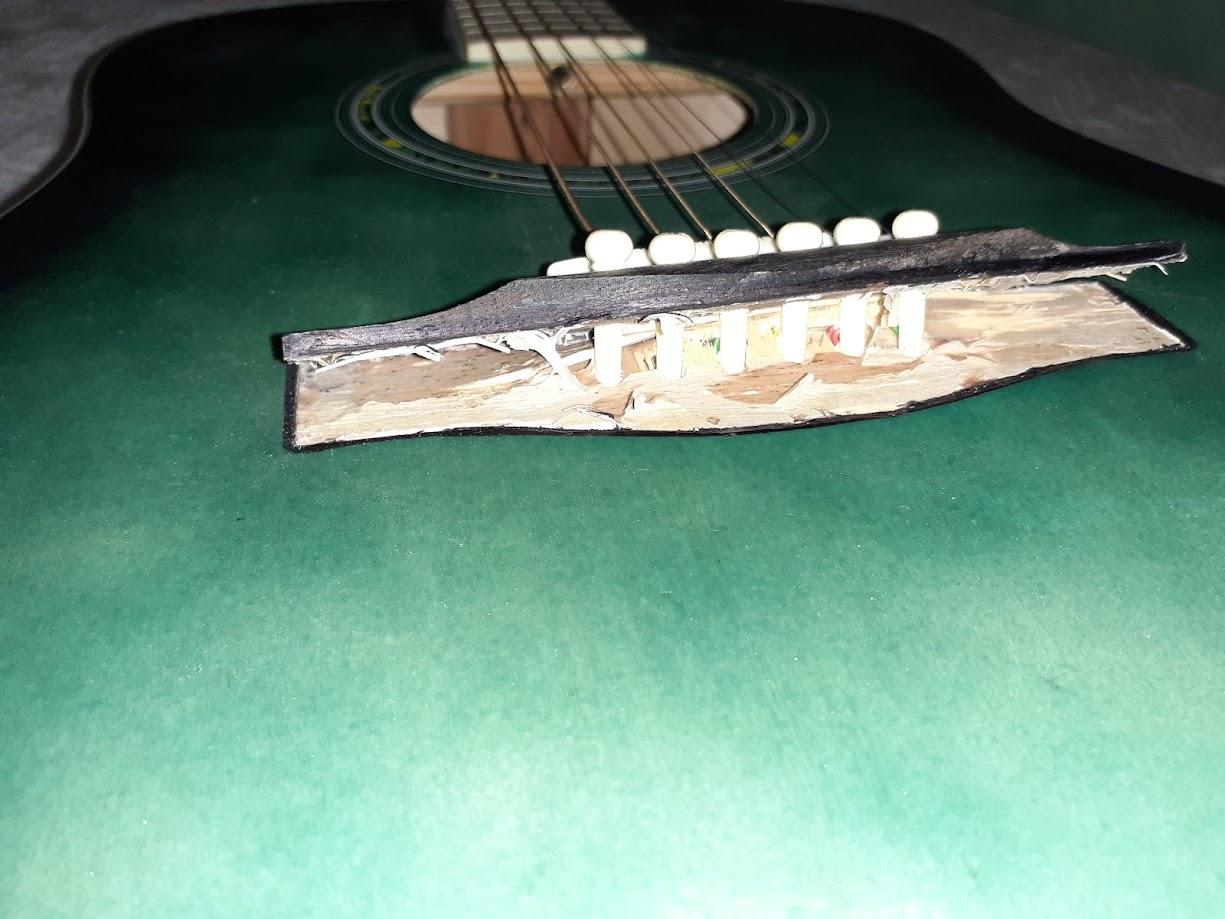
I acquired a folk guitar of appalling quality. Pretty on the outside, but made of cheap wood, barely good enough for paper pulp. The result: with the tension of the strings, the bridge exploded. I can't resist showing you a picture of the carnage. All this to say that you need to reinforce the body if you don't want problems later.
First of all, before doing anything, measure the distance between the 12th fret and the center of the bridge saddle. Logically, this distance should be equal to the distance between the nut and the twelfth fret plus 2.5mm (2.5mm corresponds to the average length compensation needed for steel strings. To be precise, you need +1mm for the high E string and +4mm for the low E string. In the middle, it's 2.5mm. This is why the bridges of folk guitars are never perpendicular to the strings).
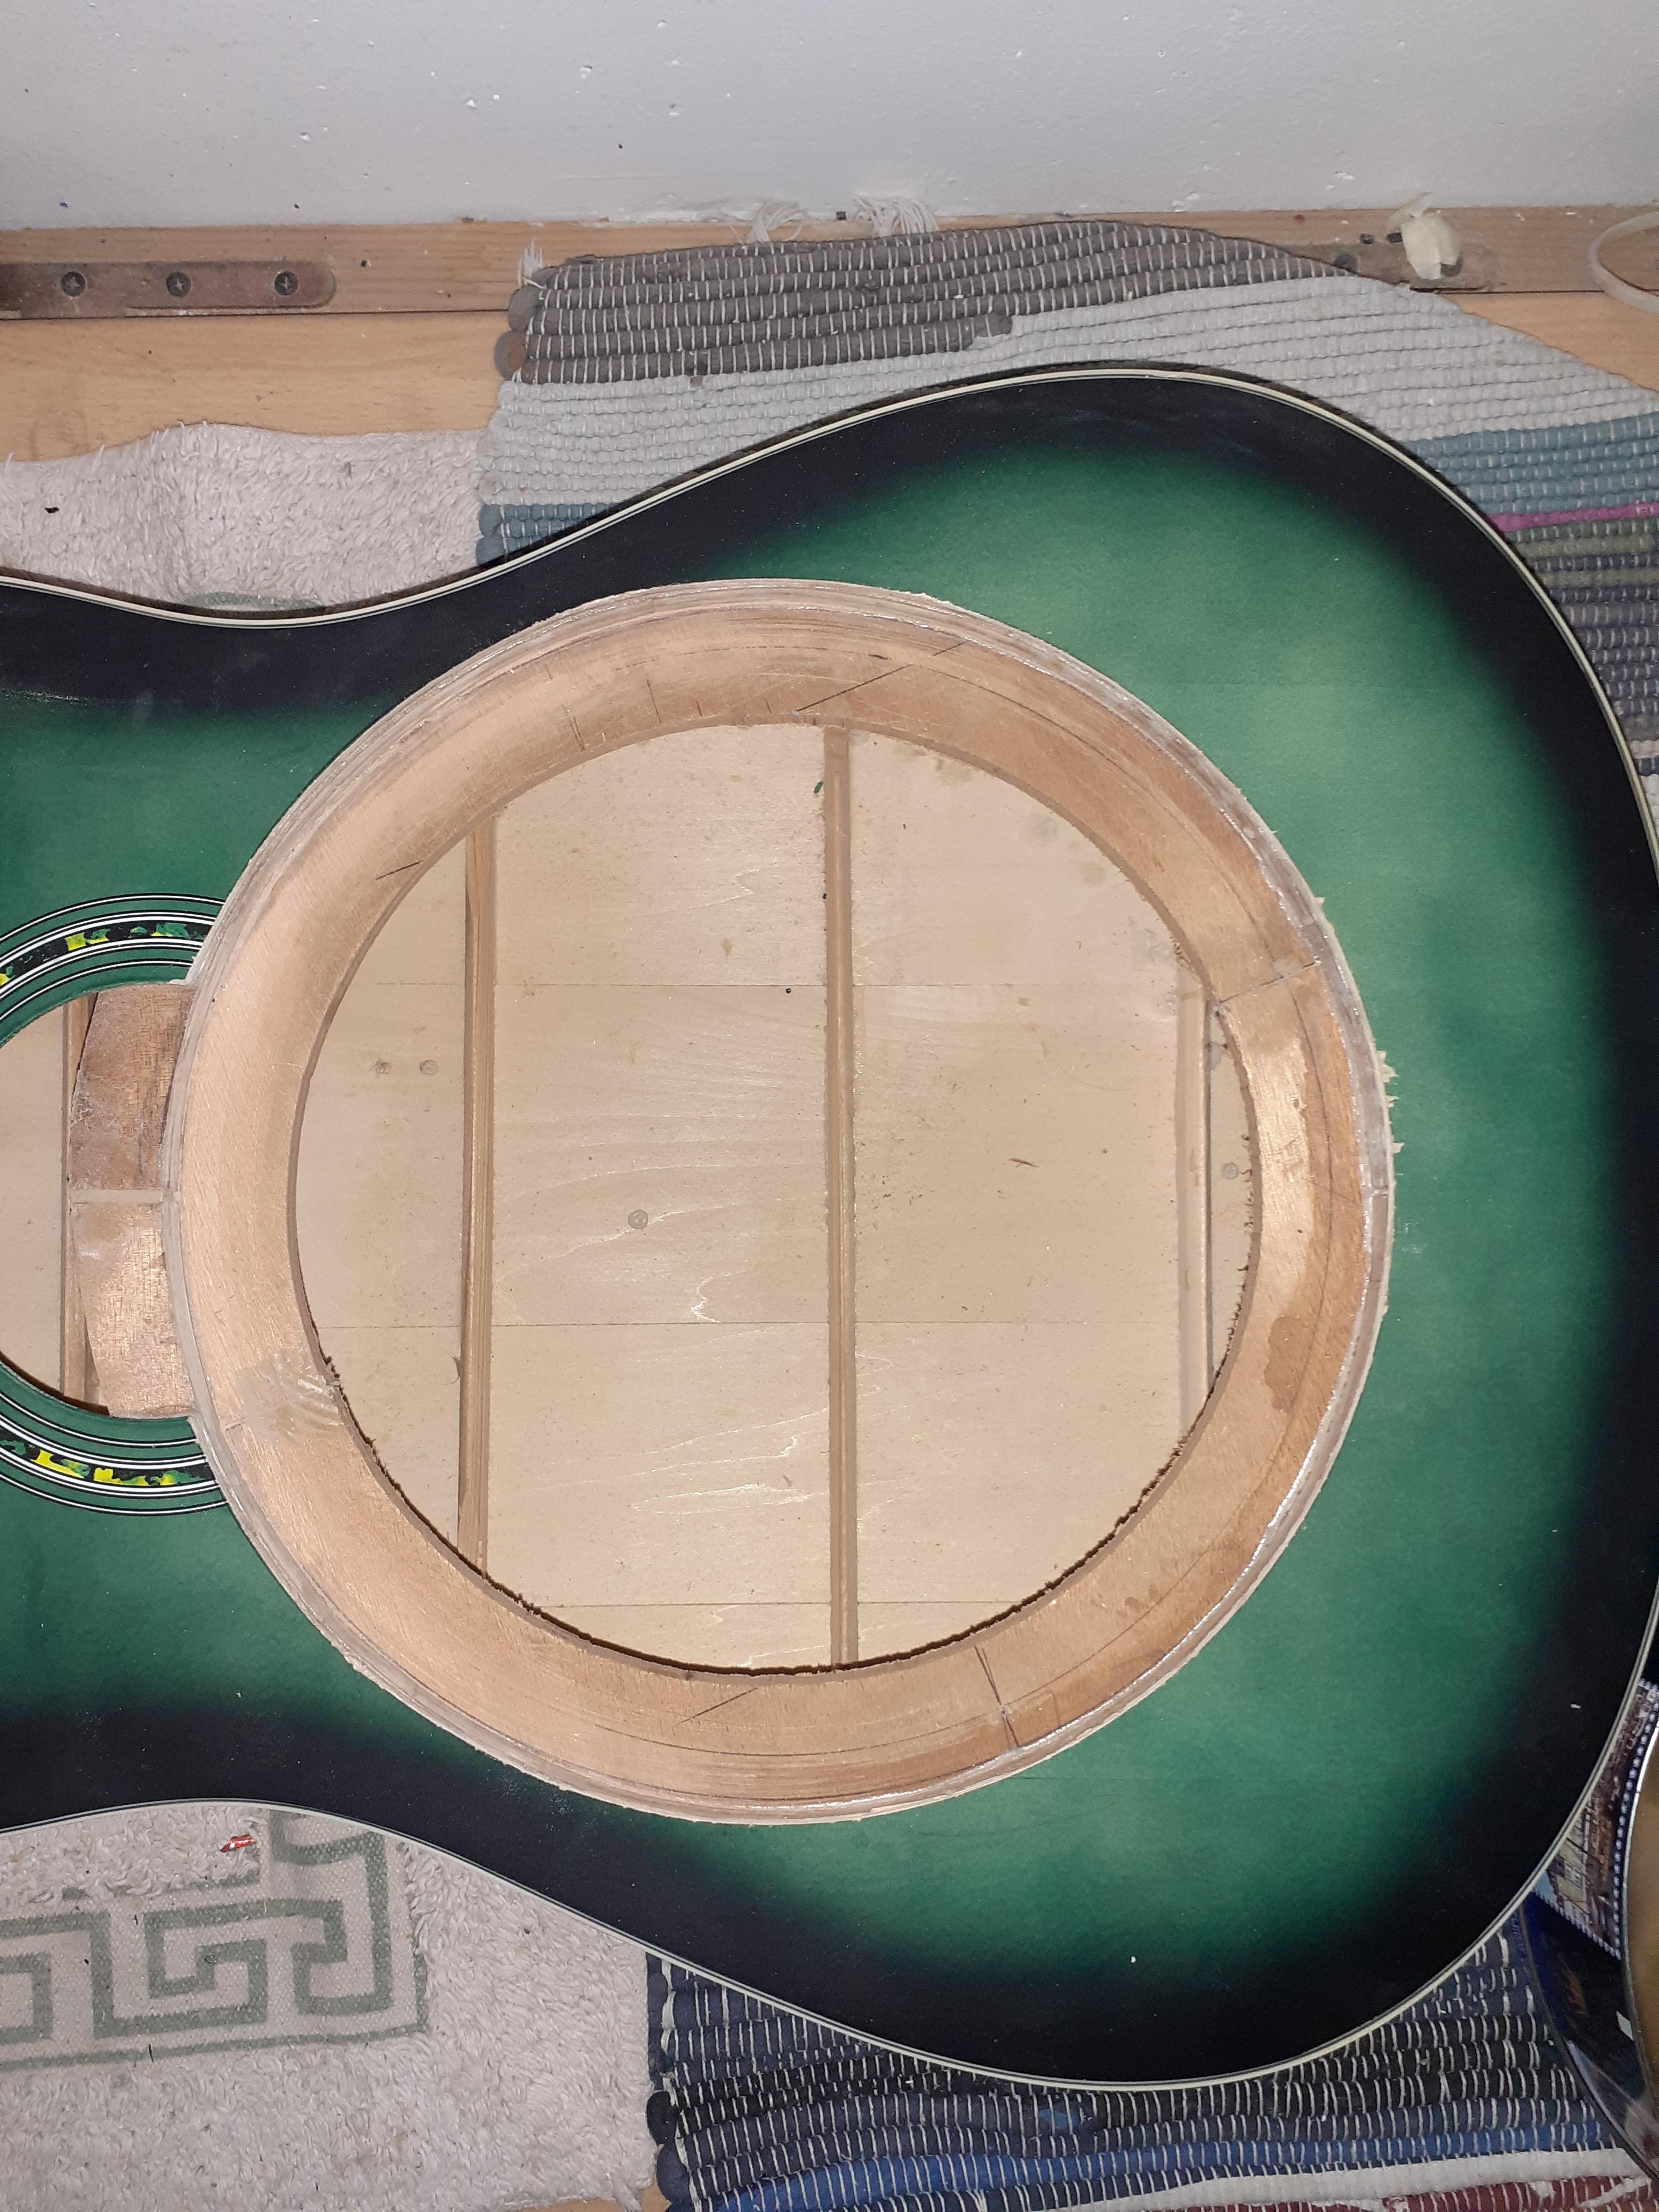
Next, you need to protect the body before working on it, and draw a circle centered on the middle of the bridge saddle, then drill the body to the diameter of the spider. I proceeded in the same way as for drilling the Dobro Z11 guitar (https://www.instructables.com/Dobro-Guitar-With-Wooden-Coverplate-Model-Z111/). You can therefore use that as a guide. For drilling, I made a hand saw from an old, broken bandsaw blade wedged between two pieces of wood.
For sanding, I made a rounded block (142mm radius) and sanded with 120-grit sandpaper.
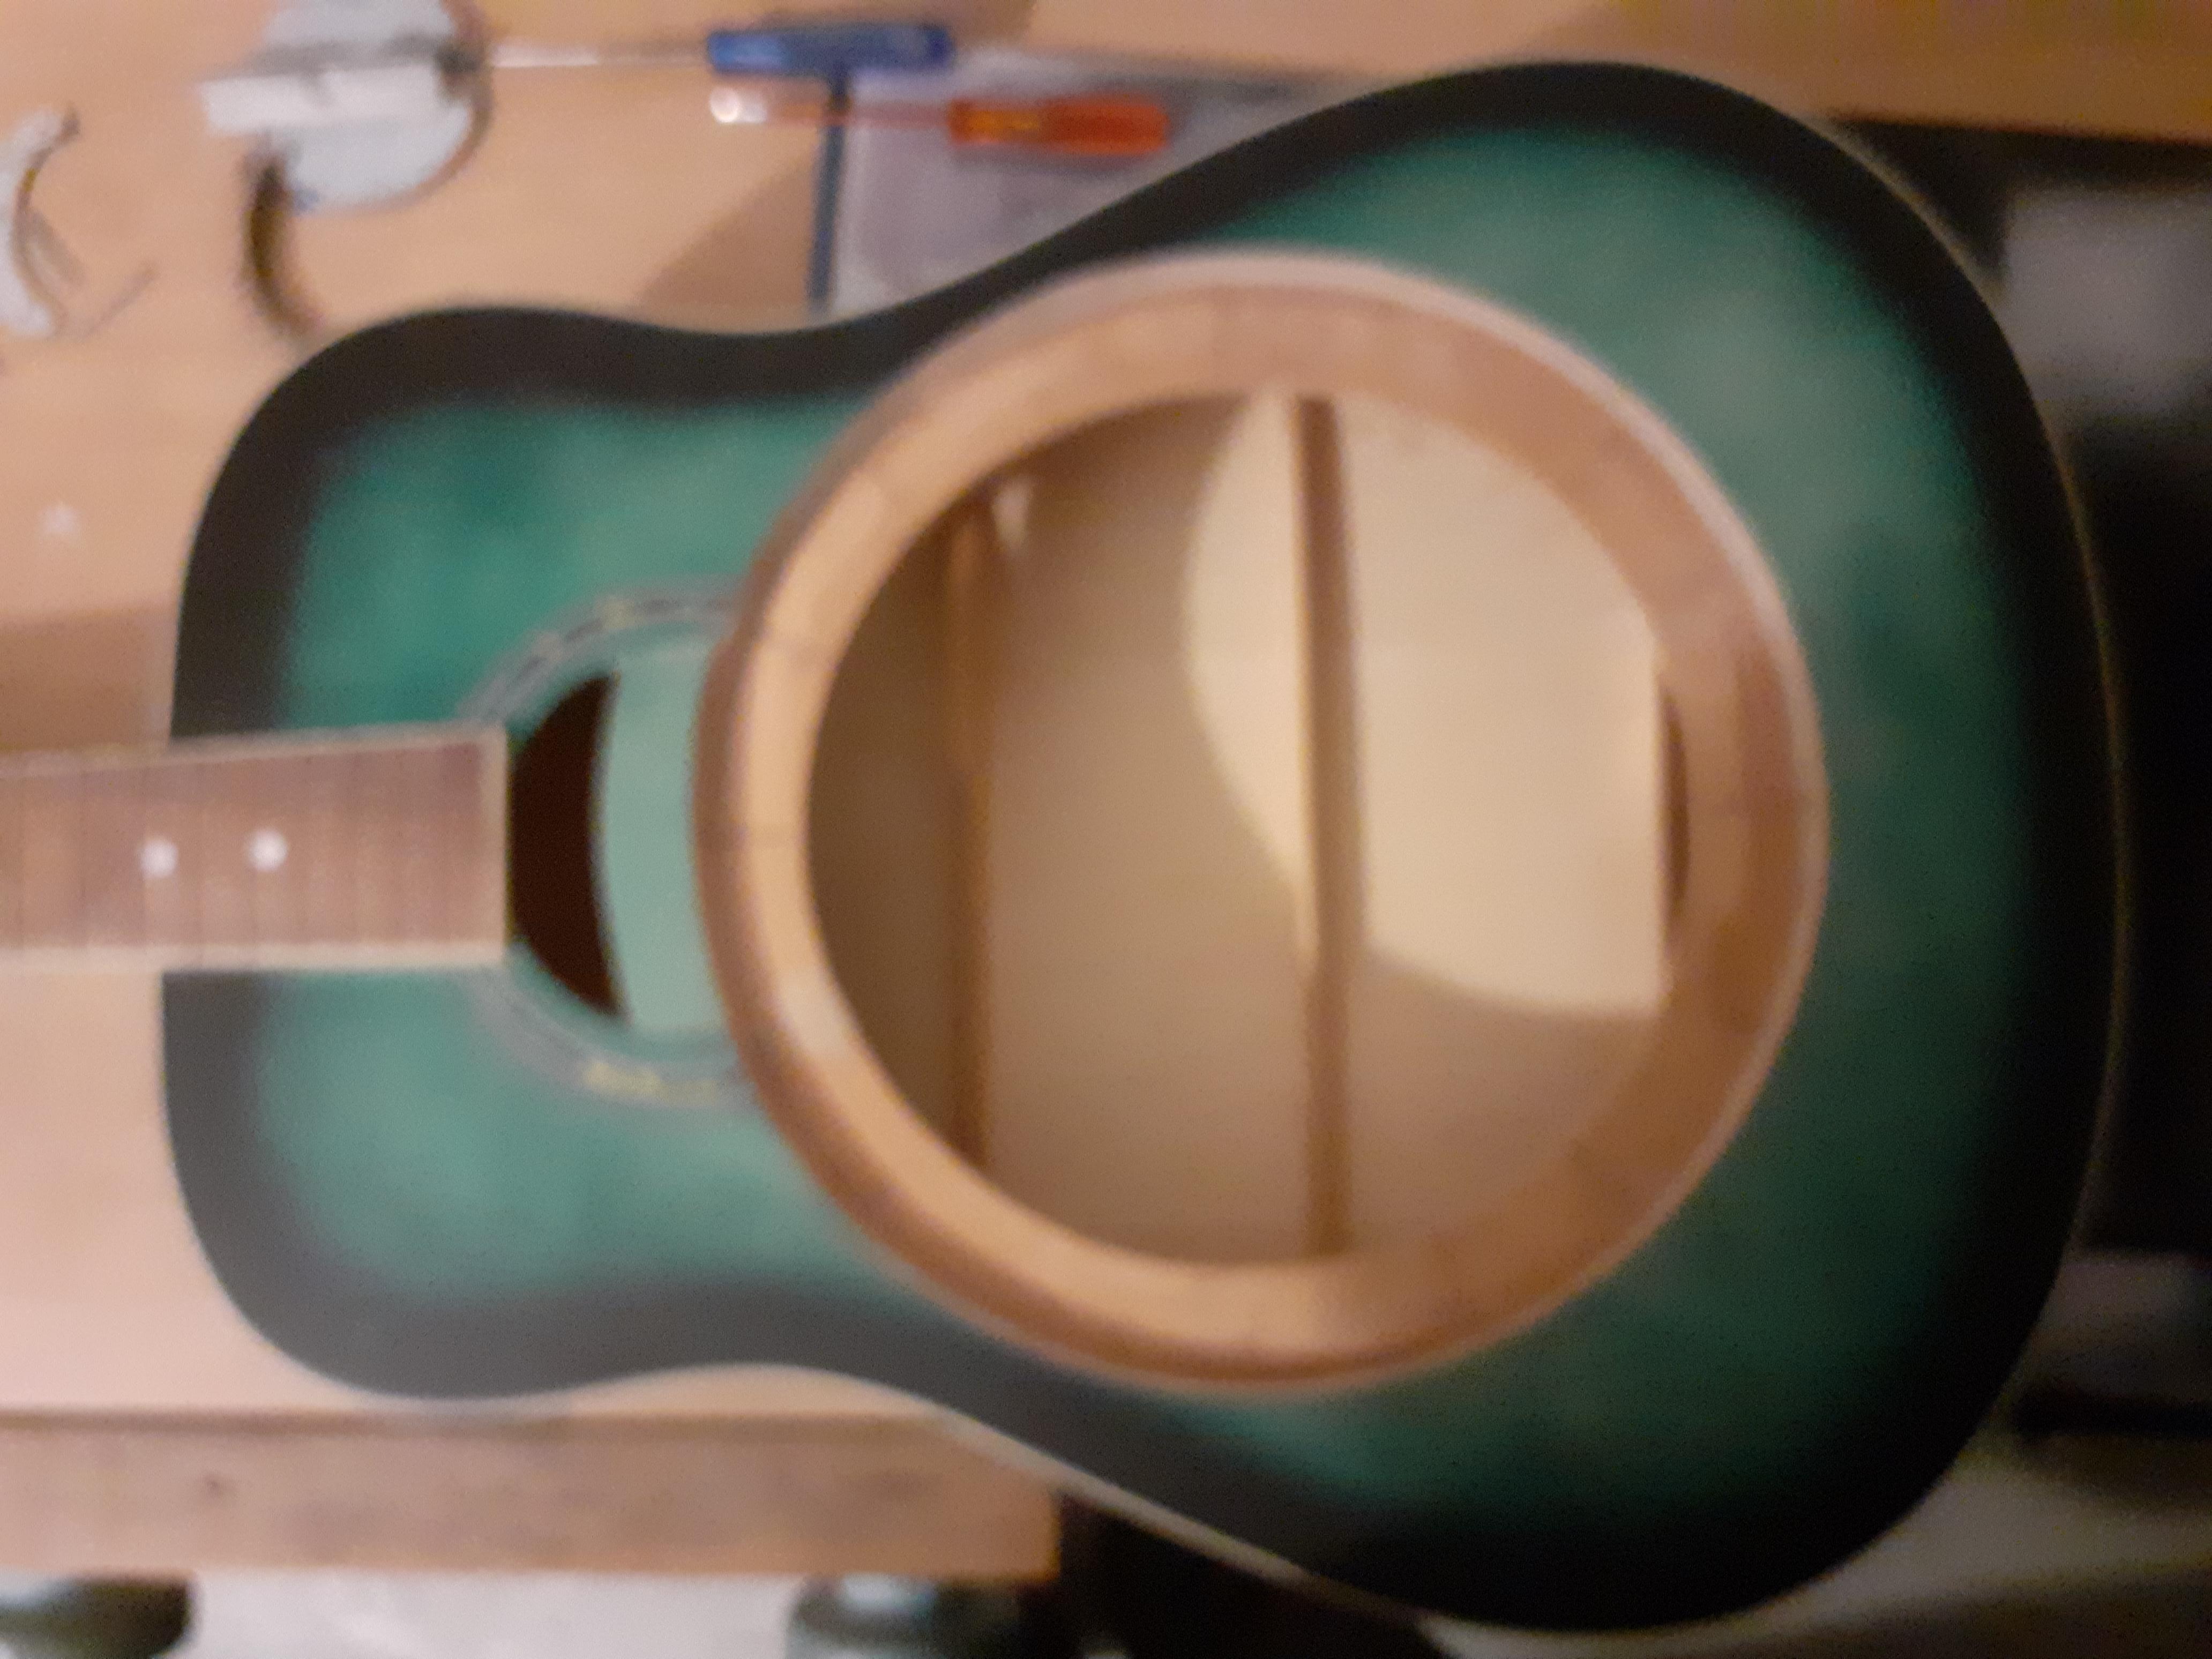
After sanding, the hole should be the diameter of the spider plus 4mm. Mine was 284mm.
Next, you need to remove all the acoustic table panels inside the cabinet (using a chisel) because they would get in the way of attaching the reinforcements we'll glue on in the next step. Sand.
Loudspeaker Supports
I proceeded in the same way as for reinforcing the Dobro Z11.1 guitar
https://www.instructables.com/Dobro-Guitar-With-Wooden-Coverplate-Model-Z111/
Only the shape of the guitar is different.
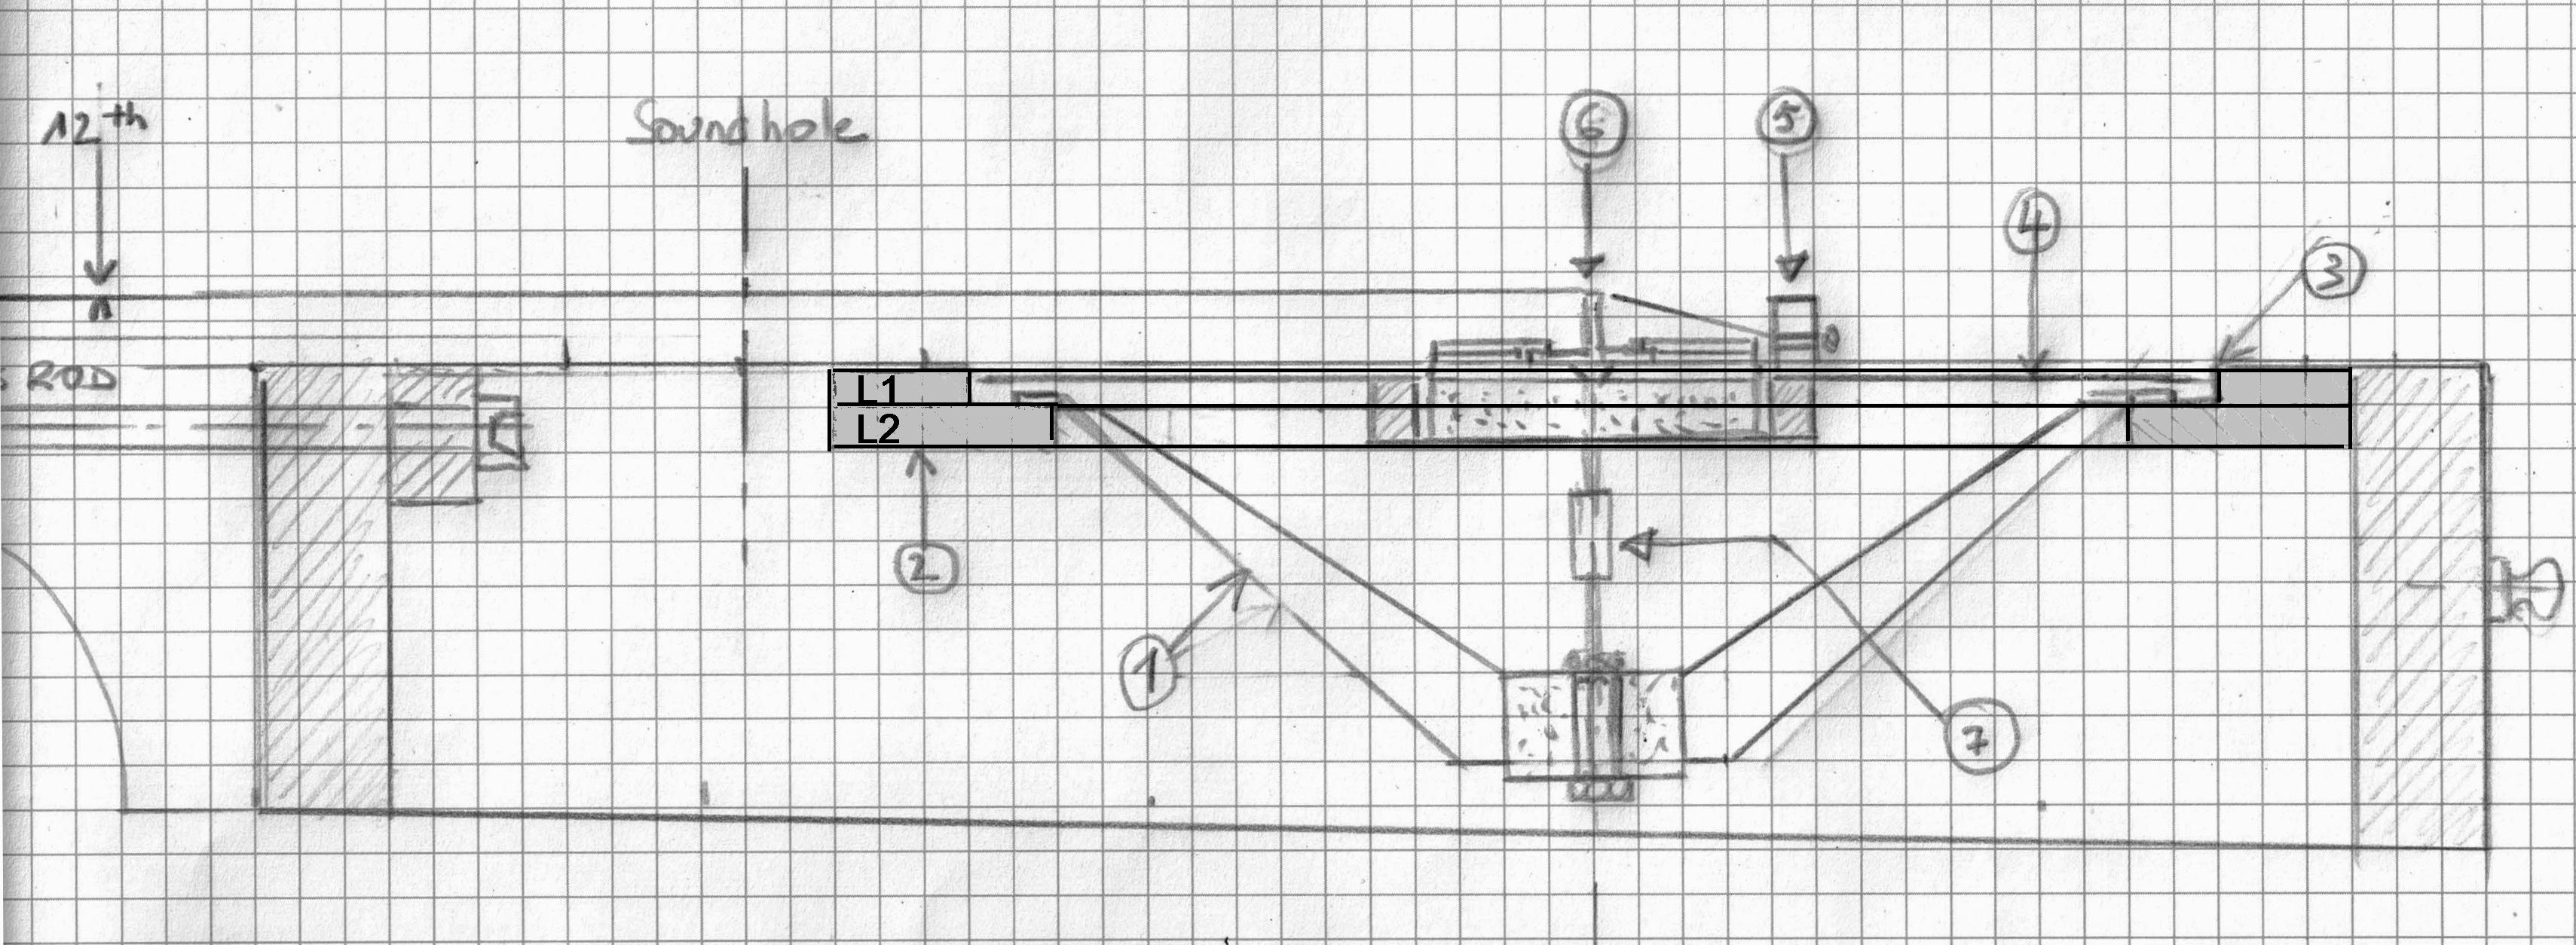
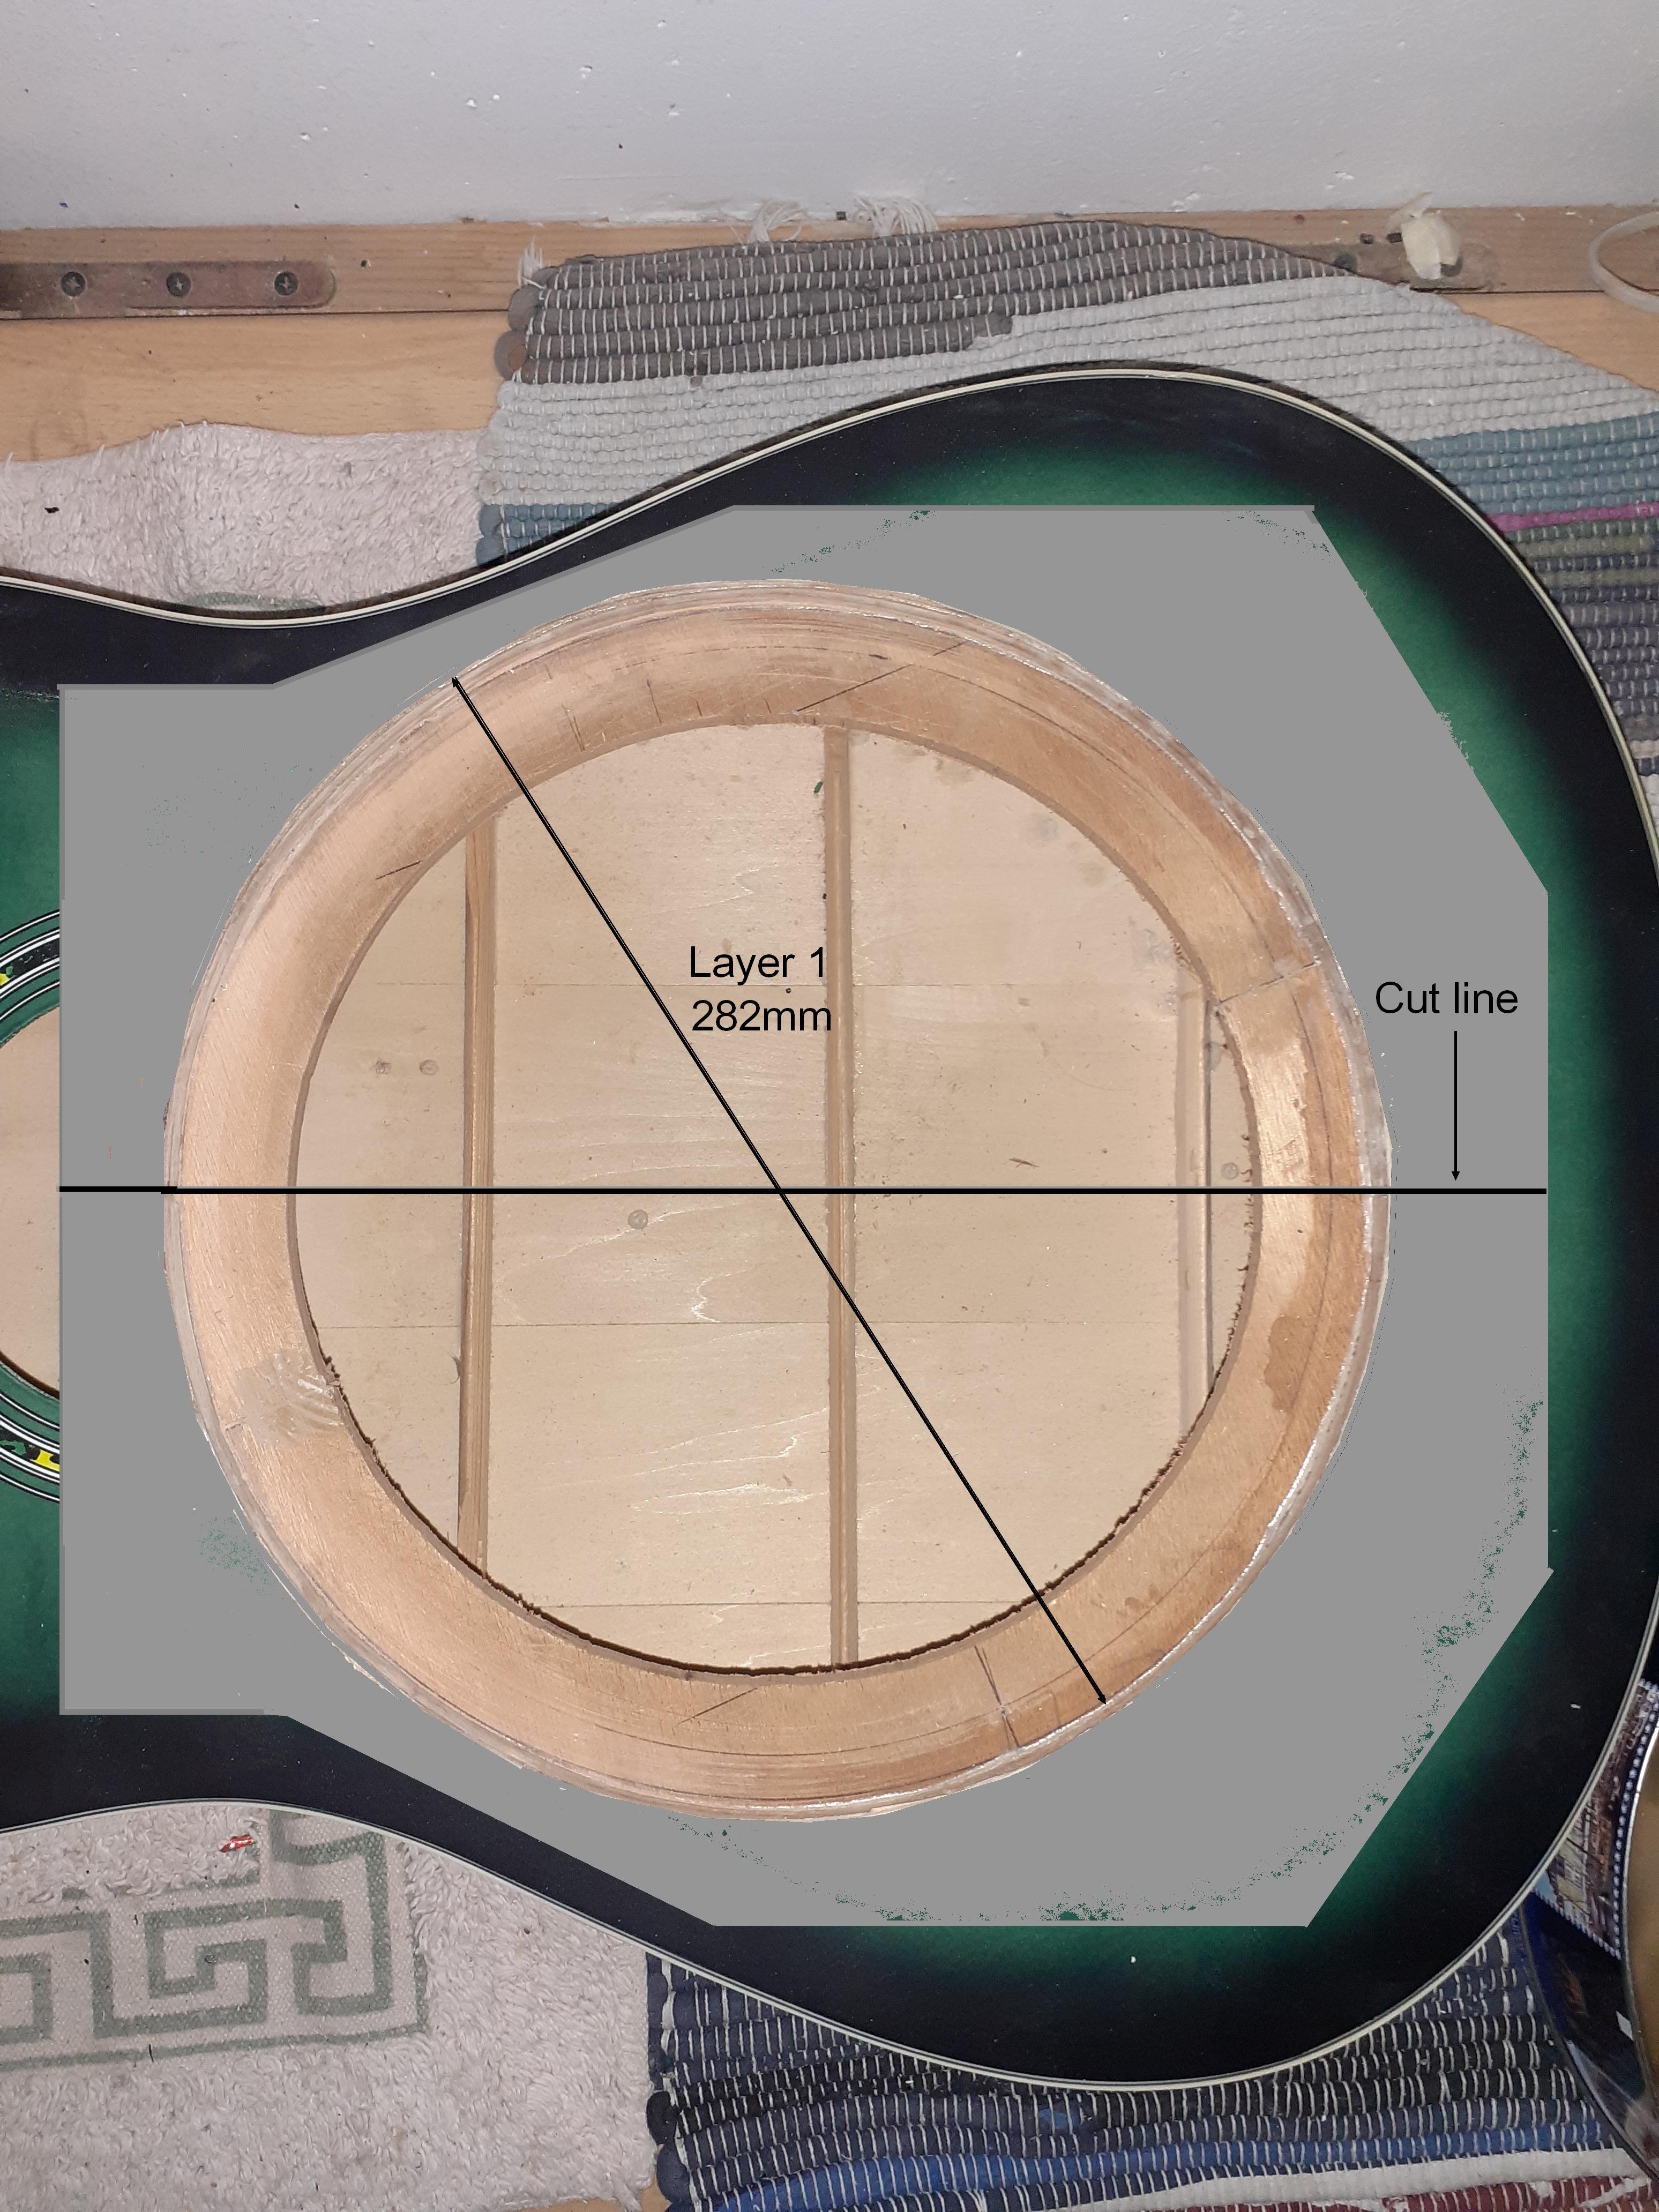
Spider support (layer 1)
Copy the shape of the guitar, and cut a first piece of plywood slightly smaller than the inside of the guitar (9 or 10mm thick) and drill a hole the same diameter as the spider + 2mm (for me, 284mm).
This piece needs to be long: once glued in place, it will be the main reinforcement of the guitar.
Cut the piece in half lengthwise so that both pieces can fit inside the body. Ensure the large hole is centered and glue.
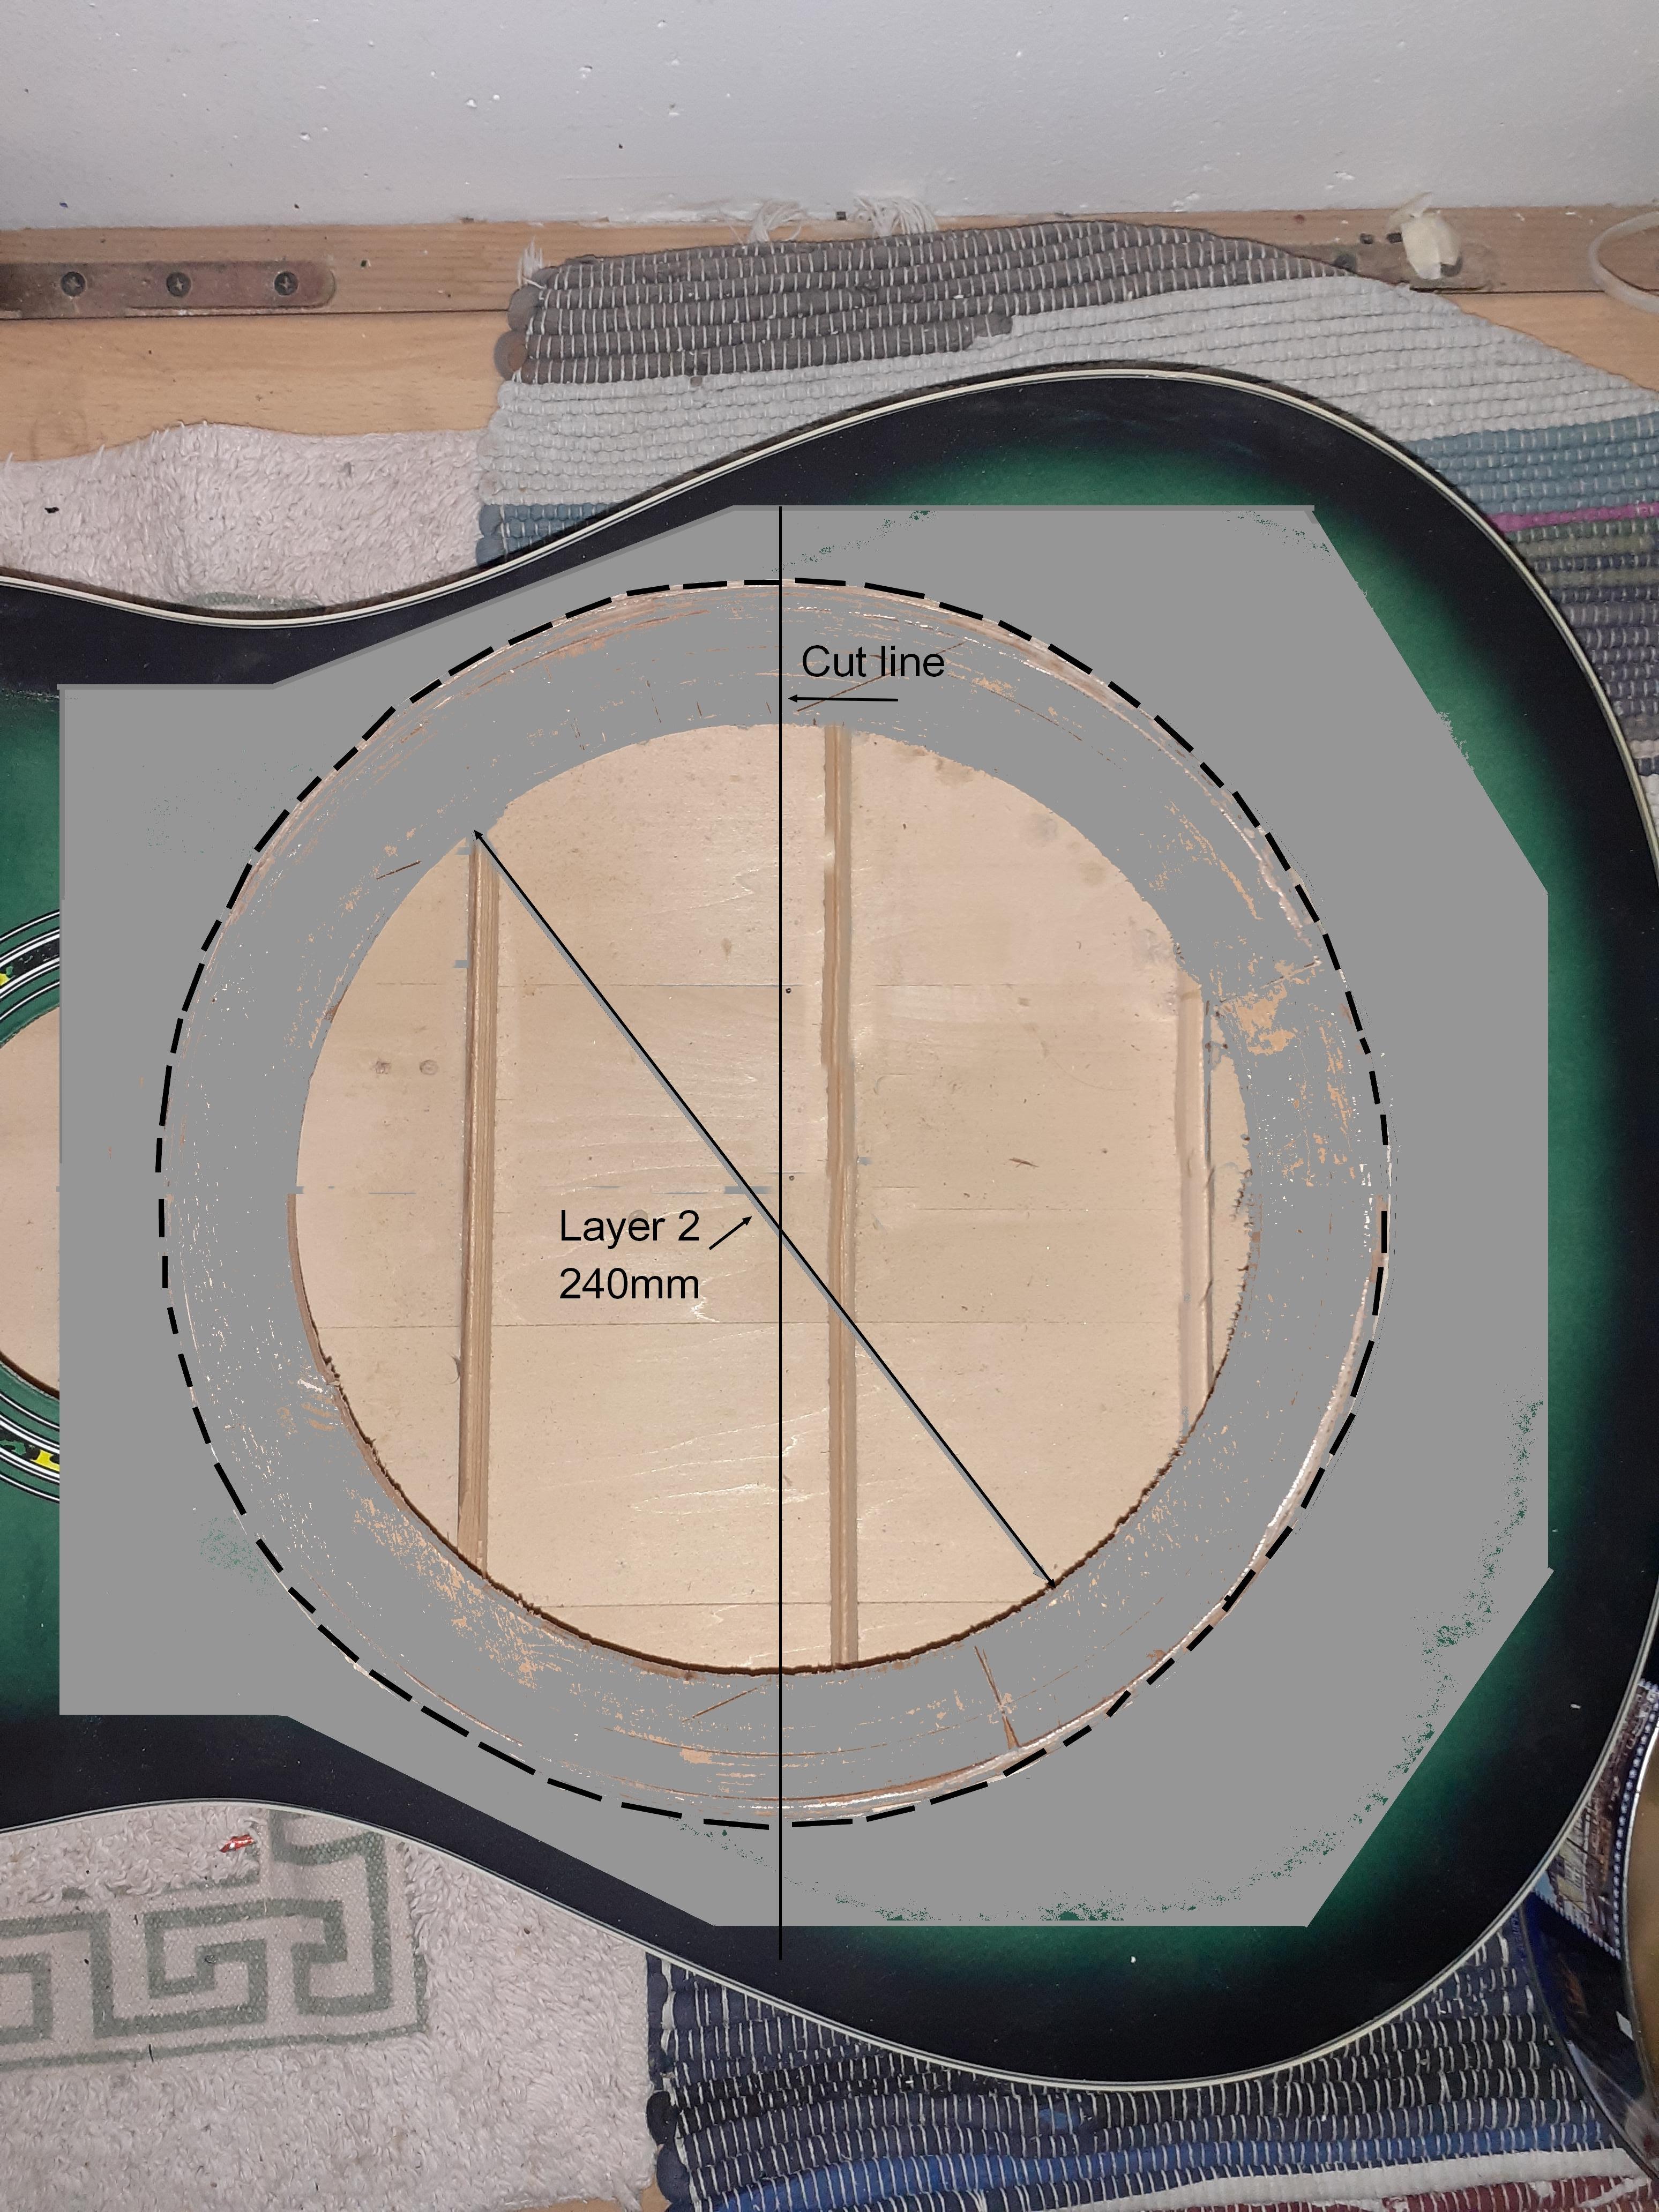
Speaker support (layer 2)
Cut a ring (Inner diameter = Speaker diameter - 30mm) which will be glued under the first ring and will support the speaker. Adjust the dimensions so that the speaker sits flat.
Cut the ring in half widthwise along its diameter so that the two pieces can fit inside the cabinet. Ensure the large hole is centered in relation to the upper reinforcement and glue.
Rosehole covering. In the last photo, you can see that I reused a piece of the acoustic table to hide the piece of plywood from layer 1 that protrudes into the soundhole.
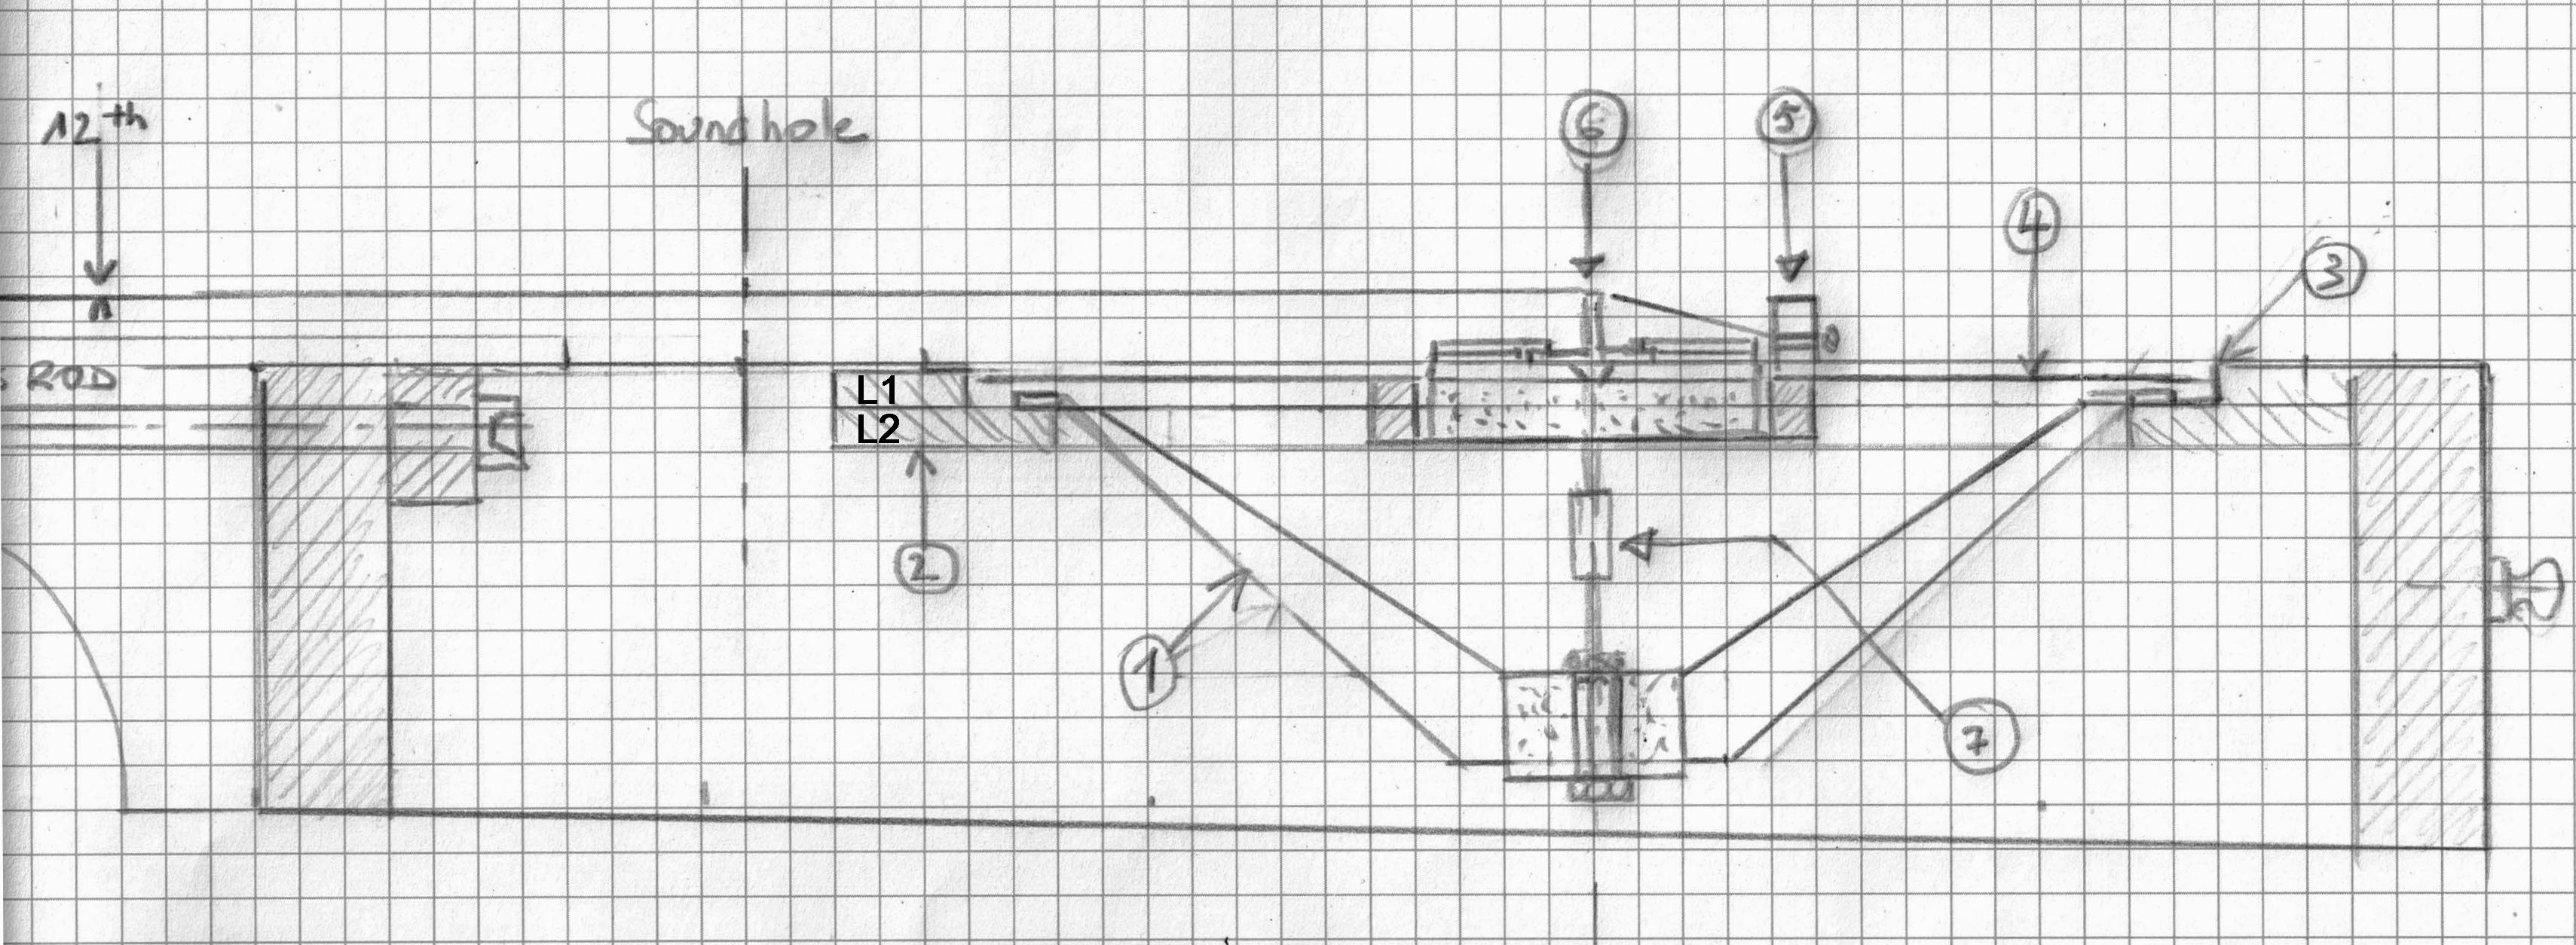
Spider


The spider is undoubtedly the main idea behind the Z8.4.
This spider must allow
- it to support the forces exerted by the strings (tension, vertical component) on the one hand, and
- to allow the vibrations from the bridge to be transmitted to the heart of the speaker on the other.
In other words: the spider needs to be both rigid and flexible. A real dilemma...
I solved the problem by creating a rigid support attached to the body, but leaving a space under the bridge filled with dense but flexible foam. This allows the bridge to vibrate freely on the foam. I was worried the foam would get crushed, but it doesn't; it holds up well without deforming. I also considered adding flexibility by putting springs under the bridge, a bit like in the Z8.2. In practice, I decided it wasn't necessary, and I kept the foam because it didn't get crushed. I'm keeping the idea in mind, though, for a possible future improvement.
Finally, the spider must be drilled to allow sound from the vibrating speaker to escape.
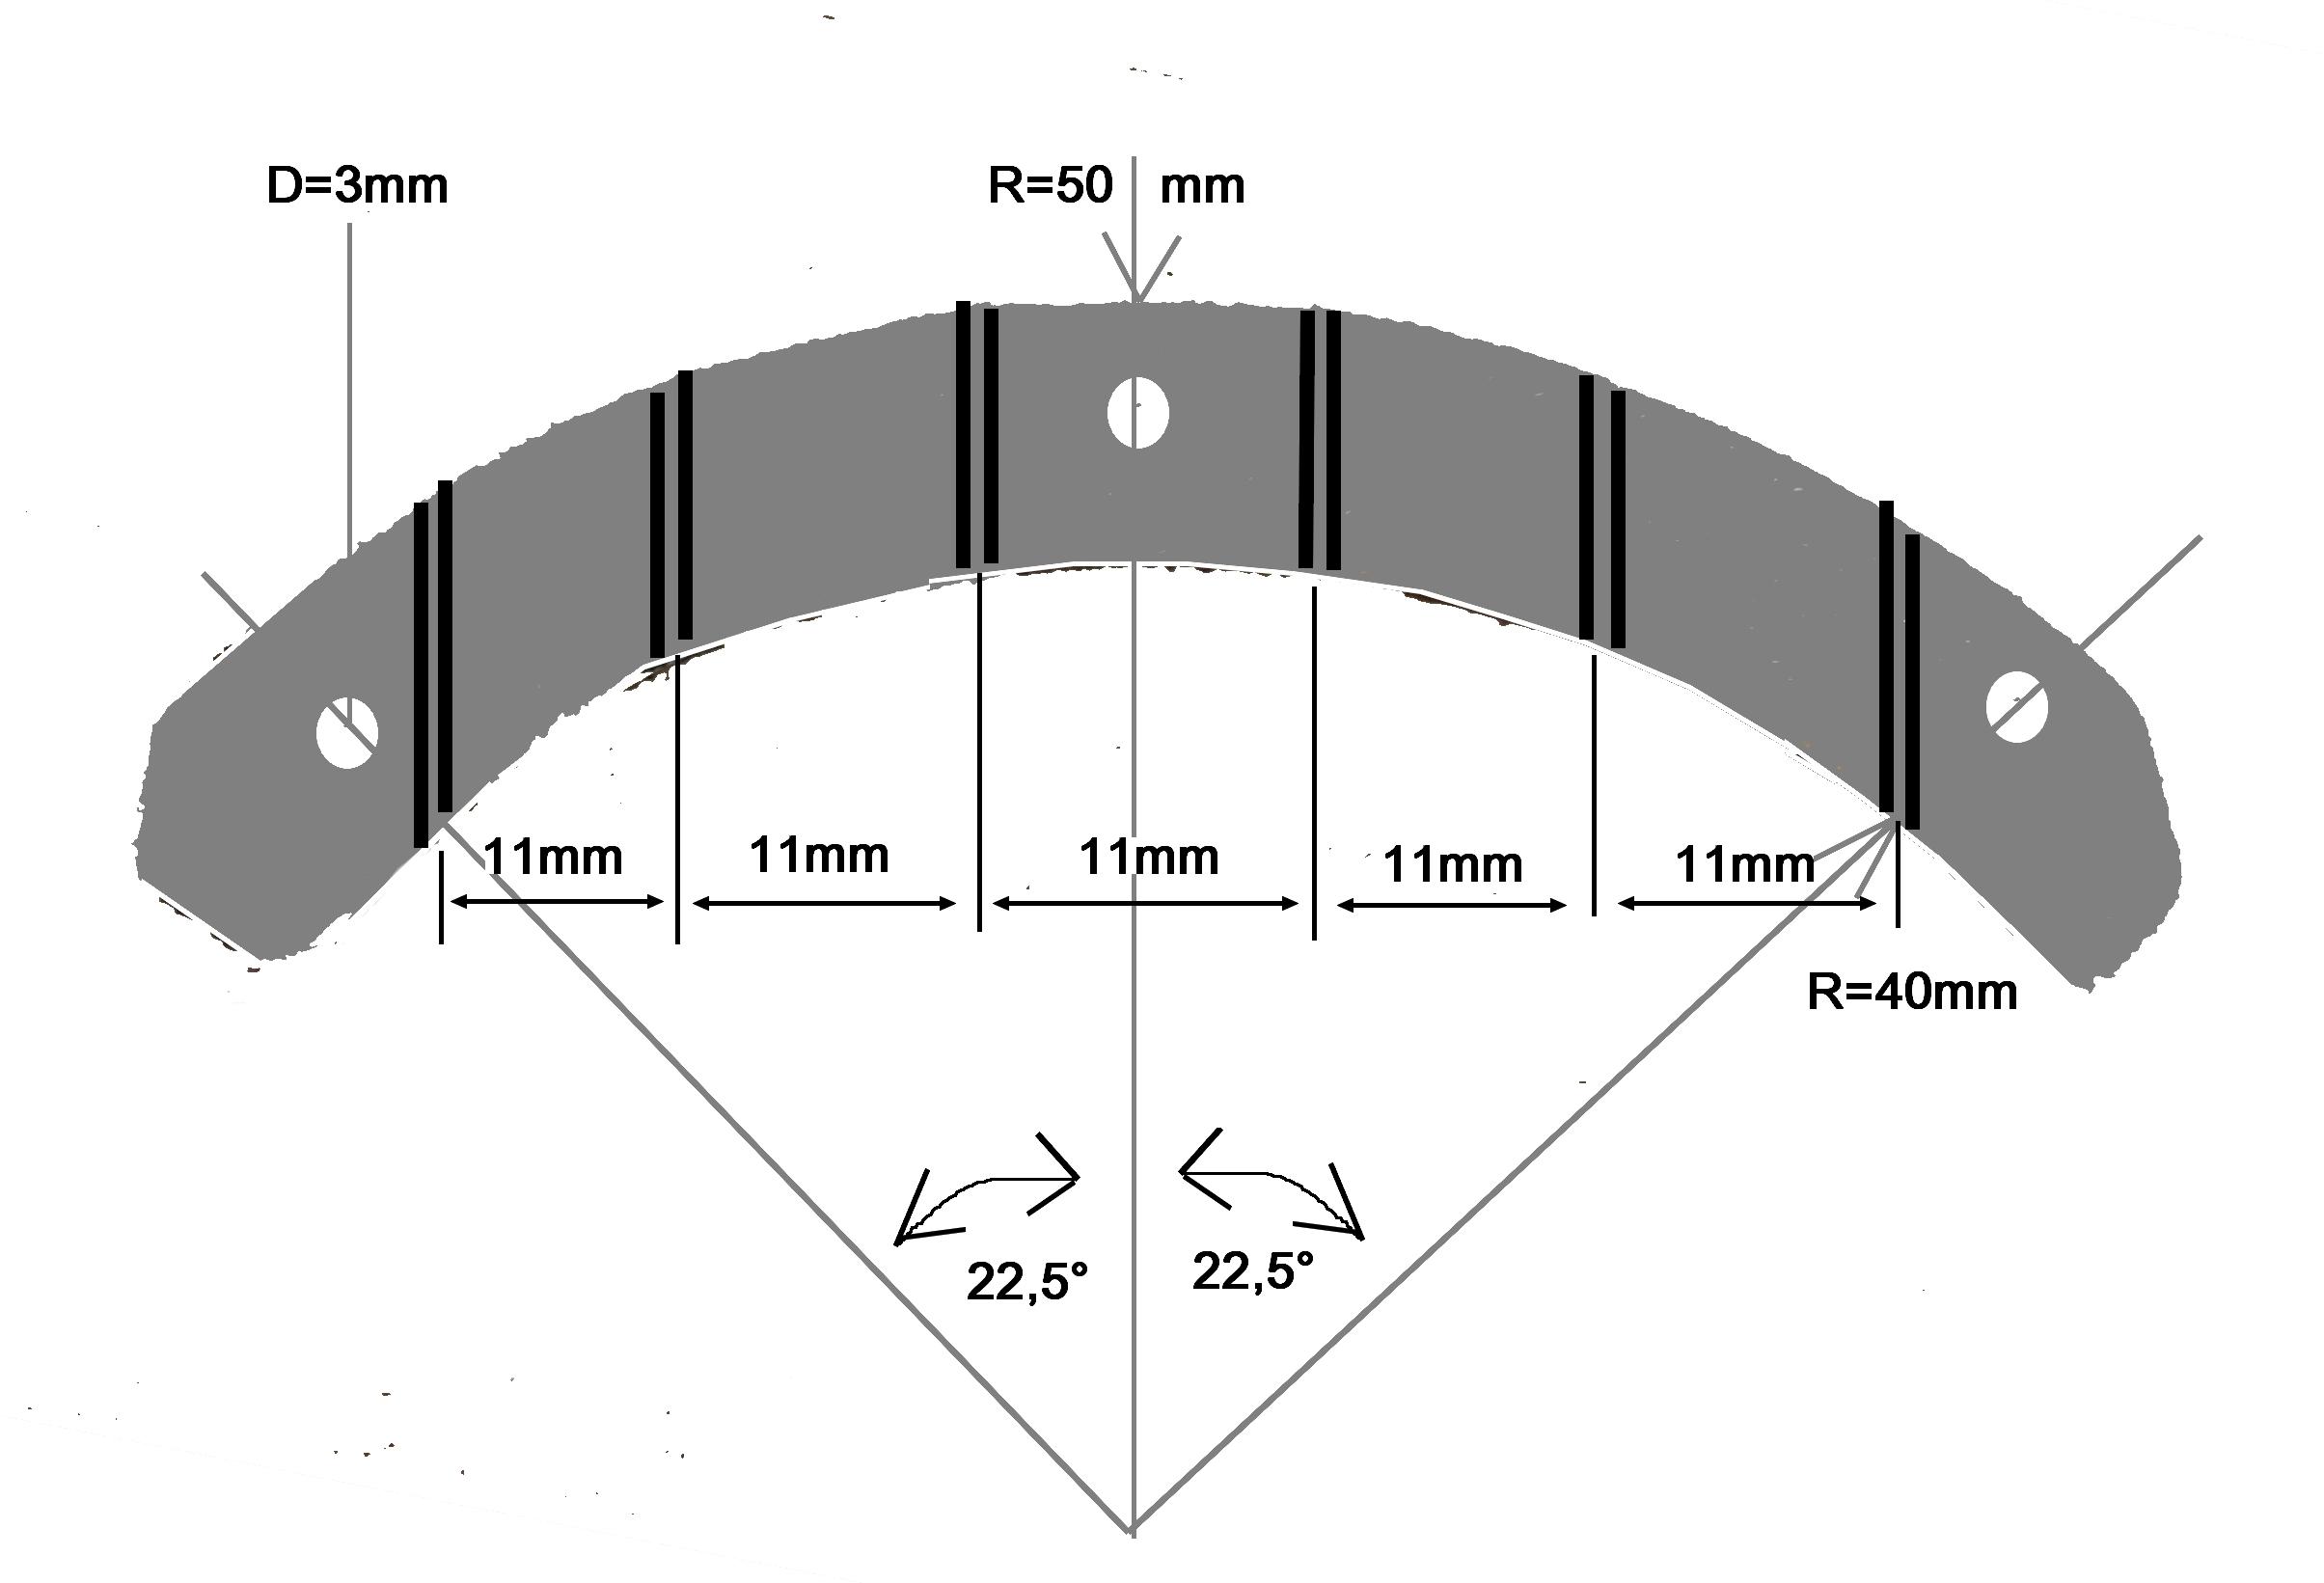
This spider is therefore composed of 5 parts:
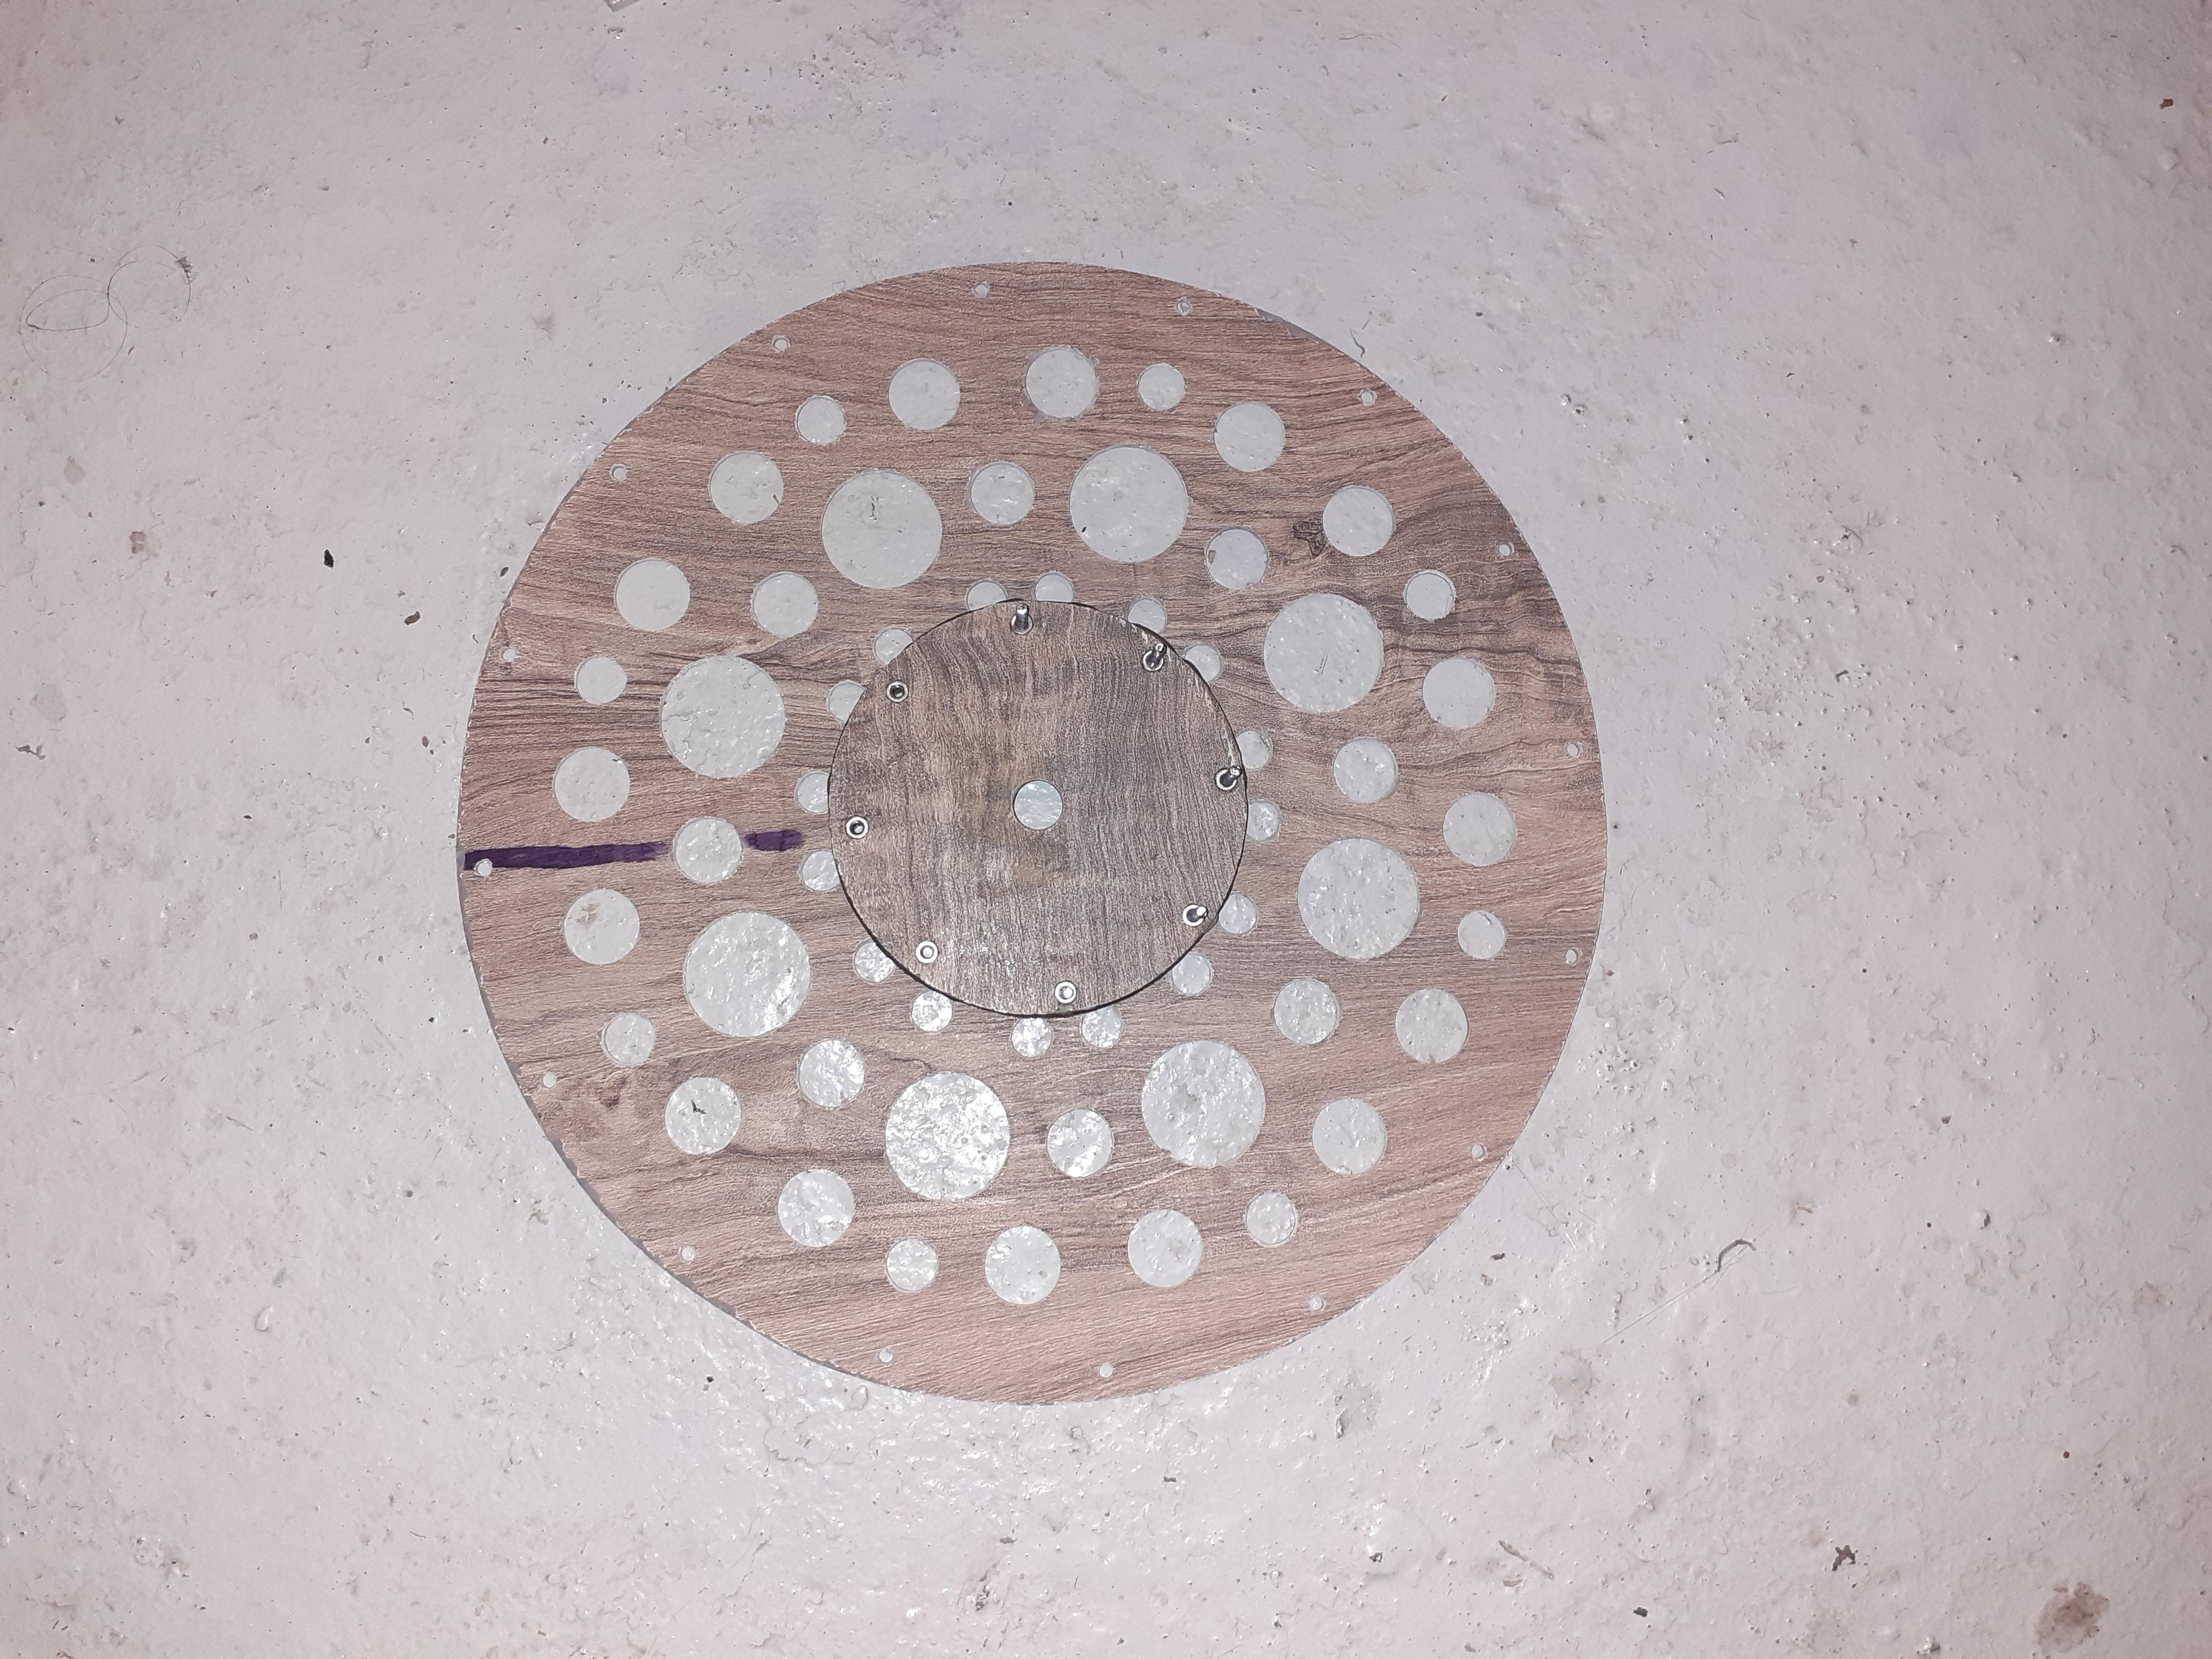
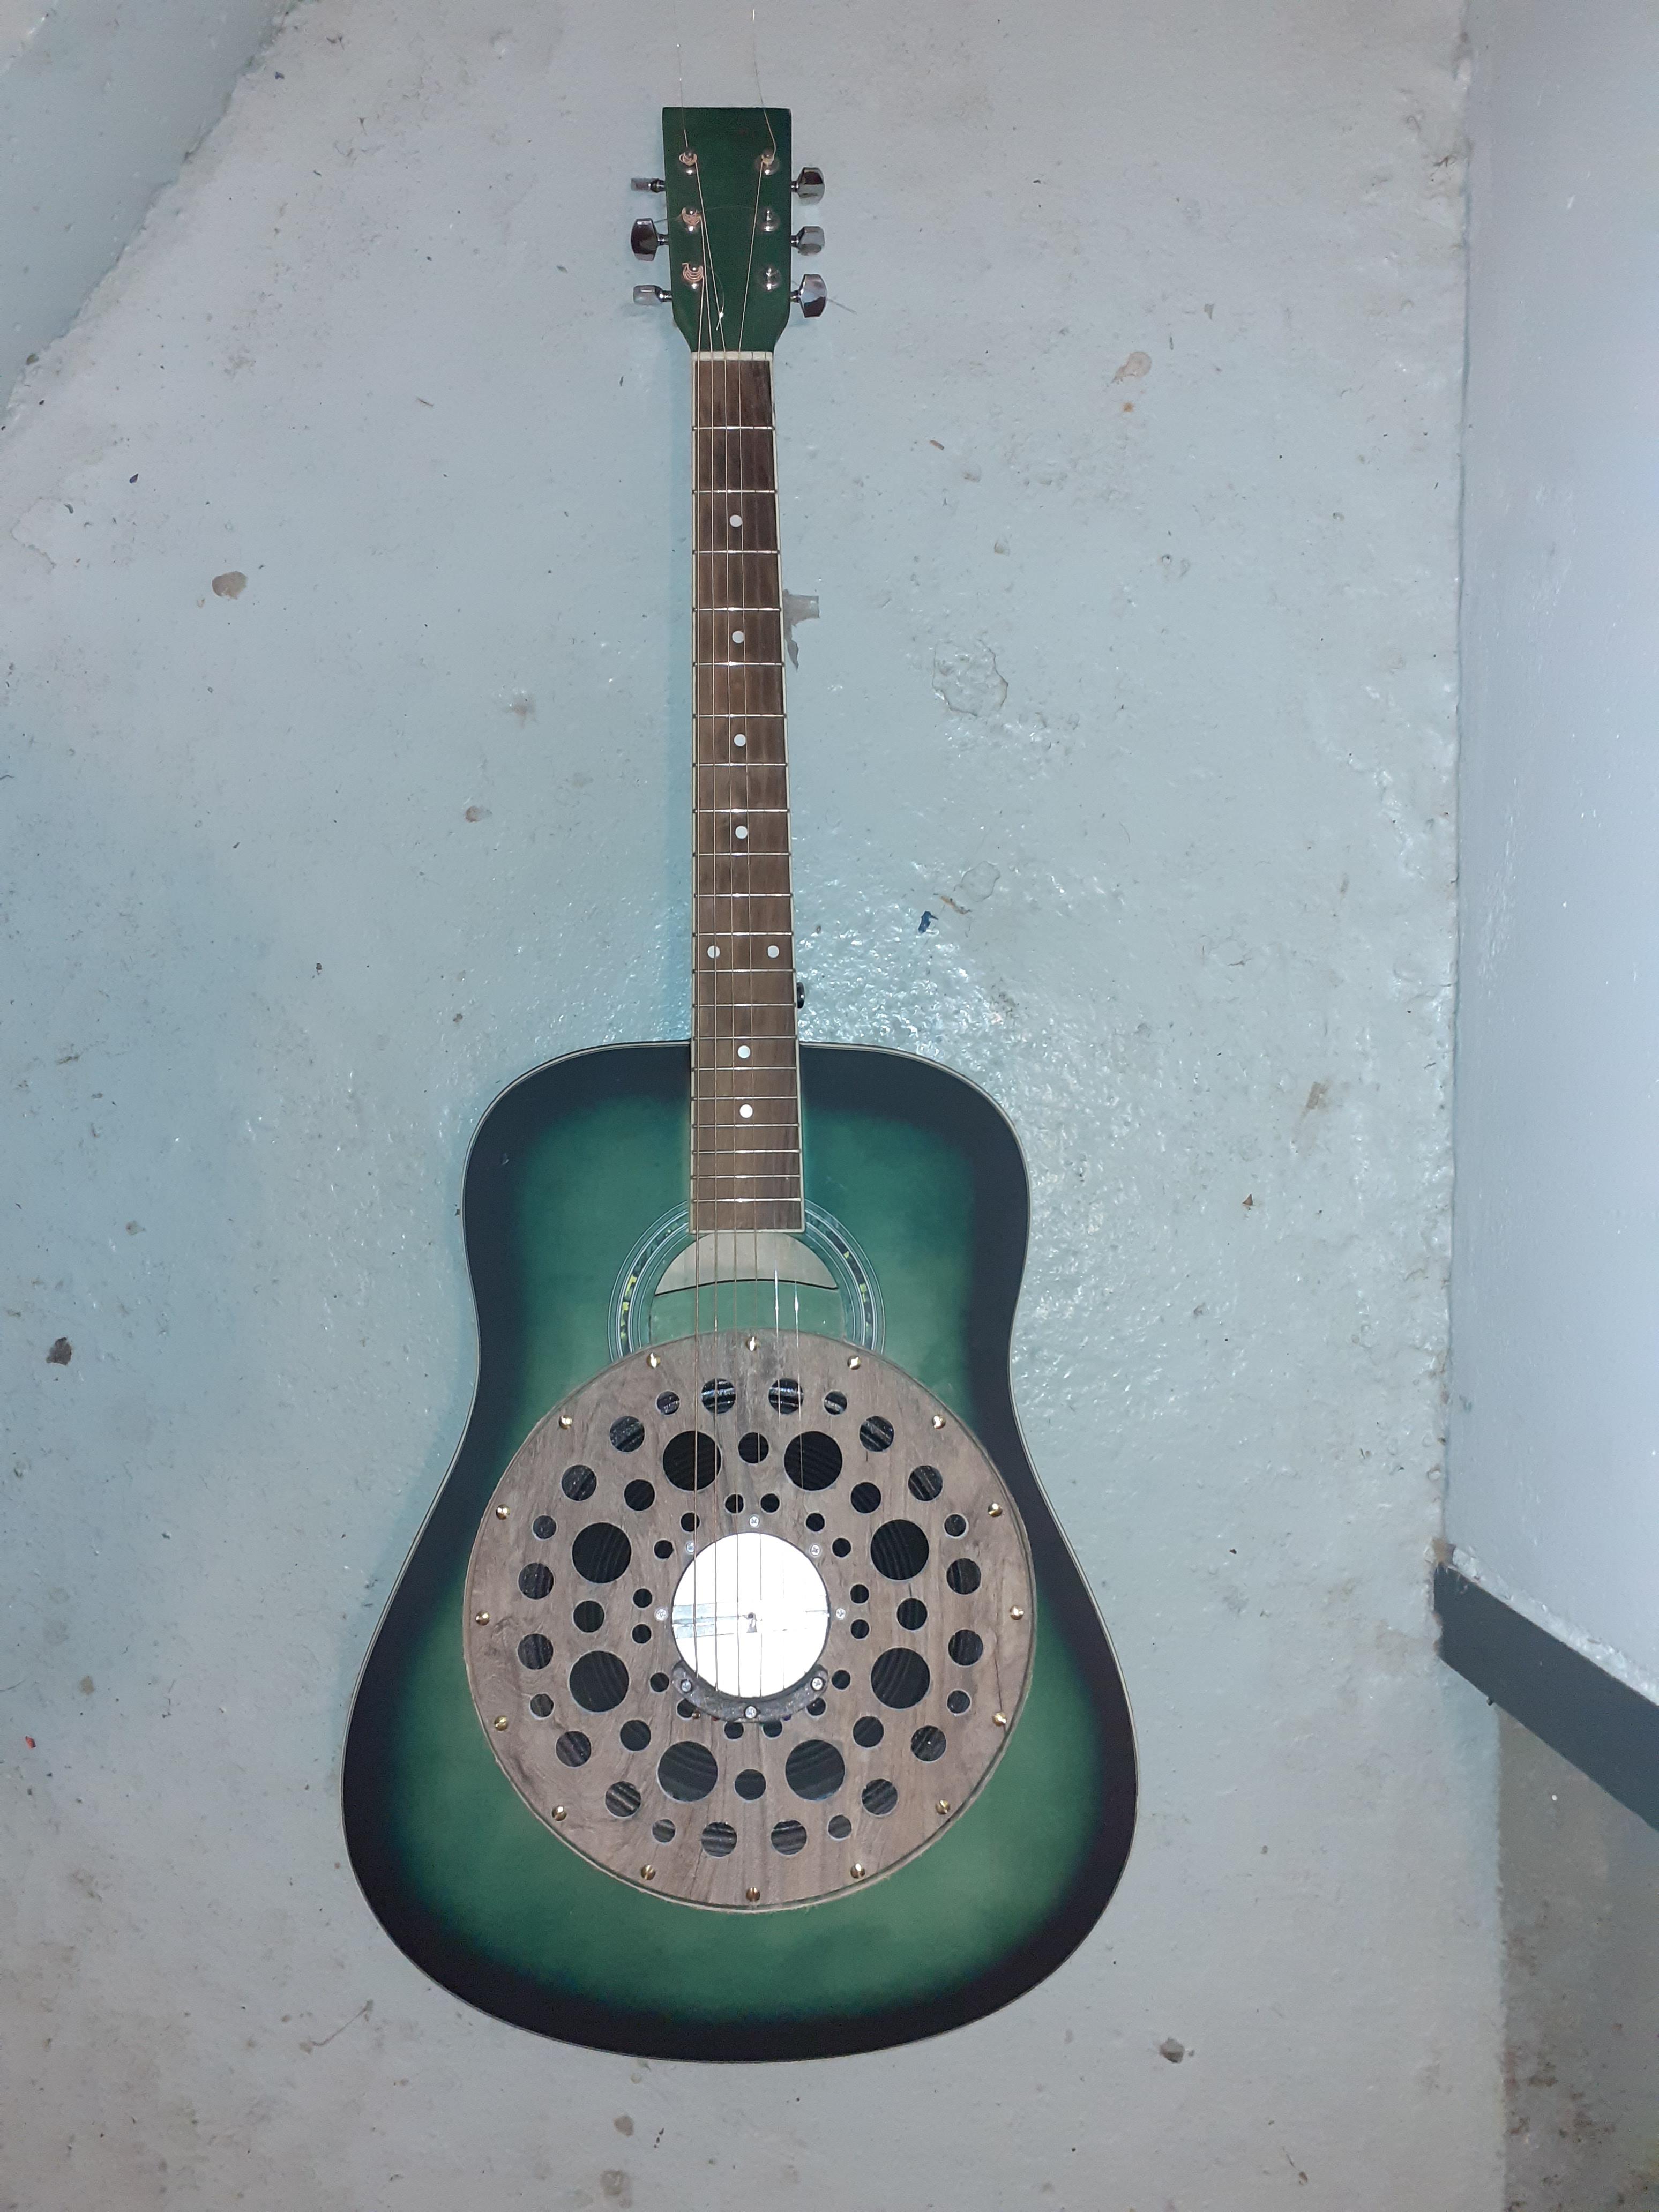
a 280mm diameter disc (made of 4mm fiberglass sheet – a self-service tray. It's strong and easily machinable). This disc is drilled to have:
- 16 mounting holes on the larger diameter for attaching it to the body large diameter
- holes that allow the sound to escape
- an 80mm diameter hole in the center (intended to create a housing for the foam and the bridge)
- 8 holes for attaching a hollow cylinder containing the foam
- a ring (made of plywood) with an outer diameter of 100mm and an inner diameter of 80mm, which will form the wall of the hollow cylinder containing the foam
- a 100mm diameter disc, which is the bottom of the cylinder containing the foam, with a 5mm or 6mm diameter hole in the center
- a 10mm thick, 78mm diameter foam disc with a 3mm diameter countersunk hole in its center a tailpiece (see the next step)
Photos: top view, bottom view, top view with tailpiece
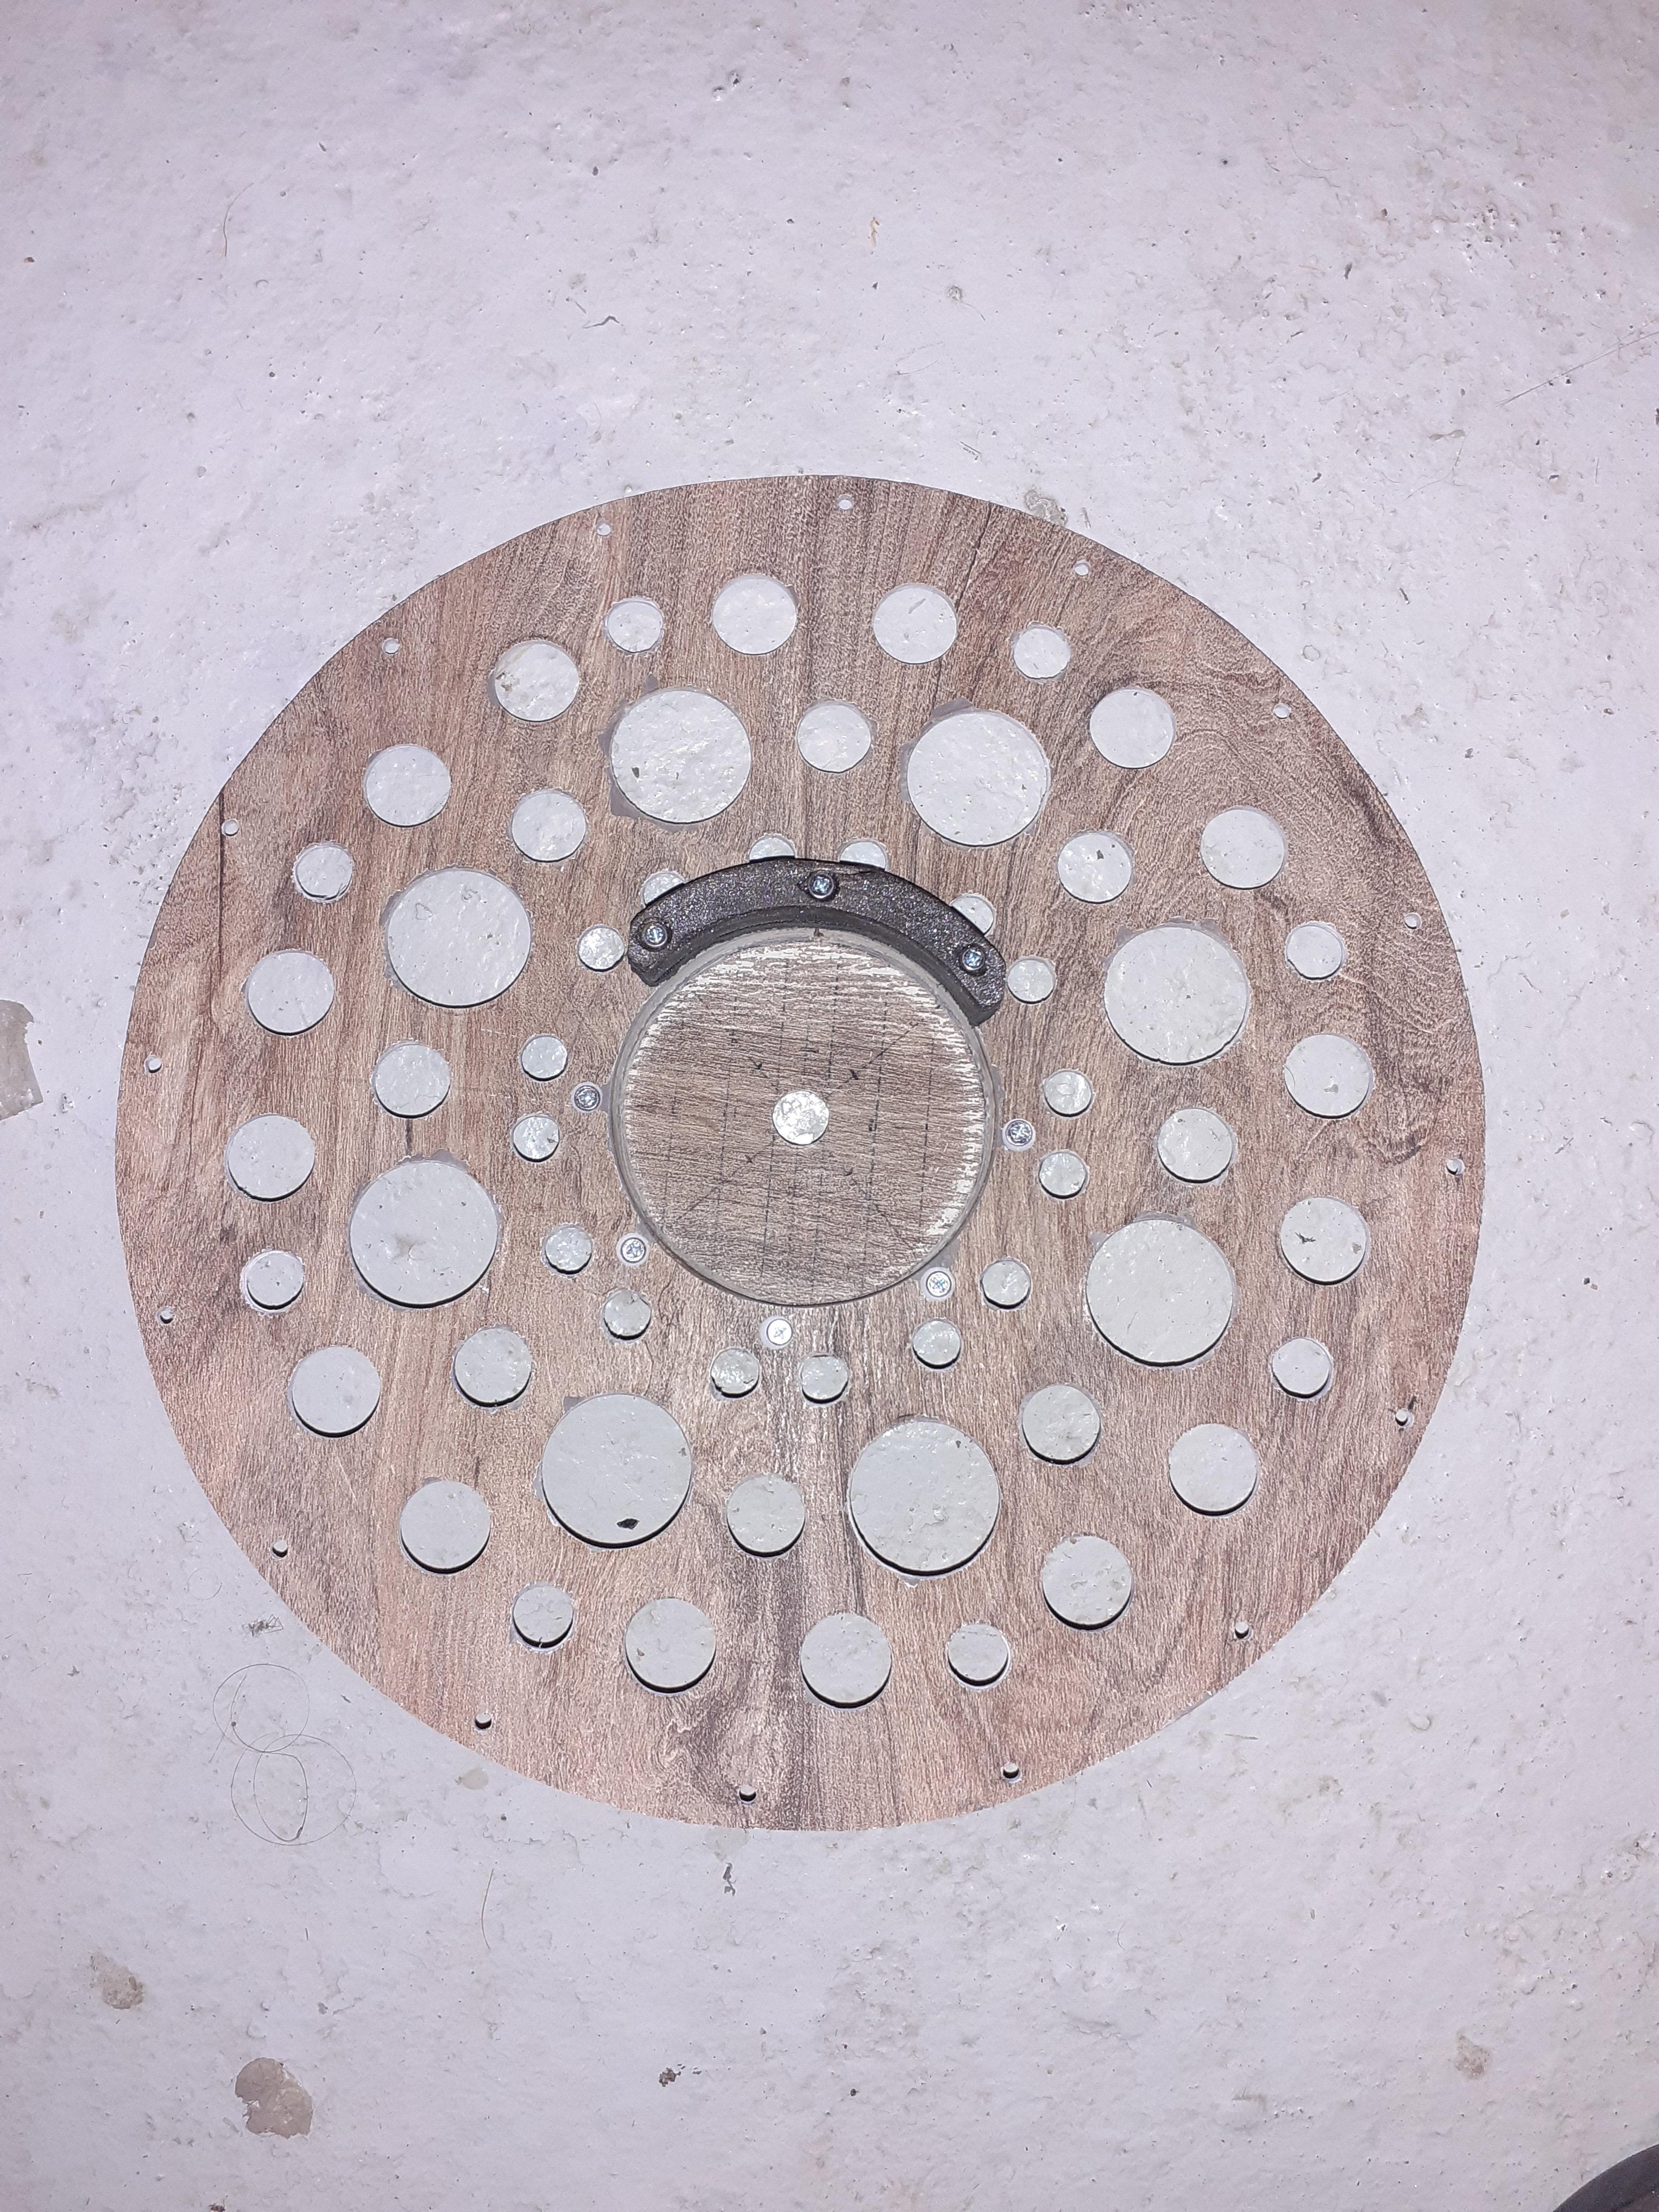
Tailpiece

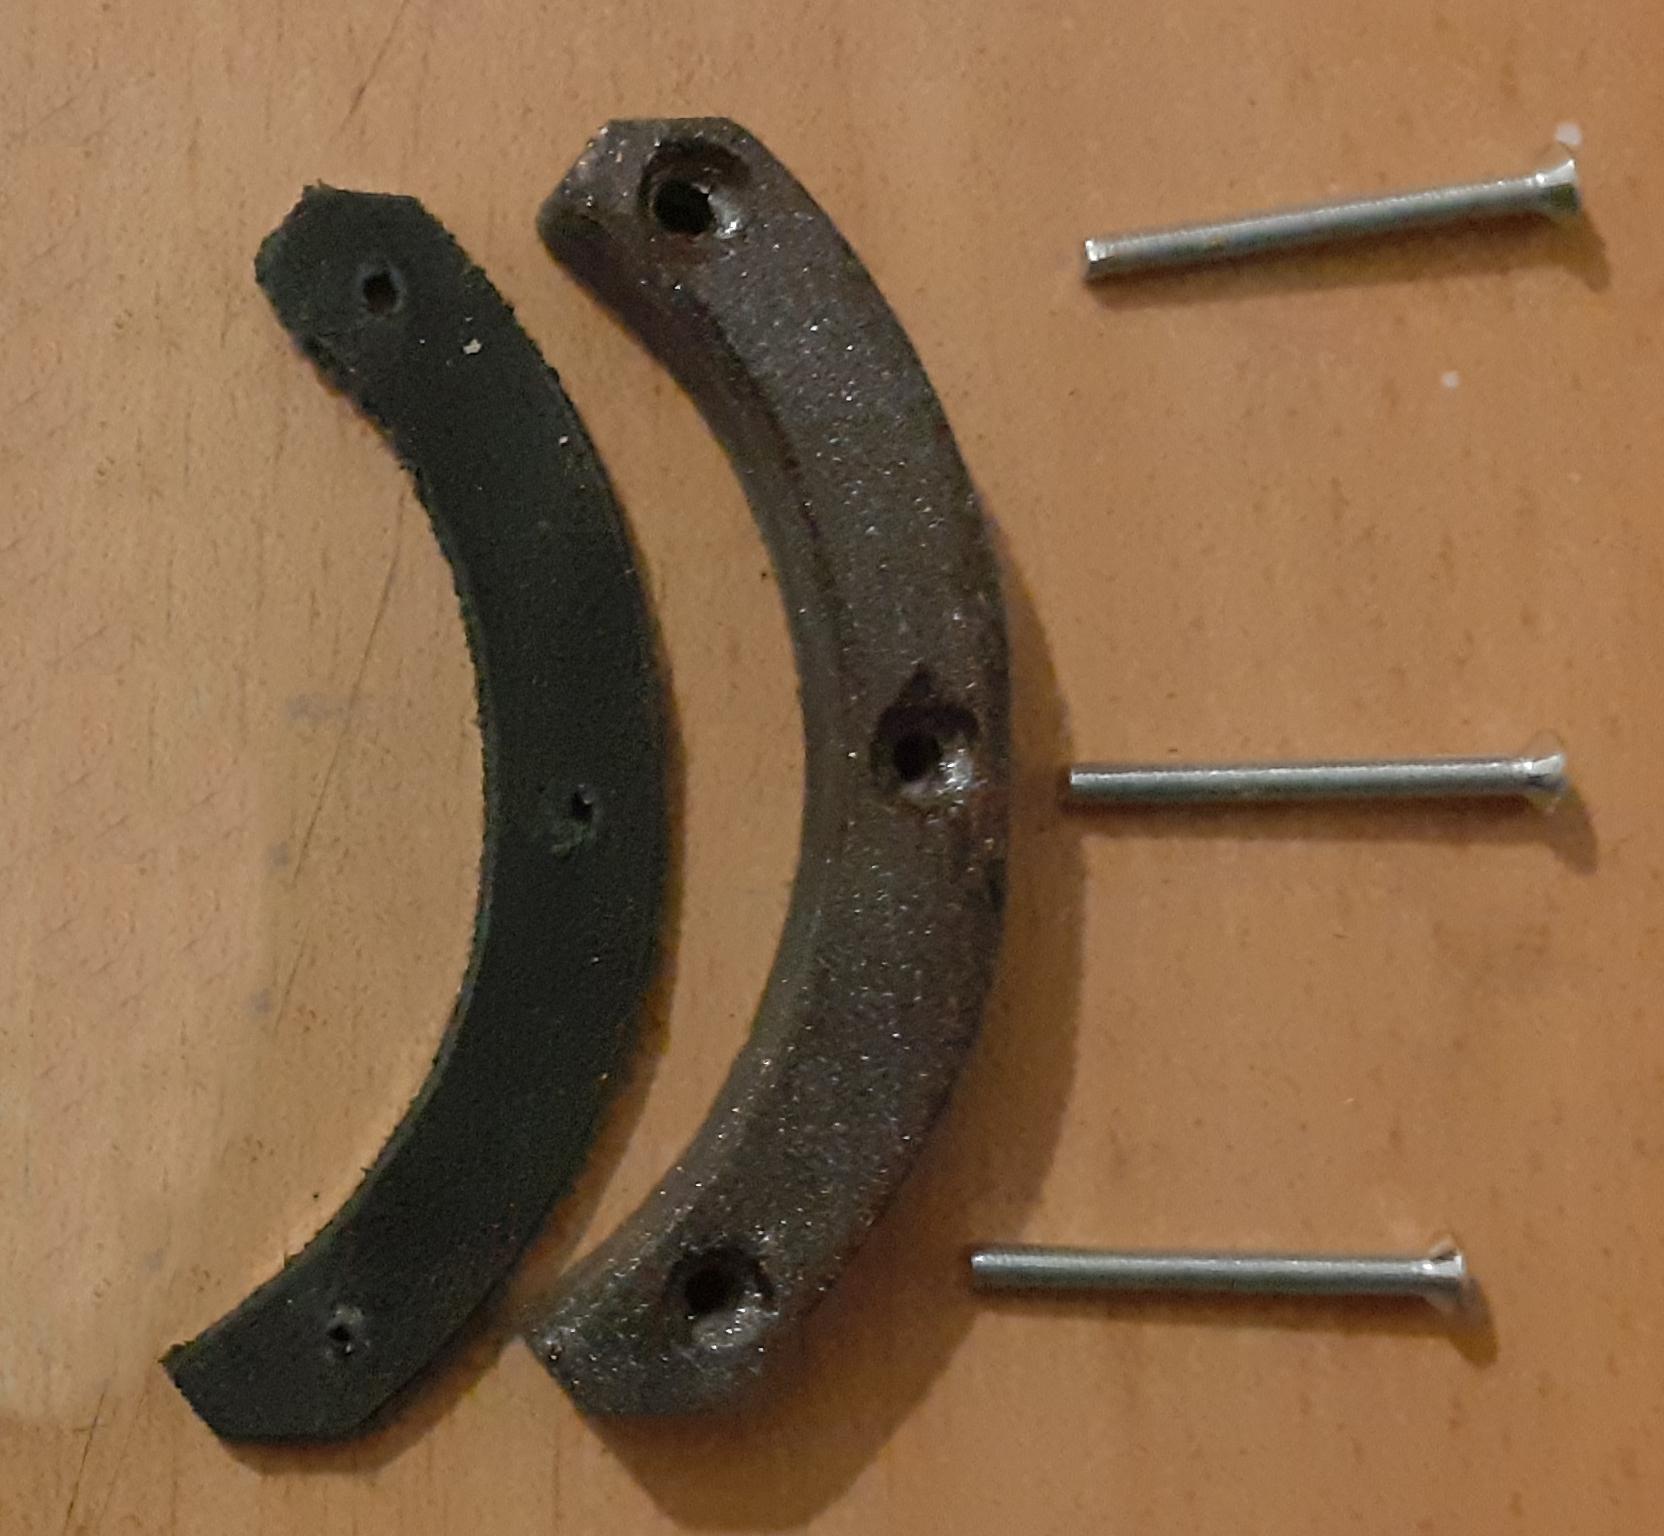
The tailpiece
The tailpiece is attached to the spider. Contrary to its appearance, this component is quite technical:
- it must withstand the tension of the strings (approximately 80 kg),
- it must guide the strings (11 mm spacing),
- it must lock the strings in place,
- it must dampen any unwanted vibrations, and
- it must be aesthetically pleasing, since it is visible.
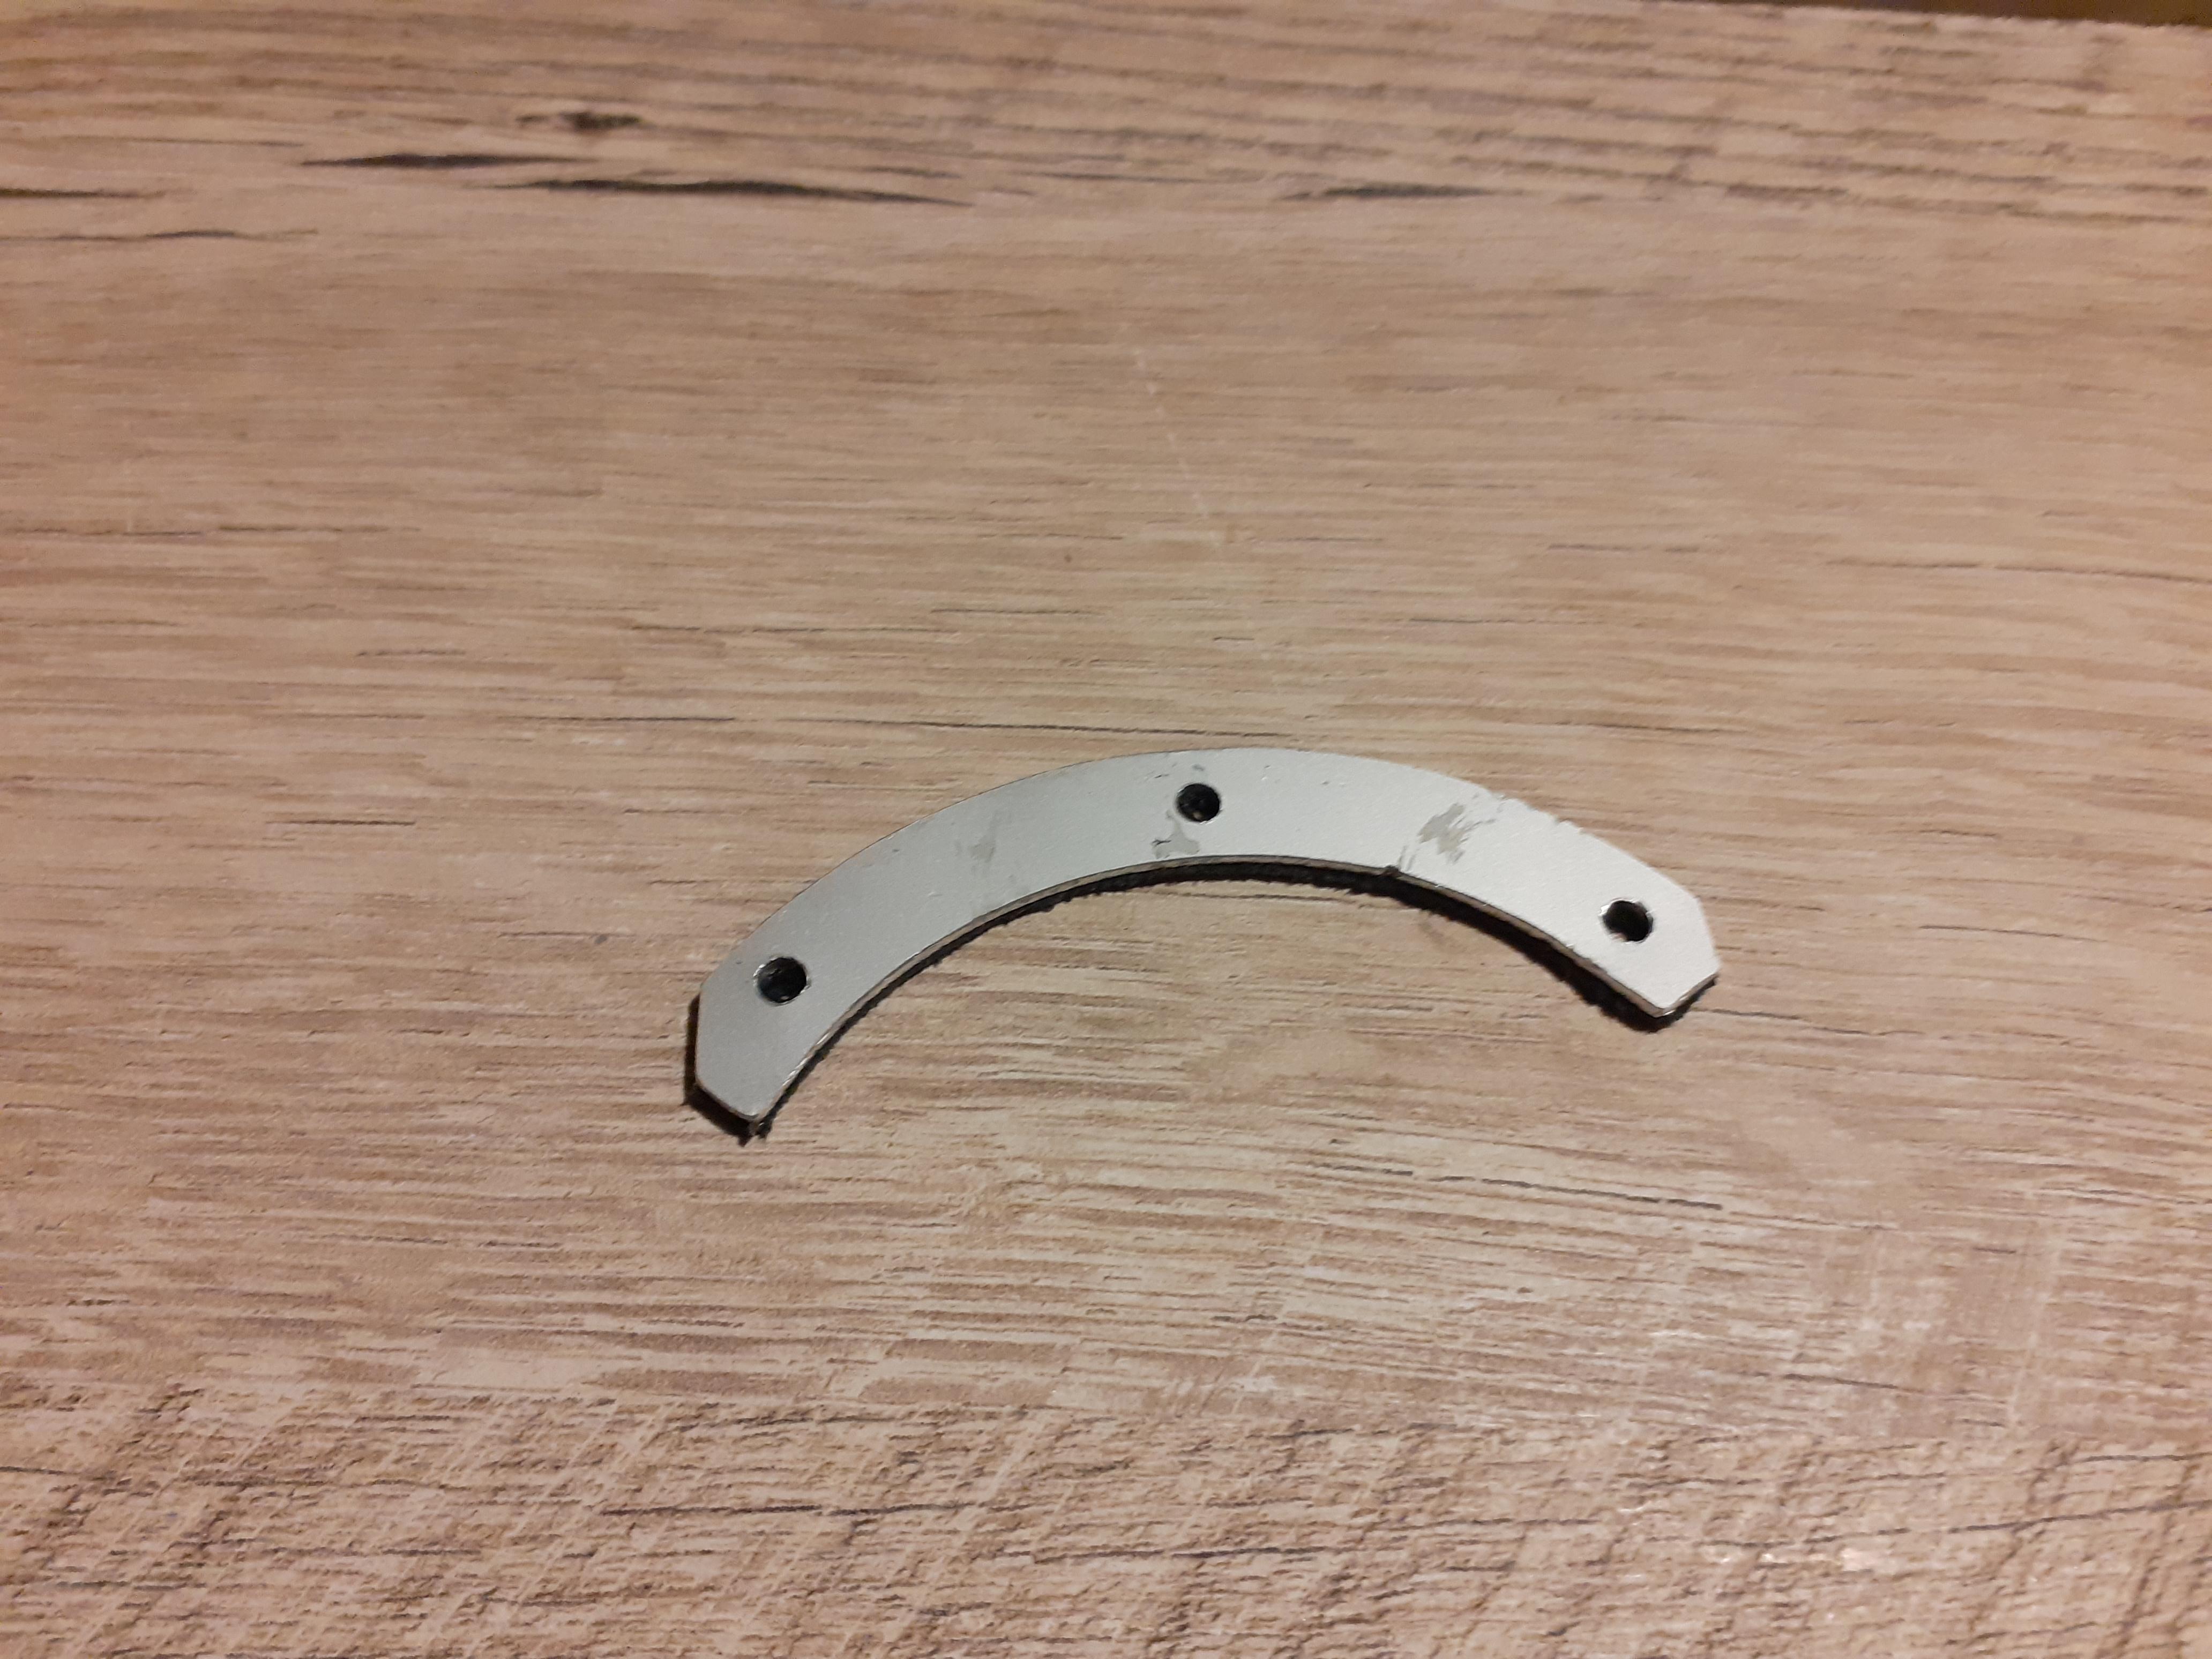
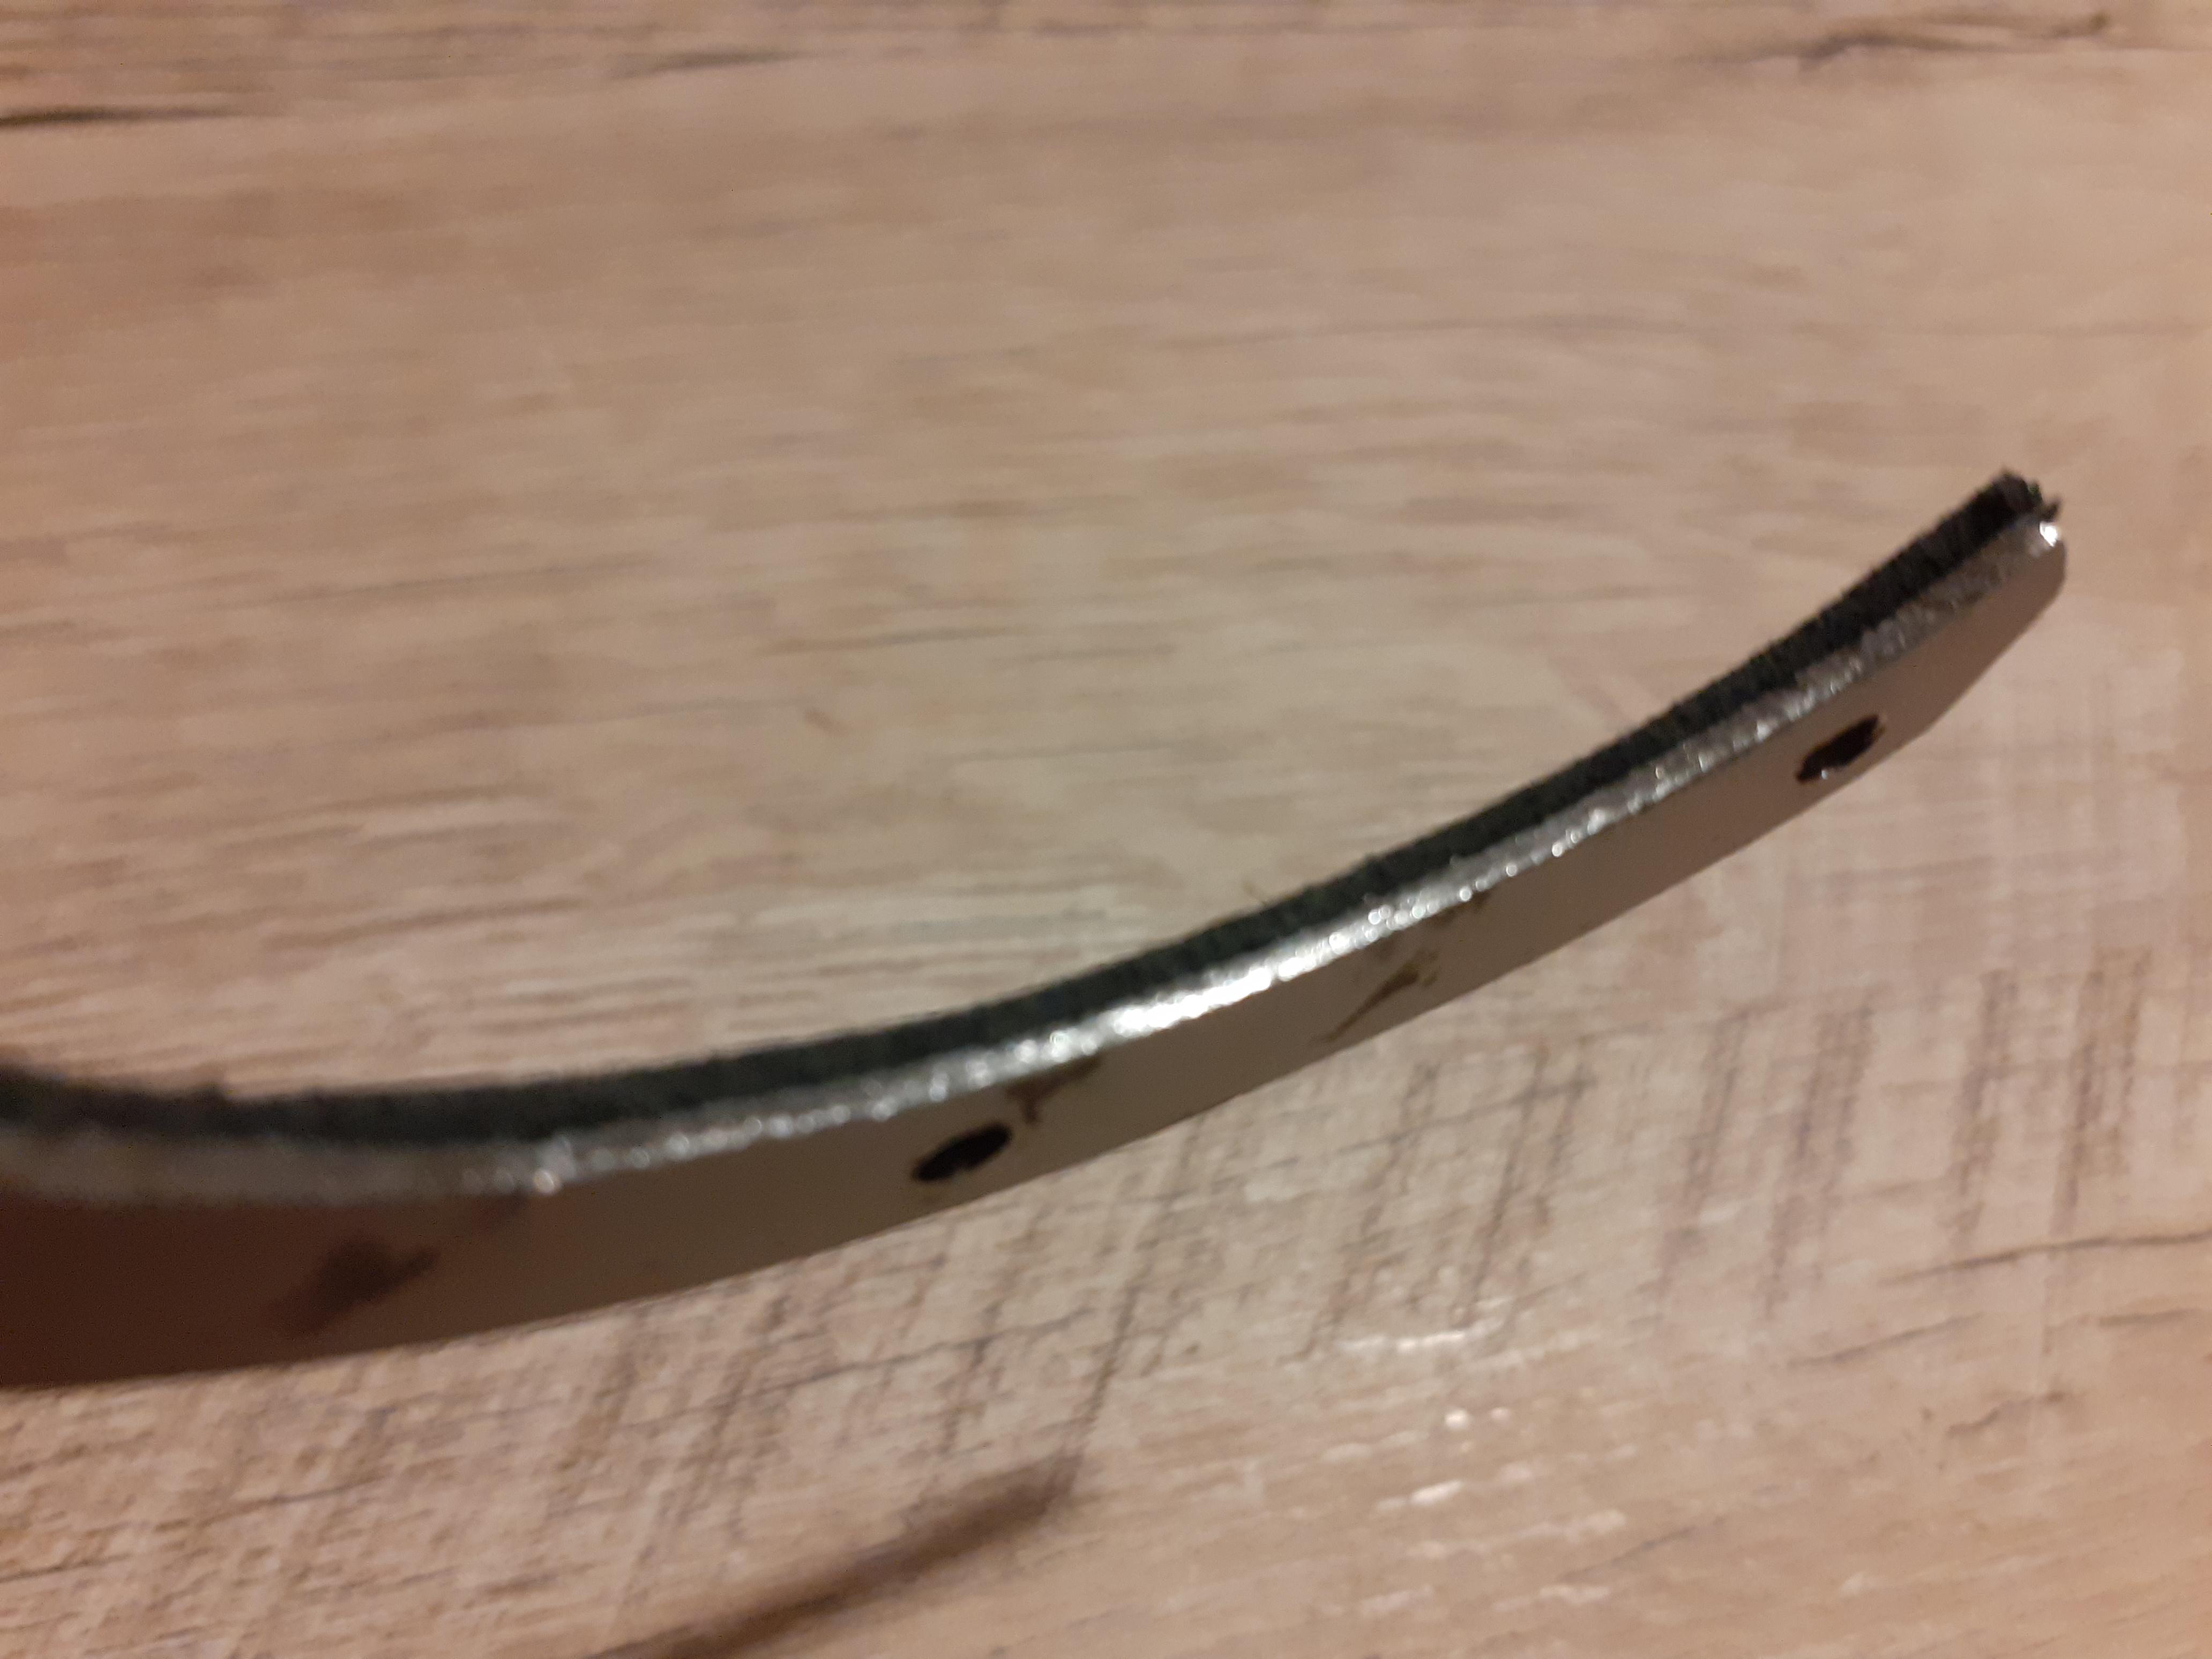
Therefore, I chose to create a stack of three layers, all with the same basic shape (a circular arc 10 mm wide, with a small radius of 40 mm and a large radius of 50 mm).
Starting from the bottom:
- a part that raises the strings, otherwise the string attachments would rub against the spider. I made it from aluminum, but I could have made it from fiberglass.
- a part of leather (salvaged from an old shoe) to eliminate any risk of vibration. This piece is glued to the aluminum piece with neoprene adhesive.
- A part of plywood in an arc shape, with grooves spaced 11mm apart to guide the strings and ensure the 11mm spacing.
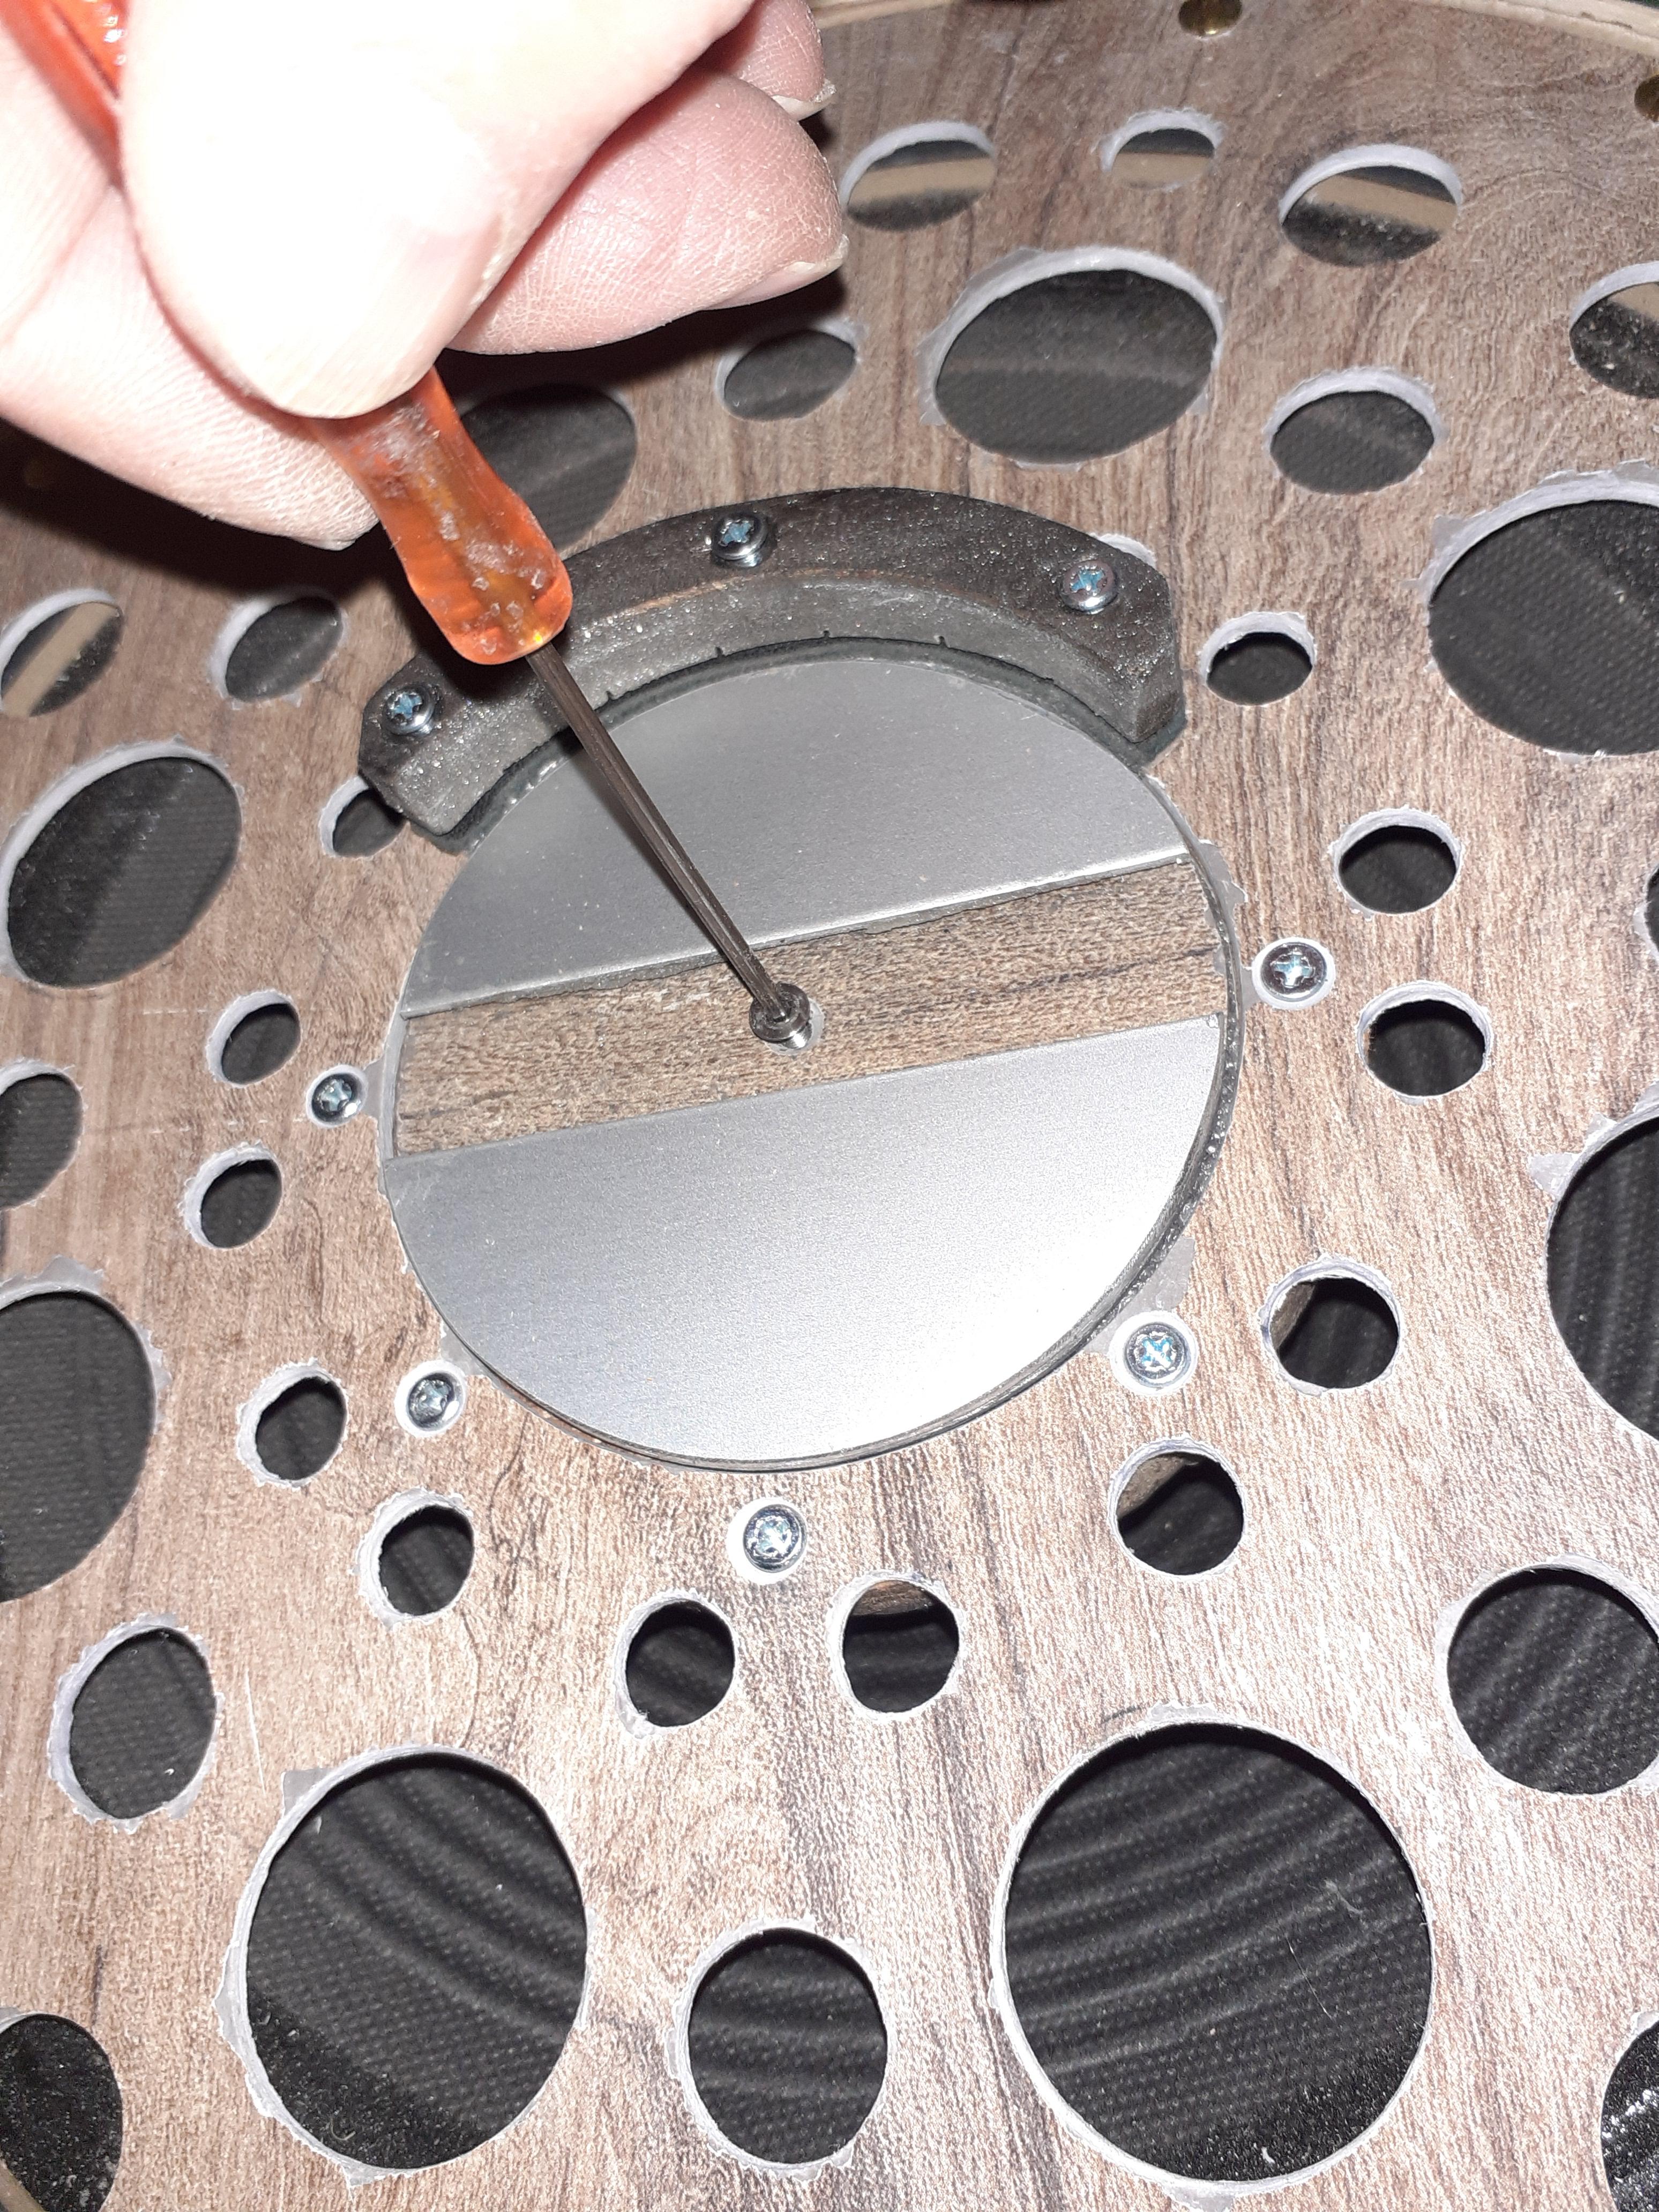
All these parts are pre-drilled and attached to the spider with M3x30 screws.
Bridge
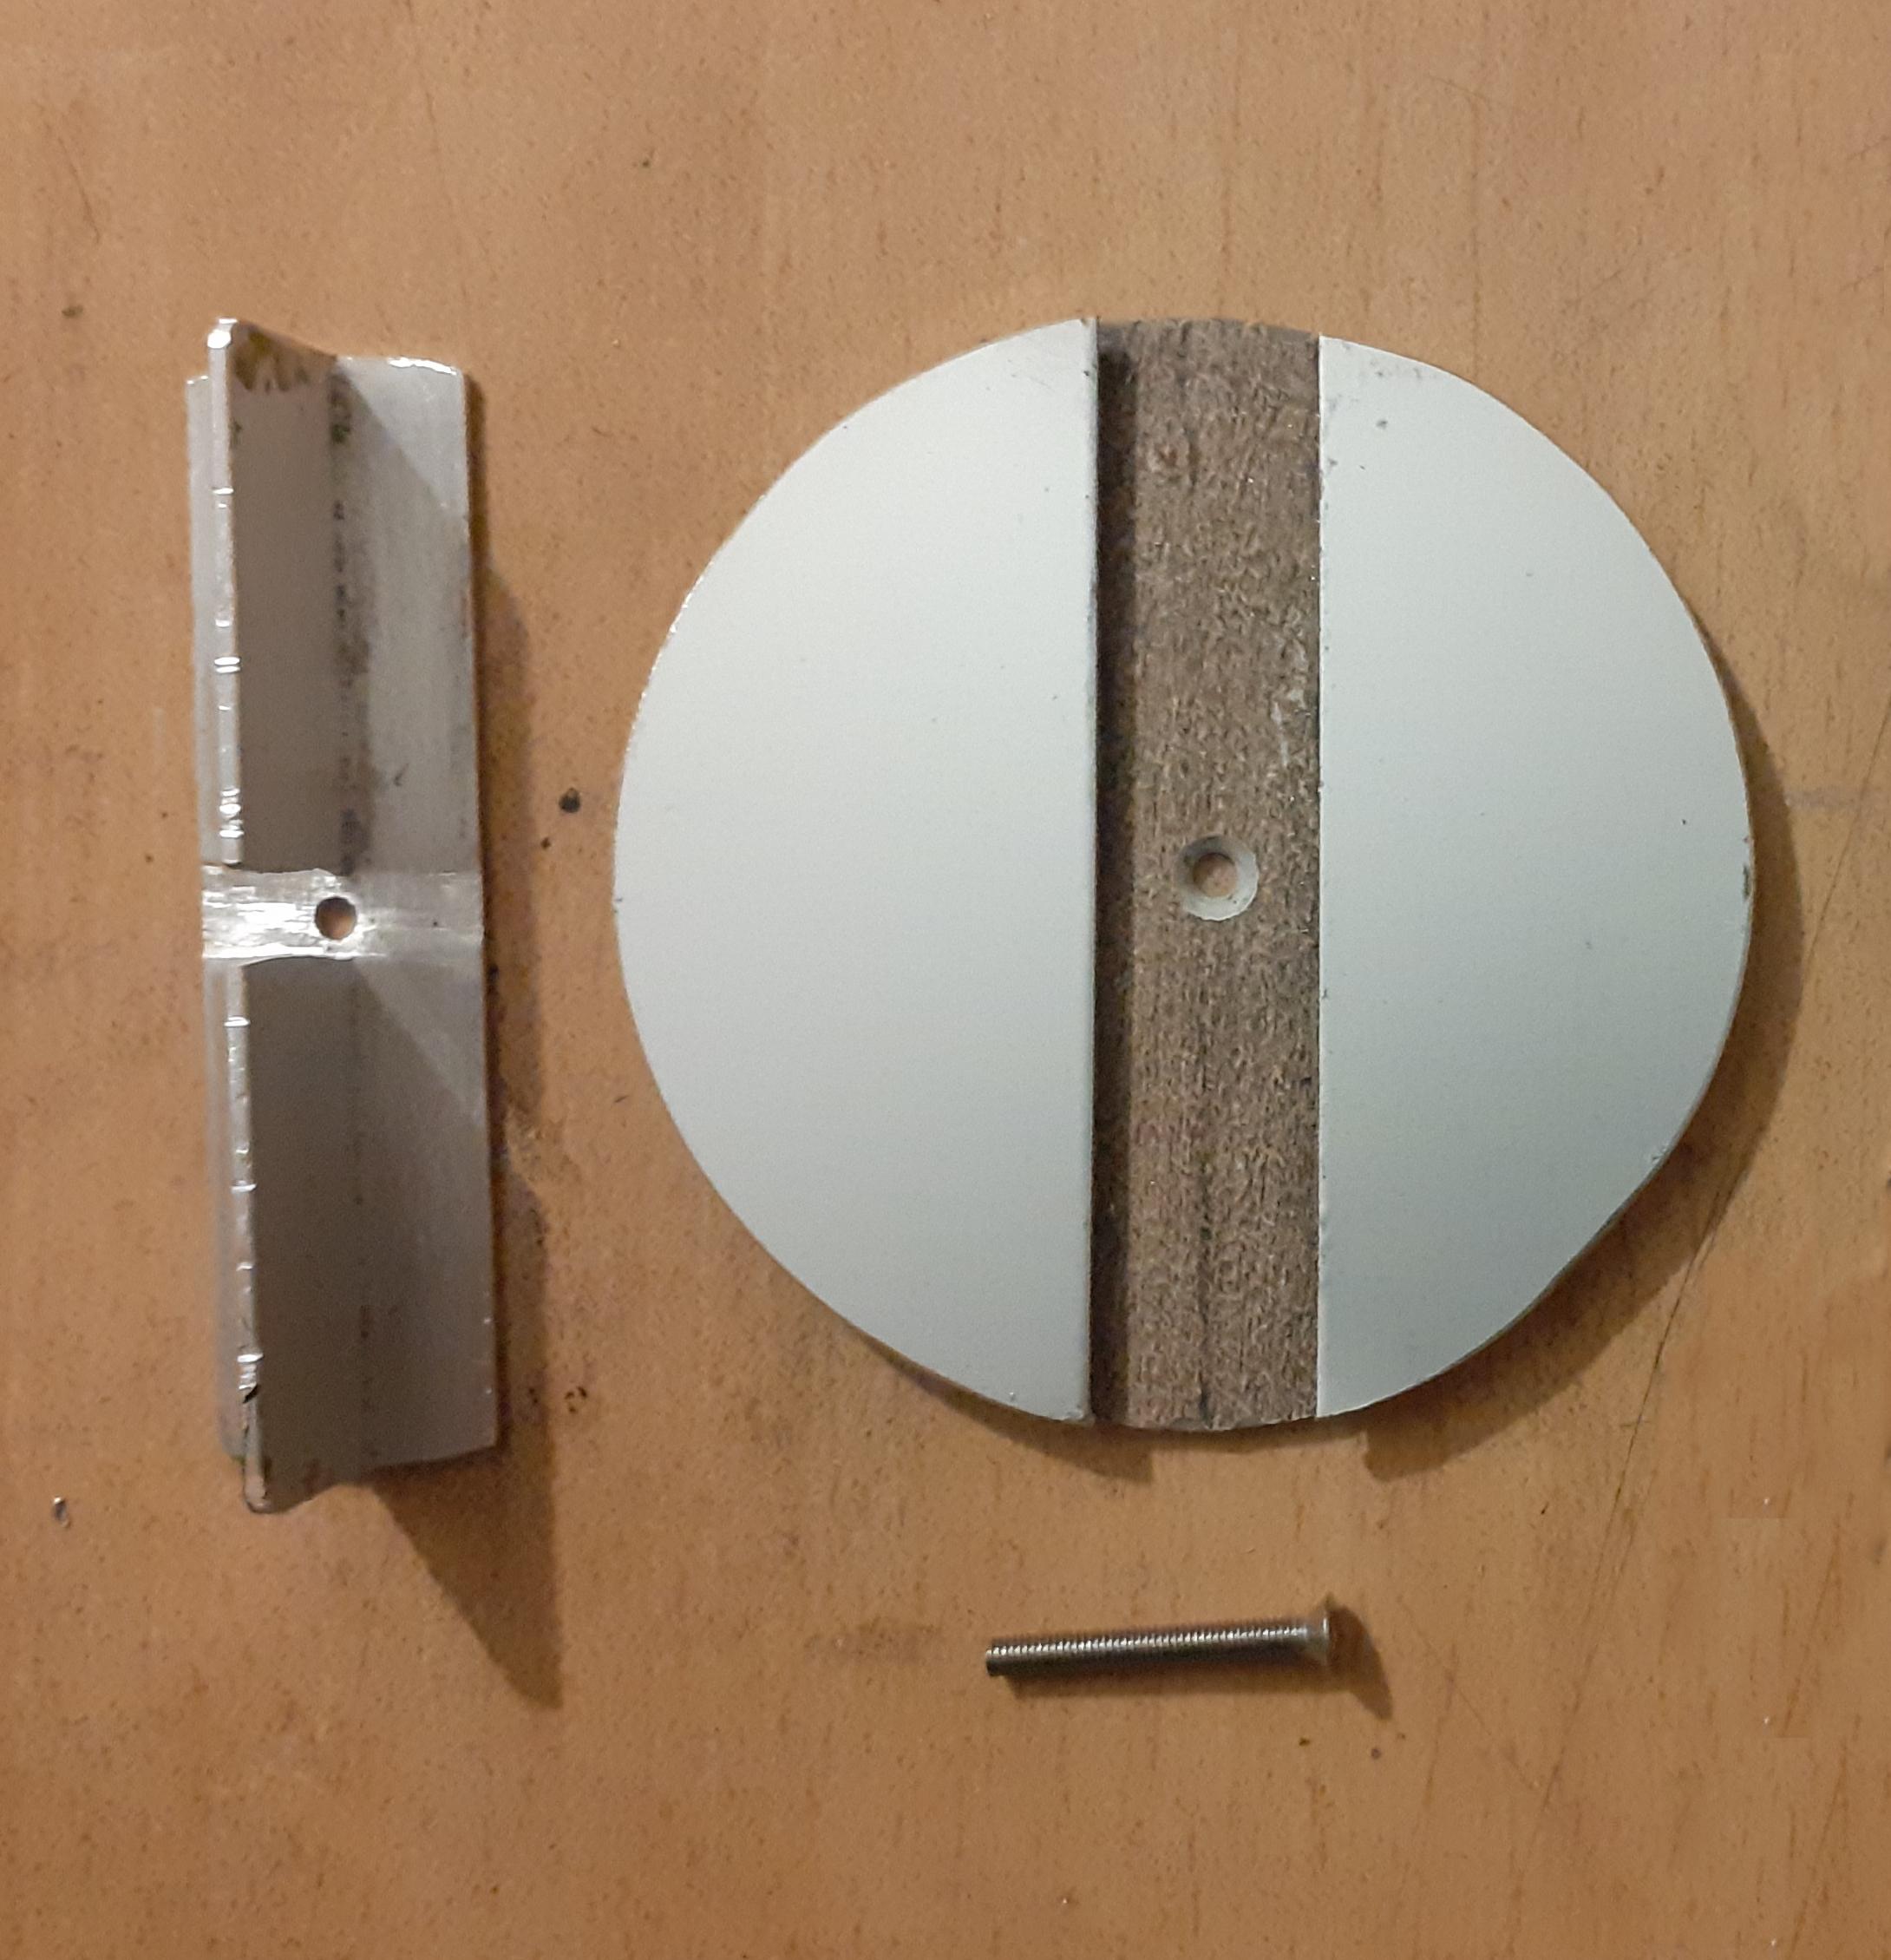
The bridge
The bridge is mounted on a disc (78mm diameter = smaller than the spider's hole) and it "floats" above a foam disc (10mm thick). It is composed of two parts:
- One disc has a countersunk hole that allows the adjustment screw to be screwed into the spacer connected to the speaker's core. This disc is fitted with a mounting of aluminum plates (for lightness) that form a slide for the nut.
- The nut is a 20mm x 20mm T-shaped aluminum profile. It will then be adjusted (filed) to allow the guitar to be played properly (see § "tuning").
Acoustic Connection
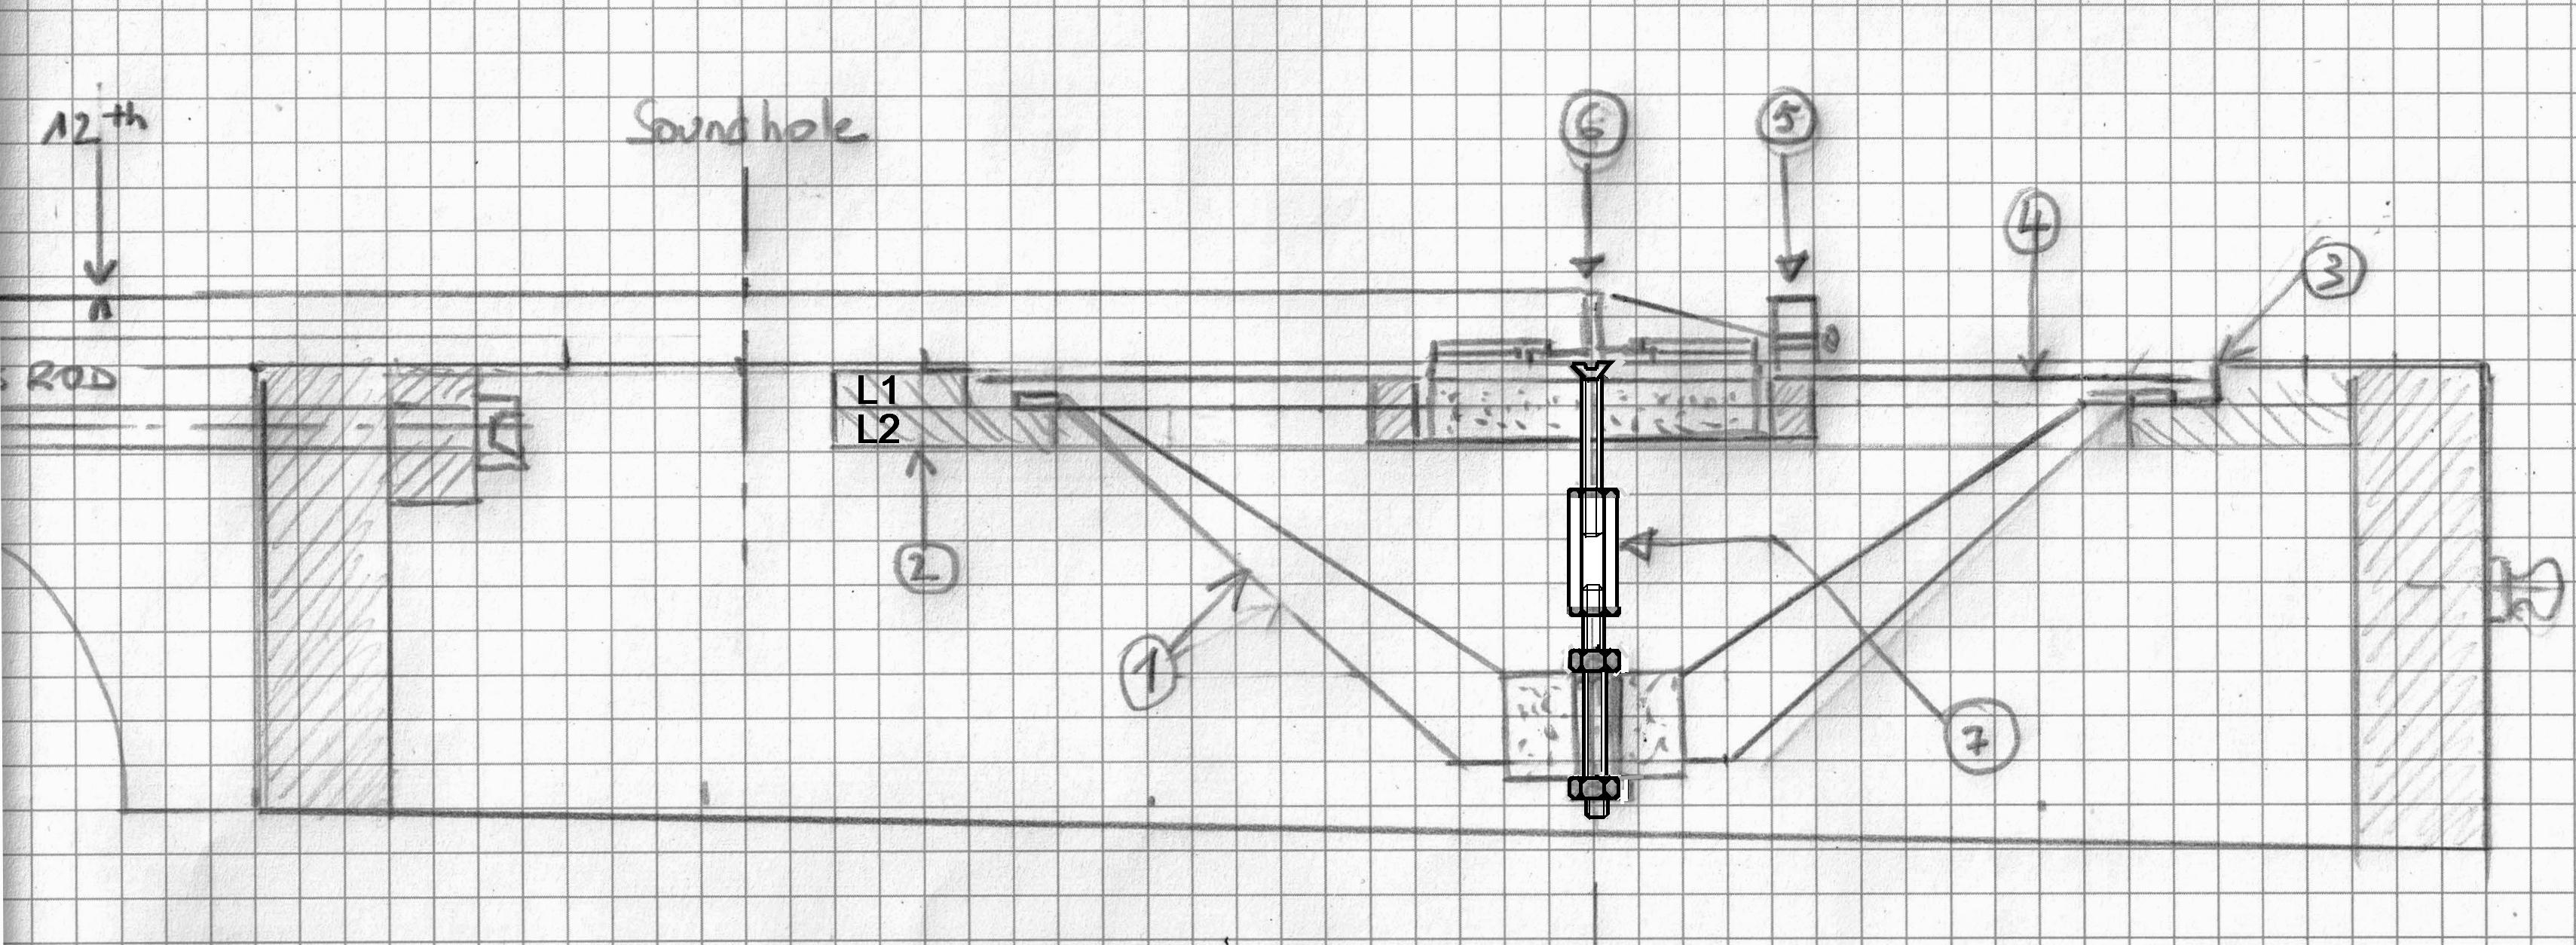
The acoustic connection is made with two parts.
- The first part is an M3 rod with a long M3x20 nut glued with epoxy, screwed into the long nut of the speaker, and secured with two locknuts.
- The second part is simply an M3x30 countersunk screw that comes from the bridge, passes through the foam, through the spider, and into the long nut just below (hence the importance of being very precise with the measurements).
Assemby


The speaker is held in place by 4 screws and washers to the lower part of the acoustic coupling.
The spider is screwed in with 16 brass wood screws (for aesthetics), 4mm in diameter.
Then the foam is placed inside the spider, followed by the bridge.
Then the base of the bridge is screwed in with the M3x30 TF screw to the lower part of the long nut of the acoustic coupling.
Then the bridge is slid into the base of the bridge.
Then the strings are mounted, and the tailpiece is screwed in. I used 10-47 steel strings. They work well. I didn't use a heavier gauge for fear of compressing the foam too much. I'm also worried that the spider plate might warp. For a heavier gauge, perhaps I should make a spider with two plates (instead of one) glued together before drilling them? Or perhaps use a metal plate instead of fiberglass? If anyone tries a heavier gauge string, please let me know how it goes.
And that's it. Now all that's left is to set up the guitar.
Tuning
The neck nut needs to be filed down to leave 0.4mm between each string and the first fret. 0.4mm is about the thickness of a credit card.
The bridge saddle needs to be filed down to leave 2.5mm between each string and the 12th fret. No less, because the strings might rub together while playing (especially the bass strings).
Tests
ttps://youtu.be/2SFNbNSUApc grenleaves on Z8.4
https://youtu.be/FPkryxj3Vig marche du roi Guillaume on Z8.4
Final Thougths
The speaker cone I used is made of paper. I therefore think it's sensitive to humidity. To withstand humidity, it would need to be replaced with a speaker equipped with a plastic diaphragm.
Conclusion
Honestly? I think this guitar is fantastic. And you can't imagine the pleasure I had bringing this innovative concept to fruition. I started with a junk guitar, and now I have a guitar with a powerful sound, excellent bass frequencies, and sustain that rivals a quality guitar.
Assembly has become easy, even straightforward. I think the design of this guitar is perfected, and it could even be mass-produced.
Greetings from France!
Bruno