A RP2040 Standalone Computer Running BASIC (SOUNDBLASTER FAKE FLA, WAV + Editor)
by czwienczek in Circuits > Computers
1013 Views, 5 Favorites, 0 Comments
A RP2040 Standalone Computer Running BASIC (SOUNDBLASTER FAKE FLA, WAV + Editor)

I have always been fascinated by the design of a computer that integrates both Basic and Editor in a single console, and I believe that MMBASIC fulfills this need. Although I long for greater compatibility with QBASIC/GWBASIC, its ability to translate lines of code strategically is satisfactory. However, MMBASIC presents limitations such as not accepting Matrices$ with the symbol $, the absence of the LOCATE function in Print, and the need to change variables V$ to V. Despite these drawbacks, if these limitations are overcome and the necessary corrections are made, a functional and adaptable system for running old programs is obtained. It is clear that, although CHATGPT can assist in some translations, its knowledge of MMBASIC's format and style may be limited. Below are some tricks and comparative translations between MMBASIC and QBASIC/GWBASIC. But first I will show you how I developed the hardware equipment using the Raspberry Pico (Chinese version for €4), I adapted the mechanical keyboard because it was an excellent idea and with it I adapted the PS2 protocol of an Arduino nano with an encoder program to PS2, I used the adapted input of the RaspI (PS2) and everything worked great. The beauty of using the Raspy Pico is that it has two cores and one is in charge of the visual part and the other is in charge of the system.
Supplies


At most the expenses did not reach a maximum of €15 for the price of the entire electronic design... the base was used wooden material from fruit boxes that I found nearby.
KEYBOARD

.jpeg)

.jpeg)

.jpeg)


I obtained a program online (unfortunately, I can't recall the exact source, but I'll leave it below for reference) and modified it to handle special characters such as CTRL and ALT. After acquiring the ASCII representation, my next step was to search for a library capable of translating it into PS2 format, with the ultimate goal of interfacing it with the RASPICO's (MMBASIC) inputs.
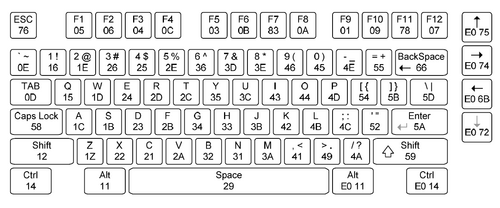
One significant challenge I encountered was understanding that the PS2 protocol operates as a "touch key" system. Consequently, I needed to devise a method for transmitting the appropriate data corresponding to capital letters or determining the location of other symbols like quotation marks. This required careful consideration of which keys to press to generate the desired input. Fortunately, I found invaluable assistance from various online resources, particularly those focusing on PS2 scan codes. (image)
During my research, I found several helpful links that provided insights into navigating the intricacies of PS2 communication and understanding scan codes. These resources were instrumental in guiding me through the process of adapting the program to suit my needs. By familiarizing myself with the PS2 protocol and scan codes, I was able to successfully integrate the modified program with the RASPICO's input system, achieving the desired functionality. Below, I've included the link to the resources that aided me in this endeavor.
https://forum.arduino.cc/t/ps-2-scancodes-and-the-ps2dev-library-confusion/225041
//Modificacion por JoseGCzwienczek
//Se incluye la librería para el manejo del teclado
#include "Adafruit_Keypad.h"
// Configuración del teclado
const byte ROWS = 4; // Número de filas del teclado
const byte COLS = 10; // Número de columnas del teclado
char keys[ROWS][COLS] = { // Definición de los caracteres del teclado
{'1','2','3','4','5','6','7','8','9','0'},
{'q','w','e','r','t','y','u','i','o','p'},
{'a','s','d','f','g','h','j','k','l','!'},
{'*','-','z','x','c','v','b','n','m',','}
};
/*
char keys_shift[ROWS][COLS] = {
{'\'','@',',','$','%','?','!','&','(',')'},
{'Q','W','E','R','T','Y','U','I','O','P'},
{'A','S','D','F','G','H','J','K','L',':'}, // Se utiliza ':' para representar el carácter '!' en mayúscula
{'*','-','Z','X','C','V','B','N','M',' '}
};
*/
byte rowPins[ROWS] = {12, 13, A0, A1}; // Pines conectados a las filas del teclado
byte colPins[COLS] = {2, 3, 4, 5, 6, 7, 8, 9, 10, 11}; // Pines conectados a las columnas del teclado
int send_pin = A2; // Pin usado como botón de envío
int LED = A3; // Pin para el LED indicador
// Estados y variables
unsigned long debounceTime = 0; // Tiempo de debounce para evitar rebotes
const unsigned long debounceDelay = 50; // Tiempo de debounce en milisegundos
bool SHIFT = false; // Estado de la tecla SHIFT
bool send_pin_state = false; // Estado del botón de envío
Adafruit_Keypad customKeypad = Adafruit_Keypad( makeKeymap(keys), rowPins, colPins, ROWS, COLS); // Inicialización del objeto customKeypad
void setup() {
pinMode(send_pin, INPUT_PULLUP); // Configuración del pin de envío como entrada con resistencia de pull-up
Serial.begin(9600); // Inicialización de la comunicación serial
customKeypad.begin(); // Inicialización del teclado
pinMode(LED, OUTPUT); // Configuración del pin del LED como salida
digitalWrite(LED, SHIFT); // Establecer el estado inicial del LED
}
void loop() {
handleSendButton(); // Función para manejar el botón de envío
handleKeypad(); // Función para manejar el teclado
delay(1); // Pequeña pausa entre cada iteración del bucle principal
}
// Manejar el botón de envío
void handleSendButton() {
if (!digitalRead(send_pin) && !send_pin_state) {
Serial.print("{"); // Si el botón de envío está presionado y no estaba previamente presionado, se envía un carácter
send_pin_state = true; // Se actualiza el estado del botón de envío
}
if (digitalRead(send_pin) && send_pin_state) {
send_pin_state = false; // Si el botón de envío estaba presionado y ahora está suelto, se actualiza su estado
}
}
/ Manejar el teclado
void handleKeypad() {
customKeypad.tick(); // Actualización del estado del teclado
while (customKeypad.available()) { // Verificación de si hay teclas presionadas
keypadEvent e = customKeypad.read(); // Lectura del evento del teclado
// Si se detecta una tecla presionada y ha pasado el tiempo de debounce
if (e.bit.EVENT == KEY_JUST_PRESSED && millis() - debounceTime > debounceDelay) {
debounceTime = millis(); // Actualización del tiempo de debounce
handleKeyPressed((char)e.bit.KEY); // Manejo de la tecla presionada
}
}
}
// Manejar la tecla presionada
void handleKeyPressed(char key) {
if (key == '*') {
SHIFT = !SHIFT; // Cambio de estado de la tecla SHIFT
digitalWrite(LED, SHIFT); // Actualización del estado del LED según la tecla SHIFT
} else {
if (SHIFT) {
sendSpecialCharacter(key); // Envío de caracteres especiales si la tecla SHIFT está activada
SHIFT = false; // Se desactiva la tecla SHIFT después de enviar el carácter especial
} else {
sendNormalCharacter(key); // Envío de caracteres normales si la tecla SHIFT no está activada
}
}
}
// Enviar caracteres especiales
void sendSpecialCharacter(char key) {
// Switch-case para determinar qué carácter especial enviar según la tecla presionada
switch (key) {
case '1': Serial.print("'"); break;
case '2': Serial.print("@"); break;
case '3': Serial.print(","); break;
case '4': Serial.print("$"); break;
case '5': Serial.print("%"); break;
case '6': Serial.print("?"); break;
case '7': Serial.print("!"); break;
case '8': Serial.print("&"); break;
case '9': Serial.print("("); break;
case '0': Serial.print(")"); break;
case 'q': Serial.print("Q"); break;
case 'w': Serial.print("W"); break;
case 'e': Serial.print("E"); break;
case 'r': Serial.print("R"); break;
case 't': Serial.print("T"); break;
case 'y': Serial.print("Y"); break;
case 'u': Serial.print("U"); break;
case 'i': Serial.print("I"); break;
case 'o': Serial.print("O"); break;
case 'p': Serial.print("P"); break;
case 'a': Serial.print("A"); break;
case 's': Serial.print("S"); break;
case 'd': Serial.print("D"); break;
case 'f': Serial.print("F"); break;
case 'g': Serial.print("G"); break;
case 'h': Serial.print("H"); break;
case 'j': Serial.print("J"); break;
case 'k': Serial.print("K"); break;
case 'l': Serial.print("L"); break;
case 'z': Serial.print("Z"); break;
case 'x': Serial.print("X"); break;
case 'c': Serial.print("C"); break;
case 'v': Serial.print("V"); break;
case 'b': Serial.print("B"); break;
case 'n': Serial.print("N"); break;
case 'm': Serial.print("M"); break;
case ',': Serial.print(" "); break; // espacio
case '!': Serial.print("^"); break; // retorno
case '-': Serial.print("}"); break; // OK
default: Serial.print(key); break;
}
}
// Enviar caracteres normales
void sendNormalCharacter(char key) {
// Switch-case para determinar qué carácter normal enviar según la tecla presionada
switch (key) {
case ',': Serial.print(" "); break; // Enviar espacio si se presiona la tecla de coma ","
case '!': Serial.print("^"); break; // Enviar "^" si se presiona la tecla de exclamación "!"
case '-': Serial.print("}"); break;
default: Serial.print(key); break;
}
}
MMBASIC OVER RASPI PICO
.jpeg)
.jpeg)

I leave below the link that helped me carry out the part of the MMBASIC system using the Raspi pico.
https://geoffg.net/picomitevga.html
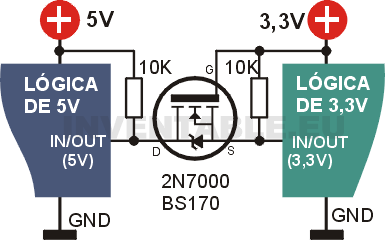
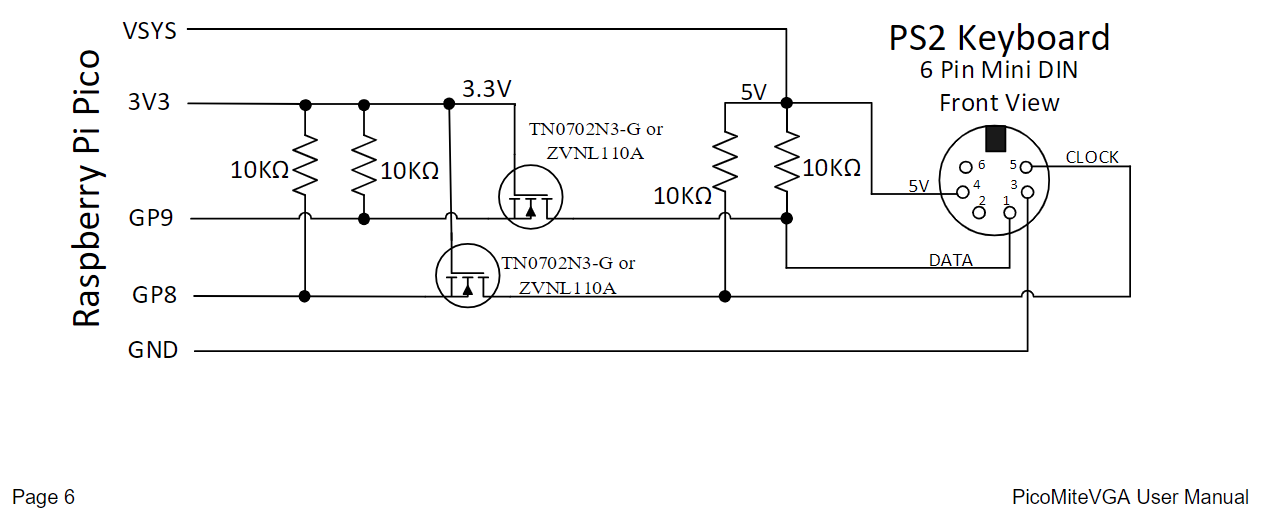
You will get the very specific manual with all the observations and assembly diagram. I'll give you a tip, try to build everything step by step and confirm that things work for you... An important note, you need a voltage converter from the Rasp pico to the Arduino_PS2 keyboard, the voltages are different.
Level Adapters Between 5V and 3.3V


I leave a voltage adapter that I use between the PS2 port of the MMBASIC/PICO and the Arduino Keyboard.
Likewise, I include the diagram taken from the manual: PicoMiteVGA_User_Manual.pdf (https://geoffg.net/picomitevga.html) my thanks and permission for mentioning the use of the document.
MMBASIC -->RASPI PICO

Loading the PicoMiteVGA firmware may erase the flash memory including the current program and other
areas of flash memory. So make sure that you backup any programs and data before you upgrade the firmware.
It is possible for the flash memory to be corrupted resulting in unusual and unpredictable behaviour. In that
case you should load the firmware file https://geoffg.net/Downloads/picomite/Clear_Flash.uf2 which will reset
the Raspberry Pi Pico to its factory fresh state, then you can reload the PicoMiteVGA firmware.
https://geoffg.net/picomitevga.html
Hardware MMBASIC

.jpeg)
I also include the introduction of the advantages of using the MMBASIC with the indicated hardware:
The PicoMiteVGA is a Raspberry Pi Pico running a full featured
BASIC interpreter with support for a VGA monitor and a PS2
keyboard for the console input/output.
This turns the Raspberry Pi Pico into a low-cost self-contained
desktop computer, similar to the “Boot Into BASIC” computers of
the 1980s such as the Commodore 64, Apple II and Tandy TRS-80.
You can have fun writing programs to balance your check book,
entertain/teach children about computing, play simple computer
games and calculate the positions of the planets (to name a few
activities).
The firmware to do all of this is totally free to download and use.
In summary the features of the PicoMiteVGA are:
-The VGA output is 640 x 480 pixels in monochrome mode or 320 x 240 pixels in colour mode with 16
colours (1 bit for red, 2 bits for green and 1 bit for blue). The VGA output is generated using the second
CPU on the RP2040 processor in the Raspberry Pi Pico plus one PIO channel so it does not affect the
BASIC interpreter which runs at full speed on the first CPU.
-The PS2 keyboard works as a normal keyboard with the function keys and arrow keys fully operational.
It can be configured for the standard US layout used in the USA, Australia and New Zealand or specialised
layouts used in the United Kingdom, Germany, France and Spain.
-The BASIC interpreter is full featured with floating point, 64-bit integers and string variables, long
variable names, arrays of floats, integers or strings with multiple dimensions, extensive string handling
and user defined subroutines and functions. Typically, it will execute a program up to 100,000 lines per
second. MMBasic allows the embedding of compiled C programs for high performance functions and
the running program can be protected from being listed or modified by a PIN number.
-Flexible program and data storage. Programs and data can be read/written from an internal file system or
to an externally connected SD Card up to 32GB formatted as FAT16 or FAT32. This includes opening files
for reading, writing or random access and loading and saving programs. The SD Card can also be
read/written on personal computers running Windows, Linux or the Mac operating system.
-USB interface to a Windows/Mac/Linux computer provides an additional console interface. Programs
can be easily transferred from a desktop or laptop computer (Windows, Mac or Linux) using the
XModem protocol or by streaming the program over USB.
-Full graphics support allowing the BASIC program to display text and draw lines, circles, boxes, etc in
up to 16 colours. Eight fonts are built in and additional fonts can be embedded in the BASIC program.
-A full screen editor is built into the PicoMiteVGA and can edit the whole program in one session. It
includes advanced features such as colour coded syntax, search and copy, cut and paste to and from a
clipboard.
-Support for all Raspberry Pi Pico input/output pins. These can be independently configured as
digital input or output, analog input, frequency or period measurement and counting. Within MMBasic
the I/O pins can be dynamically configured as inputs or outputs. MMBasic commands will generate
pulses and can be used to transfer data in parallel. Interrupts can be used to notify when an input pin has
changed state. PWM outputs can be used to create various sounds, control servos or generate computer
controlled voltages for driving equipment that uses an analogue input (e.g. motor controllers).
-The PicoMiteVGA has built in commands to directly interface with infrared remote controls, the
DS18B20 temperature sensor, LCD display modules, battery backed clock, numeric keypads and more.
-A comprehensive range of communications protocols are implemented including I2C, asynchronous
serial, RS232, SPI and 1-Wire. These can be used to communicate with many sensors (temperature,
humidity, acceleration, etc) as well as for sending data to test equipment.
-Power requirement is 5 volts at approx 50 mA.
Complete System
.jpeg)


To develop the entire system, I decided to use the sizes and thought about making something similar to a Spectrum or Galaxy computer and I wanted the power to be included.
Editor

To enter a program, you can use the EDIT command which is described later in this manual. However, for the
moment, all that you need to know is that anything that you type will be inserted at the cursor, the arrow keys
will move the cursor and backspace will delete the character before the cursor.
To get a quick feel for how the PicoMiteVGA works, try this sequence:
-At the command prompt type EDIT followed by the ENTER key.
-The editor should start up and you can enter this line: PRINT "Hello World"
-Press the F1 key on the keyboard. This tells the editor to save your program and exit to the command
prompt.
-At the command prompt type RUN followed by the ENTER key.
-You should see the message: Hello World
Colour Coded Editor Display
The editor can colour code the edited program with keywords, numbers and comments displayed in different
colours. This feature can be turned on or off with the command:
OPTION COLOURCODE ON or OPTION COLOURCODE OFF
The colour coding will apply to both the USB serial console (with an appropriate terminal emulator such as
Tera Term) and the VGA display.
This setting is saved in non-volatile memory and automatically applied on start-up.
First Tests
I have included: sound with the filter indicated in the manual but with a 5W amplifier, a DH11 temperature and humidity sensor and an RTC for updating the clock and everything works perfectly!
Enjoy


I believe that teaching children about these ancient technologies gives them great experiences (as happened to me) and fills them with interesting, powerful ideas with great potential for them to adapt in their daily lives.
MMBASIC Emuler (WINTOS)
MMBasic was originally developed for the Maximite. A small self contained computer that emulated the early personal computers of the 80s like the Tandy TRS-80 and Commodore 64. It was later to form the core of the Micromite series of chips that are embedded controllers running the MMBasic interpreter.
It is an interpreted language. It allows you to type in your program and test it immediately, in fact you can test most elements of the language by just typing them in at the prompt and seeing the result. It is fully self contained, there is no compiler, operating system or host computer... you just enter your program and run it.
Over time MMBasic has evolved into a productive language with an emphasis on ease of use. The tradeoff is speed - it is not as fast as a compiled language but with modern high speed 32-bit microcontrollers it is plenty fast for most uses.
MMBasic is written in ANSI C. It requires a 32 bit microcontroller and uses about 94KB of program space (flash memory) and as little as 16KB RAM. It was originally written for the Microchip PIC32 series of microcontrollers but has been ported to the ARM STM32 and Windows/DOS.
https://mmbasic.com/versions.html
Links and Forum
MMBASIC Home Page - http://mmbasic.com
MBASIC Overview - http://mmbasic.com/overview.html
The Back Shed - Raspberry Pi development and downloads
http://www.thebackshed.com/forum/forum_ ... PN=1&TPN=1
http://www.thebackshed.com/forum/forum_ ... p?TID=9487
http://www.thebackshed.com/forum/forum_ ... ?TID=10164
Astronomy, Aeronautics and Other MMBASIC Computer Programs
To Infinity and Beyond
Before, some TRS-80 Basic PDF links worked, with astronomy programs, games in general, a small database among billions of applications.
https://doc.lagout.org/science/0_Computer%20Science/0_Computer%20History/Byte-Magazine/
https://doc.lagout.org/science/0_Computer%20Science/0_Computer%20History/old-hardware/TRS-80/
Connection
This is a guide to my work done approximately in my free time (approximately 1 year very calmly)... If you require any support or give you any more ideas: czwienczek@gmail.com