Make a Cutting Board With Fusion 360 for Absolute Beginners
by philandmarimanning in Workshop > CNC
1337 Views, 8 Favorites, 0 Comments
Make a Cutting Board With Fusion 360 for Absolute Beginners
![cutting board photo.jpg](/proxy/?url=https://content.instructables.com/F91/SGNW/LN1RB4CR/F91SGNWLN1RB4CR.jpg&filename=cutting board photo.jpg)
Learn to draw and machine with Fusion 360 for those with little or no experience with 3D drawing software.
Supplies
![cnc.jpg](/proxy/?url=https://content.instructables.com/FBS/TEOB/LN36RI4T/FBSTEOBLN36RI4T.jpg&filename=cnc.jpg)
Wood, glue and clamps for fabricating your cutting board
Thickness planer
Fusion 360 CAD software
A CNC machine
Prepare Your Wood
![clamping.jpg](/proxy/?url=https://content.instructables.com/FWR/I3N3/LN36RI4S/FWRI3N3LN36RI4S.jpg&filename=clamping.jpg)
Prepare a face and side of your wood on a jointer. Use a table saw to cut your strips from the available wood. Check that the surfaces to be glued are very precise so that you can't see light through the joint when looking toward a light or window. Glue the pieces together and clamp them tightly with pipe clamps. Place 2 clamps on the bottom and one on the top to even out the strain and keep the boards even for gluing. Make sure the pieces fit snugly down on the bottom pipe clamps to keep them square and even. Let the glue dry for a day and remove from the clamps. Plane the glued board to 3/4 inch thickness. The dimensions of this cutting board are 8 inches by 11 inches. Leave extra length for clamping on the CNC machine.
Set Up Your Environment in Fusion 360
![step 1 2.png](/proxy/?url=https://content.instructables.com/FTG/E4WT/LN1RB5RM/FTGE4WTLN1RB5RM.png&filename=step 1 2.png)
![3 4.png](/proxy/?url=https://content.instructables.com/FB9/UU3Z/LN1RB5RC/FB9UU3ZLN1RB5RC.png&filename=3 4.png)
![5 6.png](/proxy/?url=https://content.instructables.com/FXP/8W6A/LN1RB65N/FXP8W6ALN1RB65N.png&filename=5 6.png)
Setup your environment in Fusion 360.
Start Drawing
![7 11 start your drawing.png](/proxy/?url=https://content.instructables.com/FZG/413E/LN1RB65O/FZG413ELN1RB65O.png&filename=7 11 start your drawing.png)
![12 17 draw.png](/proxy/?url=https://content.instructables.com/F2W/LFXX/LN1RB65P/F2WLFXXLN1RB65P.png&filename=12 17 draw.png)
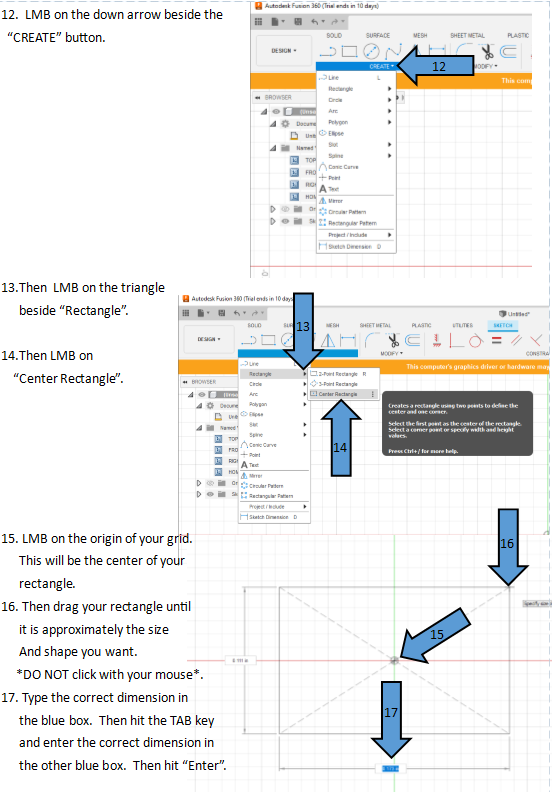
Draw a sketch of the perimeter of the cutting board.
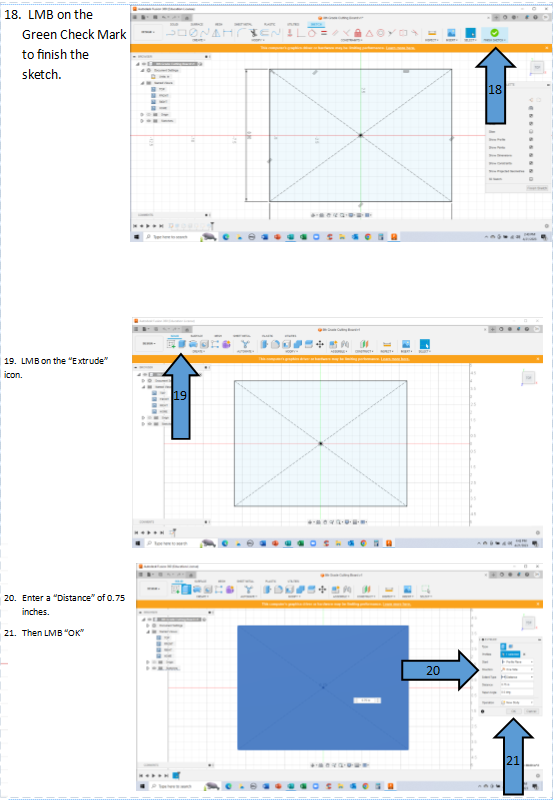
Extrude Your Sketch to Make a 3D Body
![18 21 make 3D.png](/proxy/?url=https://content.instructables.com/FE8/UNAG/LN1RB65Q/FE8UNAGLN1RB65Q.png&filename=18 21 make 3D.png)
![22 25 filet the corners.png](/proxy/?url=https://content.instructables.com/FL7/2JK9/LN1RB65R/FL72JK9LN1RB65R.png&filename=22 25 filet the corners.png)
Bore a Hole for the Handle
![26 34 bore hole.png](/proxy/?url=https://content.instructables.com/FWB/D7BK/LN1RB65S/FWBD7BKLN1RB65S.png&filename=26 34 bore hole.png)
![35 40 bore hole 2.png](/proxy/?url=https://content.instructables.com/F53/U4U4/LN1RB65T/F53U4U4LN1RB65T.png&filename=35 40 bore hole 2.png)
Draw a Slot Around the Edge to Capture Drippings
![41 46 start to make the groove around the cutting board.png](/proxy/?url=https://content.instructables.com/FHH/THWC/LN1RB65W/FHHTHWCLN1RB65W.png&filename=41 46 start to make the groove around the cutting board.png)
![46 65 groove c.png](/proxy/?url=https://content.instructables.com/F3T/4TYI/LN1RB666/F3T4TYILN1RB666.png&filename=46 65 groove c.png)
![47 55 groove b.png](/proxy/?url=https://content.instructables.com/FMA/MQVN/LN1RB669/FMAMQVNLN1RB669.png&filename=47 55 groove b.png)
![64 72 groove d.png](/proxy/?url=https://content.instructables.com/FH3/9VTW/LN1RB66A/FH39VTWLN1RB66A.png&filename=64 72 groove d.png)
If you are not able to select the edge of your board go back to a previous sketch and edit it. When you are not in sketch mode click on the edge it will likely highlight or underline the sketch that you need to edit.
Add Text
![add text to your cutting board.png](/proxy/?url=https://content.instructables.com/FZN/33Y7/LN1RB7MN/FZN33Y7LN1RB7MN.png&filename=add text to your cutting board.png)
Cosmetic - Make It Look Like Wood
![73 75 cosmetics wood selection.png](/proxy/?url=https://content.instructables.com/FLL/GOK2/LN1RB66B/FLLGOK2LN1RB66B.png&filename=73 75 cosmetics wood selection.png)
Notes: When Things Go Wrong
Notes: If you are not able to select a line or text or sketch feature you are not in the correct sketch that you did those features in originally. For example if I want to edit the text I must know which sketch I modified that in. If you click on the feature it will normally highlight the sketch in the browser where that was done. Right click on that sketch and select EDIT. Now you will have access to the menus to modify that sketch. If you are not able to edit the desired feature select another sketch to edit and try selecting the line, circle, text….It will highlight if you are in the right sketch.
The Manufacturing Process
![manufacture 1.png](/proxy/?url=https://content.instructables.com/F1M/LVD2/LN36RJMV/F1MLVD2LN36RJMV.png&filename=manufacture 1.png)
![m2.png](/proxy/?url=https://content.instructables.com/FGF/4TZC/LN36RJMS/FGF4TZCLN36RJMS.png&filename=m2.png)
![m3.png](/proxy/?url=https://content.instructables.com/FD4/IH4K/LN36RJMT/FD4IH4KLN36RJMT.png&filename=m3.png)
![m4.png](/proxy/?url=https://content.instructables.com/FJQ/TBLH/LN36RJMU/FJQTBLHLN36RJMU.png&filename=m4.png)
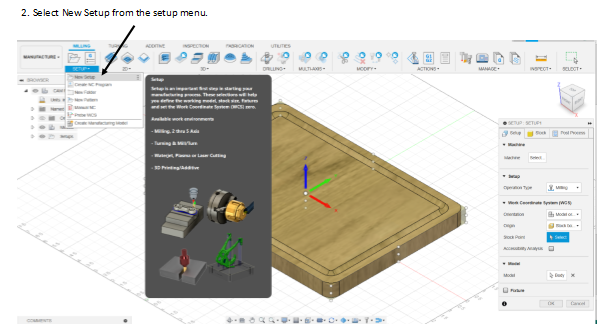
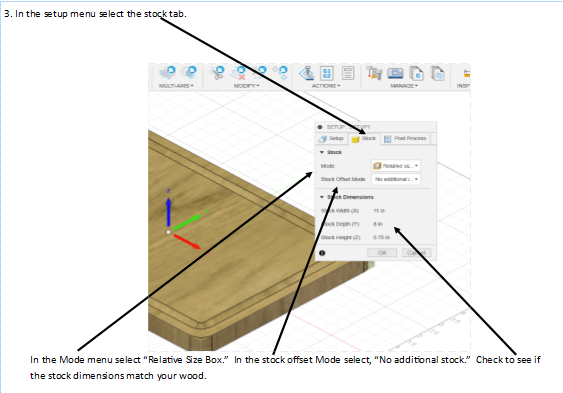
Start a "New Setup" and verify the configuration.
The Engrave Operation - Cut the Groove
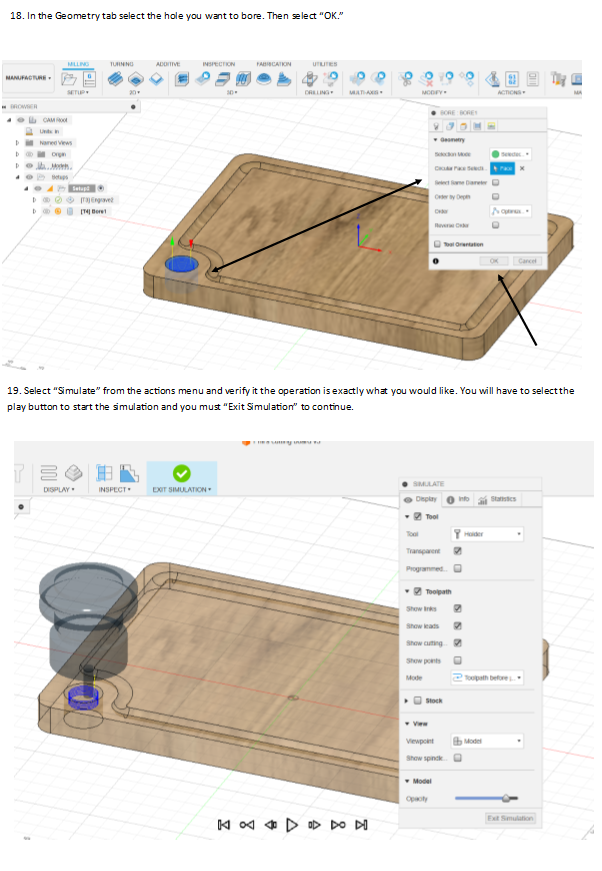
![Engrave operation 5 11.png](/proxy/?url=https://content.instructables.com/FF6/O3SM/LN1RBCGX/FF6O3SMLN1RBCGX.png&filename=Engrave operation 5 11.png)
![engrave groove.png](/proxy/?url=https://content.instructables.com/F68/PXZI/LN1RBCGW/F68PXZILN1RBCGW.png&filename=engrave groove.png)
![13 simulate groove a.png](/proxy/?url=https://content.instructables.com/FGN/3TY0/LN1RBCAY/FGN3TY0LN1RBCAY.png&filename=13 simulate groove a.png)
![simulate groove 2.png](/proxy/?url=https://content.instructables.com/FMA/7F89/LN1RBCHX/FMA7F89LN1RBCHX.png&filename=simulate groove 2.png)
Bore the Hole
![15 bore a.png](/proxy/?url=https://content.instructables.com/FYC/QSB4/LN36RKMH/FYCQSB4LN36RKMH.png&filename=15 bore a.png)
![bore 2.png](/proxy/?url=https://content.instructables.com/FQ5/Q04V/LN1RBCEX/FQ5Q04VLN1RBCEX.png&filename=bore 2.png)
![bore 3.png](/proxy/?url=https://content.instructables.com/FLS/EHMF/LN1RBCFW/FLSEHMFLN1RBCFW.png&filename=bore 3.png)
Contour Operation - Cut Out the Cutting Board
![20 21 contour a.png](/proxy/?url=https://content.instructables.com/FWY/GIQL/LN1RBCB0/FWYGIQLLN1RBCB0.png&filename=20 21 contour a.png)
![22 23 added engrave text.png](/proxy/?url=https://content.instructables.com/FAZ/UMCA/LN1RBCBZ/FAZUMCALN1RBCBZ.png&filename=22 23 added engrave text.png)
Post Process Your Operations and Transfer Them to Your CNC Machine
![24 27 post process a.png](/proxy/?url=https://content.instructables.com/FU7/1UFC/LN1RBCDX/FU71UFCLN1RBCDX.png&filename=24 27 post process a.png)
![28 transfer to cnc machine and edit notes.png](/proxy/?url=https://content.instructables.com/FXT/MH1G/LN1RBCDY/FXTMH1GLN1RBCDY.png&filename=28 transfer to cnc machine and edit notes.png)
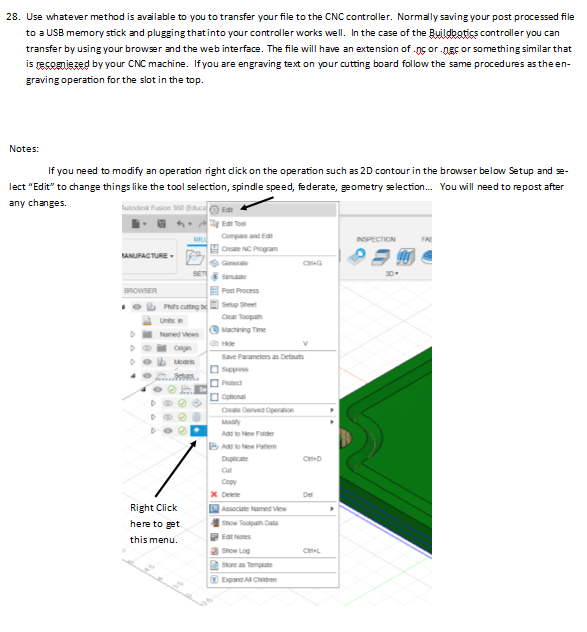
Notes- Error Messages
![error message.png](/proxy/?url=https://content.instructables.com/F7V/WWL0/LN1RBCHW/F7VWWL0LN1RBCHW.png&filename=error message.png)
Enjoy Your Cutting Board
Enjoy your cutting board and pat yourself on the back for accomplishing a hard task. You're on your way to building more amazing projects now that you have experimented with these basic drawing and machining skills. Place your ideas for improvement in the comments below.