Make a Leatherbound Book With Wood Accents From Scratch
by djfillmore in Craft > Books & Journals
988 Views, 23 Favorites, 0 Comments
Make a Leatherbound Book With Wood Accents From Scratch


I remember seeing old books in old homes and thinking about how incredible they looked. The workmanship was amazing, and I told my wife that books used to be be much cooler than they are today. She replied that they were probably similar to the books we have now, but that the owner likely paid to have them professionally bound in leather. After a little research, I found she was absolutely right. I went down the rabbit hole of bookbinding and decided I would attempt to create a hardcover for a book. Then I went a little further and thought it would be fun to make the whole book from scratch, and here we are. The idea to use wood came from my love of musical instruments, and I had veneer leftover from a ukulele I had built that was just the right thickness for this project.
Supplies
Most of these tools and materials can be found from either Hobby Lobby or Amazon if you don't already have them somewhere in the house.
Tools:
- Cutting Mat
- Utility Knife - make sure you have sharp blades to cut through the leather and chipboard
- Scissors
- Clamps
- Steel Ruler
- Stiff Paint Brush
- Paint brush for glue
- Sewing Needles
- Pliers
- Leather Stamp Set - Optional
- Hot Plate - Optional
- Sanding Block (erasers work great for this)
Materials:
- Acid-Free Paper
- Marbled Paper
- Leather - I used 1.2mm pig leather that had been dyed a navy blue.
- Wood Veneer - The wood I used is figured cherry from veneersupplies.com (not sponsored, just a great source!)
- PVA Glue
- Spool of Thread
- Twine
- 80pt Chipboard
- Cardboard Tube (I used one from a roll of aluminum foil)
- Leather Lace - suede works well for this.
- Headband material - Amazon sells inexpensive multi packs
- Thin fabric (I used cotton offcuts from Hobby Lobby)
- Acrylic Paint - I chose a light and a dark blue
- Wax Paper
- Heat Transfer Foil - Optional
- Sand Paper (150 and 220 grit)
Check Grain Direction


The manufacturing process used to make paper tends to make the fibers align in one direction. The exception to this is some handmade papers, but it is generally a good idea to check just to be safe. It is important that the grain direction for all components of the book (text block papers, endpapers, and chipboard) are all aligned with the spine of the book. Doing so will help prevent damage due to movement of the components with humidity changes.
You can check grain direction by holding the paper in your hand and gently folding it in half, but without creating a crease. Open the paper back up, rotate it 90 degrees, and repeat. The paper will fold easier and tighter when the fold runs parallel to the grain direction.
Most commercially made paper has grain that aligns with the long side of the paper, also called "grain long". You can find grain short paper at specialty bookbinding suppliers like www.talasonline.com, or you can create your own grain short paper by cutting it from oversized grain long paper and rotating it to the proper orientation.
Trim Paper to Size


Once you have selected the paper you want to use, it is time to trim it in a way that ensures proper grain direction. I used paper from a sketch book that had pages measuring 17in x 14in (43.18cm x 35.56cm). After confirming that the grain was aligned with the long side of the paper, I folded each sheet lengthwise (hot dog) and then cut the paper in half perpendicular to the fold. This gave me two sheets for my book from each sheet of paper from the sketchbook.
Fold and Assemble the Signatures


A signature is a term in bookbinding that refers to a stack of nested, folded papers. Signatures typically have between four and eight sheets. I chose to use six sheets in my signatures because I felt it worked well with the weight of the paper. You can multiply the number of sheets in a signature by four to find the total number of pages in that signature.
Once all of your signature are assembled, stack them up and make sure everything is aligned for the next step.
Prep the Signatures for Stitching


There are many different stitching patterns that can be used in bookbinding, including coptic stich, kettle stich, and intricate stiches that create patterns on the spin of the book. For this book I used a french link stitch because it is relatively simple and has a clean look to it.
I find it useful to use a scrap piece of paper and a ruler to layout where the holes for the thread will go on the signatures. Once you have decided on a design, transfer it to the folded portion of the pages. Next, unfold each signature and use a heavy gauge needle or an awl to punch holes in the proper locations. Make sure that the holes are consistent when the signatures are aligned.
Sew the Signatures


Before we start sewing, measure the length of the folded signature. You will need a length of thread that is a little over double the total length of all of your signatures combined. It is a good idea to add a little extra thread in case you go too fast, the thread gets tangled, and you have to cut and then reattach the thread to continue the stitch (yes, this absolutely happened to me during this process...twice).
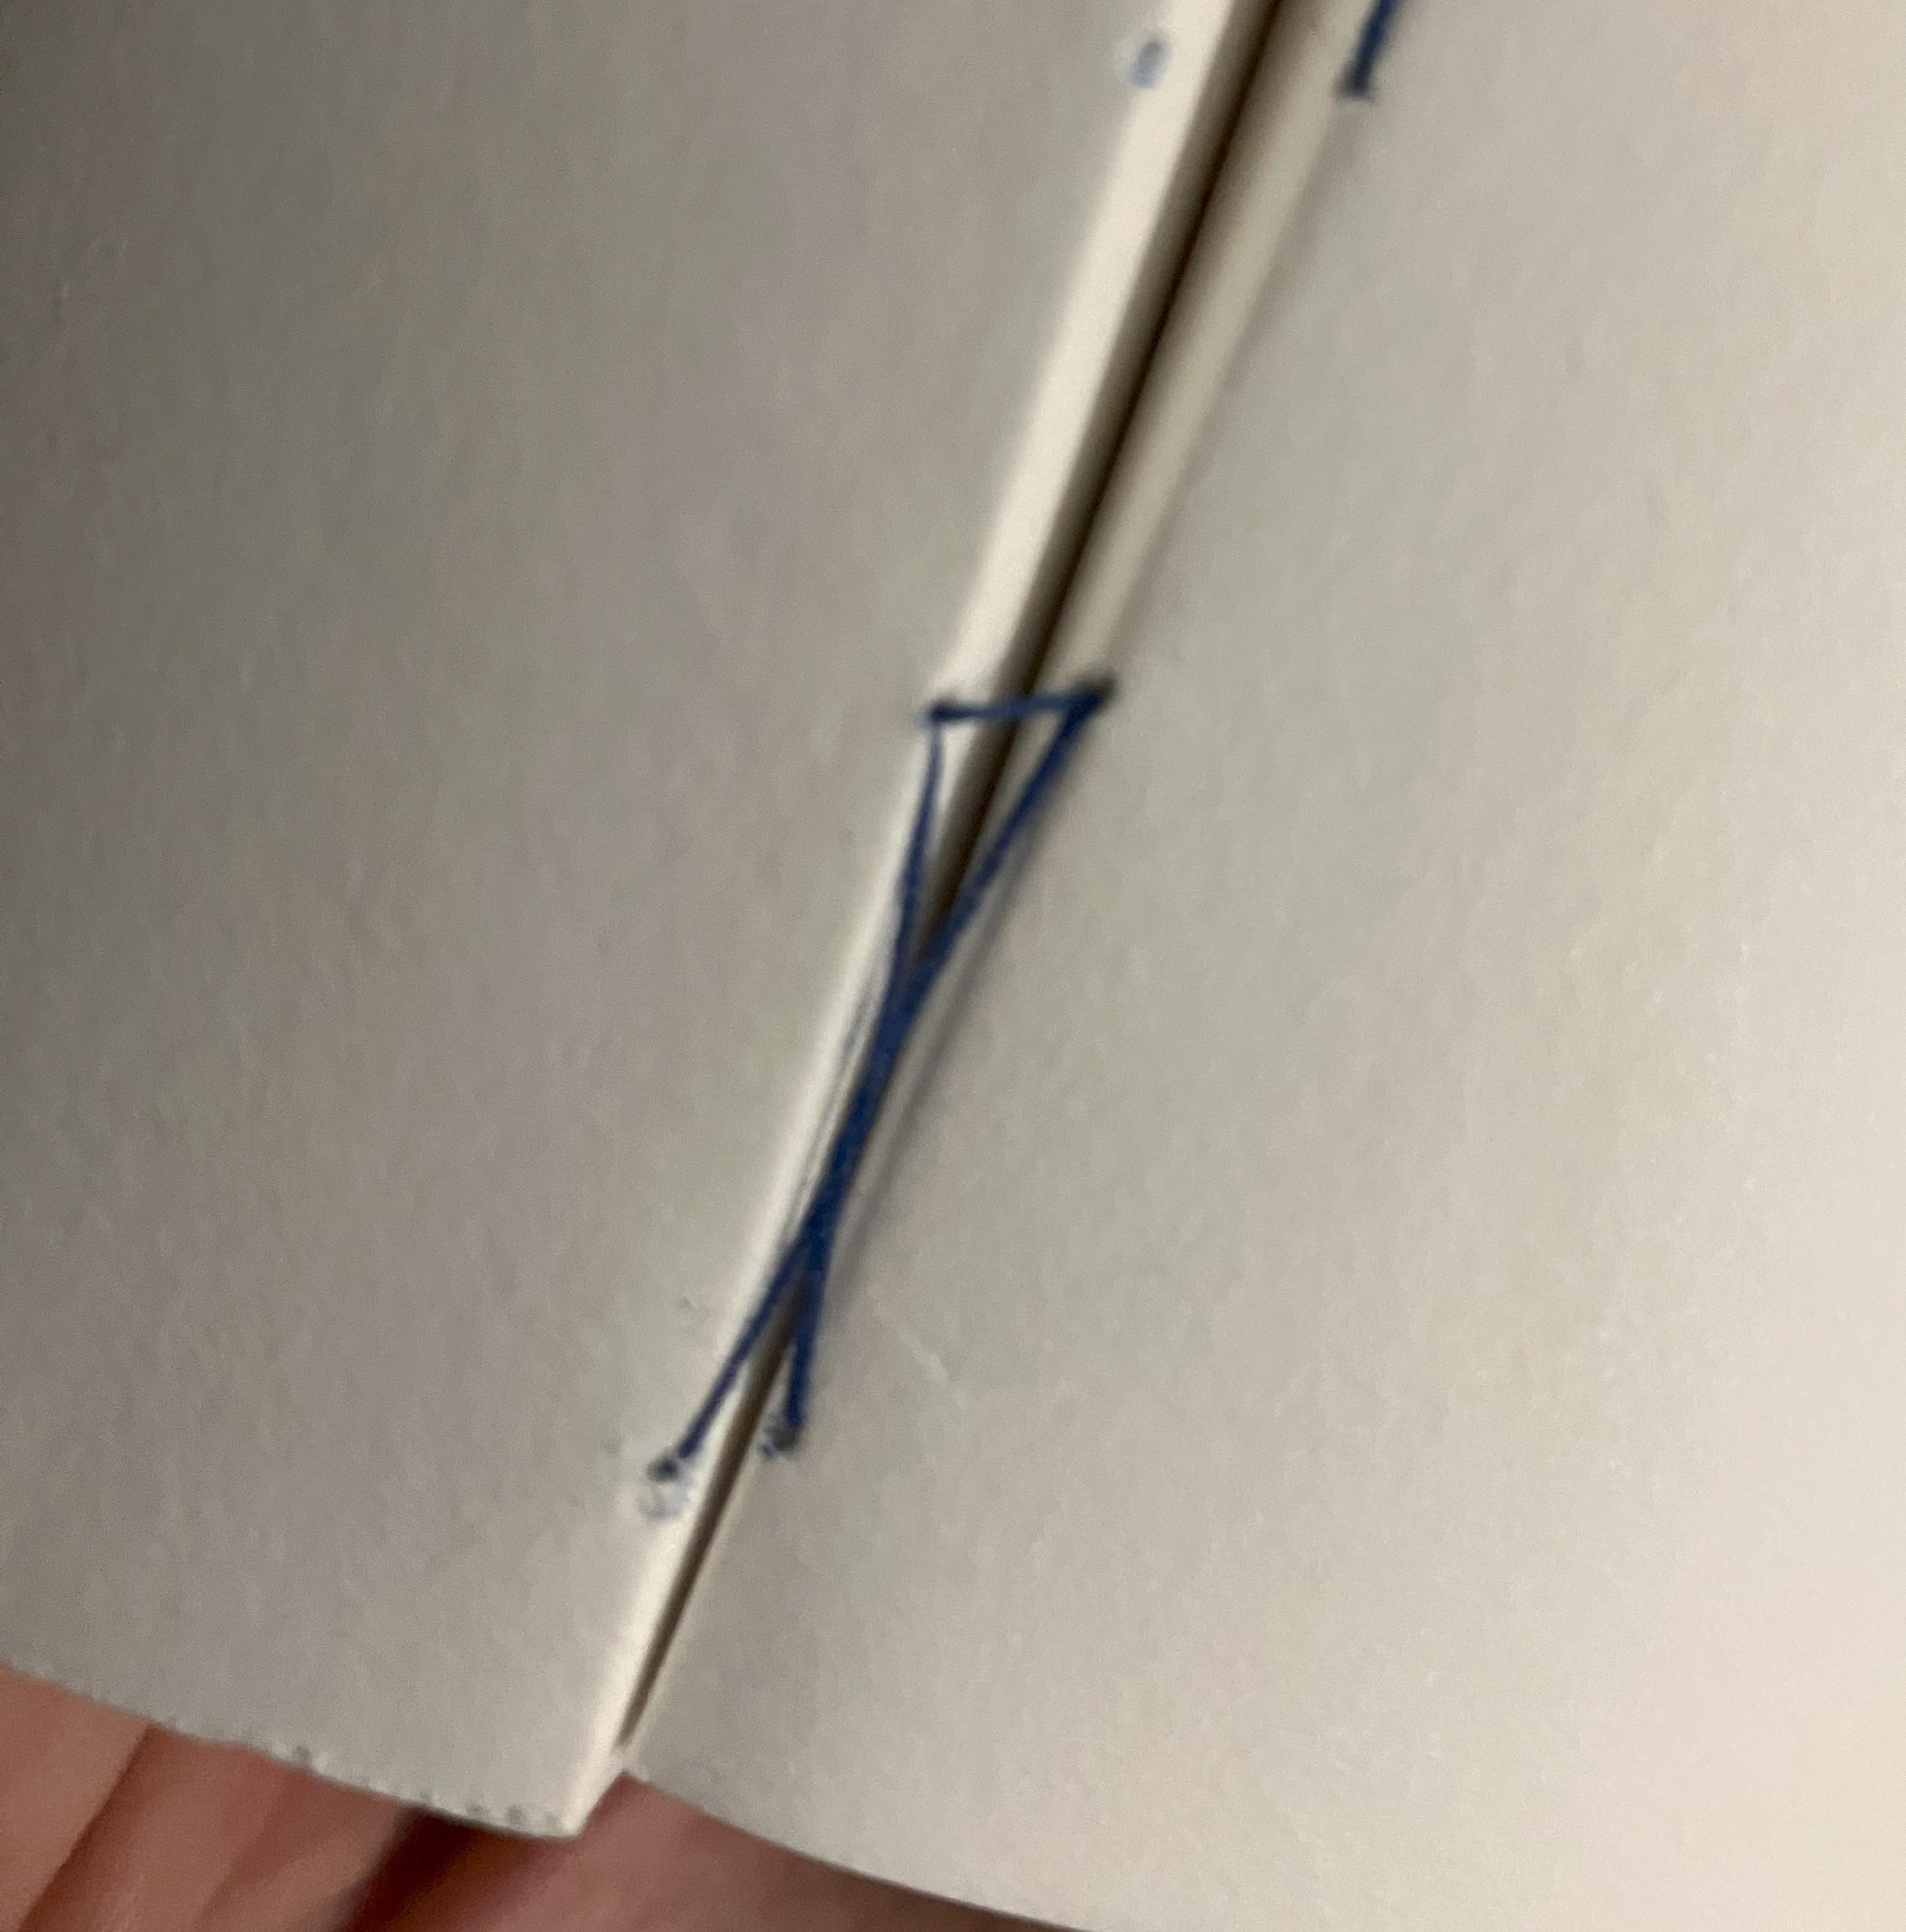
Once you have threaded the needle and moved it to the center of the thread, bring the ends of the thread together and tie a knot. Next, take a single signature and pass the needle through the second from the top hole on the outside, and pull it through until the knot stops. Now thread the needle through the top hole and pull everything taut. Put the needle through the second hole again, and then we will start weaving our way down to the bottom of the signature. When you get to the bottom of the first signature, bring the needle through the second from last hole and pull it through to the outside of the signature.
Next, we will take our second signature and place it next to the first. Pass the needle and thread though the adjacent hole on the second signature and then pull the needle through the last hole of the second signature. Now, pass the needle through under and around the loop at the adjacent portion of the first signature, and then back through the second hole from the end of the second signature. It sounds more confusing than it is, see the pictures for reference and you will pick it up in no time.
Repeat the pattern from the first signature on this one, threading the needle under and around each external loop to bind the two signatures together. When you get to the end you will add the third signature and repeat (see pictures for how to attach the loops of the third signature and beyond.
Continue this process until all of the signatures are added. Go slow, and make sure to take all of the slack out of the thread each time you pull it through. We don't want the thread so tight that it introduces stress to the paper, just tight enough that it holds everything together. After adding the last signature, you can tie off the thread and cut off any excess.
This collection of signatures is referred to as a text block.
Attach Endpapers

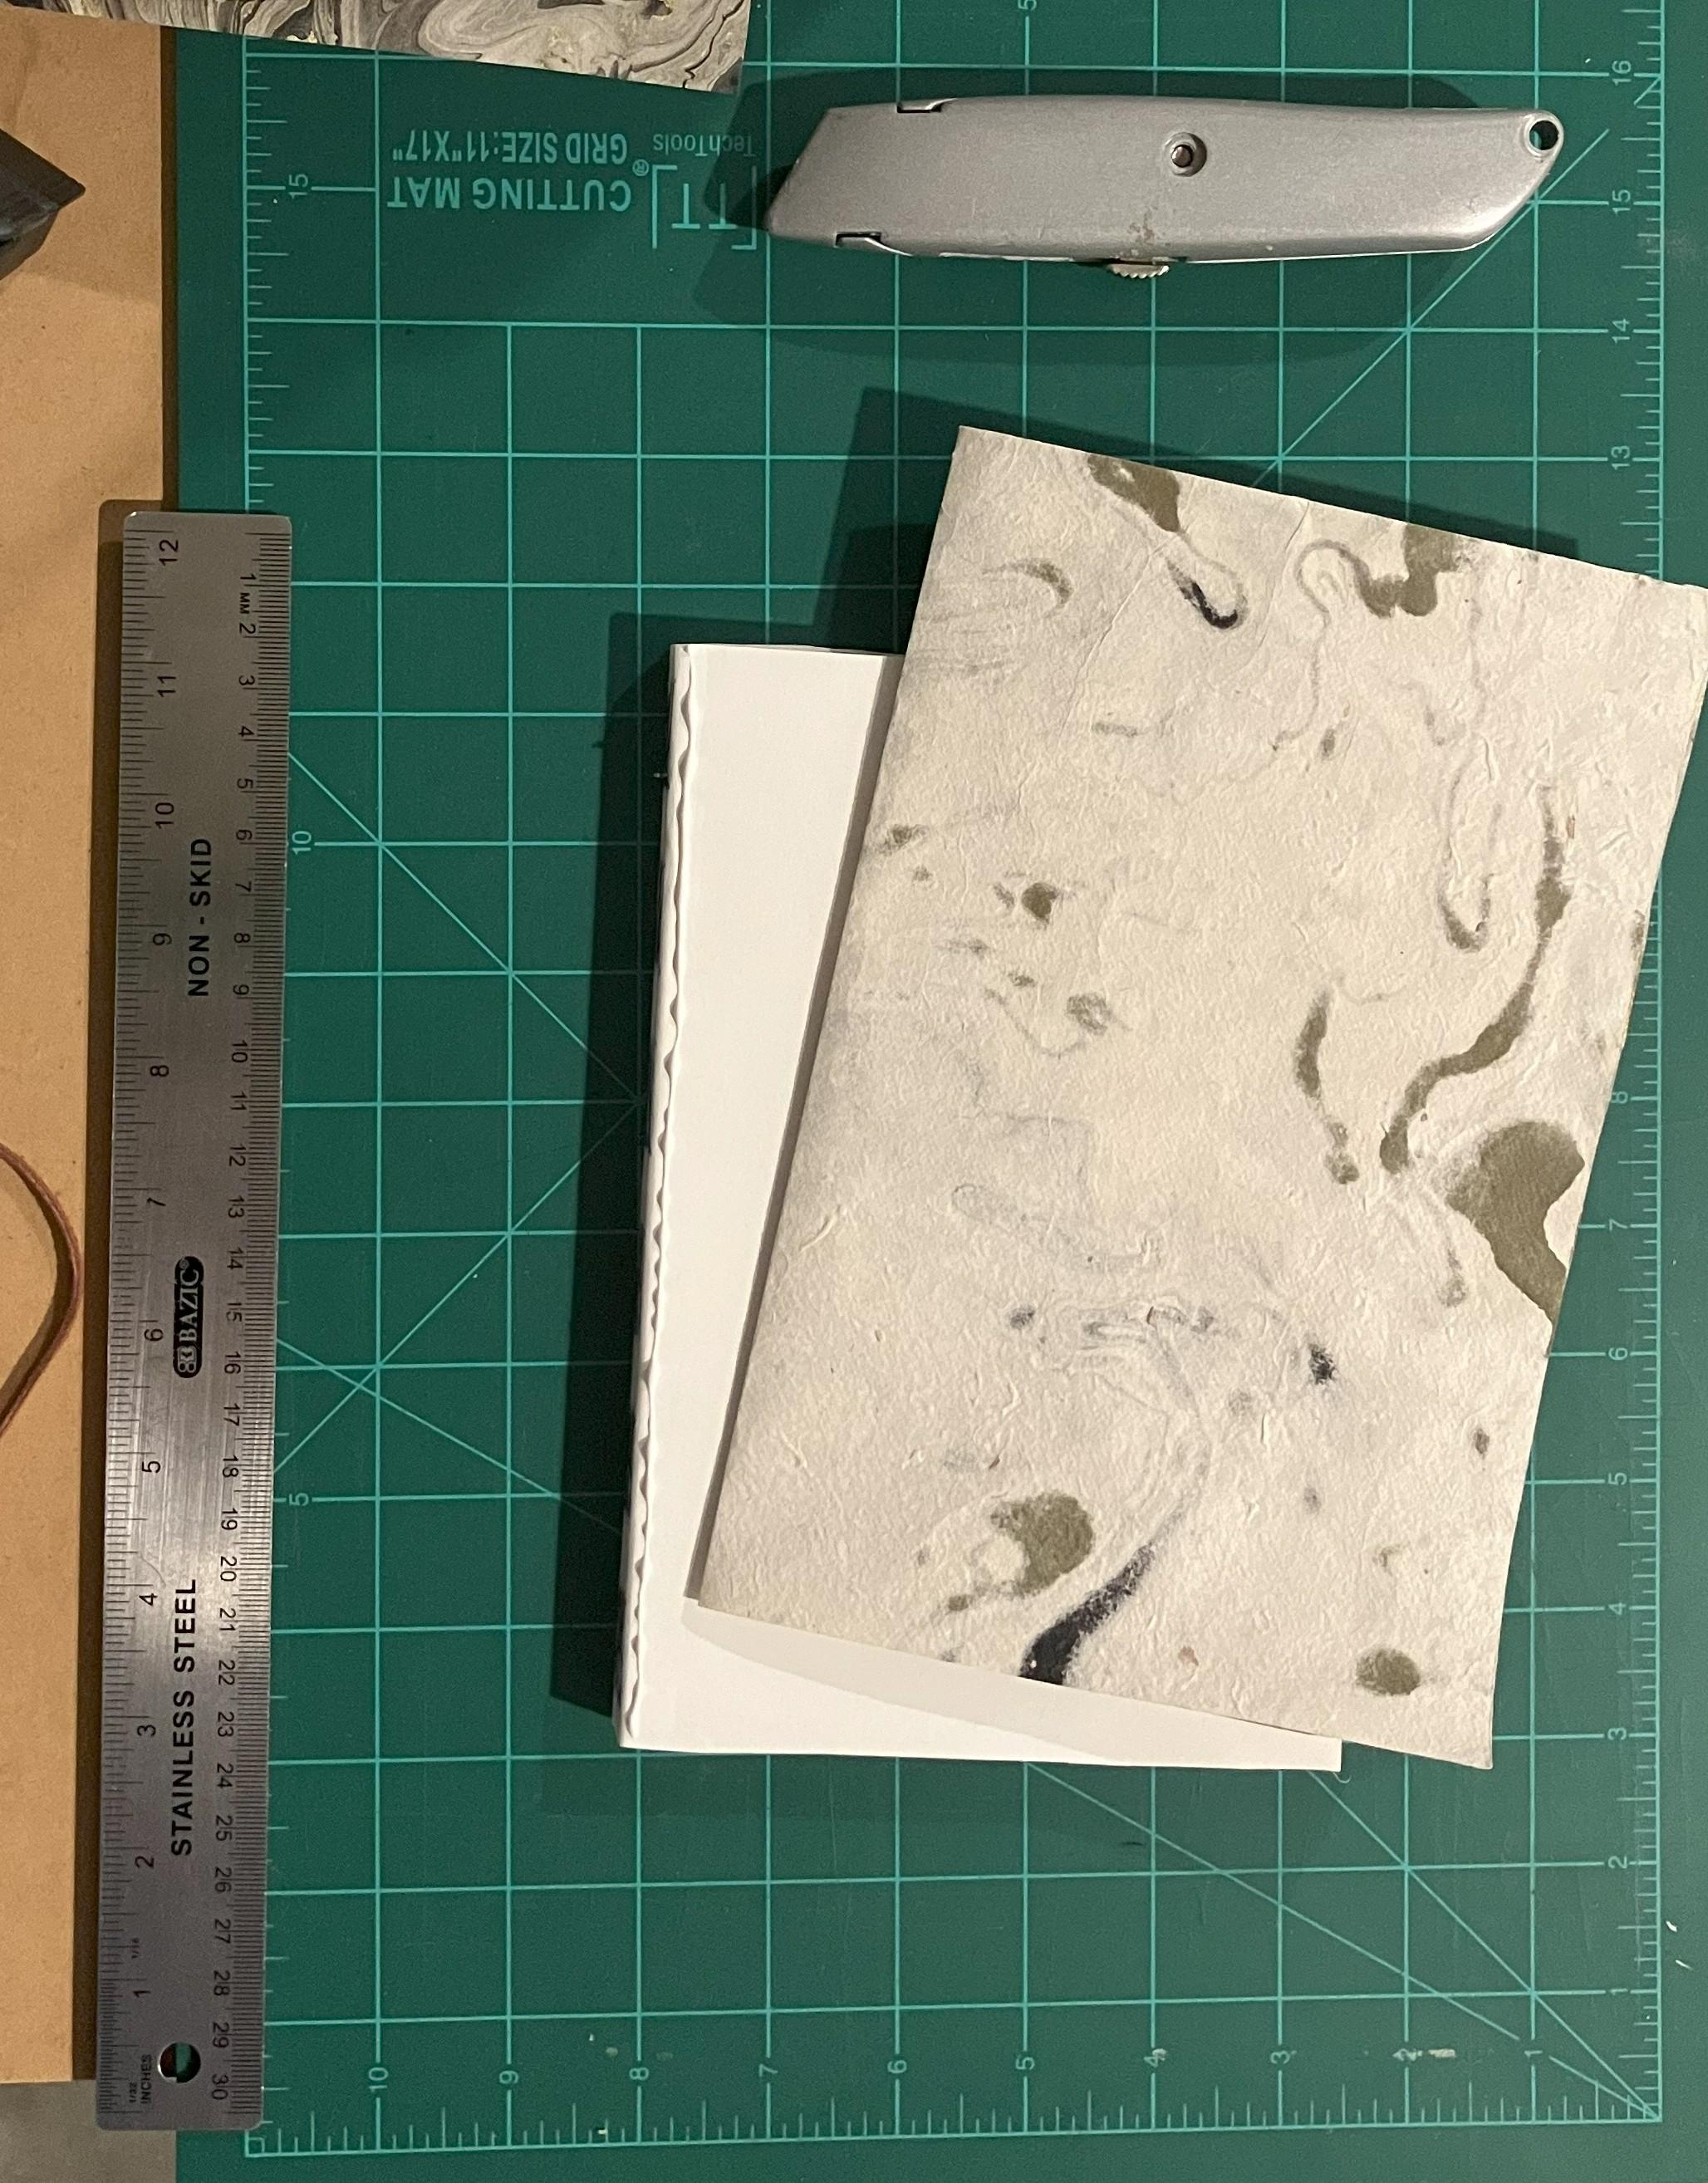


I found this beautiful marbled paper in a paper store at a mall, but you could just use the same paper you made the text block with if you want. Or if you are feeling ambitious you could marble your own endpapers (I hope it turns out better for you than it did for me!).
After checking the grain direction for your endpapers, cut them to size, fold them in half, and attach them to the text block with PVA glue. To glue them on, apply a thin bead of glue along the edge of the text block near the spine. You only need a line of glue about 1/4 in wide (6mm). Use a small paint brush to spread the glue evenly.
Once the endpapers are properly aligned, use blocks of wood (or another flat surface) and clamps to press everything together. We will refer to this setup of blocks and clamps as our makeshift book press. At this point, you can also apply glue along the spine of the book to help hold everything in place after it comes out of the clamp.
Allow about 30 minutes to an hour for the glue to dry.
Trim and Sand the Text Block


At this point, you can use a utility knife to trim the edges of the text block. If you already trimmed your pages to roughly the final shape and you like the textured look of the unfinished pages, you can skip to adding the headband to the text block.
First, measure and mark the dimensions that you would like your pages to be. Then, using a steel ruler as a guide, carefully make several passes until you have cut completely through the text block. Repeat on all sides (except for the spine!).
Now that the excess bulk has been trimmed, return the text block to the book press with about 1-2mm of one of the trimmed sides hanging out. Use a sanding block (eraser with sandpaper wrapped around it) to clean up any marks left by the utility knife and get a nice uniform edge. Start with 150 grit sandpaper and transition to 220. You can go finer, but 220 is all you need for the edge finishing we are doing here.
Rotate the text block within the book press and repeat the sanding process until the three trimmed edges are even.
Paint the Edges


This is an optional step, but I think it adds some character to the finished book. There are several types of edge finishing that can be done to decorate a book, including gilding, painting a single color, painting an image, or hydro dipping/marbling. One of my favorite finishes is the speckled edge.
You can pick an color or combination of colors that you prefer, but I really like the way these two tones of blue look together. Put a small dollop of paint on a paper plate or piece of scrap and dip your stiff paintbrush into the first color. Holding the brush a few centimeters away from the edge of the text block, use your finger to pull the bristles back and flick paint onto the surface. Try on a piece of scrap paper first to test out colors and get the technique down.
Add the second color, if desired, and try to get an even speckling of color on the three exposed edges of the book.
Add Headbands and Reinforce Spine


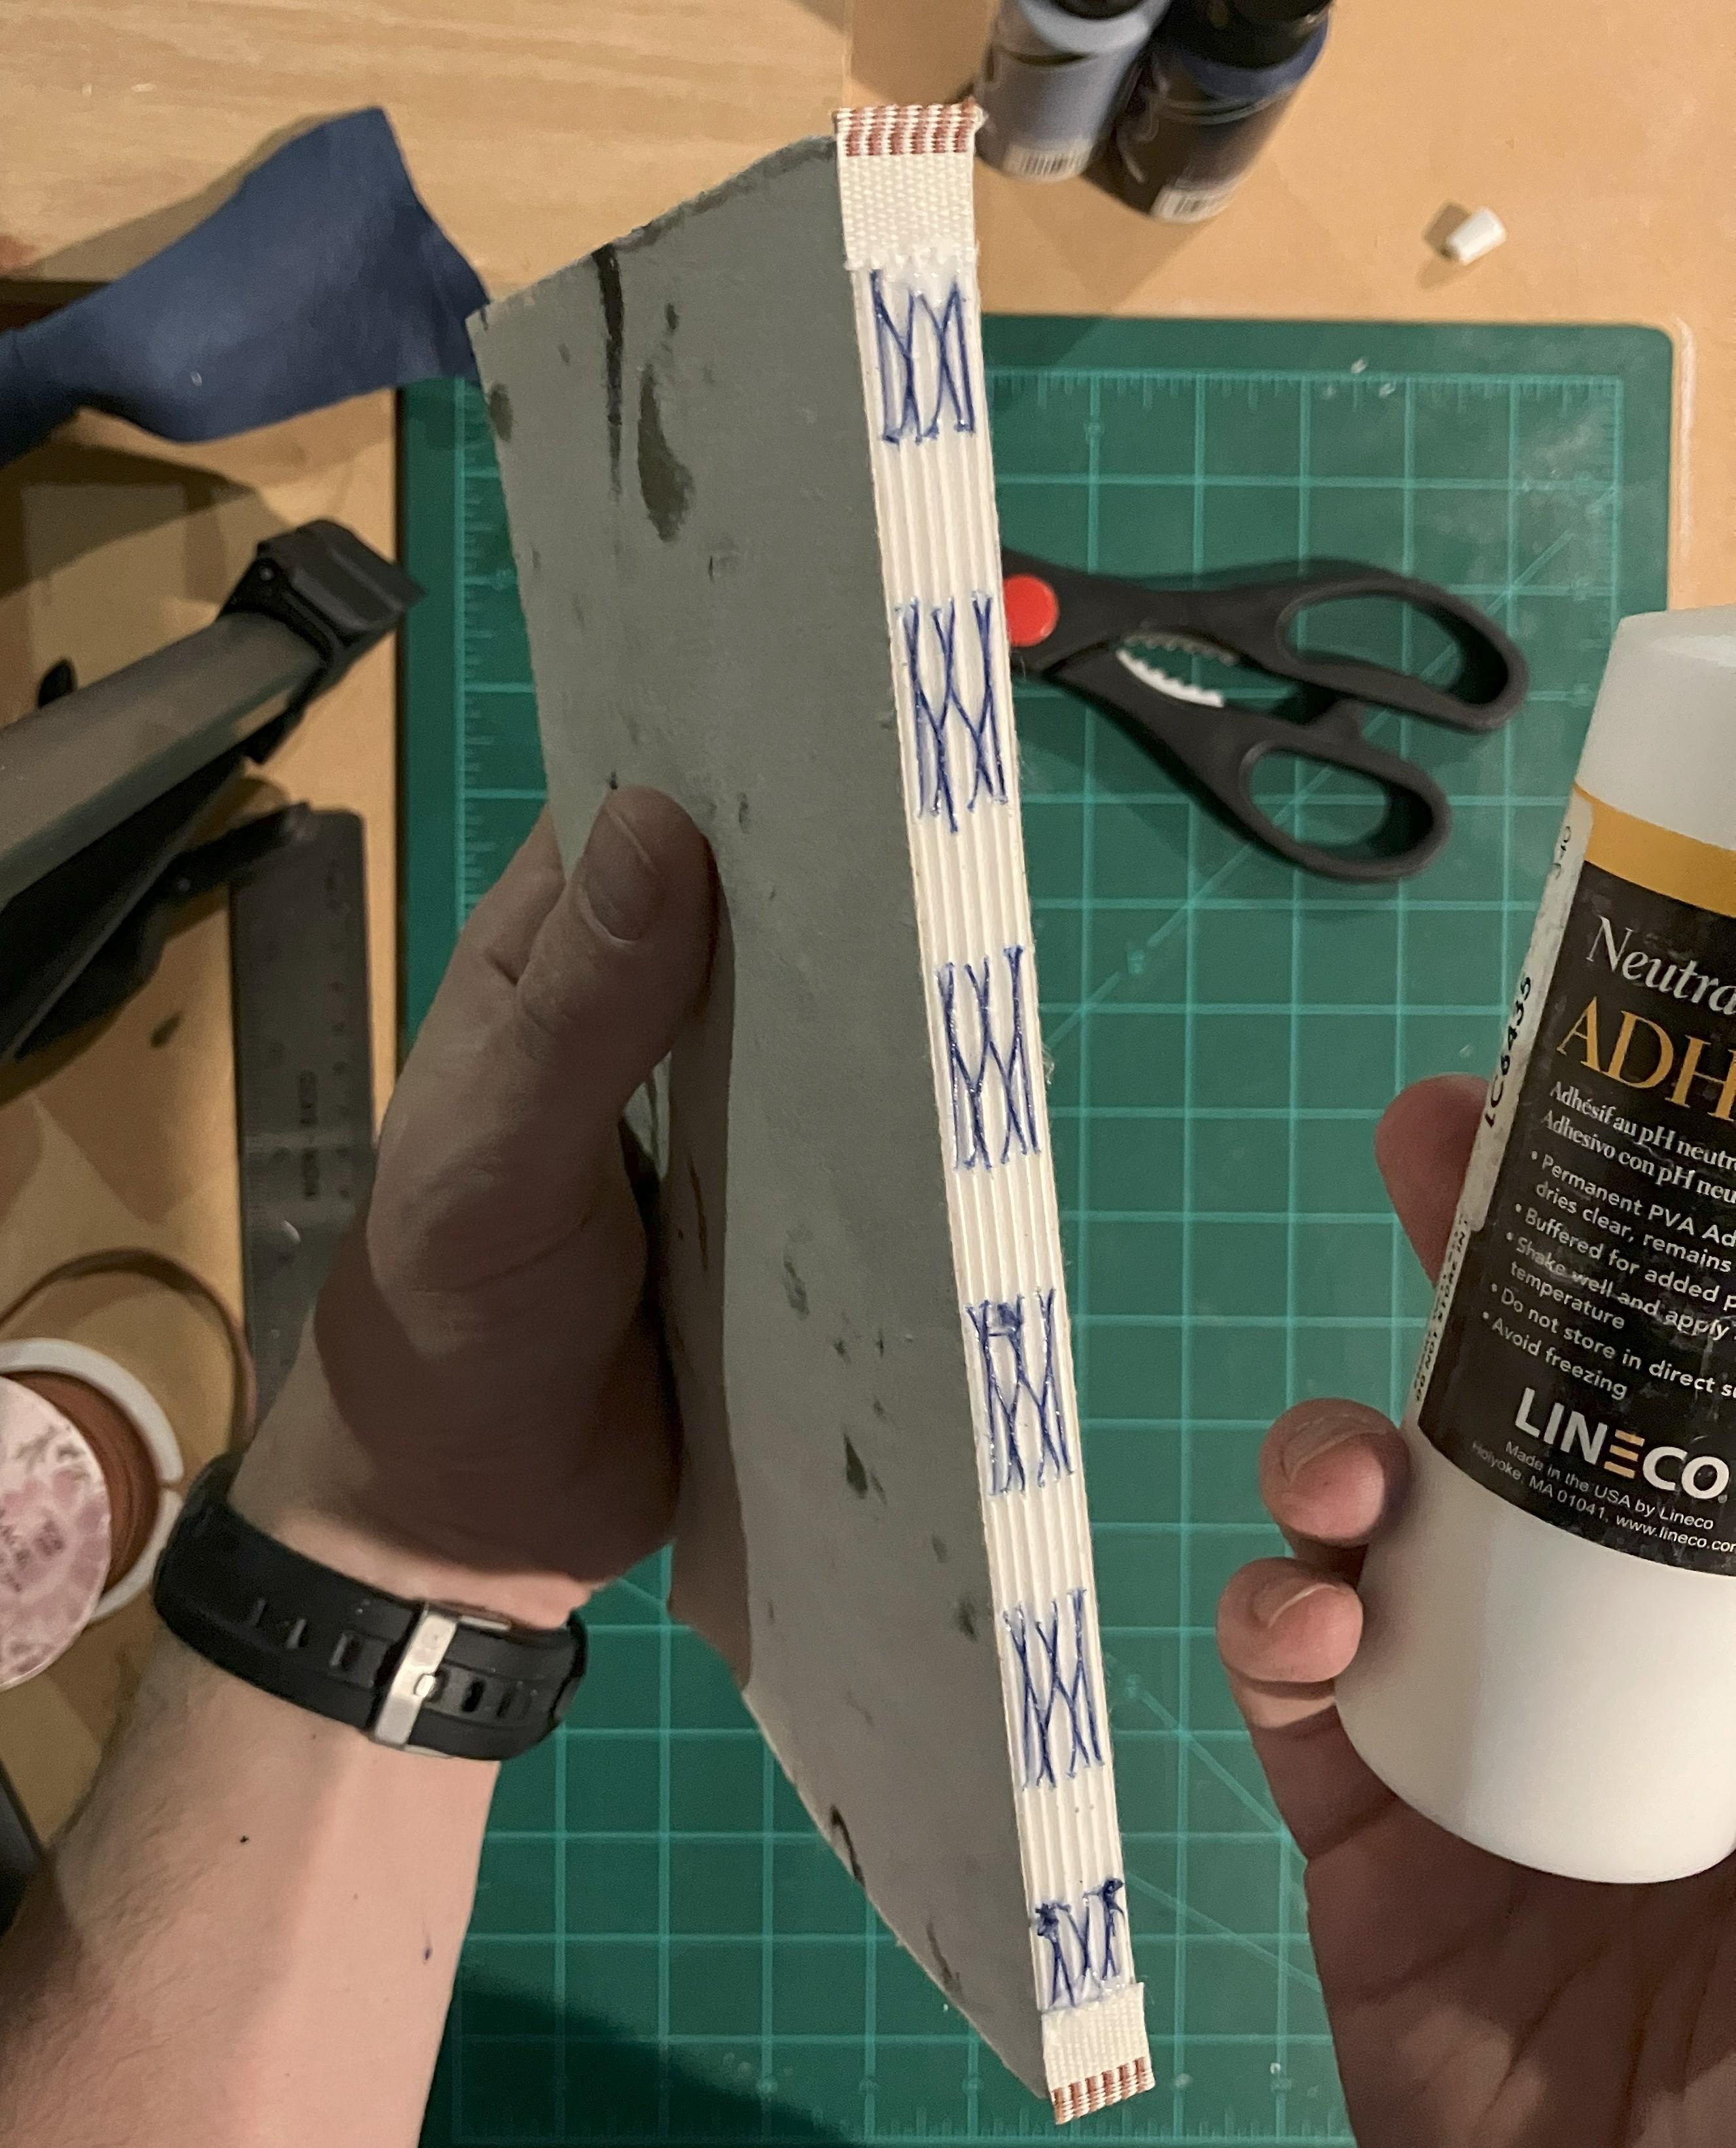


The text block is just about finished, we just need to add a few more components. The first is the headband, a small bit of fabric that peeks out on the top and bottom of the spine between the book cover and the text block. Look at just about any hardcover book on your shelf and you will see it has a headband as part of its construction.
Amazon sells inexpensive packs of headbands with a variety of colors, so you can pick one that suits the project. Cut two pieces the width of the text block and glue them to the ends of the spine, with just a small amount peeking over the top, 1-2mm.
Next, we will cut a piece of fabric to reinforce the spine of the text block. This material is traditionally a thin gauze, but I used a small piece of thin cotton that I had laying around. Cut a rectangle that is long enough to cover a portion of both headbands, and wide enough to extend about 2cm past the width of the spine on both sides.
Use a brush to apply glue to the spine, and carefully place the fabric onto the glue, pressing as necessary to ensure good contact. Apply more glue to the sides of the book where the fabric will fall, and press the fabric into place. Use wax paper to prevent unintentional sticking, and place the book in the press to dry.
Cut the Chipboard


Take the finished text block and measure the length and width in millimeters. Add 5mm to the length, and subtract 4mm from the width; these will be the dimensions you use for the chipboard.
Before marking and cutting the chipboard, it is important to note that this board also has a grain direction that needs to align with the rest of the book. Being careful not to break the board, gently flex the chip board, rotate 90 degrees in your hands, and repeat. The board will flex slightly easier in when it bends along the grain. Once you have found the grain direction, I find it helpful to draw a small arrow in the corner so I don't get mixed up.
Now that we have our grain direction figured out, we can cut out our covers. Using the new dimensions that we obtained from adding 5mm to the length and subtracting 4mm from the width, cut the covers from the chipboard with the utility knife. A steel ruler can be used as a guide, just be careful to avoid getting your fingers. It may take several passes with a sharp knife to cut through the full thickness of the board.
Cut the Spine and Add Hubs


Place your covers on either side of the text block and measure the total thickness. This will be the width of the spine of the book. The high of the spine will be the same as the length of the cover.
You can use flat chipboard for the spine, but I like the rounded look on a hardcover book. To achieve this, you can use a cardboard tube like a mailing tube or the insert at the center of a roll of plastic wrap or aluminum foil. Find a diameter tube that looks right for you. For this project, the smaller tube from a roll of aluminum foil was perfect. Cut out the spine of your book with the utility knife, making several small passes to avoid damaging the cardboard shape.
Next we will add raised bands, also called hubs, to the spine. In some methods of bookbinding these are a natural byproduct of the sewing process used on the signatures. In this method, they are purely aesthetic. I like to map out potential hub layouts on a piece of scrap to make sure it looks good before I glue them down. Once you have picked out a design, use a pen or pencil to mark the hub locations on the spine. Cut your suede lace pieces slightly larger than the width of the spine, and glue them to the marked locations with the PVA glue. Be very careful to ensure that everything is straight before the glue dries.
Once the glue has dried, use a utility knife to trim the edges at a roughly 45 degree angle. This will help give it a good shape when the leather goes over the edge of the spine later.
Mark the Layout for Covers


For this book, I went with a modified half-bound design. The "modified" bit is the leather strips covering all edges, as the leather usually only covers the portion near the spine and the corners. There are two reasons for this change - the wood veneer does not bend like the traditionally used paper, and lining the wood completely with the navy leather adds nice contrast and gives the project a very intentional look.
On the chipboard covers, start by marking lines 4mm in from the edge on all sides except the one that will go against the spine. You can make these sections wider than 4mm, but any smaller makes it difficult to glue the leather strip down.
Next, about a third of the way in from the spine edge, draw a vertical line. This it where the leather will connect the spine to the front and back covers. Make two more marks at the top and bottom of the covers another third of the way in, and draw 45 degree lines from these points towards the edge opposite the spine. These will be the triangular pieces that you see in the pictures of the finished book.
Cut Wood and Leather Pieces


The area in the center will be the wooden portion. I have not personally seen or heard of anyone else using wood in a book cover in this way, but I love the look of the wood and leather together. Use a ruler to mark this shape onto the veneer sheet, and use a utility knife to cut it out.
Next, mark and cut out the leather pieces. Make sure that there is 10-15mm of extra material on each side of the cover where the leather hangs over. This will later be glued down on the inside of the covers. It is also a good idea to oversize the leather that will be going over the spine by about 20mm to account for things shifting around during the gluing process.
The leather corners need to match the shape drawn on the covers, with the edges extending perpendicular to the edges of the chip board. Mark a 45 degree line on the portion just outside the corner of the chip board, about as wide as the board is thick. This will allow the leather to completely enclose the chipboard surface when it is wrapped around the edges later.
Attach Leather to the Spine


Place the text block into the book press and carefully align the cardboard spine on the spine of the text block. Use a brush to apply PVA glue to the spine and to the center of the leather piece that will be going over the spine.
Carefully place the leather on top of the cardboard spine, and gently pull the leather into the text block to help give it shape. You will notice that the block of wood I use for my press has a row of small nails on each side - this is an optional feature that will make it slightly easier to wrap the the book in string. If not using the nails, you can just wrap the string all the way around the text block.
Starting at one end, wrap string around the book to hold the leather in place as the glue dries. Place the string on each side of each hub to help define the raised bands and to avoid unwanted lines in other parts of the leather. Use your fingers or bits of scrap material (or a bone folder if you already have bookbinding tools - I did not) to gently shape the leather and remove creases along the glued portion.
Allow the glue to dry for about 30 minutes to an hour before removing from the press.
Trim Leather and Attach the Spine to the Covers


Line of the chipboard covers with the text block so that it overhangs the pages equally on the three non spine edges. It should extend past the text block about 2.5mm based off of our earlier measurements, but things tend to shift a little throughout the process. Add a small spring clamp or two to hold the covers in place.
Next, place the spine with leather attached onto the spine of the text block and pull the leather down the sides of the covers. It is okay if they are not parallel or even between the two sides, this is why we oversized them earlier. Carefully mark the leather where it needs to be cut to match the lines on the covers, and cut a straight line with a utility knife or scissors.
Now that the leather has been trimmed, use a brush to apply PVA glue to section of the chip board near the spine. Gently press the leather onto the glued portion and adjust it so that it lines up correctly. Once you are satisfied with the location, return the book to the press and allow the glue to dry while under light clamping pressure.
Attach Wood Veneer and Remaining Trim to the Covers


Carefully apply glue to the center portion of the cover where the wood panel will be. Add the veneer, butting it up against the leather and aligning it with the other guide marks to center it properly. If the wood is curled, or if the glue causes it to curl, you can place the book in the press for it to dry before adding the rest of the leather.
Next, add the corner pieces, gluing and carefully aligning the leather so that it butts against the wood and aligns with the guide marks on the chipboard.
Once the corners are in place, we can add the horizontal and vertical strips. These are last because they are the easiest to stretch or press into place as needed to avoid gaps and create a clean look.
Place the cover over the text block and return the book to the press for the glue to dry. Give it about an hour to ensure that nothing will move as we finish the cover.
After removing the book from the press, add glue one section at a time to the suede side of the leather (on the interior of the cover. After spreading the glue evenly with a brush, gently fold the leather in and press it against the chipboard, making sure to pull everything tight. Smooth out the leather as needed. Continue around the edge of the book cover section by section, making sure to press and pull each piece of leather together to make the seam as invisible as possible.
Once you have made your way all around the cover, place wax paper over the text block to prevent sticking and place the cover over the text block. Place everything in the book press, and give it at least 30 minutes to dry.
Attach the Cover to the Text Block


At this stage, you can add decorative elements to the book cover. If you are more skilled than me and have a very steady hand, you can paint designs on to the cover. I went for a more minimal look on the covers, and tried adding gold accents to the spine. I won't go into much detail because there are many sources out there with better experience that can explain it better, but I used leather stamping tools, a hot plate to heat the tools, and gold transfer foil to apply gilded designs to the spine.
The curvature of the spine made it a little tricky to use the flat tool, and the result was an incomplete stamp. If you go this route, I recommend practicing on scrap beforehand. You can optionally seal the leather at this point, or you can leave it as is for a more rustic look.
The last step is to glue the cover to the text block. Slide a piece of wax paper in between the folded endpapers. Use a paint brush to apply glue to the outside of one endpaper. Do NOT glue the space adjacent to the spine, leave a gap about 10mm from the edge. This will ensure that the hinge of the book can open and close properly.
Carefully align the spine of the cover with the spine of the text block, making sure everything is centered, and close the cover onto the glued endpaper. Flip over the book and repeat the gluing process on the the other endpaper. When you are finished, close the book and place it into the press one last time.
Wait about an hour for the glue to dry, and then you are ready to remove the completed book. If you enjoyed this process, try making other books with different kinds of papers, stitching patterns, cover materials, or any other variations. Use the book yourself, or give it to friend to brighten their day.
Thanks for following along, I hope you learned something new! Keep on making!