Make an Android App to Control Via Bluetooth an Arduino Controlling Your House Via RF, All With AppInventor
by diy_bloke in Circuits > Arduino
10694 Views, 91 Favorites, 0 Comments
Make an Android App to Control Via Bluetooth an Arduino Controlling Your House Via RF, All With AppInventor
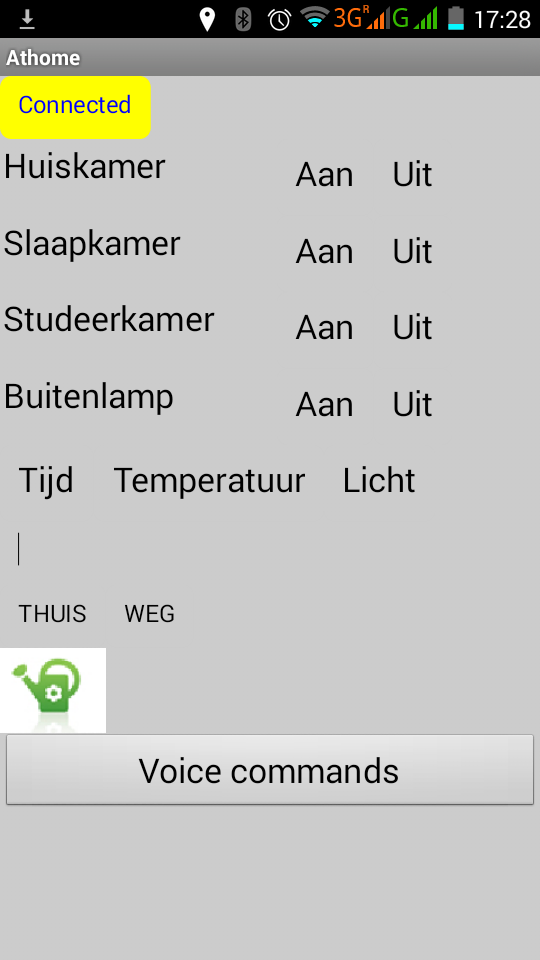


I know that title is quite a mouthful, but it is exactly what it is.
Some time ago, I made an instructable describing a circuit around an atmega328 (or an 'Arduino') that was to deter burglars by simulating me being at home.
Gradually that system extended into a 'home automation' system as it included taking care of my garden as well.
Although it could operate all on its own, I added a Bluetooth interface to get some feedback from the system, or to set some parameters, or to intervene by switching a lamp on or off on my own.
The 'interface' i used for the bluetooth communication with my phone was 'Bluetooth terminal'. Not really userfriendly and it would lose connection whenever I tilted the phone far enough for the program to go to landscape mode.
So, i was in real need for an 'App', after all, no decent control system nowadays can do without. We are not living in the stone age anymore :-)
Although I am no novice on HTML and Java, I had no experience in making apps. Basically I had no idea where to start. Downloaded some app developing systems like Android studio, but I think that needed a triljard gazillion magabytes of diskspace and honestly I found it a tad unfriendly.
So, after some searching I came to 'App inventor' The nice thing about App Inventor is that it works on line. All you need is a google account. App inventor does not need any prior program experience, it is all done by attaching graphic 'blocks' to one another
At first App inventor may seem a bit daunting, talking about "emulators" and having to download the 'compagnon' app to your phone, but that is all not necessary.
What you do is you go here to app inventor, and if you have a google account you can start right away.
Then I advise to take their basic tutorial, Hello Purr, so you get a feel of how it works.
Once you have done the 'Hello Purr' example, you may know how it works, but you probably still have questions like: 'yes but how do I connect over bluetooth?'
Well, that is what I will explain in the next step
The App: Pushing a Button, Reading Input and Output
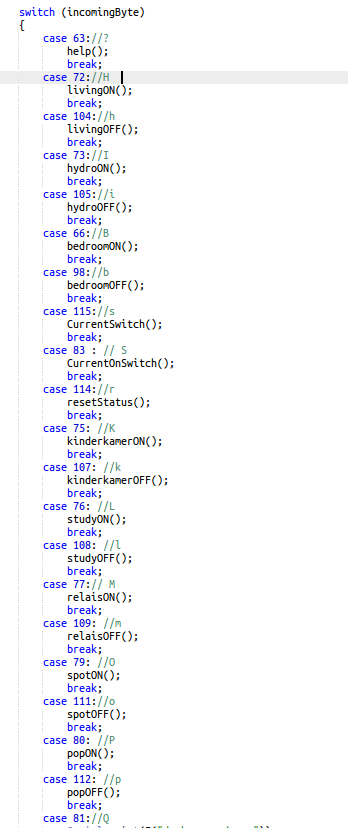


My Arduino circuit, as mentioned, has a regular bluetooth module attached to the serial port. It works autonomically but it can take commands from the Serial port From there it takes commands to make it do things, Switch on a light, switch on a pump. These commands were all printable ascii characters as I had to be able to choose them from my keyboard when i was still using Bluetooth Terminal. In an app it isnt that important whether it is printable ascii or not, but in the two images above you can see the various input values that the arduino is scanning for via 'Serial.read()'
So all we need to do in the app is to define buttons that send those values to the bluetooth of the phone, who will pass it on to the bluetooth module of the Arduino and to the serial port.
i will not describe the app in every detail because that would be tedious and I am convinced the best way to learn is to just play with it yourself, so I will provide the app source for you to load and play with. I will discuss some basic principles though, so you understand what the app is doing.
If you went through the 'Hello Purr' example of App Inventor, you know that there are two screens: The design screen and the block screen.
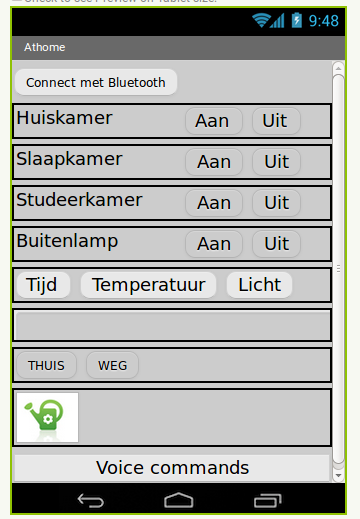
In the design screen we determne the layout of our app, It is basically 'drag and drop'of elements onto the mock 'phonescreen'. All sort of properties like color, placement, fontsize etc are all done in the design screen and you will soon get the hang of it.
Then in the block screen we define the function of the various items: By clicking on an item in the left column we get to chose for a number of possible actions for that item.
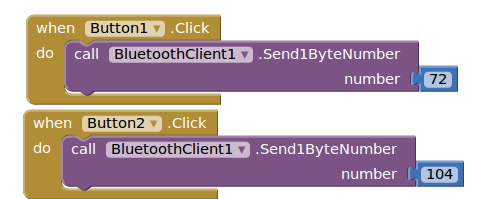
In the third picture you will see how that works for two buttons:
If button one is clicked it calls the bluetoothclient to send a byte and in this case that is the number 72 (or 'H'). In the Serial.read() structure in the Arduino program you can see that this means to switch on the lights in the living.
Similar for button 2: that calls the bluetoothclient to send the number 104 ('h'). That in the Arduinoprogram means "Switch of the light in the living room"
The Arduino program also sends data (time, temperature) to the serial port and and we need to catch that data and print it out on the phone. The fourt picture shows how that is done. We dont only have defined a button but also a textbox to print the results. Again the button calls the bluetoothclient to send a byte, 116, (a 't'), which as we can see from our Arduinoprogram results in the time being printed to the serial port.
We therefore define another action under that button and that is to have the textbox call the bluetoothclient to read the income bytes. Now this is rather crude because if there is anything that was being printed already to the serialport (say an automated statusmessage), then that will be printed as well, so some refinement is still in order
The App: Toggling a Button


previously I showed how you could send a command with a button: One button for 'ON' and one button for 'OFF'.
Boring!!! It would take less space if we just had one button that we could toggle and it looks flashier as well.
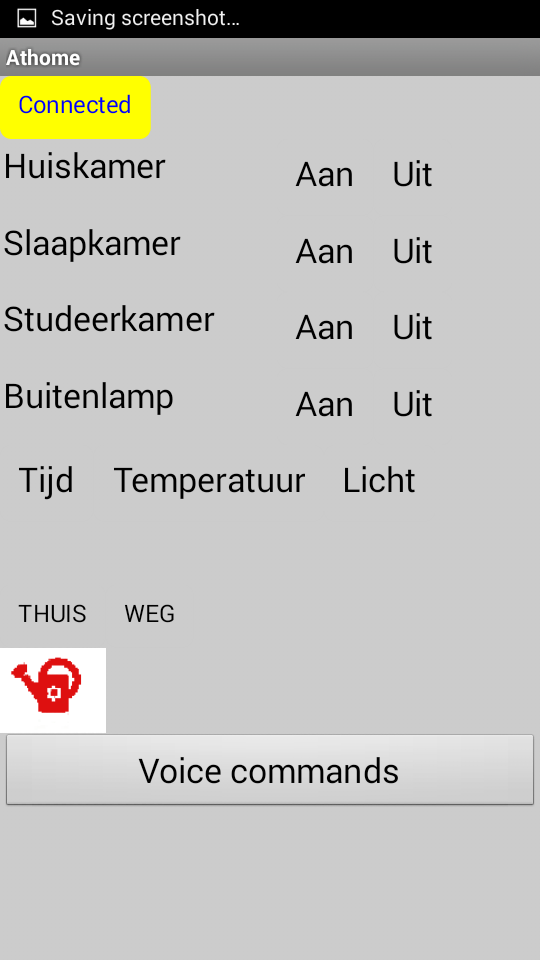
Well that isnt so hard. If you look at the snap of the design screen, you see a lot of 'outlandish gobbledydock' (sorry for that), but in the lowerleft you see a button with a green Watering can. Obviously this has something to do with irrigating the garden.
On the next two pics it shows the appearance on the actual functioning app: Push the green button and it sends a command to the bluetooth client and subsequently turns red. Press the red button and it sends a different command and becomes green again
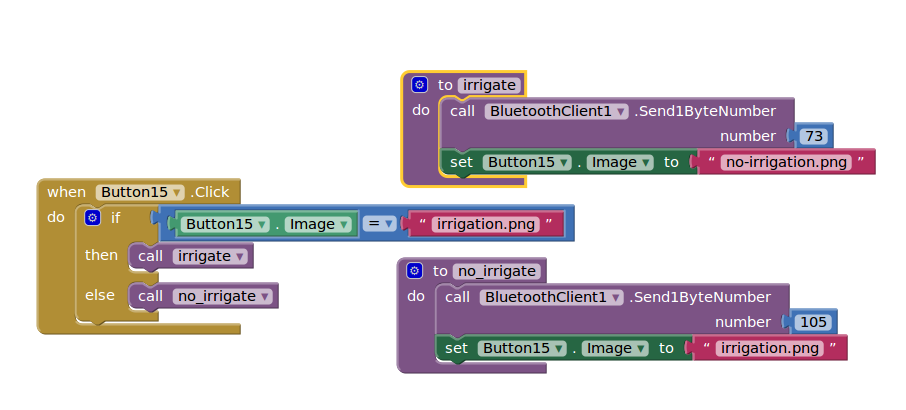
Initially I found a method as illustrated in the 4th picture. Under the button we define an 'If Then Else' structure in which we the condition we check is the name of the picture we attach to the button. Depeding on that name we then go to either one of two procedures in which we issue the desired command (in this case sending an 'I' or an 'i') and toggle the picture on the button.
However, that seemed needlessly complicated and the 5th picture shows an easier way, without having to call procedures
The App: the Bluetooth Connection
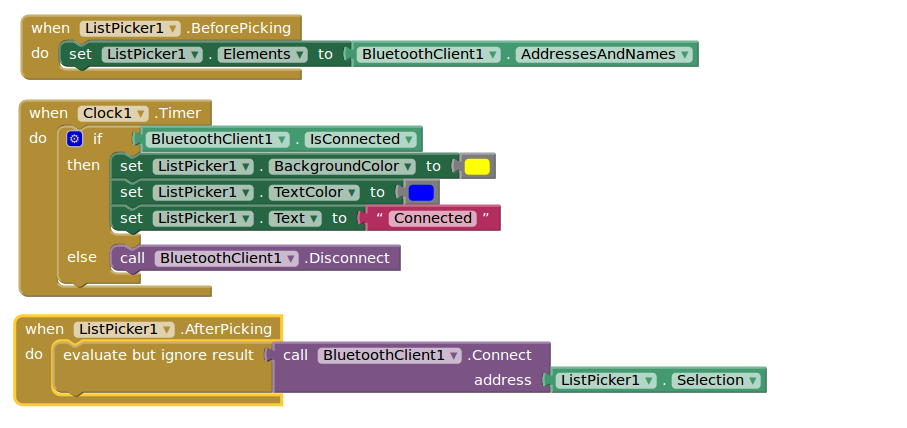

The app would be worthless if it couldnt connect to bluetooth. I am not sure if the way I did it is the best way but it works for me. I start with calling the list of paired devices and when I pick mine and it connects I change the color and text of the connect button.
Now ofcourse if you have an app that is only meant for one specific device, you could do away with the list picker and just connect to the UUID of the required device.
The second picture shows two basic ways of connecting to Bluetooth:
via the list picker and via the UUID of yr desired device. The UUID is the name under which your device appears when you add it, pair it or connect to it. It usually is a series of numbers with a name like
XX:XX:XX:XX:XX:XX HC-05
There are many other ways of connecting to Bluetooth and you may find some interesting reading here.
The App: Voice Commands
I have added Basic voice commands to the App. I found that somewhat longer words work better than shorter words 'ON' never worked for me, 'OFF' worked better, but 'Bedroom' was usually spot on. Perhaps that is because English is not my mother tongue. Also, I am not sure how well the speech recognition is in understanding other languages
The App: Testing and Uploading It
App inventor offers several ways to test your app. I did it by downloading the App inventor companion on my phone. As long as your computer and your phone are using the same network, that works.
In all honesty though, after a few times I gave up on using the App inventor companion, but I just uploaded the apk code to my phone.
So, how to upload an apk file?
Well first you have to get one. You do that by clicking on the 'build' button in the Top Toolbar: That gives you two options: scanning a QR code or downloading the apk file to yr computer.
I usually go for the latter. The easiest way to then install that code on your android phone is by sending it as attachment to yr own gmail account that you have on yr phone. Opening the attachment then gives you the choice to install it.
The App: Just Some Tiny Tidbits and the Code
Just a few more things and then I let you have the code to play with.
The design I gave is not very flashy, I am sure you can tailor it to yr own needs with much more icons, but it is only meant as an example to tinker with.
The apk file will be installed with a standard dull icon. You can specifie your own flashy app icon in the 'Screen1' properties. This is also where you can specify the name of your app.
remember, at the time I write this, I may only be one day ahead of you in working with App Inventor. It is real easy, go use it.
here is the file, just go to 'import' in App Inventor and start using and altering it to your needs