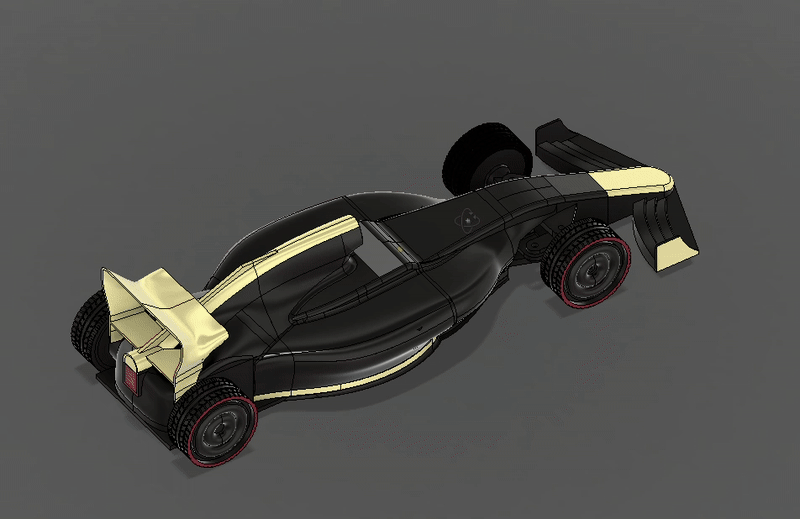
Mini F1 Rc Drift Car

Ever looked at an RC car and thought, “Cool… but what if I made my own?” This project takes that thought and slams it into top gear — from a hand‑painted body that can hold its own on any pit lane, to a controller so comfortable it feels like it grew there. Along the way, there’s just the right amount of drama (masking‑tape betrayal, near‑glued switches) and the sweet satisfaction of watching your own creation light up and fly.
It’s part engineering, part art, and entirely fueled by the joy of making something that looks fast, feels fast, and — spoiler alert — is fast. Whether you’re here to copy every step or just learn a few ideas for your own build, buckle up. This ride’s about to get interesting.
*see the new version that doesn't require you to solder, code, or wire things and is fixed with new updates!*

Supplies
Super glue or strong hobby adhesive
Masking tape
Paints — yellow base, gold topcoat, or your choice
Small paintbrushes or spray cans
Background

End of June, I watched the F1 movie. You know the one — engines roaring, tires squealing, cars looking like they just popped out of a poster you’d hang on your bedroom wall. When the credits rolled, I had two thoughts:
- “Wow, I need one of those cars.”
- “Wow, I can’t actually afford one of those cars.”
Now, I could’ve just bought a model and stuck it on a shelf to gather dust. But where’s the fun in that? I wanted to drive it. I wanted to feel those tiny tires scream around corners — preferably in my living room, without the risk of my neighbors calling the cops.
So, RC car it was. But not just any RC car. Oh no. This one had to be:
- Small enough to race under the coffee table.
- Drifty enough to make my cat question its life choices.
- Styled enough to nod at those cinematic F1 curves — not a perfect replica, but close enough to make fellow fans smile and say, “Hey… I see what you did there.”
And thus began my descent into the glorious rabbit hole of solder smoke, 3D‑printed parts, and late‑night “just one more test lap” sessions. This is that story… well, build.
Front Wing Assembly

I chose to split the pieces before printing. This was done for two main reasons:
- Material efficiency — breaking it up reduced the need for support structures, which saved filament and minimized post‑processing work.
- Surface quality — printing in certain orientations avoided stepping (layer stair‑step effect) on curved areas, resulting in cleaner surfaces right off the printer.
I learned the hard way that some print orientations make your beautiful curved wing look like it was built out of Lego bricks. That’s stepping for you — tiny “stairs” where you really want smooth slopes. Splitting the part and changing the print orientation was like a pit‑stop tire change: a little extra time, way better performance.
Steering

I went with a rack and pinion setup for one main reason: compactness. As mentioned in the model section, this F1 car is small in both width and height, which makes finding room for steering components a challenge. Rack and pinion not only keeps the footprint small, but also provides direct, precise steering response — important for a drift‑capable build where quick direction changes matter.
By keeping the mechanism low‑profile, I could fit it neatly between the chassis and front wing without sacrificing turning angle or stability. In such a tight layout, every millimeter counts.
Front Chassis

In this step, the rack and pinion can’t be assembled inside the chassis/front wing once everything’s bolted up, so the sequence matters:
- Assemble the chassis and front wing together first.
- Slide the steering mechanism into position from the front.
- Secure it in place using the four screws.
This order ensures everything seats correctly and prevents binding once it’s tightened down.
Main Body

Attaching the main body was the most challenging gluing step in the build. The parts don’t have much surface area in contact, so alignment and adhesive choice are important. For best results, use hot glue or super glue paired with an instant‑cure activator spray. A fast‑setting adhesive will help lock the parts in place before they have any chance to shift out of alignment while curing.
Drive Shaft

Instructions:
- The motors don’t quite touch, but they’re close — so check spacing carefully before committing to glue.
- Verify that each motor spins in the correct direction before securing them in place.
- Loop the wiring neatly or solder your leads before inserting the motors into position.
- Use a fast‑setting adhesive (hot glue or super glue with activator spray) to lock them down once everything checks out.
Notes: This was probably the trickiest part of the whole build.
- The drive shaft gave me grief — I tried multiple gearbox designs, but 3D‑printed gears just didn’t cut it.
- Brushless motor experiments were a no‑go too; the F1 chassis was simply too compact.
- In the end, the trusty N20 motor won out for size and fit.
That said, I’m still chasing a little more punch — a 3S battery for ~12 V might be the next pit‑lane upgrade over the current 7 V setup.
Leds (optional)

My goal here was simple — ditch the “red sniper dot” look and go for a nice, even glow. I popped the LED in its hole, then filled it with clear hot glue, not to hold it in place, but to spread the light out like a tiny diffuser.
It worked… sort of. The glow was better, but still not the glorious cinematic beam I had in mind. Honestly, the best solution would probably be printing the part in transparent filament, but since I don’t have a multi‑color printer (and given the price tags on those, I’d have to start selling tickets to my RC races), that’s going in the “future dream upgrade” column.
Electronics

- Keep it clean, keep it lean — the neater and smaller the wiring layout, the less your future self will curse Present You.
- Double‑check every connection — because “mystery smoke” is never a good diagnostic tool.
- Break out the multimeter — a quick continuity or resistance check now can save you hours later. Think of it as an early warning system for short circuits.
- Upload the code — you’d be amazed how well an RC car doesn’t work without its brain installed.
My Setup

I know it looks a bit like spaghetti back here, but everything has its place (mostly).
- Up Top: The big blue board is a voltage regulator. I didn’t have a smaller one on hand, so this was the stand‑in. The supplies list shows the compact version I’ll use later — it should help clear out some of the clutter at the rear.
- Lighting: LEDs are wired in at the back for a clean glow.
- Drive Power: You can also see the two motors tucked into place.
- Foundation: All of this is sitting on a prototype PCB board.
- Future Plans: I’m working on learning PCB design so I can make a custom premium board, but for now I’m sticking to through‑hole parts — I don’t yet have the tools or components for SMD soldering.
Back Cover

Once this part is glued in place, the “wiring pasta” disappears from view — no more accidental cravings when you glance at the back of the car. Out of sight, out of mind… and firmly stuck where it belongs.
Magnets (part 1)

Press‑fit 8 magnets into the top panel.
Ensure all magnet poles are oriented the same way before installation.
Glue is typically not required, but if your tolerances are loose, a small amount of adhesive can be used for extra security.
Magnets (part 2)

It’s wild how a handful of magnets can instantly level‑up a DIY build. They’re like the secret handshake of “professional” — making everything feel more polished, more user‑friendly, and way sleeker. Plus, they click together so satisfyingly, you’ll start wondering why you didn’t magnetize everything you build.
Servo Motor

Instructions:
- Screw the servo into its mount.
- Screw the servo horn into the servo, ensuring the servo is centered (power the ESP32 to verify center position).
- Apply glue inside the 3D‑printed servo horn “cover” and attach it to the servo horn.
Notes: This step was a bit of a puzzle. The servo’s a chunky one, and its rotation axis sits right on the edge instead of the middle — which meant shoving it deeper inside the chassis to hide it. Great for aesthetics, less great for available space. Then came the horn: too tall. Sure, I could’ve cut it, but that would’ve limited future tweaks or part swaps. So the servo got a little lift kit so the horn would fit. At last, I capped it all off with the 3D‑printed pinion gear — the “aha!” moment after a whole lot of chassis Tetris.
Base

Angle the pinion gear to guide it through the opening.
Once positioned, apply glue to secure it in place.
Refer to the bottom picture for correct pinion gear alignment.
Spoiler

Instructions:
- Attach the spoiler to the rear of the chassis, ensuring it is aligned and secured firmly.
Modeling Notes: The spoiler was one of the trickier parts to model due to its irregular shape. I used a mix of lofts and extrusions to get the curves and angles right.
I also considered adding a DRS (Drag Reduction System) — in Formula 1, this is an adjustable flap on the rear wing that opens to reduce aerodynamic drag, giving the car a short burst of extra top speed for overtaking. It’s a clever system, but in this RC build, space is already tight — I could barely fit the small battery, so adding another servo for DRS wasn’t practical.
I might experiment with a super‑mini servo in the future, but they can get pricey. For now, a functional DRS wouldn’t add much to performance here and would mostly be for looks.
Wheel

Fit the tire onto the wheel.
Since the tire is TPU, there’s no need to apply glue.
Rc Car Done?

Top wheels — Secure with screws so they stay put through every drift, jump, and “oops, that curb came out of nowhere” moment.
Bottom wheels — Press‑fit into place. Firm, snug, no wobbles — the IKEA of RC car assembly, minus the allen key.
Now it’s standing proudly on all fours, ready to roll — and with that, we can glide gracefully into the paint stage. This is where the character of the car is born, the place where we swap the smell of solder for the smell of spray paint, and where “prototype” becomes “poster child.”
Visualize

Before I even think about shaking a can of paint in real life, I like to take my design for a spin in Fusion 360. It’s basically digital bodywork — I can splash on bold colors, mix wild combos, and erase any disasters with a single click. No cleanup, no paint smell, and no risk of waking up tomorrow asking, “Why did I think neon green flames on purple was a good idea?”
It’s quick, it’s simple, and it’s gloriously mess‑free. I can experiment with everything from sleek pro‑race schemes to “I let my imagination drive and now it won’t give back the keys.”
This time? Let’s just say I got… a little carried away. Somewhere between “subtle accent stripes” and “full carnival parade,” my virtual car turned into something that would require sunglasses just to look at.
Render
.png)

Side Quest — Chasing the Golden Hour 🌅🏎️
Somewhere between wiring LEDs and debating paint colors, I took an artistic pit stop. I’ve always loved the F1 The Album cover — that deep gold sunset, the dramatic gradient sky, and the perfect silhouette of a race car with just a pinpoint of light. It’s the kind of photo that screams “epic” — and also “you’re never getting this shot in real life unless you own a plane, a track, and the world’s biggest light rig.”

So I did the next best thing: rendered it.
Here’s the thing about silhouettes: if you can’t see them… they’re working perfectly. The car becomes this mysterious outline, and your brain fills in the rest. It’s simple, it’s bold, and it’s a lot easier to get right in software than in real life, where the sun inconveniently moves.
Of course, I also tried to work my LEDs into the render for that little pop of realism — but, truth be told, making LEDs look convincingly real in Fusion 360 is… tricky. They either looked like dull dots or tiny supernovas. In the end, I admitted defeat for now. If I really wanted to nail the lighting and reflections, I’d jump into one of Autodesk’s dedicated rendering tools like Autodesk VRED or 3ds Max for some proper photorealism magic.
With that creative detour done, I holstered my virtual camera and headed back to the main quest: real‑world paint.
Masking Tape

Assembly:
- Apply masking tape to prep for painting.
- Fit it carefully onto curved surfaces.
- Trim away excess tape to reveal intended edges.
Notes: This turned into an unexpected boss‑level challenge — getting tape to stick smoothly on curves felt like wrestling an octopus. Cutting was its own ordeal, made worse when I realized halfway through that my blade was about as sharp as a marshmallow. After a determined battle, the curves were conquered, and everything ended up fully masked and ready for paint.
Painting

Now for the fun part: painting. I knew I’d need multiple coats — partly to smooth out the layer lines and partly to cover the stubborn black filament. Black, as it turns out, is like the photo‑bomber of paint jobs — always lurking under the surface, ready to ruin your big moment. I started with yellow, not for fashion points, but because it’s strong, bright, and works like a bold primer. Then came two coats of gold, which erased the black completely and gave the body that “fast even when parked” look I was aiming for.
The main hiccup came courtesy of masking tape. I didn’t know you’re supposed to peel it off while the paint’s still wet, so I waited — only to have it peel the paint right along with it. A quick save with isopropyl alcohol smoothed things back into place, sharpening the lines again. Crisis averted, and the car was now ready for its big reveal. 😅
Your RC car is officially race‑ready! 🏎💨 Of course, without a controller, its top speed right now is roughly… zero. On the bright side, it’s also the safest driver in the world — it can’t crash if it can’t move.
Sponsors


Sponsor Decals — My Personal Pit Crew 🏎️✨
Every F1 car wears its sponsors like a badge of honor, so I figured my RC deserved the same treatment.
First up: Instructables — I appreciate that they host these contests and give makers a stage to share, learn, and get inspired. Without platforms like that, half the cool ideas in my head would still be just… in my head.
Next was Autodesk. They provide their software free for students, and honestly, if it weren’t for that, I might never have started 3D modeling. That leads perfectly into Fusion 360 — the app I probably use more than any other. It’s my go‑to for designing everything from quick brackets to full‑blown chassis, and it’s saved me from more “measure twice, cut once” disasters than I can count.
Finally, Orca Slicer — in my opinion, one of the best slicers out there. It’s open‑source2, free, and constantly improving thanks to its community. Slicers are like the chassis of 3D printing: without them, nothing moves forward.
I printed the sponsor logos on paper, cut them to size, and glued them onto the RC body. They fit perfectly — like they were always meant to be there — and now my car looks ready to take on Monaco… or at least the driveway.
Your RC car is officially race‑ready! 🏎💨 Of course, without a controller, its top speed right now is roughly… zero. On the bright side, it’s also the safest driver in the world — it can’t crash if it can’t move.
Controller - Batteries

- Add battery cover to controller
- Route wires through hole
Notes: I had a brief moment of doubt about whether two AA batteries would be enough to power the controller. Most AAs give about 1.6 V each, so wired in series that’s a solid 3.2 V — more than enough to keep things running smoothly. After snapping in the batteries, sliding the cover into place, and giving it a test, the controller came to life without hesitation. Signal steady, worry gone, and my mild panic replaced with that satisfying “it just works” grin.
Controller - Switch

- Glue switch
- Careful not to glue knob
- Solder positive switch lead to battery
Notes: I wanted a small, clean switch that wouldn’t shout for attention — just a subtle click to bring everything to life. The glue set faster than I expected, and for a tense moment I thought I’d sealed the knob forever (instant sculpture, zero functionality). Thankfully, it freed up with a gentle twist, and the solder job from the positive lead to the battery went on without protest. Now the setup has that “less is more” look… without the “less working” part.
Wiring


- Solder components
- Route wires cleanly
- Heat‑shrink/insulate joints
- Continuity test and polarity check
Notes: The only real anxiety here was the joystick. It’s just two potentiometers acting as voltage dividers, so its “center” sits around mid‑supply — but AA batteries sag from fresh to tired, and that voltage wanders. If your ADC reference is the same supply, the readings stay proportional, yet mechanical offset and noise still nudge the numbers. So I wrote a quick calibration: on boot, leave the stick untouched, sample X and Y a handful of times, average to get center offsets, subtract those from all future reads, and add a small deadzone to kill jitter. Boom — both axes zero out at rest, full throw maps cleanly, and my thumb gets to be dramatic without the code believing it.
Cover

- Glue electronics in place
- Glue cover on top
Notes: One of the core design goals here was pure comfort — minimal fuss, maximum feel. I shaped it with soft curves instead of sharp edges, adding fillets so every contour sits naturally in the hand. Once the electronics were glued down and the cover secured, it felt like a single smooth piece, no awkward ridges or angles. The fit is so good you almost forget there’s a tangle of circuits inside… and with luck, you’ll never need to crack it open again.
Battery Cover - Controller

Add batteries
Screw the bottom in place
Test — built‑in LED should light up
Conclusion

This build was a blast. Definitely one of the most challenging projects I’ve tackled — from modeling the tiny F1 curves to squeezing in electronics that clearly didn’t read the size memo. But in the end, seeing it drift across the floor made every late night and dull blade worth it.
I hope you enjoyed following along, and maybe even got inspired to build your own mini racer. If you have any questions, suggestions, or just want to talk shop about RC builds, feel free to reach out — I’m always happy to chat.
And hey, if your wiring looks like spaghetti at some point… you’re probably doing it right.
Next Steps & Future Upgrades


This little F1 drift beast is just getting started. Version 2.0’s shaping up to be part performance lab, part tech playground:
Swappable Body Shells: Magnetic mounts for lightning‑fast style changes — because even pint‑sized racers deserve a wardrobe refresh.
FPV Setup: Strapping a micro camera to the nose for true cockpit‑view driving. Think Monaco Grand Prix… but in the kitchen.
3S Battery Upgrade: More volts, more torque, more grins. Just enough power to make “accidental” oversteer feel intentional.
Functional DRS: A servo‑driven rear wing flap to cut drag on the straights — pure F1 theatrics in miniature.
Bluetooth/Phone Control: Trade the transmitter for your smartphone and tweak throttle curves between sips of coffee.
Telemetry Display: Speed, voltage, temps — live. Because data is delicious, especially when it helps shave tenths off a lap.
Adjustable Suspension: Swap springs and tweak ride height so it hugs a drift pad or devours a bumpy parking lot.
If you’ve got hacks, experimental mods, or ideas so wild they just might work, I want to hear them. This build’s about learning, tweaking, and squeezing maximum fun out of every millimeter of carbon, plastic, and code.
The Secret Pit Lane

This build actually has a split personality when it comes to how I showed the assembly. The RC car itself was fully rendered in Fusion 360, while the controller was photographed in real life, parts and all, right from the start. The idea came after looking at a LEGO Ideas set — you know, the ones where they sprinkle in fun facts as you assemble — and loving how it makes the build feel like an interactive story rather than a flat set of instructions.
The rendering route has that ultra‑clean, “nothing out of place” look and lets you show angles you could never get with a camera. The photo route, on the other hand, gives you the grit, the texture, and the satisfaction of seeing the actual thing in your hands. I’d honestly love to know which style you enjoyed more — the virtual perfection of the render, or the real‑world charm of the photos — because both have their place, and I had a blast trying them side‑by‑side.