Motorcycle Mechanical Overhaul - Honda CB250N
by TomGoff in Workshop > Motorcycles
207 Views, 0 Favorites, 0 Comments
Motorcycle Mechanical Overhaul - Honda CB250N

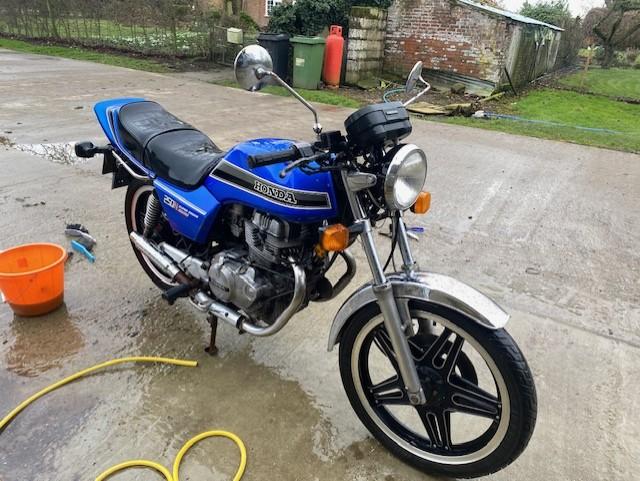
I've owned this simple bike 250cc commuter bike for over 15 years, buying it for a bargain price of £450. It was bought as a cheap form of transport used for commuting to work during the recession of 2008 - 2012. It did it's job of hauling me to work every morning at 6am through wind, rain, snow, ice and hot weather and it only let me down once when the battery died (the engine still worked, I just had no lights and it was night). I eventually bought myself a bigger more modern bike and tried to sell this reliable little workhorse for £400. However, after many people came to look at the bike and were undecided on whether to buy it or not I decided to keep the bike and use it to experiment with engine tuning.
I lightened the bike, skimmed the cylinder heads, polished the inlet and outlet ports, tuned the carbs and fitted performance parts. After a couple of dyno runs I gained about 15% more horse power and the bike ran well. However, as my family grew and moved house a couple of times the bike languished in a barn on the family farm for over 10-years.
After chatting to friends about the bike earlier this year I decided to give it a try and see if it would start up. So I drained out the old petrol and attached a car battery with some jump leads and low and behold the bike fired up and seemed to run pretty well, a testament to the quality of Honda engineering in the 1970's and 80's.
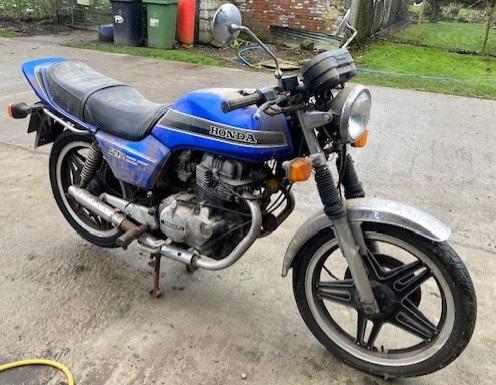
My friends have tried to convince me to convert it into a café racer or flat tracker however I feel it is best suited to stay reasonably original (although a flat tracker is tempting). I don't want to restore the bike to mint showroom condition, I just want to tidy it up and make sure it's safe and mechanically sound for regular road use (I think this is called an "Oily Rag" restoration). The bike is nearly completely original, even with the original aluminium number plate which will definitely stay.
Supplies
Spare Parts and materials:
- Front brake calliper and pads.
- Front brake master cylinder.
- Fork seals and dust caps.
- Front Fender.
- Head light unit.
- Ignition switch
- Handlebars
- Mirrors
- Air Filters
- Battery
- Regulator Rectifier
- Drive chain
- Rear sprocket.
- Exhaust silencers pair
- Rear Shock absorbers pair
- Fork oil
- Engine oil
- Oil Filter
- Brake Fluid DOT 4
Cleaning and Surveying
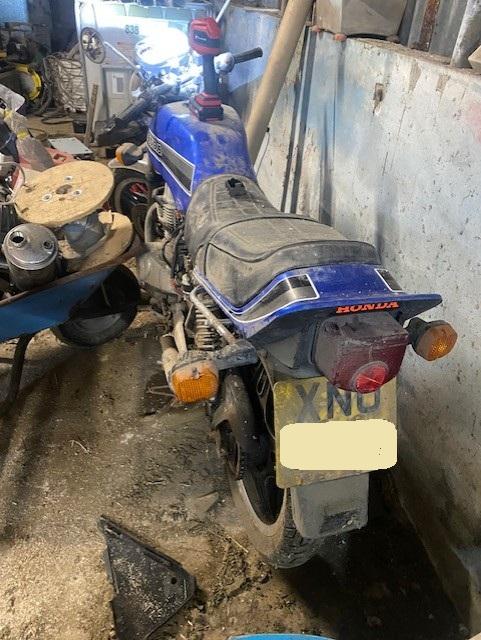
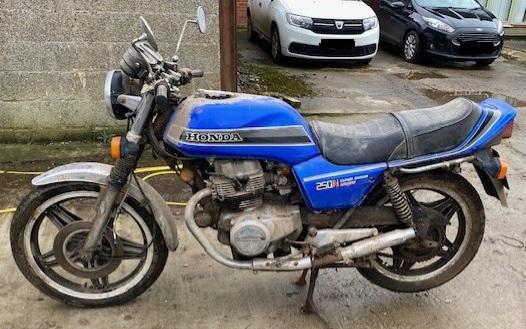
I dragged the bike out of the barn and washed of all the old dust and muck. I was pleasantly surprised at how well it cleaned up. I think in the dark depths of my mind I remember spraying it over with some light oil before I left it for hibernation which I think probably attracted more dirt but also saved it from corroding too badly.
Once I had clean the bike I made a mental note of all the jobs I wanted to do.
- Service the front and rear brake.
- Fit new handlebars and mirrors.
- Replace the damaged ignition switch.
- Replace the fork seals.
- Replace the rear shocks.
- Check over the electrics.
- Fit a new chain and sprocket.
- Clean up the paint work.
- Service and clean-up the carburettors
- Fit new air filters
- Replace the engine oil and filter.
- Check / set the valve clearances.
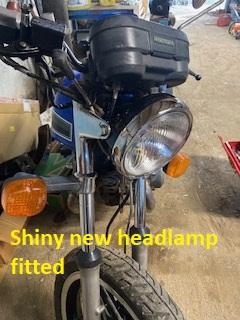
- Fit a new headlight (the old one worked fine, I just want a shiny new one).
- Fit new exhaust silencers.
- Replace a damaged indicator unit.
- Take it to a proper garage for an MOT test.
In the UK a MOT (Ministry of Transport) is a test done by an approved garage each year to ensure a vehicle is safe to use on the road. A change of the law a few years ago means that vehicles over 40 years old no longer need to have this test. Although this bike is over 40 years old I have decided to have an MOT test because I would like an expert to check it over to make sure it's safe to use.
There's quite a bit of bit of work to do but the parts are easy to get and generally not too expensive if you shop around.
Front Brake
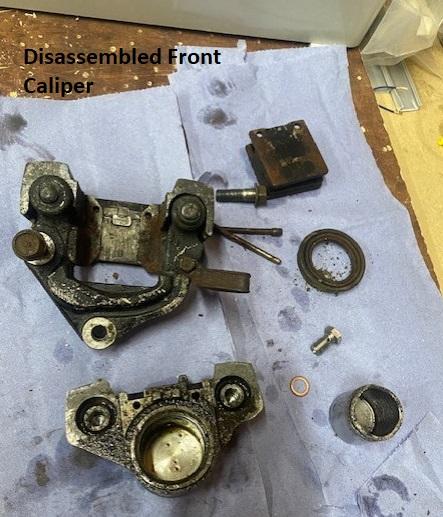
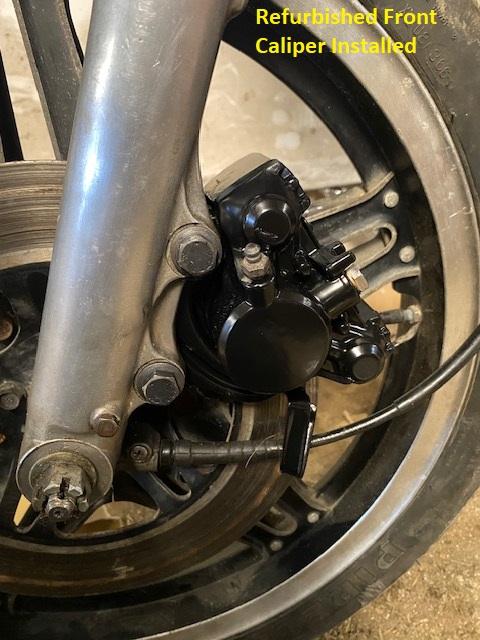
The front brake caliper had seized when I dragged the bike out of the barn. As a result I decided to strip and refurbish the caliper. Remember brake fluid is a nasty chemical and you always wear the correct PPE such as protective gloves and glasses. This involved replacing the piston and seal with new. When working on brakes you must make sure the spotlessly clean, here is the process I followed:
- Disconnect the brake line from the caliper and seal off the end of the brake line.
- Remove the brake caliper from the LHS front fork.
- Strip down and refurbish the caliper as follows:
- Remove the brake pad retaining pins, this took a bit of heat and penetrating fluid.
- Remove an dispose of the old brake pads.
- Split the two halves of the brake caliper.
- Drain any old brake fluid from the caliper.
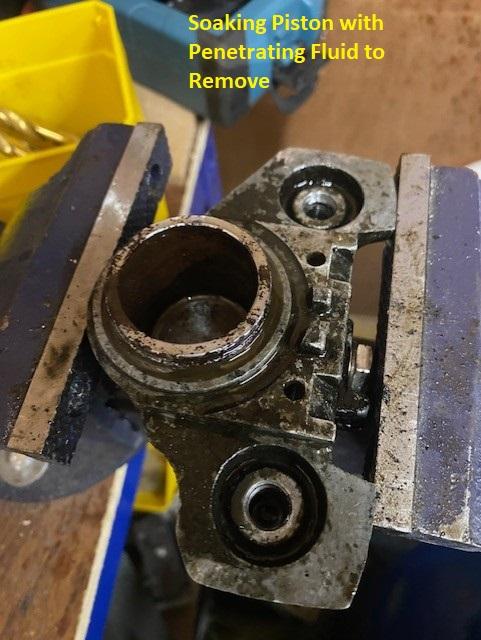
- Remove the old brake piston. This took a lot of persuading with heat and penetrating fluid.
- Remove the old brake piston seal and dispose of.
- spotlessly clean the brake caliper outside and in so it is completely free of dirt.
- Smear some clean brake fluid around the new piston seal and fit to the caliper cylinder.
- Reassembled the Brake Caliper.
- Paint if required (making sure you cover all holes and areas not requiring paint.
- Fit new brake pads.
- Refit the Caliper to the front Forks.
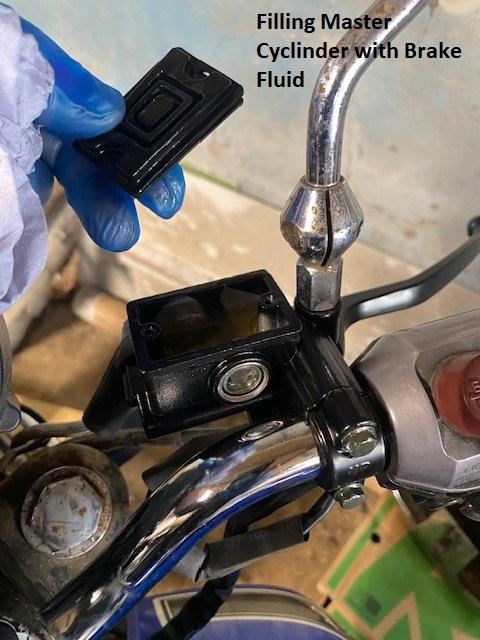
I also fitted a new front Master Cylinder because the cost of a new pattern part Master Cylinder made refurbishing the original not economically viable.
With the refurbished caliper and master cylinder fitted I checked over the existing braided brake tine and connected it using new washers. I was very careful to inspect the brake line to make sure it had no damage to it.
With the system full of new DOT 4 brake fluid I then proceeded to bleed the system, there are multiple ways to bleed a motorcycle brake system but I keep it simple and did the following:
- Make sure the bike is parked on a level surface on the centre stand.
- Attach clear tubing to the bleed nipple on the front caliper.
- Submerge other end in a jar with a little brake fluid (to prevent air returning).
- Pump brake lever several times, then hold it in.
- While holding the lever, open the bleed nipple slightly.
- Watch for fluid and air bubbles exiting the tube.
- Close the nipple before releasing the lever.
- Repeat until only clear fluid with no air bubbles comes out.
- Top up the reservoir regularly during the process to avoid sucking in air.
- Once done, tighten the bleed nipple and remove tubing.
- Top off brake fluid, refit the reservoir cap, and clean any spilled fluid.
Rear Brake
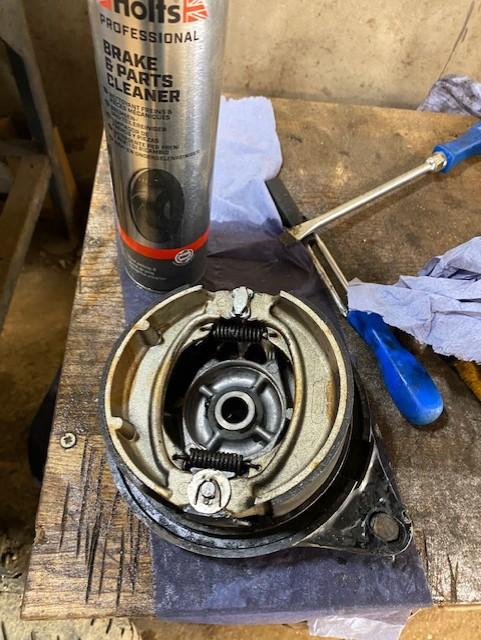.jpg)
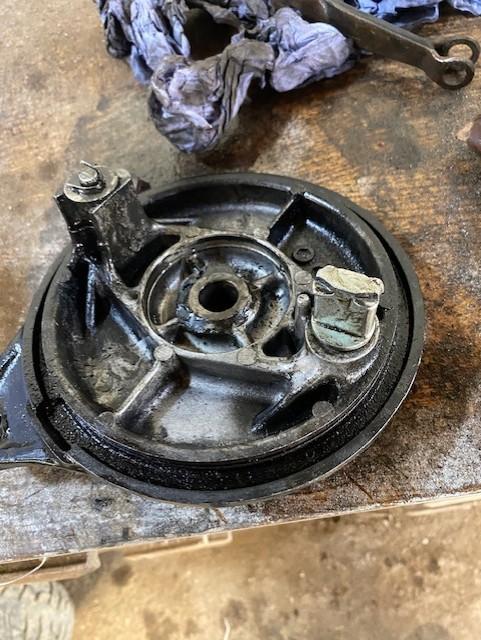
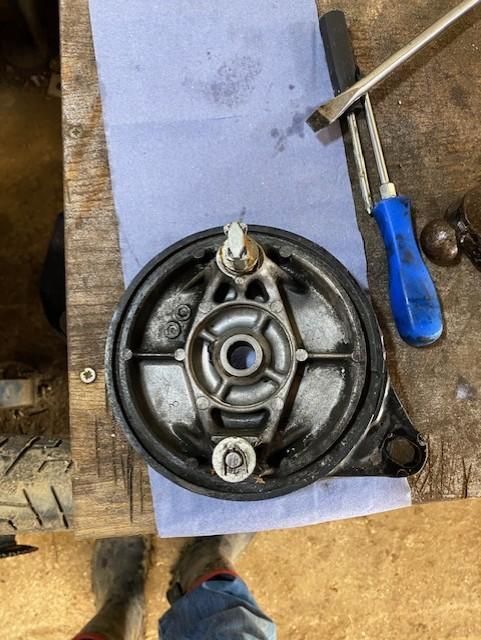

As with the front brake, the rear drum brake was also seized. The rear brake did not require the the amount of work as the front brake. Here's the procedure I used refurbish the rear drum brake.
- Disconnect the linkages to the rear drum brake.
- Disconnect the drive chain.
- Remove the rear wheel assembly which includes the drum brake assembly.
- Remove the Brake Shoe Assembly
- Remove the Brake shoes
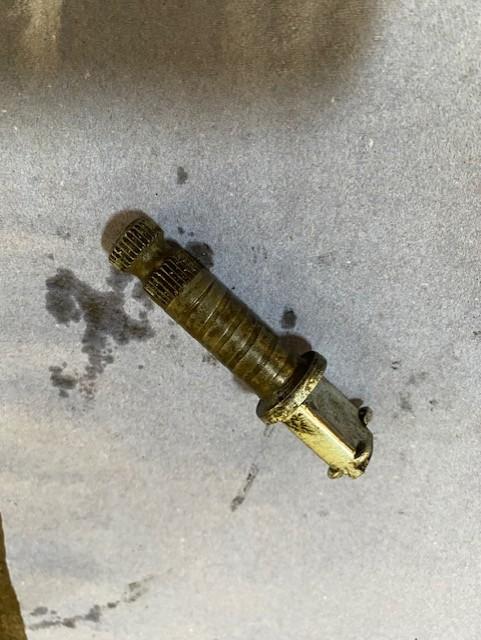
- Remove the actuator cam which expands the brake shoes when rotated. This was the seized component and needed penetrating fluid sprayed on it to remove.
- Clean the cam and re-grease with silicon grease.
- Clean the complete brake assembly with brake cleaner.
- Grease the remaining moving parts with silicon grease.
- Re-fit the brake shoes.
- Refit the drum assembly to the back wheel.
- Re-fit the back wheel.
- Connect the brake linkages and adjust as necessary.
- Re-connect the drive chain.
Fork Seals


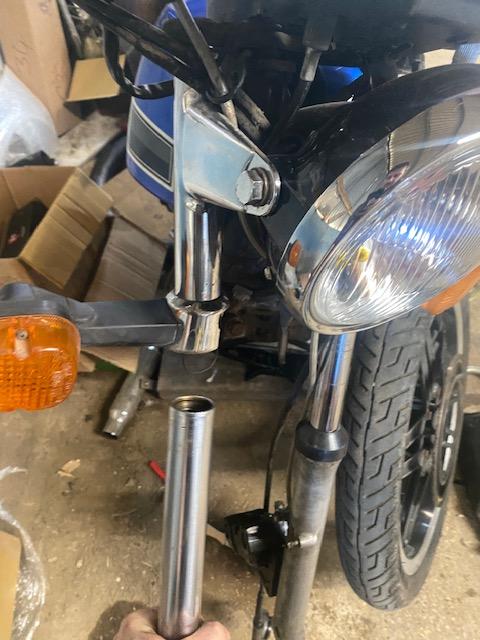


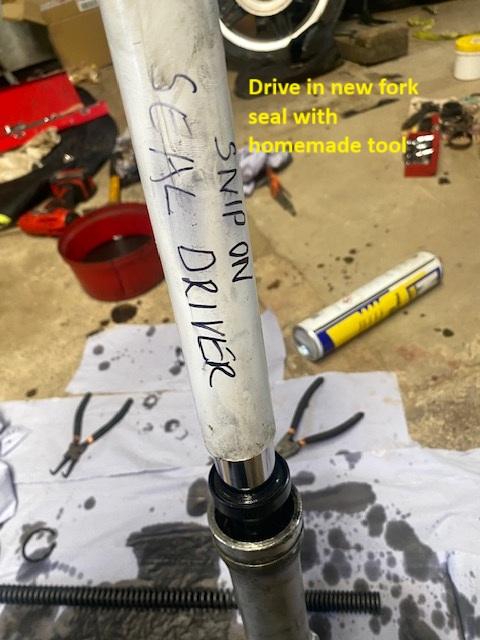
Because the bike had sat for so long one of the fork seals had degraded badly and fork oil had leaked. Replacing motorcycle fork seals is essential to maintain both suspension performance and safety. Worn or leaking seals allow fork oil to escape, reducing damping ability and affecting handling. Oil on brake components or tyres can be very dangerous. Regular replacement prevents wear on internal parts and keeps the ride smooth and controlled. Here's a guide to how I replaced the fork seal on the RHS fork assembly:
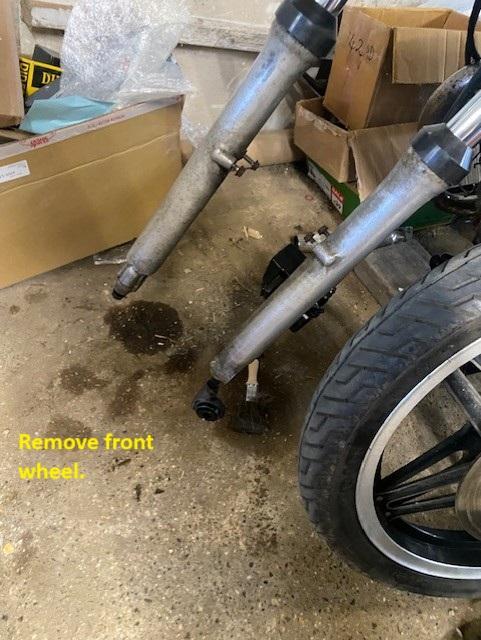
- Remove the Front Wheel.
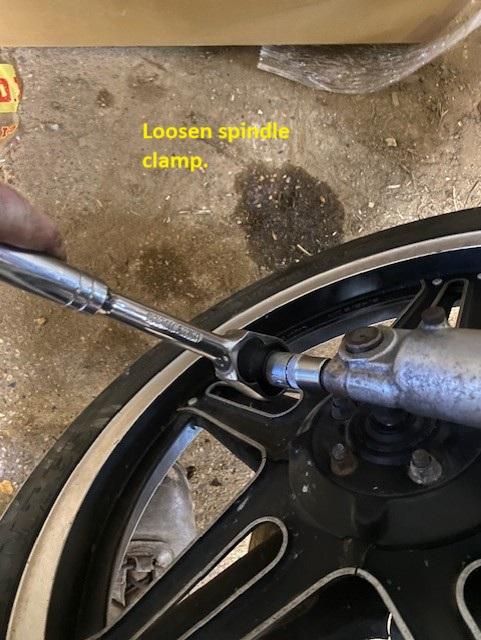
- Remove the large nut at the top of the fork station with a socket.
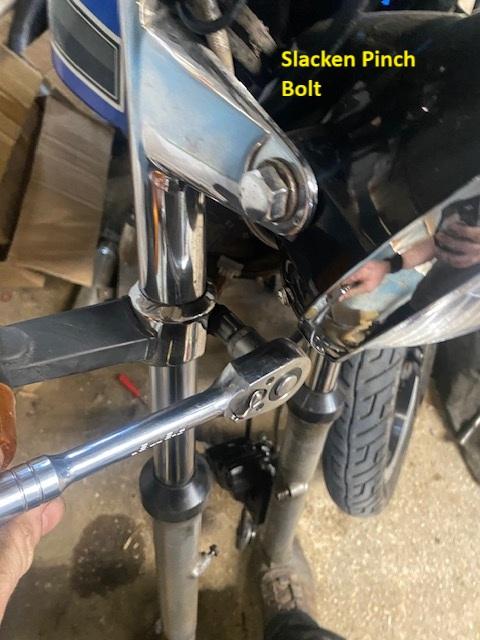
- Loosen the pinch bolt that holds the fork stanchion in place.
- Remove the fork assembly.
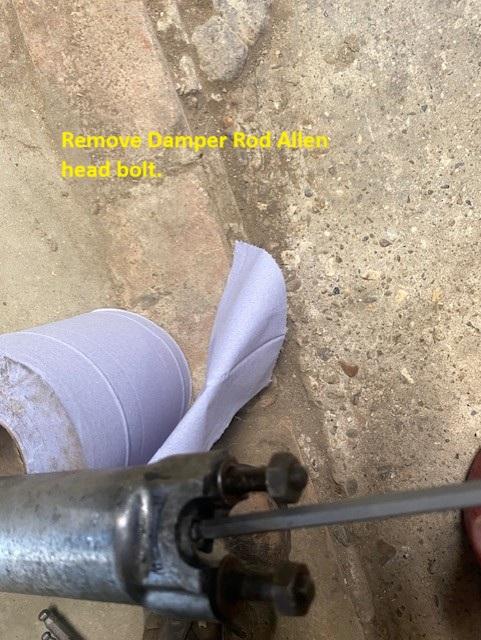
- Remove the Allen head bolt at the bottom of the fork that holds the damper rod in place.
- Drain out the fork oil into a waste container.
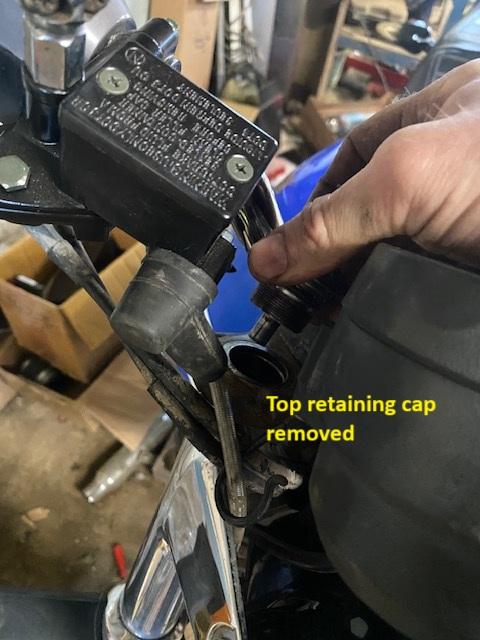
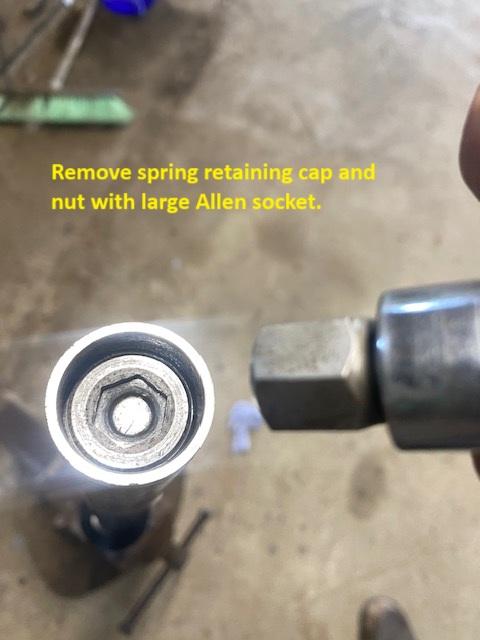
- Remove the Allen head nut from inside of the fork stanchion that retains the spring with an Allen head socket. There is a cap under this nut that holds the spring.
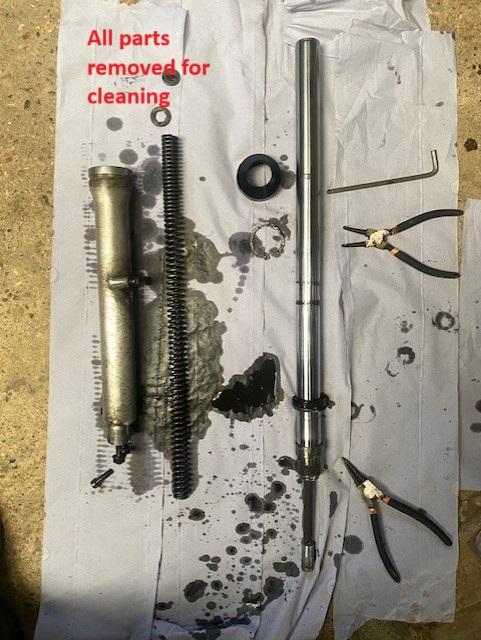
- Remove the main spring and give it a good clean.
- Remove the dust cap.
- Remove the circlip that holds the fork seal in place.
- Using the fork stanchion like a slide hammer, pop out the fork seal and cup washer.
- Remove the damper rod assembly.
- Give everything a good clean.
- Put the damper rod assembly back in the stanchion rod.
- Re-fit the Allen head bolt that holds the damper rod assembly in-place. It's important to to this now as otherwise when you fill with oil it will all run out.
- Slide on the cup washer so it seats correctly.
- Coat the new fork seal in fork oil and slide down the stanchion as far as it will go.
- Drive the new fork seal into position. I used a homemade fork seal driver using a price of plumbers waste pipe that had an internal diameter just bigger than the fork.
- Re-fit the circlip.
- Re-fit the dust cap.
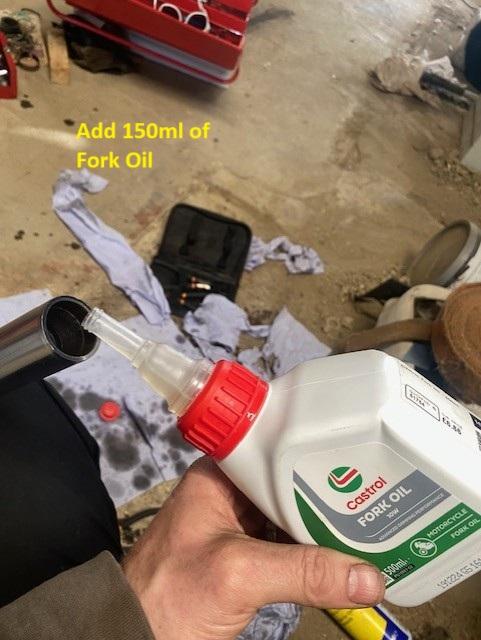
- Fill the fork with the correct quantity of fork oil, my bike requires 150ml of oil per fork.
- Re-fit the spring.
- Re-fit the fork spring retaining cap and nut. You may need to hold the fork up right with a clamp as you will need to compress the spring while you tighten the nut.
- You can now re-fit the fork which is the reverse of the removal.
It's probably a good idea to refer to your manual for the correct torque settings for your particular bike make, model and year of manufacture.
I repeated the above procedure for the LHS fork.
Carburettor Clean and Service
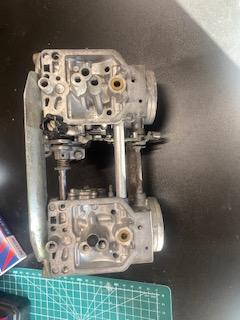
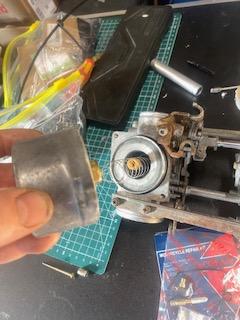
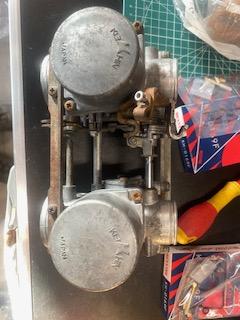
Because the the bike had sat unused for so long I decided to refurbish the carburettors. This involved stripping the Carbs of the bike as follows:
- Turning off the petrol tap and draining the fuel from both the bowls.
- Removing the two throttle cables (one to open the throttle and one to close the throttle).
- Removing the choke cable from the carb.
- Removing the air filters.
- Disconnecting the Inlet rubbers from the engine.
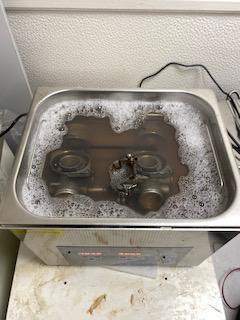
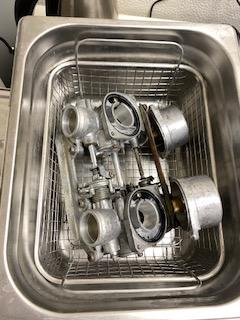
Once the carbs were off I removed the bowls and then took out all the jets.
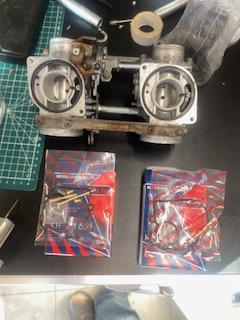
With the carbs stripped down it was time to clean them in an ultrasonic cleaning machine. This enables all the passages inside the cab to get a thorough clean. I used a 10 litre ultra sonic cleaner with a specialist carb cleaning solution. The cleaning process took 1 hour at 60 degrees Celsius.
I decided to purchase to refurbishment kits for the cabs as I really wanted to replace the rubber gaskets which can become hard over time, due to the amount of ethanol in modern fuels. The kits came with new jets so they also got changed.
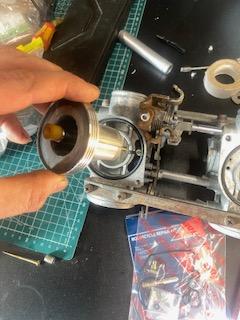
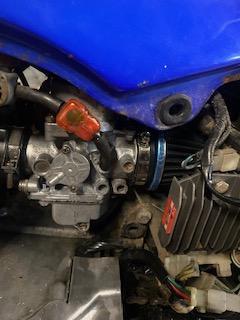
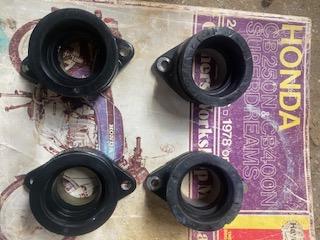
When I fitted the carbs I found the engine ran better however I did not come back down to idle when I stopped the bike and pulled the clutch in. If I briefly loaded the engine the idle speed dropped to normal. This is a classic symptom of an air leak. With the bike at idle I sprayed a small amount of carb cleaner around the inlet rubbers and found the idle speed increased by 500 rpm. After further inspection I found a slight crack in one of the inlet rubbers. New inlet rubbers were then ordered and replaced.
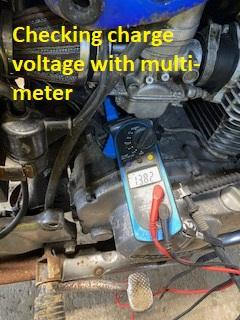
Ignition Switch and Electrics
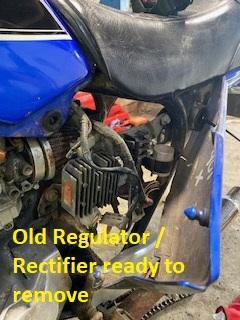
There were three main electrical jobs I needed to do:
- Change the ignition Switch
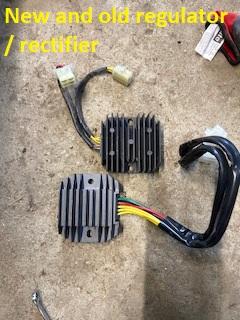
- Change the Regulator Rectifier
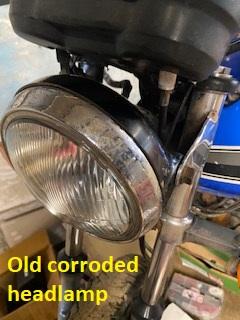
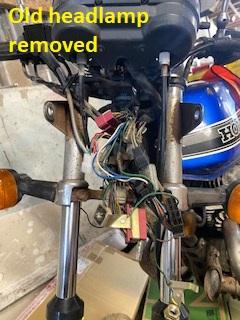
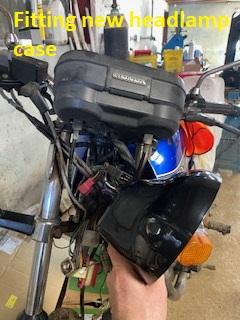
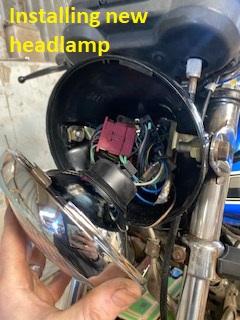
- Change the Headlamp
- Change the rear LHS indicator
None of these jobs were too hard.
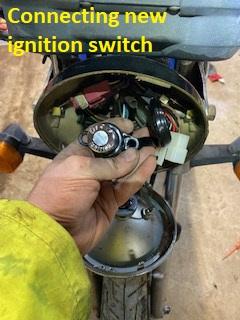
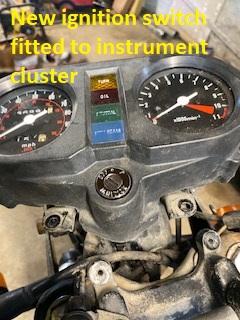
Ignition Switch
This was super simple and I did it as follows:
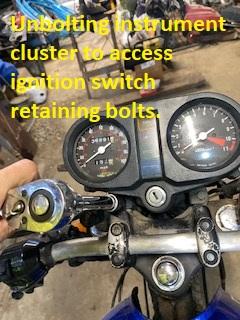
- Undo the two bolts holding down the instrument cluster.
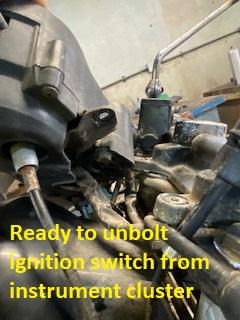
- With the instrument cluster loose, undo the two bolts holding the ignition assembly.
- Undo the two bolts holding the headlamp lens in place and remove the headlamp lens.
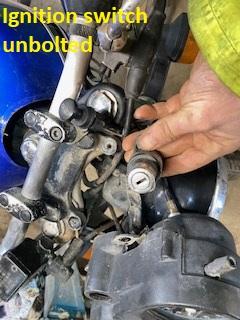
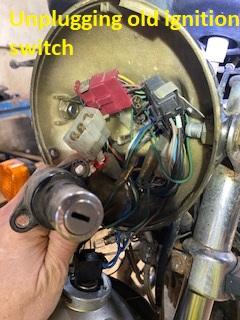
- Disconnect the connector connecting the ignition switch.
- Pull the old ignition switch wires back through the headlamp case.
- Remove the old ignition switch.
- Pull in the wires for the new ignition switch into the headlamp case.
- Reassemble everything (reverse of disassembly).
Regulator
This was super simple and I did it as follows:
- Undo the two bolts holding down the instrument cluster.
- With the instrument cluster loose, undo the two bolts holding the ignition assembly.
- Undo the two bolts holding the headlamp lens in place and remove the headlamp lens.
- Disconnect the connector connecting the ignition switch.
- Pull the old ignition switch wires back through the headlamp case.
- Remove the old ignition switch.
- Pull in the wires for the new ignition switch into the headlamp case.
- Reassemble everything (reverse of disassembly).
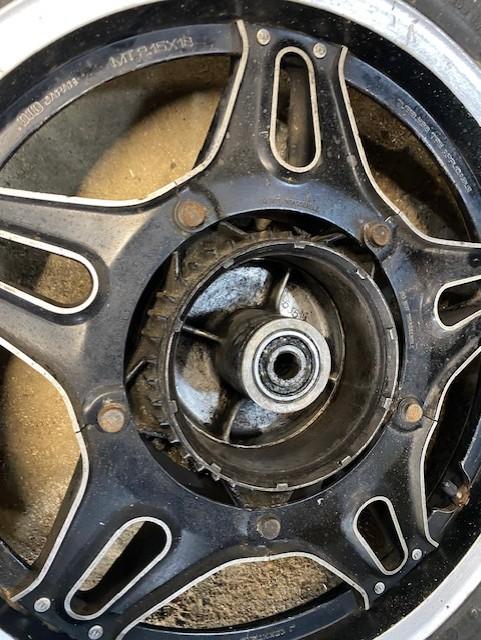
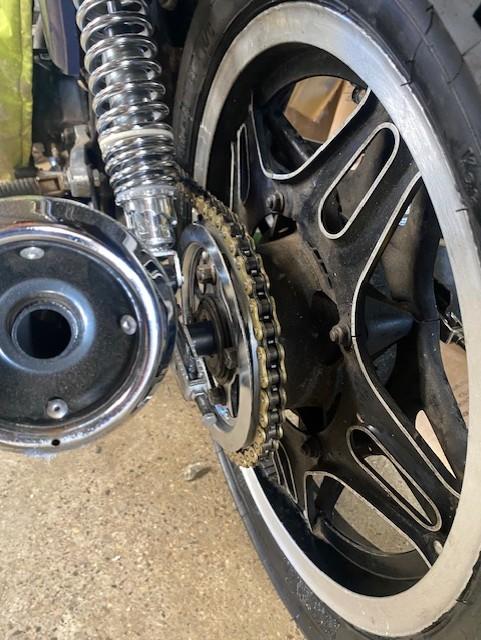
Chain & Sprocket
The chain and sprocket looked pretty old and corroded so I decided to replace with new. This is what I did to replace them:
- Split the drive chain and leave in place.
- Disconnect the rear brake linkages.
- Loosen the chain tensioner bolts.
- Remove the rear wheel axle.
- Remove the rear wheel assembly.
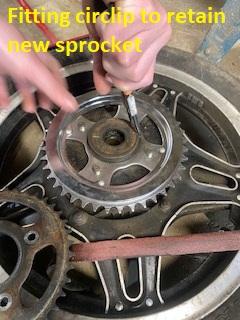
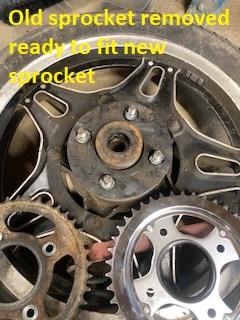
- Remove the sprocket by undoing the 4 sprocket nuts.
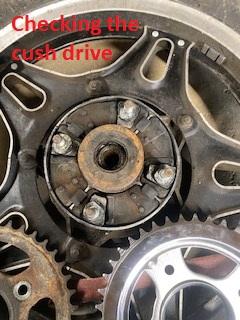
- Remove the cush drive cover and inspect the rubber cush drive. The cush drive softens the initial force when driving the rear wheel making a smoother drive.
- Replace the cush drive cover.
- Fit the new rear sprocket making sure the nuts are torqued up properly.
- Refit the rear wheel assembly but only tighten the the rear axle "finger tight".
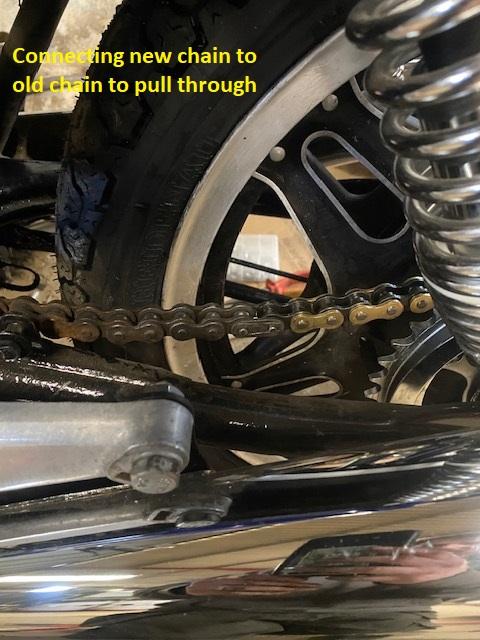
- Fit the new chain as follows:
- Connect the new chain to the old chain with a chain link (this saves removing an engine casing, I had previously inspected the drive sprocket so I new it was ok).
- Pull the new chain in and around the drive sprocket.
- Disconnect the old chain.
- Connect the new chain up making sure the rounded point of the connecting link points in the direction of travel.
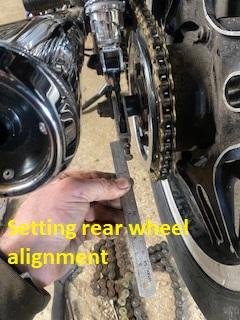
- Set the chain tension as follows:
- Check owner's manual for the correct slack range, a typical range is 12-25 mm total slack. I used 25mm for this bike.
- Turn the chain tension adjusters on the swing arm (one on each side) to move the axle forward or backward.
- Ensure you make the same adjustments on both sides to keep the wheel aligned, I used a steel rule on each side to check the adjustment, there is usually a crude guide stamped on the swing arm.
- Rotate the rear wheel a few time and check and adjust again as required.
- Once the chain slack is correct, tighten the chain tension adjuster lock nuts on both sides.
- Tighten the rear axle nut to the manufacturer's specified torque.
- Fit a split pin to the castle nut on the rear axle.
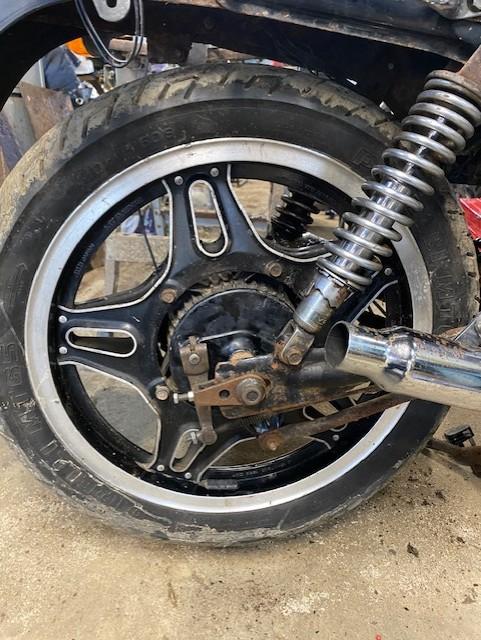
Rear Suspension and Swing Arm Overhaul
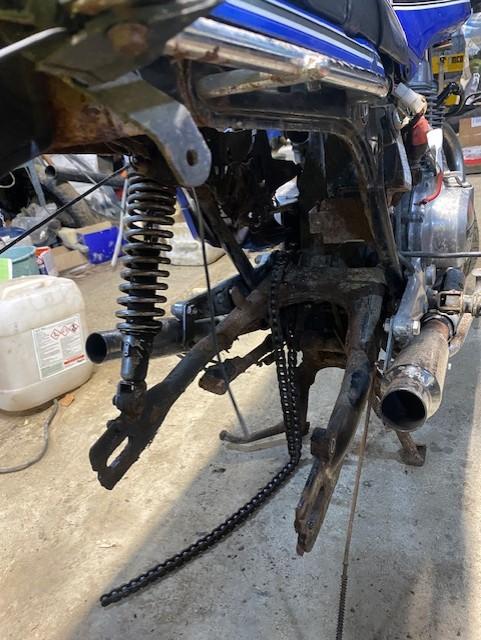

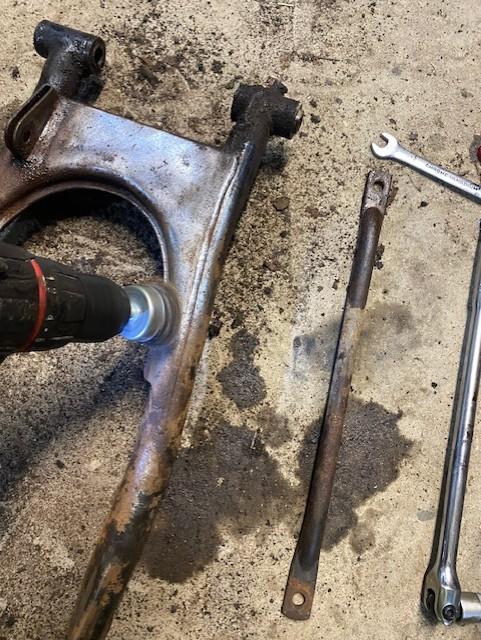
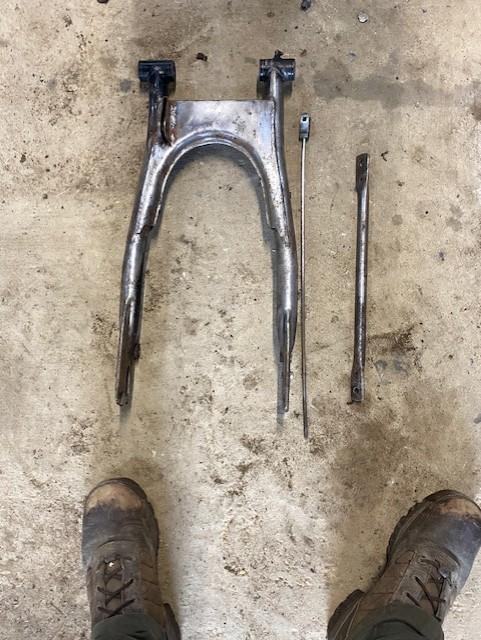
Replacing the rear shocks is an incredibly simple job on a Honda CB250N Superdream. You simply unbolt the two bolts holding on the existing shocks, remove them and them replace them with new. Because the swing arm was corroded and dirty I decided to remove it at the same time and remove all the corrosion and repaint it. While the swing arm was off I checked over all the bushes and bearings and made sure they were cleaned up and re-greased upon reinstallation.
Engine Service
Before I did any work on the engine I changed the oil and filter, this is a very simple procedure as follows:
- Warm-up the engine by running it for a few minutes, this makes the oil runny and easy to drain.
- Put a container under the oil drain plug with a minimum capacity of 4 litres.
- Remove the oil drain plug.
- Allow all of the oil to drain.
- Place the container under the oil filter housing.
- Remove the oil filter housing and change the oil filter.
- Replace the oil filter housing.
- Replace the oil drain plug.
- fill with oil (I used 10-40). Note the Haynes manual gives a overly large quantity of oil in it's specifications. I find my bike only requires just over 2 litres. I usually add 2 litres and then top-up until its the correct level on the dip stick.
- Run the engine and check for leaks.
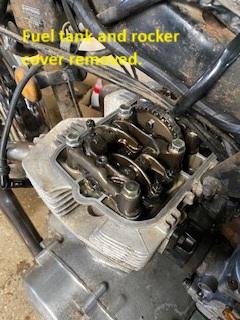
Valve Clearances.
After I changed the oil and filter I decided to check the valve clearances (the tappets). Checking tappet clearances is vital for engine performance and longevity. Incorrect clearances can lead to poor starting, reduced power, increased fuel consumption, or engine damage. Tight valves may not close fully, causing overheating or valve burn. Loose valves can cause excessive noise and wear. Regular checks ensure smooth, efficient operation.
Here's a guide on how I checked the valve clearances:
Preparation
- Park the bike on a level surface, on its center stand.
- Ensure the engine is stone cold (ideally left overnight).
- Disconnect the battery (optional but safer).
- Remove the seat and fuel tank.
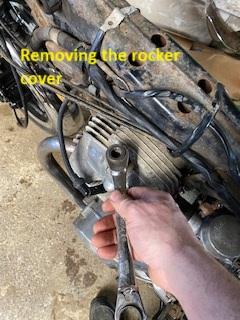
Access the Tappets
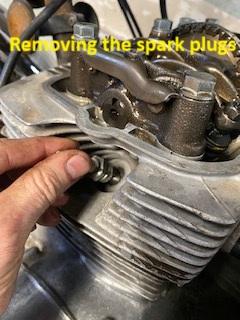
- Remove the spark plugs so the engine is easier to turn over.
- Remove the rocker cover.
- Check the gasket condition;, check and replace if you see any damage.
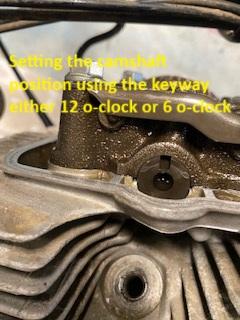
Find Top Dead Center (TDC) on Compression Stroke
- Turn the engine over by putting the bike in a high gear and turning the back wheel as if the bike was moving forward.
- Watch the cam shaft and rotate the engine so the keyway on the cam shaft is at 6-o-clock.
- Watch the rockers — you want both intake and exhaust valves fully closed on the cylinder you're checking (i.e. rocking stopped).
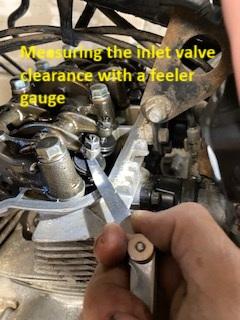
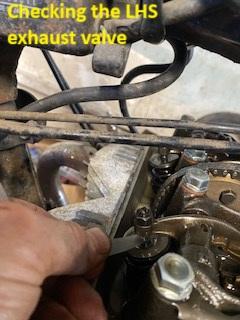
Check Valve Clearances (Left Cylinder)
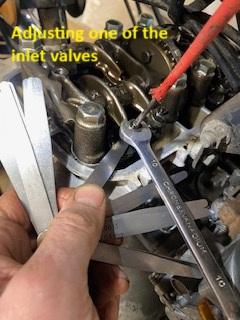
- Use a feeler gauge to slide between the tappet adjuster screw and the valve stem.
- It should slide with slight resistance.
- If too tight or too loose, proceed to adjust.
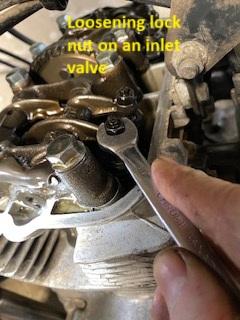
Adjust if Needed
- Loosen the locknut on the tappet using a spanner.
- Turn the adjuster screw with a screwdriver to set the correct clearance.
- Hold the screw steady while tightening the locknut.
- Recheck clearance after tightening — repeat if necessary.
Note: The valve clearance specifications for my Honda CB250 NB are 0.12mm (intake) and 0.16mm (exhaust) when cold. If you don't have the correct values on a single feeler gauge you can usually use two feeler gauges to make up the correct value, for example a 0.05mm and 0.07mm make 0.12mm.
Rotate Crankshaft 360° to TDC for Right Cylinder
- Watch the cam shaft and rotate the engine so the keyway on the cam shaft is at 12-o-clock.
- This brings the right cylinder to TDC on its compression stroke.
Repeat Check and Adjustment (Right Cylinder)
- As above, check and adjust both intake and exhaust clearances.
Reassembly
- Clean any old gasket material off tappet covers.
- Replace gaskets or apply gasket sealant if needed.
- Refit the tappet covers and torque bolts evenly (do not overtighten).
- Refit spark plugs (check gap if needed).
- Refit the fuel tank and seat.
Final Check
- Reconnect the battery.
- Start the engine and listen — it should tick over smoothly.
- A slight tapping is normal; loud ticking or silence can indicate incorrect clearance.
Other Jobs

I did a few other jobs to tidy the bike up a bit, here's a list of them:
- Replace the exhaust mufflers for shiny new ones.
- Clean and paint the centre stand and fit a new spring.
- Clean and paint the side stand and fit a new spring.
- Clean up the chrome bits and pieces.
- Fit new tyres.
- Check the headstock bearing.
- Fit new nuts and bolts together with safety split pins.
- Check through the controls (Lights, indicators, brake light, horn etc..)
To clean up the surface rust on the chrome bits I just used a combination of soft wire wool, penetrating oil and perseverance. Thet weren't perfect but look pretty good if you squint ;-).
Fitting the new tyres was probably one of the hardest jobs of everything I did. I did it the old fashioned way with tyre irons and a bit of lubricant. I wanted to show my son how to change a tyre yourself to show him it can be done!
Test Ride and MOT Test
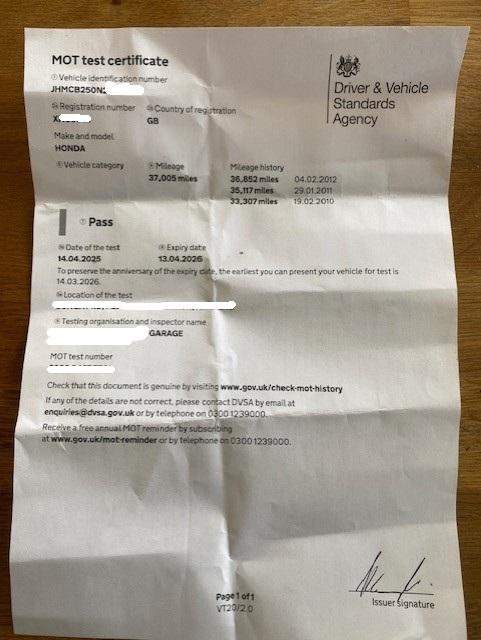

With the bike finished I took it out for a test ride on a concrete track to make sure everything worked fine and to test the brakes. Everything seemed fine so I insured the bike and booked it in for it's MOT test.
The MOT test was a success and the bike passed with no problems and no advisories. I was very interested in the brake performance and the bike performed very well with a 73% braking efficiency on both the front and rear brakes. The MOT centre was 8 mile ride and the bike performed well on the ride to and from the MOT test centre, I took it up to 60 mph with no issues at all.
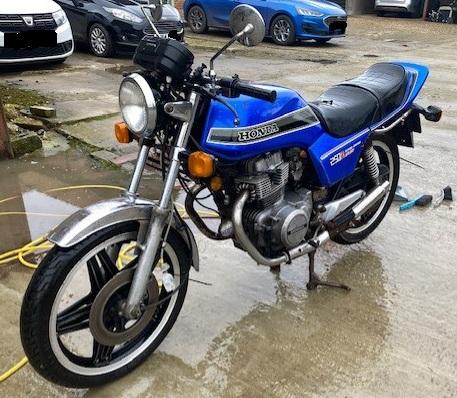
I have now got the bike into a condition I am happy with for general everyday use. However, a 44 year old bike like this is never really finished as you can always find more jobs to do. I will probably take the bike off the road again over the winter months and strip it down and get the frame powder coated.