Nice Looking Component Side Preview for PCBs
by danjovic in Circuits > Electronics
7781 Views, 17 Favorites, 0 Comments
Nice Looking Component Side Preview for PCBs


This instructable will teach how to make a nice looking image of the component side of your printed circuit boards made with Cadsoft's EagleEagle. The process can also be easily adapted to other PCB Cads. The software tools needed are:
-IrfanviewIrfanview
-MS Paint
Comparing the crude looking of the original green/blue/white image with the sharp look of the
salmon/white image one can see that it worths the effort!!!
-IrfanviewIrfanview
-MS Paint
Comparing the crude looking of the original green/blue/white image with the sharp look of the
salmon/white image one can see that it worths the effort!!!
Exporting the Background


Open your board with Eagle PCB editor.
Click in "Display" icon at Eagle pallete and then in "None" button. Then reselect the following layers
- Bottom
- Pads
- Vias
- Dimension
Click "Ok" button and you'll see the blue and green image of the bottom copper layer with pads and vias.
Click in File->Export, then select "Image"
Now check the "Clipboard" and "Monochrome" boxes and set the resolution to 300dpi. Then click Ok
button.
Changing the Colors of the Background


Now open Irfanview and then press Control+V (or select Edit-Paste). You shall see the Black and white image of the board
Now go to Image->Pallete->Edit pallette... menu in Irfanview, then click twice in the white box to change the white color to the color that will appear as the tracks, pads and vias. I prefer to use the salmon color, (RGB: 255,128,128) for two reasons:
- First one is that this is the first of the so called "Basic Color" in the Color window that appears, then I don't have to remember which color I've used the last time.
- Second one is that this salmon color provides a very nice look either when seen in a computer display or in a monochrome printer.
Click Ok button and then double click the black square in Pallete entries window. This time change the black color to a white color. Click Ok Button in the Color select window.
Now the board image shall be salmon and white.
Now choose Edit->copy option in irfanview (or press Control+C) to copy the image to the clipboard.
Pasting the Background
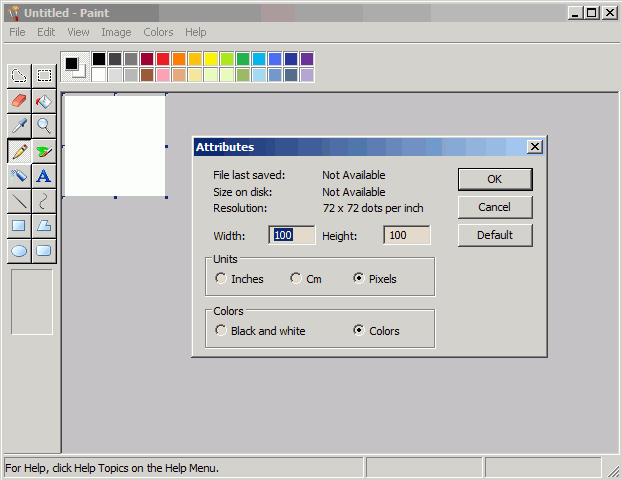


Open MSpaint and open the Attributes window by typing Control+E or by clicking in Image->Attributes. Change Width and height of the image so it's smaller than the board image. A 100x100 pixels is a good start.
Now type Control+V or go to Edit->Paste to paste the board image to MSpaint workspace. The Workspace now was resized to the Board image size.
Now, still in MSpaint, go to menu Image and unmark the Draw Opaque option.
Now type Control+V or go to Edit->Paste to paste the board image to MSpaint workspace. The Workspace now was resized to the Board image size.
Now, still in MSpaint, go to menu Image and unmark the Draw Opaque option.
Exporting the Image With the Components


Now go back to back to Eagle and click the Display menu and select the following layers:
- Vias
- Dimension
- tPlace
- tOrigins
You shall see the black and white image with the components.
If you haven't arranged the Names and Values of the components you can do it now:
First select the Group button in Eagle. Then draw a square big enough to embrace all the board. This will mark a group wit all the components of the board.
Now click in the Smash button of Eagle. Then RIGHT click over the board to perform the Smash function in the whole group, i.e., all the components. Now it's possible to move the components as well as the Name and Value labels.
After the labels are properly organized, go again in the Display menu and unselect the tOrigins layer.
Go again in File->Export, Image and check the "Clipboard" and "Monochrome" boxes and set the resolution to 300dpi. Then click Ok button to send the black and white image of the components to the clipboard.
Placing the Components Image


Go to MSpaint again. Click in Edit->paste, to paste the Black and white board image over the salmon and white background.
Now type Control+I in MSpaint, or click in Image->Invert colors. Make sure that Draw Opaque option is unmarked in Image menu of MSpaint. You shall see now in MSpaint a nice looking board image, but there's one last step:
Type Control+A in MSpaint, or select Edit->Select All. Then Type Control+C (Edit->Copy) to copy the image to the clipboard.
Finishing


Go to Irfanview and press Control+V (Edit->Paste). Now select Image->Decrease Color Depth option in Irfanview menu. Now Choose 16colors to reduce the image size.
Now press S (or File->Save as) in Irfanview and select GIF and uncheck "Save interlaced" and "Save Transparent Color". Now give a name to the picture and we're done!
Now press S (or File->Save as) in Irfanview and select GIF and uncheck "Save interlaced" and "Save Transparent Color". Now give a name to the picture and we're done!