Panel Poster - Make Your Own Giant Posters
by laboratory424 in Living > Decorating
33876 Views, 121 Favorites, 0 Comments
Panel Poster - Make Your Own Giant Posters


We wanted some ultra-giant posters around the lab. The costs and limitations were too much, so we created the Panel Poster. An inexpensive technique to create huge, professional-looking posters of any image you want using simple, raised, paper panels.
A Panel Poster is an image printed across multiple sheets of card stock and folded into panels measuring about 6.5 x 8.5 x 1/2 inches (16.5 x 21.6 x 1.27 cm). This allows you to produce large, custom posters at a fraction of the cost. The raised panel design gives the poster a professional appearance, is simple to install with our non-permanent, double-stick foam blocks, and panels can easily be replaced as needed.
This instructable shows you how to generate, print, and, build your panels. The instructable, How to install Panel Posters, shows you how to install, remove, and reuse panel posters.
Learn more details on the project page.
See more pictures in our Panel Poster gallery.
Here's a 5:55 minute video showing how to build a panel.
Get Parts, Tools, and Materials


Note: Some products purchased through these links may earn me a small commission to help fund further inventing to share with you. Thank you for your support.
For Printing
- 110 lb, 8.5" x 11" (216mm x 279mm) white card stock (or similar)
- Ruler
- USB Thumb Drive (optional)
- Access to a printer or a print service provider
For Building
- Panel poster score guide
- Double-stick tape strips
- Hobby knife, scoring tool (or similar)
- Scissors
- Self healing mat (or similar)
- Tweezers (optional)
- Vinyl gloves (optional)
Generate Poster File


To make a file for a Panel Poster, we need to pass an image through an application that will enlarge and dice it up across multiple pages contained in a single PDF document. We covered 4 free applications that do this nicely on our website:
Generate a Panel Poster File Using PosteRazor
Generate a Panel Poster File Using Block Posters
Generate a Panel Poster File Using Rasterbator
Generate a Panel Poster File Using Rasterbator Standalone
Our preference is PosteRazor since it has the ability to create huge, detailed posters using large image sizes. We will cover that here.
1. Select Image
PosteRazor is a free Macintosh, Windows, and Linux application that is the best option if your goal is to generate a poster at the highest quality possible. The input image can be as large as desired. We’ve been able to produce some highly detailed posters using this tool.
Here's some guidelines to help you select an image:
- The file format can be JPG, GIF, BMP, PNG, TIFF, and many more.
- We recommend using images that are 1 MB or larger.
- The larger the image size, the better the outcome.
- The larger the final poster (number of panels), the larger the image should be.
For example, here are three posters that used images ranging from 1 MB up to 4.8 MB. All produced large posters with great image quality. (PIC 2-2, PIC 2-3, PIC 2-4) If you want to search the internet for an image, an easy way to find images that are large enough is to use Google's images search tool:
- Go to Google's Advanced Image Search tool.
- Enter your search term(s).
- Set the image size to at least "Larger than 1024 x 768".
- Click "Search images" button.
- Click on an interesting image to see it's size.
2. Get a PDF Viewer
You will need an application that can view and print PDFs. On Mac, you will use the "Preview" application located in your "Applications" directory. On Windows you will need to download and install a free PDF viewer like Adobe’s Reader: get.adobe.com/reader/
3. Download and Install
Go to posterazor.sourceforge.net, click on the "Download" button, and choose a version you would like to download. (PIC 2-5) On Windows, run the installer. (PIC 2-6) On Mac, double-click to mount the DMG file and drag the PosteRazor application to your applications folder. (PIC 2-7)
4. Select Image and Paper Format
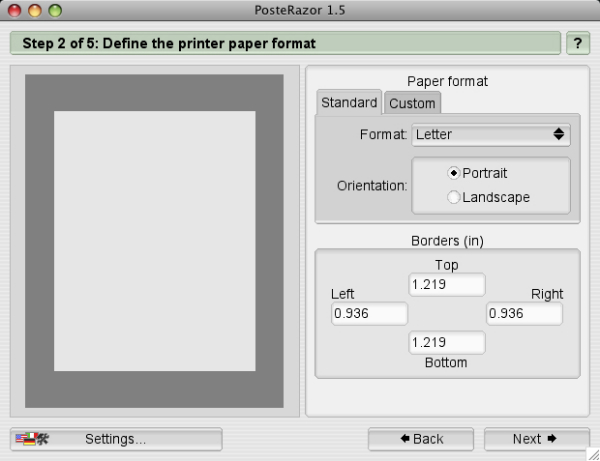
Launch PosteRazor and click the folder icon to load your "Input image". (PIC 2-8) Click "Next". Set the paper size and orientation as desired. The file needs to be scaled to allow at least a 3/4" margin. Do this by setting the borders to:
Left = 0.936 in (2.377 cm)
Right = 0.936 in (2.377 cm)
Top = 1.219 in (3.096 cm)
Bottom = 1.219 in (3.096 cm)
Click "Next". (PIC 2-9)
5. Define Image Overlapping
PosteRazor is designed to produce large posters by pasting pages together. To make this easier they have an "overlap" area where you layer adjacent pages. We do not want the overlap area. You cannot set the overlap to 0, so we set it to a small, unnoticeable number like "0.0001 in". (PIC 2-10) Click "Next".
6. Define Poster Size
Set the number of pages high and wide you would like your poster to be. If the image isn't being diced up correctly, you may need to crop and/or scale your image in another application like Photoshop or Gimp first. Don't worry about partial panels you don't care about. You can either remove these from the final PDF, or simply not print those panels. (PIC 2-11) Click "Next".
7. Save and Verify
Click the "Save the poster" button and name your poster file. (PIC 2-12) PosteRazor will process your file and open it when the poster is complete. Review the panels. (PIC 2-13) If you have partial panels that you do not want in the PDF, and your PDF viewer allows it, delete them from the PDF. If you have any other issues with the output, start the process again and make the desired changes.


Panel Poster images need to be printed on heavy card stock leaving at least a 3/4” (1.9 cm) margin around each image. This allows room to fold the artwork into a raised panel.
Printing on Macintosh or Windows
1. Load the card stock.
Load the card stock into your printer as directed by your printer’s manufacturer.
2. Open your PDF.
3. Print dialog settings.
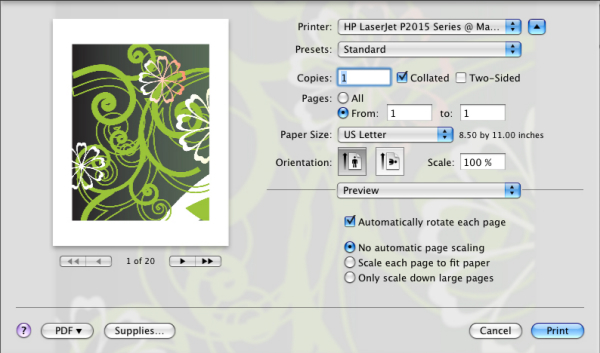
Click on the “File” menu and choose “Print”. On Mac, set the range for a single page. If you used PosteRazor, leave the scale at 100%. Otherwise, set the scale to 80%.(PIC 3-1, PIC 3-2) On Windows, set the range for a single page. If you used PosteRazor, "Page Scaling" in the "Page Handling" section should be set to "none". Otherwise, set “Page Scaling” to “Tile all pages”, and set “Tile Scale” to 80%. (PIC 3-3, PIC 3-4).
4. Print test page.
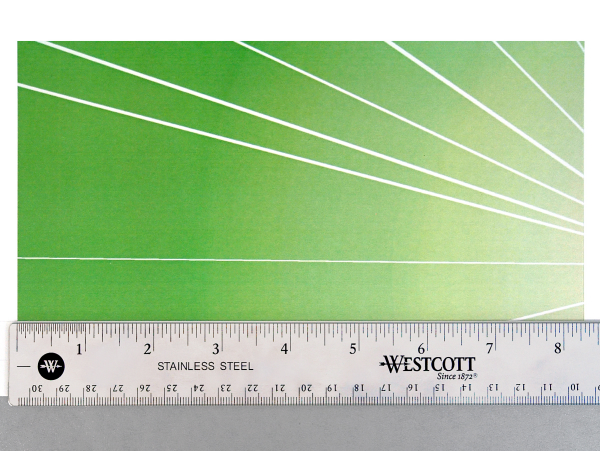
Measure each margin to make sure you have at least 3/4”. (PIC 3-5) They do not have to be equal. Go back to (3) and modify the “Scale” if you need more/less of a margin.
5. Print poster.
Once you have the margins verified, set the “Pages” option in the print dialog to “All” and print.
Using a Print Service Provider
1. Prepare USB thumb drive.
Copy your PDF file to your USB thumb drive.
2. Bring materials.
Bring your ruler, thumb drive, and card stock to the print service provider.
3. Instructions for the print service provider.
Tell the print service provider you would like to print on your card stock, and you need a proof of one of the pages before printing the entire file. If you did not use PosteRazor, ask them to scale the file 80%.
4. Check test page.
Review the print quality and measure each margin to make sure you have at least 3/4”. (PIC 3-5) They do not have to be equal. Go back to (3) and have the print service provider modify the scale if you need more/less of a margin.
5. Print poster.
Once you have the margins and quality verified, have the print service provider print the entire file while you go out and get a cappuccino. Make sure to check the final output when you are done. Print service providers will usually adjust color and reprint at no charge if you are dissatisfied with the output.
Score


The key to a perfect panel is using our Score Guide to produce properly spaced cut and fold patterns. (PIC 4-1, PIC 4-2, PIC 4-3)
Before you start, here's a few tips to keep in mind.
- Good Light. When scoring use a bright, direct, light source shining at an angle into the inside of the score edge. This will make it easy to see your alignment to the image edge.
- Images with lots of white. If you have a lot of white space you will not see where to score. (PIC 4-4) To figure out where to score, measure a colored panel's width. (PIC 4-5) On the panel to score, make light pencil marks where you should score. (PIC 4-6) Score as usual. (PIC 4-7)
- Imperfections are ok. The process is designed to be tolerant of imperfections. As long as you don't damage the face of the panel, it will not be noticeable once it is up on the wall. (PIC 4-8, PIC 4-9)
1. Position score guide.
Place a page on the cutting mat, face up. Position inside of score guide along picture edge. (PIC 4-10) Hold guide firmly.
2. Score inside edge.
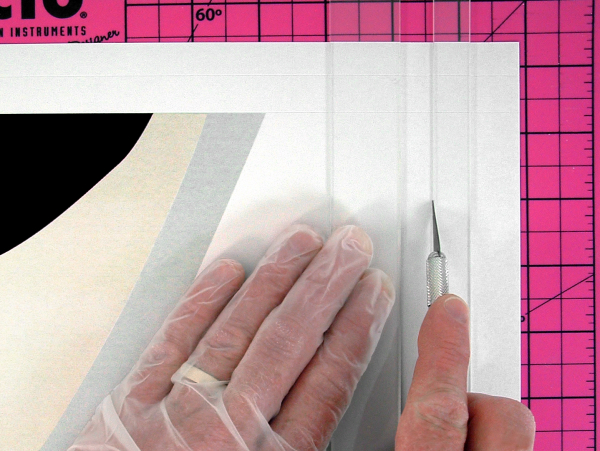
Using the back edge of a hobby knife, drag a score line along the inside of the score guide while holding the score guide firmly in place with your other hand. (PIC 4-11) Keep the knife at a sharp angle and apply pressure during the process. (PIC 4-12)
3. Score outside edge.
Score with back edge of hobby knife along the outside edge of guide. (PIC 4-13)
4. Rotate mat and repeat.
Rotate the mat to the next edge and repeat process. (PIC 4-14) Continue until all 4 edges have been scored. (PIC 4-15)
5. Repeat for other pages.
Repeat these steps for the rest of the pages.
Cut


We need to cut the page corners to create tabs and prevent the back edge from touching when folded. (PIC 5-1) Tabs are left attached to the short side of the page. (PIC 5-2)
1. Cut score lines A & B
Cut lines "A" and "B", stopping at line "D". (PIC 5-3, PIC 5-4) Repeat for all four corners.
2. Cut score lines C & D
Cut line "C", stopping at line "A". (PIC 5-5) Cut line "D" stopping at line "B". (PIC 5-6) Repeat for all four corners.
3. Cut corners
Cut the corners on the outer score lines at about a 45 degree angle (it doesn't have to be perfect). (PIC 5-7) Repeat for all four corners. (PIC 5-8)
4. Repeat for other pages
Repeat these steps for the rest of the pages.
Fold


Before we can assemble the panel we need to bend, fold, and crease all the score lines. (PIC 6-1)
Flip the page over. Grab along the inner score line and carefully bend inwards. Fold and crease the edge. (PIC 6-2, PIC 6-3, PIC 6-4) Repeat for the outer score line. (PIC 6-5, PIC 6-6) Repeat for the all sides. Bend all tabs inward. (PIC 6-7)
Assemble


Final assembly is fast and clean using double-stick tape strips. (PIC 7-1, PIC 7-2)
1. Apply tape strips
Using the hobby knife and score guide, cut the double-stick tape strips in half. (PIC 7-3) Remove a tape strip from the sheet. Apply the strip at the corners of the inner score line on the long side. (PIC 7-4) Repeat for all 4 corners.
2. Bond the corners
Carefully remove all the protective sheets from the pieces of tape leaving the thin sticky residue behind (tweezers help). (PIC 7-5) Line up a corner so that the long and short sides are even. The tab should be on the inside. Apply pressure to the tab against the tape to set the corner. (PIC 7-6) Repeat for all 4 corners.
3. Bend outer edge inward
Grab the outer edge and carefully bend inwards. Fold and crease to force the outer edge to bend inward a little. (PIC 7-7) Repeat for all 4 corners. Flip your panel over. It should sit flat on the table surface. (PIC 7-8)
4. Repeat for the other pages
Repeat for the rest of the panels. (PIC 7-9)
Install


Now it's time to install your awesome poster!
If you want to install your panels side-by-side (no spaces between panels), go to the instructable, How to install a Panel Poster.
If you want to install your panels with a 1/2 or 3/4 inch spacing between them, go to the instructable, How to install a Panel Poster with Grid Spacing.
NEW INVENTIONS AND INTERACTIVE BLUEPRINTS:
LIMITED RELEASE PROTOTYPES, ARTWORK PRODUCTS, REPRODUCTION PLANS.
https://shop.laboratory424.com/
I CREATE NEW INVENTIONS AND INTERACTIVE BOTS ON TWITCH:
https://www.twitch.tv/laboratory424/about
THINGS I USE INVENTING: