Pi Box


Hello everyone, and welcome back. Here's something portable and fun.
Pi Box is an all-in-one Raspberry Pi 4-based Mini PC with an internal power supply and an impressive 5" IPS display. We are currently running Recalbox OS in the Pi Box to play games, but this configuration can also be used as a Raspberry Pi Desktop running Linux and other operating systems.
Here, we're using a Raspberry Pi 4 with the DFRobot's 5'' 800x480 IPS display, both powered by a battery pack circuit we created for a previous project. We're using a 11.1V lithium cell battery pack.
The Pi 4 and display require a stable 5V to function; therefore, we designed a customized Buck converter circuit to step down the 11.1V from the battery pack, providing a stable 5V 3A to power the Pi.
In terms of design, we created a box-like enclosure that is divided into two halves: the front section houses the display with Pi 4, and the back section holds the battery pack circuit in place. To improve the design's looks, we added a handle-like section to the left side of the front and back parts, as well as printed the enclosure in two colors to give the entire design a duotone vibe.
This device can be used as a Pi desktop or with an OS such as Octoprint or other general-purpose OS. One usage for this device was as a game emulator station, and YES, THIS SETUP CAN RUN DOOM.
This instructables will cover the entire build process for this project, so let's get started.
Supplies
These are the components used in this project:
- Custom PCB (Provided by HQ NextPCB)
- Raspberry Pi 4 Model 4GB
- DFROBOT 5" IPS Display for Raspberry Pi
- IP6505 IC
- 22uH SMD Inductor
- 10uF Capacitor 1206 Package
- 22uF Capacitor 1206 Package
- M7 Diode SMC Package
- LED 0603 Package
- 1K Resistor 0603 Package
- Battery Pack Circuit (from a previous project)
- 12V/4A Adaptor
- M3 HEX PCB standoffs
- M2 Screws
- 3D Printed parts in dual colour (white and orange)
- Rocker Switch
Raspberry Pi 4 and 5" Display


We are using the Raspberry Pi 4 Model 4GB variant in this project, which is a significant improvement over the previous Raspberry Pi 3 in terms of power and functionality.
It features a quad-core 1.8GHz processor, up to 8GB of RAM, and dual 4K monitor support via micro-HDMI ports, making it suitable for a variety of demanding applications.
It offers excellent connectivity options, including Gigabit Ethernet, dual-band Wi-Fi, and Bluetooth 5.0, ensuring fast and reliable network connections. The inclusion of two USB 3.0 ports and two USB 2.0 ports provides enhanced data transfer capabilities. This model is also equipped with advanced multimedia support, including H.265 video decoding and OpenGL ES 3.1, making it an ideal choice for multimedia projects
As for the display, we are using the DFRobot's 5'' 800x480 IPS display, which is an IPS display that supports Raspberry Pi DSI display interface and comes with a capacitive touch panel
The display operates at a voltage of 3.3V, supplied by the Raspberry Pi display interface, with a maximum operating current of 320 mA and a screen-off current of 100 mA. It features a resolution of 800x480 and connects via the Raspberry Pi DSI video interface. It supports up to 5 touch points, with an 80-degree viewing angle on all sides.
The color depth is RGB888, offering 16 Mega True Colors, and the display has a refresh frequency of 60Hz. Additionally, the IPS panel includes optical bonding for improved brightness and clarity, anti-fingerprint and anti-glare coatings for better visibility in various lighting conditions.
3D Design


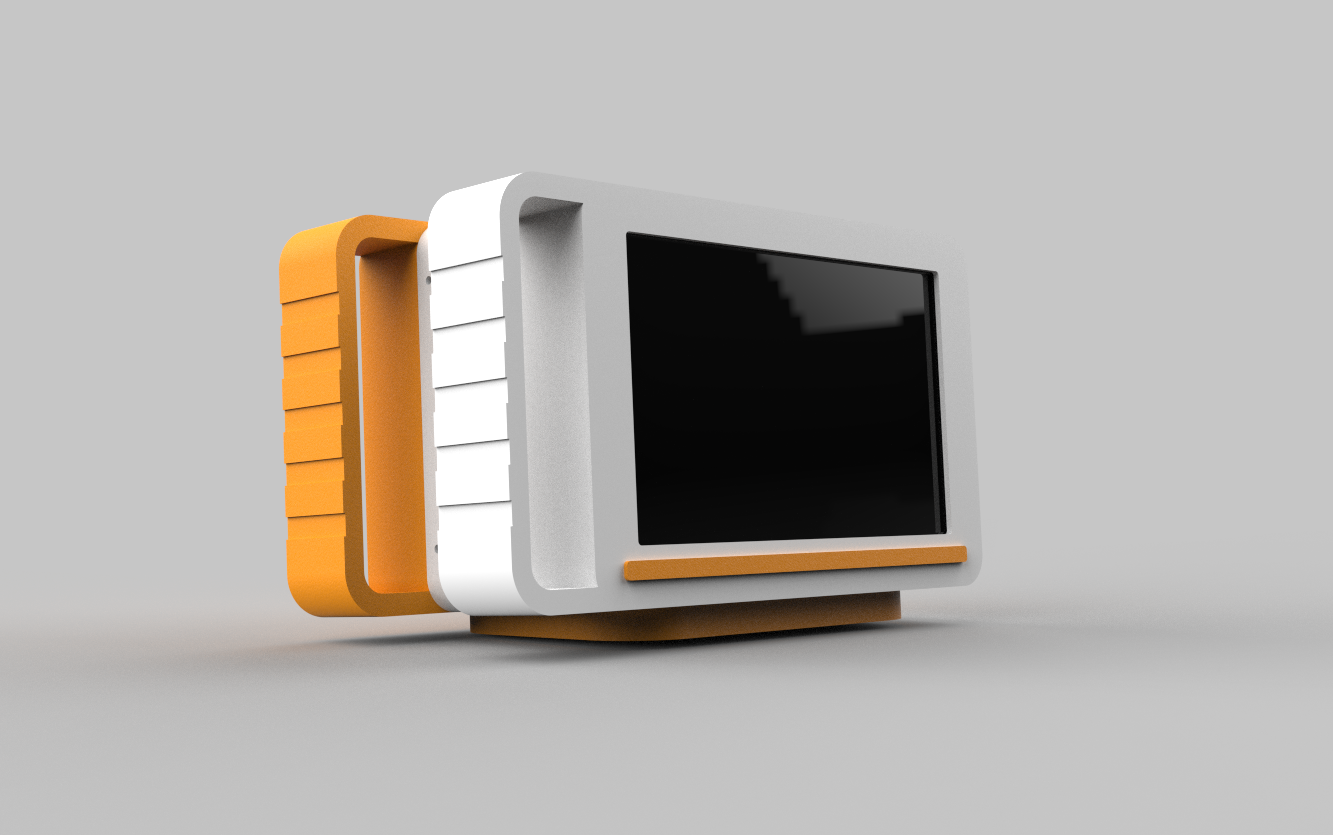


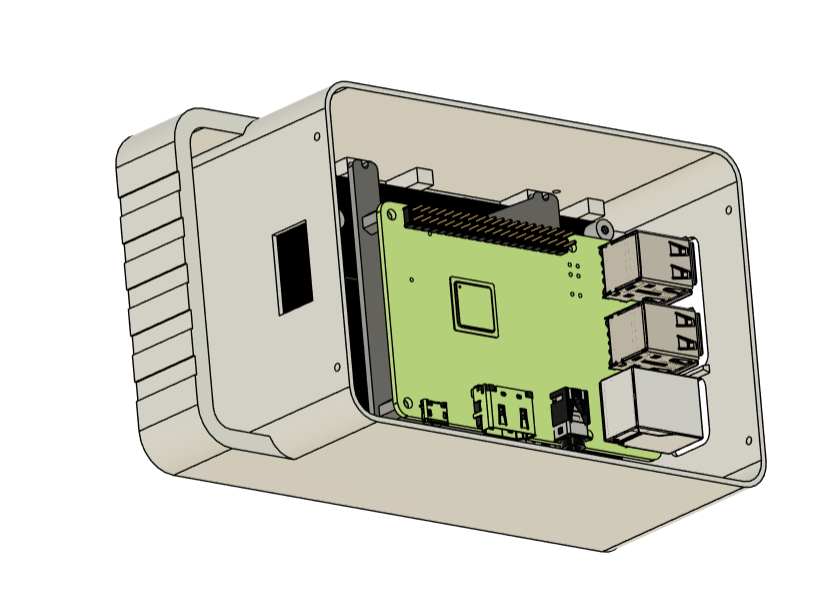

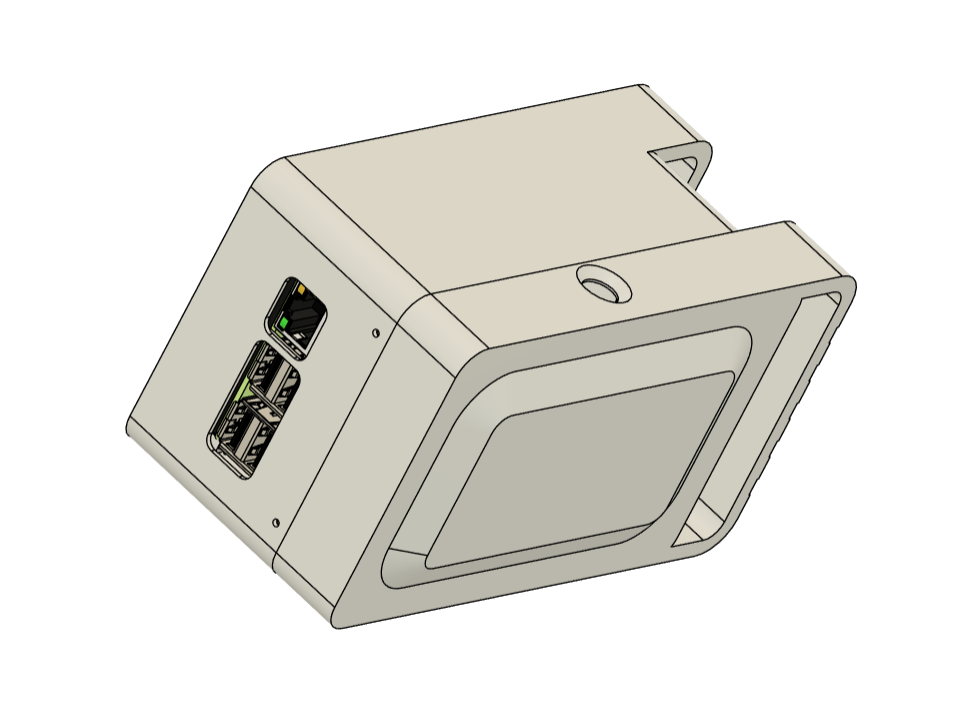
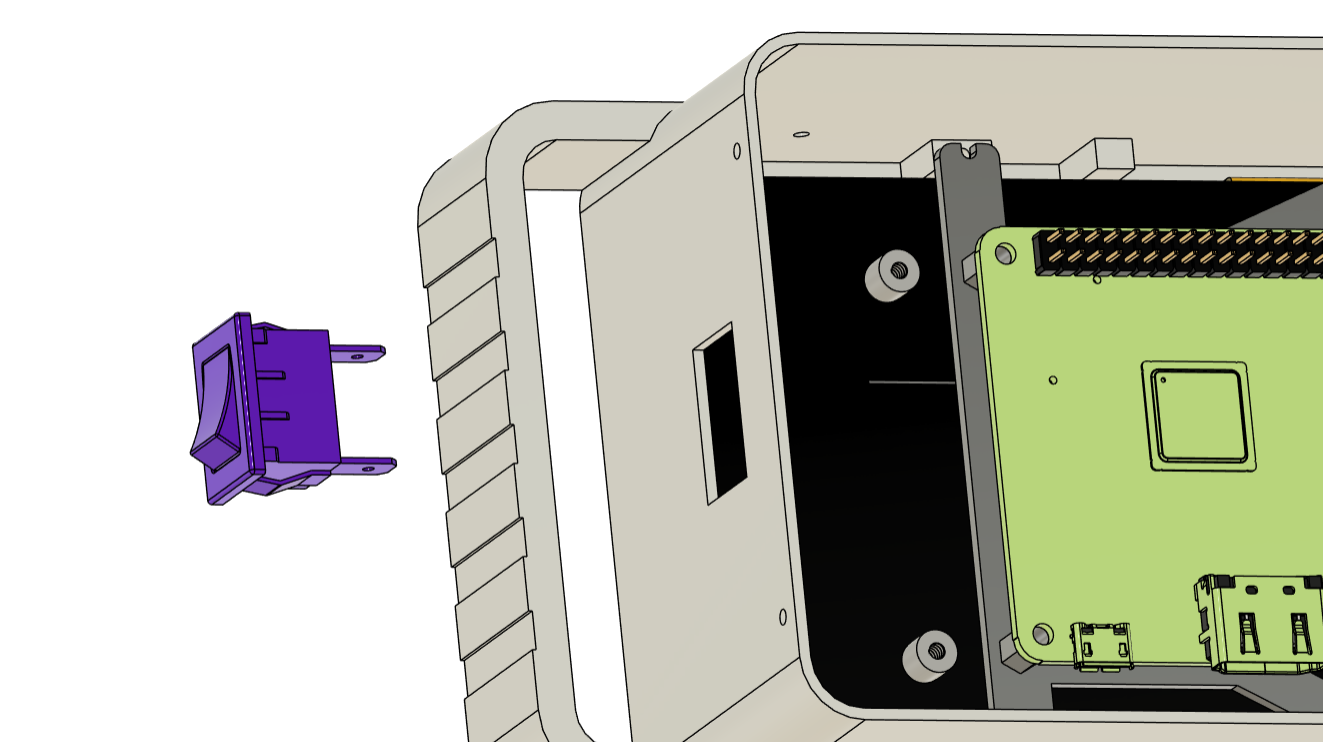


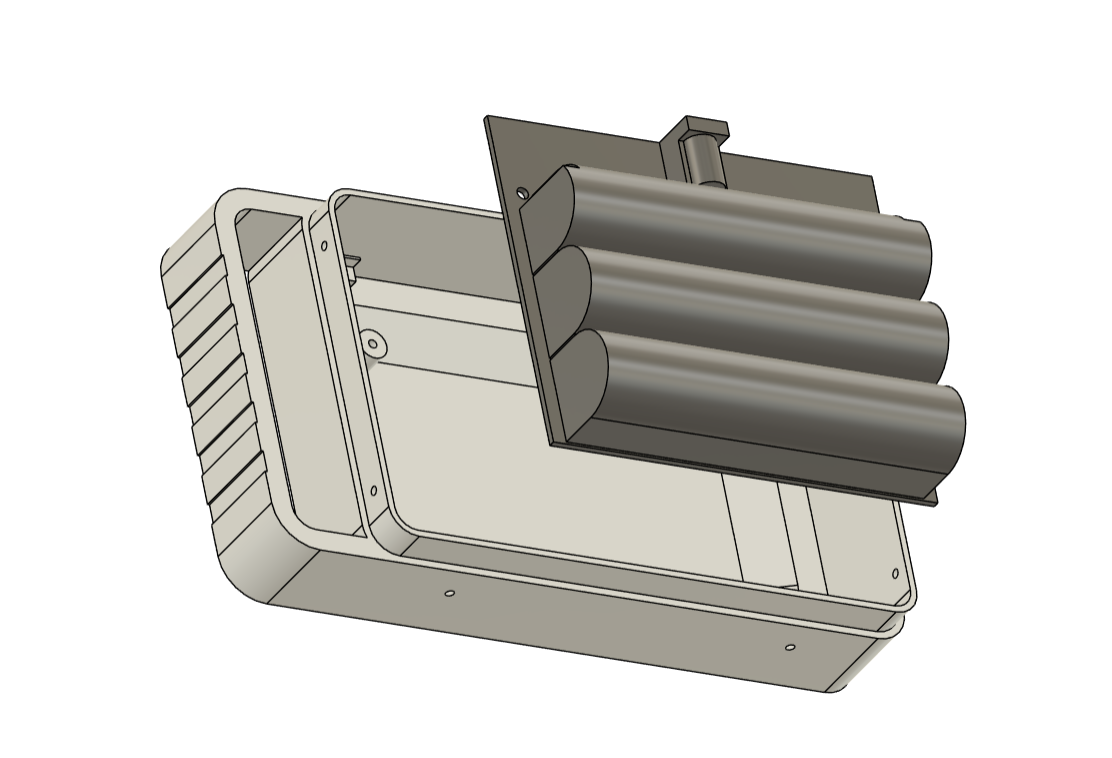

This project begins with the creation of the model, which began in Fusion360 by importing the model of the 5" display, Raspberry Pi, and Battery Pack Cirucit into the design. All three crucial components are positioned such that the display is at the front, and the Pi is placed behind the display but not on the mounting holes given on the back of the display, but the Pi is shifted slightly left so that we can access the I/O from the left side of the model.
The battery circuit is positioned behind the Raspberry Pi. By arranging the components in their proper positions, we started forming a box-like body around them, with the display at the front, the Pi in the center, and the battery pack circuit on the rear. We designed the model and divided it into two sections, with the front section housing the display, Raspberry Pi, and power switch in place. The battery pack circuit is housed in the second half, which is the back.
In addition, we designed a Pi holder portion to keep the Raspberry Pi 4 in place inside the front section. The Raspberry Pi 4 is connected to this Pi holder component by four hex standoffs.
We put two handles on both halves to give the model a little industrial element, and the rocker switch is positioned between these two handles.
Also, to give the model's aesthetics a duotoned feel, we printed every part in only two colors, PLA, white, and orange.
Battery Pack Circuit

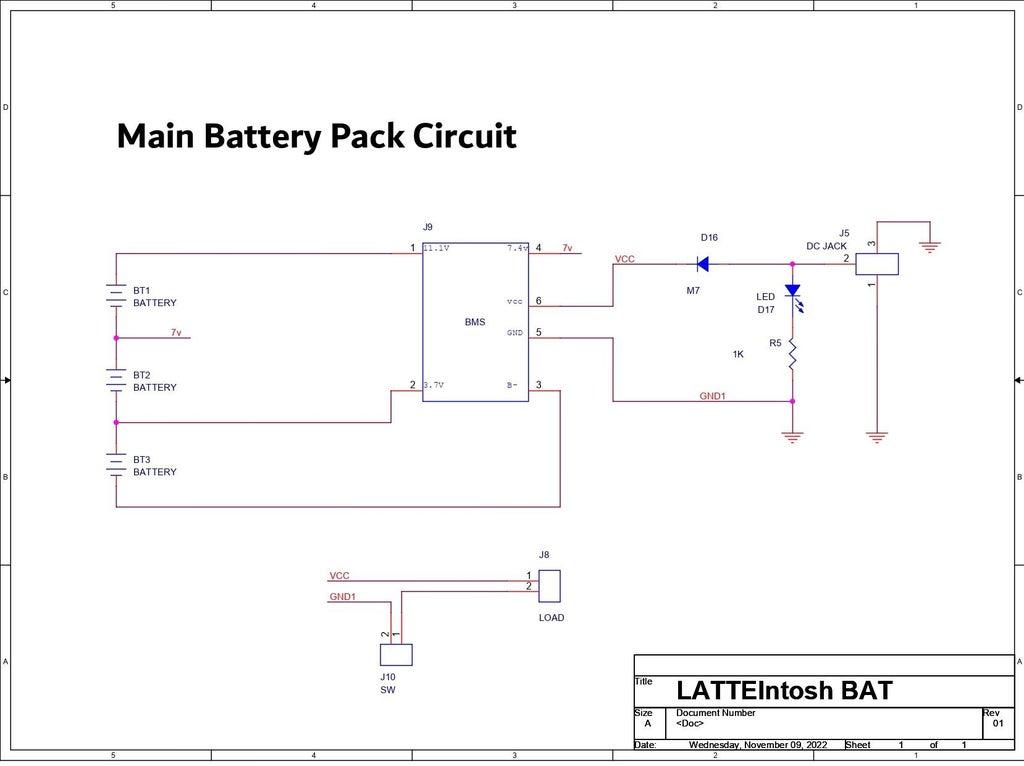

For the power source, we are using one of our previously created battery pack circuit boards from an old project.
We basically have a circuit that comprises a BMS (battery management system) circuit coupled to three lithium cell holders. There is also a DC jack attached to a diode, which allows us to charge the cells using a 12V adaptor.
This board comes with three 3.7V, 2900mAh lithium cells.
Power Module Circuit


To power the Raspberry Pi and display arrangement from the battery pack circuit we are using, which is an 11.1V 3S Lithium cell battery pack setup, we needed a Buck converter board that would step down the 11.1V to a stable 5V to run the Raspberry Pi and display.
To address this issue, we selected a Buck Converter setup that includes the IP6505 IC, a step-down converter with an integrated synchronous switch capable of handling an output of up to 10A for fast charging protocols.
The IP6505 features an integrated power MOSFET with an output voltage range of 3V to 12V and an input voltage range of 10.5V to 28V. It can provide up to 24W of output power by automatically adjusting the voltage and current in line with the recognized quick charge protocol, more than enough for our Raspberry Pi 4 and display setup.
The schematic was initially created and customized following the datasheet's example layout. All of the components on this board are surface mount, which reduces the need for manual soldering.
HQ NextPCB Service


After completing the PCB design, we export the Gerber data and send it to HQ NextPCB for samples.
Gerber Data was sent to HQ NextPCB, and a Green Solder Mask PCB with White Screen was ordered.
After placing the order, the PCBs were received within a week, and the PCB quality was pretty great.
In addition, I have to bring in HQDFM to you, which helped me a lot through many projects. Huaqiu’s in-house engineers developed the free Design for Manufacturing software, HQDFM, revolutionizing how PCB designers visualize and verify their designs.
HQDFM: Free Online Gerber Viewer and DFM Analysis Tool

Also, NextPCB has its own Gerber Viewer and DFM analysis software.
Your designs are improved by their HQDFM software (DFM) services. Since I find it annoying to have to wait around for DFM reports from manufacturers, HQDFM is the most efficient method for performing a pre-event self-check.
Here is what online Gerber Viewer shows me. Would not be more clear. However, for full function, like DFM analysis for PCBA, you need to download the software. The online version only provides a simple PCB DFM report.
With comprehensive Design for Manufacture (DFM) analysis features, HQDFM is a free, sophisticated online PCB Gerber file viewer.
It provides insights into advanced manufacturing by utilizing over 15 years of industry expertise. You guys can check out HQ NextPCB if you want great PCB service at an affordable rate.
PCB Assembly Process


- The PCB Assembly Process for this project begins with applying solder paste to each component pad with a solder paste dispensing needle. We're using 63/37 Sn-Pb solder paste.
- Next, we select all of the SMD components and place them in the correct spot.
- We next place the board on our Mini Reflow Hotplate, which heats the PCB from below up to the solder paste melting temperature of roughly 200 °C. Solder paste melts permanently and connects all SMD components to their pads.
Pi4 Frame Holder


- We begin the assembly procedure by attaching four hex M3 PCB standoffs to the four mounting holes of the Pi 4. We're utilizing four 6.7mm-long hex standoffs here.
- Next, we install the Pi Holder Part to the bottom side of the Pi 4 using the M3 Standoffs.
Front Body Assembly


To improve the aesthetics of the design, we created two add-on parts: a line printed in orange PLA and placed on the front side, and a nametag printed in two colours and placed on the top of the front body.
- We applied Super glue to the bottom side of the 3D printed line and then placed it on the front body.
- Super glue is next applied to the rear side of the Pi Box nametag, which is then placed on the top side of the front body.
Front Body With Display and Pi4 Assembly


- We now begin the front section assembly procedure by sliding the 5-inch display inside the front body section. To keep it stationary, we used hot glue to adhere the screen to the body.
- We connected the FPC cable (supplied with the display) to the Pi 4's MIPI DSI connector in the correct order.
- The other end of the FPC cable is then connected to the DSI connector on the 5-inch display.
- The Pi is then placed inside the front body and secured in place with four M2 screws tightened with the Pi holder and screw bosses positioned inside the body.
Power Module Pi4 Assembly


- The Power Module is now positioned over one of the display's PCB standoffs and secured with an M2.5 bolt.
- We then used a JST Wire Harness connector to attach its positive and negative terminals to the power module's Vout and GND terminals.
- Next, the JST wire harness connector is connected to the Raspberry Pi's 5V and GND via the 40-pin GPIO header connectors.
Power Source With Front Body Assembly


- We begin the power source assembly process with the front section by first positioning the rocker switch and then connecting the GND terminal of the Power module to the NC of the rocker switch.
- We then connected a RED wire to the VIN of the power module and another to the NO terminal of the rocker switch. This additional wire attached to the NO terminal will be linked to the GND of the battery pack; the switch will serve as a break between the Power module and the battery pack circuit.
- The rocker switch terminals were close to the FPC cable connecting the display and Raspberry Pi; therefore, we used Kapton tape to wrap the rocker switch terminals.
- We connected the VIN and GND wires to the VCC and GND terminals of the Battery Pack circuit.
Final Assembly


- The final assembly process begins with placing the battery pack circuit inside the back section.
- The battery pack circuit is subsequently secured in place with two M2 screws that are put into the screw bosses on the back section.
- We then placed the front section on top of the back section, followed by the base holder on the device's bottom side. It is then held in place with four M2 screws. This base holder part connects the front and back sections from the bottom.
- We put two M2 screws to the left and right faces, permanently fastening both components together and completing the assembly procedure.
Recalbox OS


We are currently using the RecalBox OS, a retro game emulation OS that supports a wide range of previous consoles, including the GameCube, PS1, PS2, and Xbox.
Recalbox OS is simple to use and comes pre-installed with a large number of free games.
Furthermore, it is compact and runs efficiently on low-end Raspberry Pi computers, making it excellent for the Pi 4, which operated directly off an SD card.
The installation process is straightforward:
- We downloaded and installed Raspberry Pi Imager, an imaging utility application similar to Etcher or Rufus. It includes a list of Raspberry Pi-supported operating systems, which you may download and burn directly to the boot USB.
https://www.raspberrypi.com/news/raspberry-pi-imager-imaging-utility/
- Next, we choose the OS we wanted to install, which was the Recalbox OS for the Pi4.
- After that, the raspberry pi imager completes the installation process, and we just install the SD card on the Pi4 and power it on; the first boot will take an additional 2-3 minutes.
Conclusion


Here's the end result of this small build: a working Mini Raspberry Pi PC or console. Because this device falls somewhere between a Mini PC and a Console, it's difficult to define a specific use case for it; for the time being, we're utilizing Recalbox OS to utilize it as a retro gaming emulation station. This setup can also run DOOM, because of the Raspberry Pi 4.
Using the Raspberry Pi 4's Bluetooth, we can link our controller to play games or connect any device, such as a keyboard, using the USB port.
Because of the onboard battery pack, we can take the Pi BOX anywhere. The device's backup is more than one and a half hours, which is adequate given the battery pack utilized, as we simply chose a 3S battery pack. Maybe in a future revision, we will add a larger capacity battery pack to this design, allowing it to last a full day of use.
Special thanks to HQ NextPCB for providing components that I've used in this project; check them out for getting all sorts of PCB or PCBA-related services for less cost.
Thanks for reaching this far, and I will be back with a new project soon.