Portable USB Charger (Version 2.0)
486659 Views, 314 Favorites, 0 Comments
Portable USB Charger (Version 2.0)

The project name says it all. It is a device that will charge things like Ipods, PDAs, other other devices that plugs into a USB to charge.
Supplies

The parts needed for this project are all in the second picture.
You will require:
LM or MC 7805 +5VDC Voltage Regulator
Type-A Female USB Port
100 UF Electrolytic Capacitor 10-50v
0.1-0.5 UF Capacitor 6-50v (any type would do)
150-160 ohm Resistor (optional)
9V Battery clip
2.2V 20mA LED color of your choice (optional)
Unprinted circuit board
ON/OFF Switch (optional)
These parts can be easily purchased at your local electronic store, like Radio Shack. Or you can buy them online at:
http://www.digikey.com
Regulator:
http://search.digikey.com/scripts/DkSearch/dksus.dll?Detail?name=LM7805CT-ND
USB port:
http://search.digikey.com/scripts/DkSearch/dksus.dll?Detail&name=151-1080-ND
100 uF Capacitor:
http://search.digikey.com/scripts/DkSearch/dksus.dll?Detail?name=P12392-ND
0.1 uF Capacitor:
http://search.digikey.com/scripts/DkSearch/dksus.dll?Detail&name=399-4151-ND
The Circuit Board (Simple Way)

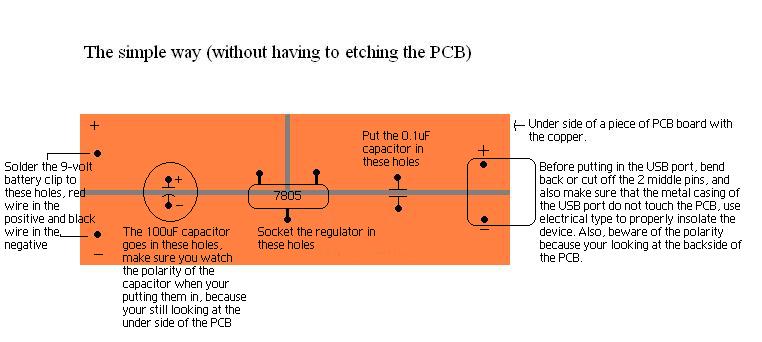
The following picture shows the prepared PCB before putting in the necessary components.
What your looking at is the underside of a PCB with the copper foil facing you.
The gray line represent the location where the cut is to be made. Make sure that the 3 sections are electrically isolated (do not conduct to each other). If you have a dremel tool, you can score the copper cladding with a cutting wheel.
The black dots are the locations where holes are to be drilled.
Attching the Components


Watch the polarity when putting in the components, especially the regulator, or it will get very hot and burn out.
*BEFORE plugging in your USB device to this charger, test the charger's output using a multimeter. Hookup the 9-volt battery and measure voltage output, it should be between 4.8-volts to 5.2 volts.
*If the black light comes on when you plug the iPod into the charger, that means the charger is working correctly, and if the black light doesn't come on after 3 seconds, remove the iPod from the charger immediately, and recheck your charger for shorting or incorrect polarity.
*If you double checked the output and still no luck, try attaching a resistor bank described in the comments below to the data lines.
The Printed Circuit Board


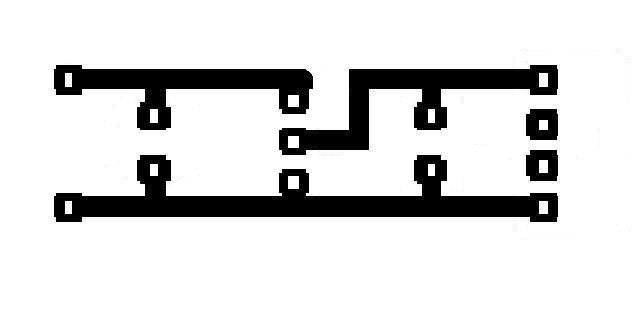
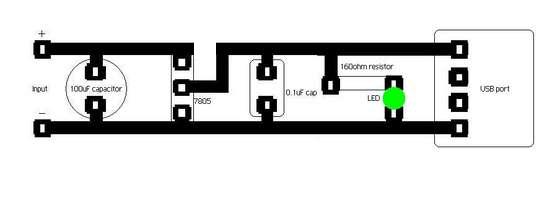
The first picture is the circuit that is to be etched onto the PCB, the second picture shows where everything should go.
*Your looking at the side with the copper foil, so watch the polarity when putting in the components
*Your looking at the side with the copper foil, so watch the polarity when putting in the components
Printed Circuit With LED


This design incorporates a LED which will be lit when the device is turned on.
Adding the Switch


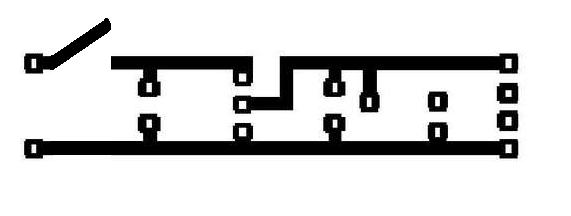
Add a switch to this circuit is very simple, it'll save a lot of battery when you turn it off than just leaving it on idle. You can attach the switch anywhere BEFORE the capacitor (if you did not use a capacitor, then before the 7805).
Done!

Now that you've finished building your own USB charger, all you have left to do is to put it in a nice box and show it off to your friends!