Program Your Makey Makey
by anouskadg in Circuits > Microcontrollers
17044 Views, 60 Favorites, 0 Comments
Program Your Makey Makey

Do the default MaKey MaKey key presses not fit your needs?
In this Instructable I'll show you how to customize the keys!
What you need:
- MaKey MaKey
- USB Cable
- Arduino IDE
Download the Addon

The MaKey MaKey needs an addon to work with the Arduino IDE. This addon will add an entry to the "boards" list in the IDE.
If you work with Arduino 1.5 or higher you need to download the zip file Arduino-Addon-1.5-higher.
If you work with an older version than 1.5 you need to download the zip file Arduino-Addon-lower.
Once you've downloaded the zip file, go to your Arduino folder and unpack the zip file.
Now close all existing Arduino windows. After that open a new Arduino window and you should now see the MaKey MaKey options in the "boards" list.
The Code
The next step is to download the code attached to this post.
In the zip file you'll find makey_makey.ino and settings.h. If you open the .ino file with the Arduino IDE, the .h file will automatically open in a tab.
You only need to change things in settings.h since this is where all the keys are defined.
#include "Arduino.h"

/*
/////////////////////////////////////////////////////////////////////////
// KEY MAPPINGS: WHICH KEY MAPS TO WHICH PIN ON THE MAKEY MAKEY BOARD? //
/////////////////////////////////////////////////////////////////////////

  - edit the keyCodes array below to change the keys sent by the MaKey MaKey for each input
  - the comments tell you which input sends that key (for example, by default 'w' is sent by pin D5)
  - change the keys by replacing them. for example, you can replace 'w' with any other individual letter,
    number, or symbol on your keyboard
  - you can also use codes for other keys such as modifier and function keys (see the
    the list of additional key codes at the bottom of this file)

*/

int keyCodes[NUM_INPUTS] = {
  // top side of the makey makey board

  KEY_UP_ARROW,      // up arrow pad
  KEY_DOWN_ARROW,    // down arrow pad
  KEY_LEFT_ARROW,    // left arrow pad
  KEY_RIGHT_ARROW,   // right arrow pad
  ' ',               // space button pad
  MOUSE_LEFT,        // click button pad

  // female header on the back left side

  'w',                // pin D5
  'a',                // pin D4
  's',                // pin D3
  'd',                // pin D2
  'f',                // pin D1
  'g',                // pin D0

  // female header on the back right side

  MOUSE_MOVE_UP,      // pin A5
  MOUSE_MOVE_DOWN,    // pin A4
  MOUSE_MOVE_LEFT,    // pin A3
  MOUSE_MOVE_RIGHT,   // pin A2
  MOUSE_LEFT,         // pin A1
  MOUSE_RIGHT         // pin A0
};

///////////////////////////
// NOISE CANCELLATION /////
///////////////////////////
#define SWITCH_THRESHOLD_OFFSET_PERC  5    // number between 1 and 49
                                           // larger value protects better against noise oscillations, but makes it harder to press and release
                                           // recommended values are between 2 and 20
                                           // default value is 5

#define SWITCH_THRESHOLD_CENTER_BIAS 55   // number between 1 and 99
                                          // larger value makes it easier to "release" keys, but harder to "press"
                                          // smaller value makes it easier to "press" keys, but harder to "release"
                                          // recommended values are between 30 and 70
                                          // 50 is "middle" 2.5 volt center
                                          // default value is 55
                                          // 100 = 5V (never use this high)
                                          // 0 = 0 V (never use this low


/////////////////////////
// MOUSE MOTION /////////
/////////////////////////
#define MOUSE_MOTION_UPDATE_INTERVAL  35   // how many loops to wait between
                                           // sending mouse motion updates

#define PIXELS_PER_MOUSE_STEP         4     // a larger number will make the mouse
                                           // move faster

#define MOUSE_RAMP_SCALE              150  // Scaling factor for mouse movement ramping
                                           // Lower = more sensitive mouse movement
                                           // Higher = slower ramping of speed
                                           // 0 = Ramping off

#define MOUSE_MAX_PIXELS              10   // Max pixels per step for mouse movement

/*

///////////////////////////
// ADDITIONAL KEY CODES ///
///////////////////////////

- you can use these codes in the keyCodes array above
- to get modifier keys, function keys, etc

KEY_LEFT_CTRL
KEY_LEFT_SHIFT
KEY_LEFT_ALT
KEY_LEFT_GUI
KEY_RIGHT_CTRL
KEY_RIGHT_SHIFT
KEY_RIGHT_ALT
KEY_RIGHT_GUI

KEY_BACKSPACE
KEY_TAB
KEY_RETURN
KEY_ESC
KEY_INSERT
KEY_DELETE
KEY_PAGE_UP
KEY_PAGE_DOWN
KEY_HOME
KEY_END
KEY_CAPS_LOCK

KEY_F1
KEY_F2
KEY_F3
KEY_F4
KEY_F5
KEY_F6
KEY_F7
KEY_F8
KEY_F9
KEY_F10
KEY_F11
KEY_F12

*/
The first variable in this code is keyCodes[NUM_INPUTS]. This variable is an array that contains 18 values. Each value stands for a key or mouse input and has its own index. So KEY_UP_ARROW is index 0, KEY_DOWN_ARROW is index 1 and so on. These index numbers match with the MaKey MaKey inputs on the board.

At the bottom of the code you can find a list of additional key codes. You can use these codes to change the key mapping of the MaKey MaKey.
Let's say you want to change the SPACE key to an ENTER key. This is index 4 as you can see on the image. Search for index 4 in the code and change ' ' to KEY_RETURN.
Downloads
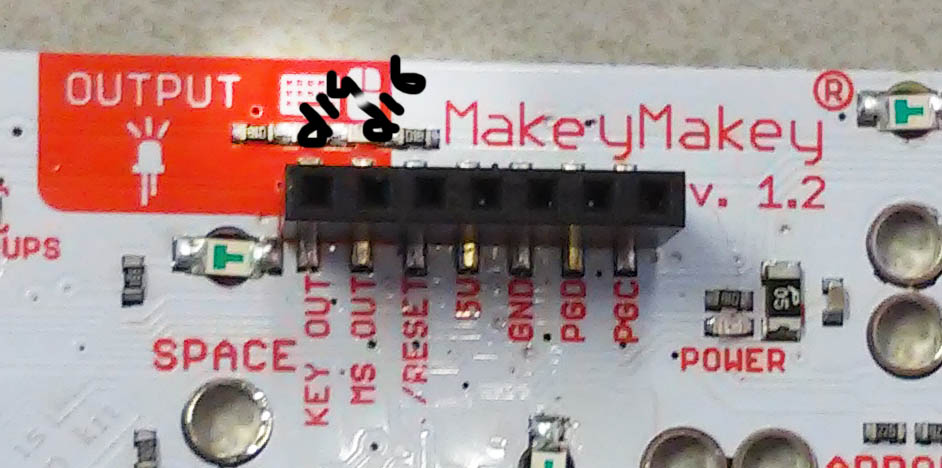
The Output Headers

Last but not least there are the output headers. MaKey MaKey can not only receive inputs but it can also generate outputs.
It has 6 output pins at the top of the board. One pin is for 5V, one for Ground and two digital pins.
D14 is connected to the keyboard inputs. So if a keyboard button is pressed MaKey MaKey will send a 1 to D14. If none of the keys is pressed it'll send a 0. D16 is connected to the mouse inputs the same way.
What can you do with this?
Well you can for example connect a LED to pin D14, and everytime a key is pressed the LED will light up.
But you can also connect other things like a buzzer, a DC motor, a relais or something else that works on 5V!
That's It!
That's it!
You now know how to change the key mapping of your MaKey MaKey, and you know how the output headers work. So the only things that's left to do is to make cool stuff!
Have fun!