Rat Costume

Here you’ll hopefully learn how to make a giant rat costume, perfect for Halloween, Renaissance Festivals, Conventions, or just for fun!
Quite a few mistakes were made in the making of this giant rat, I’ll do my best to explain where I wish I had done something differently so you don’t make the same mistakes I did. It’s been a few years since I’ve made a costume like this so I had to re-learn some things along the way :) I’m not exactly the best at explaining things so I’ll do my best to have a visual for each thing I do that may be confusing.
This project will probably take about a week to complete, more or less depending on how many layers of paint you need / use, as well as the time you have and how fast you work. This tutorial can also be used to make other similar animals like mice, squirrels, opossums, or even rabbits with simple easy changes to the design!
Quick little disclaimer, throughout this project I would bounce between different pieces so that’s why you may see some things finished before others. And for the sake of simplicity each part will be a different step;
Step 1 : Head, Step 2 : Body, Step 3 : Tail, etc.
Otherwise this tutorial would be well over 20 steps.
Hopefully if you’re not big on reading everything I’ve typed, you’ll still be able to follow along through the pictures and notes I’ve compiled :)
Anyways, hope you enjoy!
Supplies
Materials :
Faux Fur - For this I used 4.5 yards of fabric, however you may need more or less depending on your height and build as well as how wide the fabric is. I’m on the taller side and my fabric was unfortunately not wide enough either, so I needed more than I initially thought.
Skin Fabric - This will be for your ears and tail and maybe some lining! You’ll need anywhere between half a yard to 1.5 yards, depending on the fabric width and how long you want your tail to be. This can be faux leather, flannel, plush, fleece, etc.
T-Shirt Fabric - This is optional, but this will be used for the inside of the head and on your leg padding, I recommend at least half a yard but again, this is optional and more for aesthetics / comfort.
Masking Tape - You’ll need this to make your fur pattern.
Foam - A roll of 1” x 27” x 76” will be more than enough.
Craft Foam or EVA Foam - Stores like Michael’s will carry craft foam in single sheets if you don’t wish to buy a whole pack. I recommend getting two large sheets to layer for strength, or EVA foam since it’s already strong.
Hot Glue - Hot Glue is a must for this project!
Needle & Thread - You’ll need thread that matches your fabric colors, one for fur and one for your ears and tail. If your sewing machine can’t handle faux fur you’ll be forced to hand sew the fur,,,,, I apologize in advance.
Torso Length Zipper - My zipper was about 23” inches long, I measured by holding the different options just under my neck and seeing where the end landed. I did this in the store for 5 minutes, just measure at home….
Model Magic Clay - These will be for your nose, eyelids, and teeth if you choose to make them.
Clear Plastic Ornament - Usually they will break in half for you to put stuff inside, but these will be for your eyes!
Paints - What color paint you get will depend on your fur and skin color, I chose gray fur and pink skin so I got black and cream paint for my fur and pink / orange for my ears, nose, and tail.
Elastic - This will be for your belt loops, you don’t need much.
Fishing Line or Wire - Wire bends out of shape easily, so I recommend using fishing line for your whiskers. ( I’ve seen other costumes use broom bristles or those fiber optic cable lights for whiskers too )
Velcro, Buttons, Hooks, or a Zipper - Later in the tutorial you’ll see why I give all these options, these are for if you want to make your head detachable from your body. You could use one of these or none!
Tools :
Hot Glue Gun - A large hot glue gun will be the most helpful and efficient, but a mini one would work too
Sewing Needle - You should always have a needle and thread in your house anyways.
Fabric Pins - These will help with your fabric as well as pinning your foam pieces in place while or before you glue them down.
Exacto Knife - Please cut your fur with this! It’s so much easier, just be careful!
Scissors - Fabric designated scissors for your fabrics, and use a pair of scissors you don’t mind dulling / destroying for cutting your foam.
Fabric Chalk / Marker - For marking out your patterns.
Fabric Measuring Tape - Of course you could always eyeball it, but you want this to look good right?
Big Roll Of Paper - For your body pattern.
Heat Gun - If your fishing line refuses to straighten, blast it with a heat gun while it’s taught and let it sit overnight.
Fur / Hair Brush - If you choose to paint your fur you’ll definitely need to be okay with this brush getting paints on it.
Sheers - If you don’t want to cut your fur with scissors, I recommend finding some cheep sheers to shave your fur down with.
Face Mask - So you don’t inhale fur fibers.
Sewing Machine - You can definitely hand sew everything, but a sewing machine would for sure come in handy for the ears and tail.
Prices for everything will of course vary depending on where you get them and how much you get. Though I will say faux fur is definitely the most expensive part of this project. Be sure to measure out how much you think you’ll need and look at your options both online and in stores.


Making The Head
This was my favorite part of this whole project, and in my opinion, the most fun :)
You’ll see in my images I have a lot of words, some I’ll repeat here some I won’t, the whole tutorial will be like this. I’ll try to explain my steps and struggles the best I can.
There are also clearer pictures of my foam pattern template, I tried to make this a link but wasn’t able to for whatever reason :( I hope they still help.
Anyways,,,,
The Bowl :
- For your foam base ( bowl ) you’ll want to start by measuring around your head and from your eyebrows to the top of your head, cut out a long strip of foam with these measurements, and add an inch or two to the length for good measure.
- Once you’ve got it cut out, glue the two ends together to make a cylinder.
- Cut triangles into your cylinder, they should be half the width of your cylinder. For example, if your cylinder is 6 inches wide your triangles will be 3 inches deep.
- Once your triangles are cut out, glue them together, you should have a bowl shape!
- The last step for your foam bowl base is adding a top, cut a circle and glue it down to close off the top.
The finished bowl should sit comfortably on your head like a hat. If it’s too tight, trim at the foam till it fits more comfortably, if it’s too loose, add a strip of foam to the inside so it’s more comfortable.
Foam Base :
- Start by tracing your pattern out on your foam using a marker, make sure to cut the right amount of pieces as well; two eyebrows, two of each cheek, two jaws, etc.
- Once everything is cut out, start with the muzzle piece. My pictures will show you how I glued it best as it’s hard to explain. I tried my best to make both sides even and I want to emphasize the pieces near the eyes that overlap!
- The muzzle is honestly the hardest part of the foam base, once you get it glued in you’ll add your cheek 1 pieces, then cheek 2, eyebrows, jaw, and so on.
- As you add pieces it helps to round off the sharp edges as you go, but not too much! It’s harder to add more than it is to cut off, so I recommend shaping everything once you’ve got all your pieces glued on.
- After you’ve shaped the foam to be as symmetrical as possible on both sides you’ll want to make your ears! I highly recommend layering your craft foam or using EVA foam for your ears, I didn’t do either of these and my ears are very flimsy and prone to tearing or bending out of shape.
- Pin the foam ears in place to make sure you like the placement before permanently gluing them on.
For the foam base making it symmetrical can be hard, it helps to look at it in a mirror, ask another party, or simply let it sit overnight so you can see it with fresh eyes later. When you work on something for a long time things can go unnoticed, so take a break every so often, it’ll help I promise :)
Also, put your foam trimmings in a trash bag as you work! This helps a ton with cleanup and helps you keep a clean workspace!
Ear Fabric :
- Take the same pattern you used to make your foam ears and trace it onto your fabric 4 times with some seam allowance.
- You’ll sew these together leaving the bottoms open to slip over the foam ear like a glove.
- Once you slip your fabric onto the ear, glue it down! I was trying to save glue and didn’t fully glue my fabric to the ear and they turned out fine :)
Nose :
For the nose I decided to make mine out of clay, I couldn’t be bothered to figure out how to properly make one out of foam, but if you’d prefer to make one out of foam there are plenty of fursuit nose tutorials out there that can definitely help!
- I started with a ball of clay, and pressed it onto my foam base to get the size and shape right.
- Referencing a rats nose I tried my best to copy its shape.
- After getting the shape right I would wait for the clay to fully dry before painting the nose. You’ll notice it had a lot of dips and dents in it, I filled these with a thick gel paint and they smoothed out further after lots of layers of color.
- When painting I tried my best to color match to my pink fabric while making the nostrils and creases slightly darker. ( Again, reference a rat’s nose as you do this )
Eyes :
While the base was being made, along with the nose, the eyes were painted and set aside to dry so they’d be ready when I needed them. I decided to only paint the inside of the ornaments so the outside would stay glossy and clean. The blue eyes you see me use in my pictures are the same kind of ornament just from a separate project, I mostly used them for measuring placements while my actual eyes dried.
Masking Tape Pattern :
- Once your base is done start adding strips of masking tape all over your base, you’ll want at least two layers all over. You’ll see in my pictures I didn’t tape where the eyes would be, I later regretted this, so go ahead and tape there too!
- If you wish to line the inside you should add masking tape there too! I also didn’t do this and had to freehand everything which took way longer :/
- Once you’ve got your two or three layers of tape on your base you’re gonna want to mark out your pattern! If you want your rat to have different color furs in different spots this is the time to mark out where they’ll be.
- Draw out your pattern, I personally try to keep my pieces as big as possible. I made the forehead and snout all one piece, the sides of the face, cheeks, jaw, and back.
- It’s important to label all of your pieces, add fur color, fur direction, what side of the face, what part of the face, etc. And when you’re all done with that, take pictures so you can reference them later!
- Using your exacto knife or some thin scissors, cut along your lines and carefully peel the tape off of your foam base.
- You’ll notice some pieces will bubble out and not want to lay flat, for these you’ll need to cut darts, to do this pick a convenient edge of your pattern and cut a straight line to the middle of that bubble. If a piece only bubbles out a tiny bit you don’t need to make a dart.
Fur Pattern + Sewing :
I chose to pre-shave some of my fur pieces, which is why on picture #8 of this process you’ll see the face is lighter / shorter than the rest of the head, I can’t say this really helped or hurt my process? But if this is something you choose to do keep the fur at a medium length so you can properly shape it later when it’s glued on the base.
- Your masking tape patterns should all be laying flat now, lay them onto your fur fabric making sure the fur is going in the right direction for each piece!
- Whether you trace out your pieces with chalk or a marker leaving however much room you may need for seam allowance, or choose to cut directly around the pattern, is up to you. If your fur is thin or a light color you should use chalk or something that won’t bleed through the fabric.
- Be sure to label your fur pieces too! At the very least label what side of the face the pattern goes on.
- Using your exacto knife, carefully cut your fur pieces out, it helps to gently brush the fur after cutting it to reduce the amount of fur fibers that will inevitably be flying around your room.
- Once everything’s cut out, you can drape them onto your foam base to get a vague idea of where each piece will go, it helps to pin them together while on the base so you know they’re in the correct positions.
- Now,,,, start sewing, I recommend using a blanket stitch for this, and try to stay on your marked pattern line (?) so it’s a snug fit. If you’re machine sewing this part I recommend trimming off the seam allowance you don’t use.
- Now that you’ve sewn everything together it should be able to slip right onto your foam base like a glove, a big hairy glove.
Gluing It Down :
Now, before you glue your fur on, line the inside of your head if that’s something you planned to do. You can pattern it the same way you patterned the fur, sew it together, and hot glue it in. Adding lining now, without the fur will make installation much easier.
I didn’t pattern mine and it was a frustrating experience, so I recommend taking the time to pattern the lining properly. Even if it’s something only you will see, it’s still a nice touch and is probably more comfortable than having straight foam on your head.
- To glue your fur you can start from either the back or the front, I recommend starting from the front so any excess fabric will be pushed towards the back.
- I’m unsure of how to explain this so bear with me, if you were to glue your sock to your foot you’d start by gluing your toes to the end of the sock and continuing to glue as you roll your sock up the rest of your foot, you’ll want to do this with your fur and base, start by gluing the nose down, then work your way to the back of the head. ( I’m sorry for that example )
- Once you’ve got the base glued on you can trim away any extra fabric, I had a lot extra fabric in the mouth area and after trimming it down and gluing it back in place it looked a lot nicer. ( On the 5th picture, the images labeled #1 and #4 show the before and after of this process )
Trimming & Shaving :
Everything should be glued down at this point and you’ll be left with an overwhelmingly fuzzy ball of fur with ears. For this step you’ll need clippers / sheers or a good pair of scissors, as well as a trash bag and a brush. Avoid cutting the fur with a fan on to keep it from going everywhere, and use a face mask if possible to avoid inhaling any of it.
- Start by looking up a reference picture of a rat’s face, notice where the fur is short and long and try to imitate this. For my rat I made the face short but left the eyebrows and nose bridge slightly longer, and decided not to cut past the ears.
- The way you shave depends on the quality of your clippers, most recommended going with the direction of the fur, but since mine were cheap and dull I had to go in all different directions to get my desired length. If you’re using scissors you’ll have a much harder time getting an even length all around, but it’s not impossible.
- With both clippers or scissors you’ll have to brush the fur as you work to make sure it’s even, the brush will also help clean off any loose fibers.
- Just like shaping your foam base, take your time with this step and clean up along the way!
Note : If you’re using a tri-color fur like mine your short, medium, and long sections will all be different shades /colors. Some tri-furs are more noticeable, mine thankfully is not, please keep this in mind when you’re picking out your fur. I have another fabric that looks gray but when cut it goes to white then orange, which would be a nightmare for a project like this.
Painting :
☆ I’ll most likely tell you to come back to this step at least two more times for the body and tail, but please please please test your paints on scrap fabric first and let them fully dry before painting your costume! ☆
For my paints I used watered down acrylic’s and some watered down fabric paint, I didn’t notice much of a difference between the acrylics and the fabric paint aside from the fabric paint being a little softer? But that’s it. I only used watered down paint throughout this project as I didn’t want my dots, blotches, and shading to be too harsh, if you want your colors to be stronger use less water.
Alternatively you could also airbrush your costume if you have access to an airbrush and that equipment.
Whatever method you use it helps to find a reference of a rat with the same color fur you’re working with, so you can see what parts appear darker or lighter.
- Start by mixing your paint and water, I recommend starting with your lighter colors first. Because I didn’t have any lighter colors on my head I started with black.
- Work in layers, slowly darkening areas and painting with a paper towel. I’d soak the paper towel in my paint water and brush it against the fur being sure to push it in multiple directions to get a more even distribution and to avoid just the top layer of fur being painted.
- Gently brush your fur as it dries. The less water you use in your mix the more careful you’ll have to be, as your fur will be more prone to sticking together. If it dries in a clump and gets stuck together it’ll be a lot harder to fix.
- Try to avoid over saturating the fur when you paint, if you do it’s not much of a problem, the watery paint mixture will just want to drip off and it can be a little messy.
You can also paint your ears in this step, adding dots or texture. For my ears I added black and pink splotches using the same method I used for the fur, minus the brushing.
Eyes, Nose, & Whiskers :
Remember the eyes and nose you should’ve painted before this step? The ones that should be dry and ready for you to use? Well now you need them.
Eyes
- Your eye ornaments may have little plastic loops still attached to them, you can break these off if you haven’t already.
- Hold your eyes to your base and position them where you want them to be, once you’ve got them positioned you can swivel or twist them around a little on the fur to “ mark “ where they’ll go. ( Hopefully this makes sense lol )
- Once you’ve got them where they’ll go, glue the inside edge of the eye and stick it to the spot you marked. They won’t be held on with gorilla strength, but they’ll be held on enough if done right. If you’re worried about them coming off you can very carefully add more glue around the edges.
Nose
- Brush the fur away from the nose before sticking it on to avoid awkward fur clumping and uneven fur around the edges of your nose.
- And just like your eyes, position your nose where you want it to be before permanently gluing it in place.
- Hold the nose in place as the glue dries.
Whiskers
- Whether you’re using fishing line, wire, fiber optic, or broom bristles for your whiskers you’ll attach them the same way. Start by cutting out your whiskers at the lengths you want them to be, I did 6 long, 4 medium, and 10 short whiskers total. It’s better to make them too long than too short, you can always trim them later.
- Before you glue them, poke them through the fur into the foam and arrange them the way you want them to look, don’t forget to add eyebrow whiskers! Make sure to get your placement and spacing even on both sides.
- Once you’ve got your whiskers how you like them, you’ll very very carefully glue them in right where they meet the fur, it’s good to keep some of the length still anchored in the foam itself. I used tiny bits of hot glue but you could possibly use tiny dots of superglue instead.
- After everything’s glued in, trim them to be the lengths you want!
The fishing line I used refused to straighten and kept curling, to fix this I taped it to a wooden rod and warmed it up with a heat gun making sure not to melt or burn it. I let the string sit overnight to fully cool off and straighten.
Details :
Now that your head is painted and your nose, eyes, and whiskers are added, you can go over it with one final round of paint, darkening around the eyes to blend them in, or adding a little pink around the nose. I ended up sculpting little eyelids and gluing them on ( you hardly even notice them unfortunately ), and also sculpted some teeth maybe glue in, but didn’t like how they turned out. Anyways, your head should be done and hopefully you were able to follow along well enough, now onto the body….


The Body
I’d really like to stress that I truly thought my fabric would be wider. Every other time I’ve gotten fur and they take it off the bolt it’s folded over and doubles in width, so when this didn’t I had to compromise, get more fabric than I originally thought I’d need, and adjust my pattern to fit. Hopefully you won’t have this problem, and your fabric is wide enough, however if you do have this problem maybe the documentation of my struggles will be of some use.
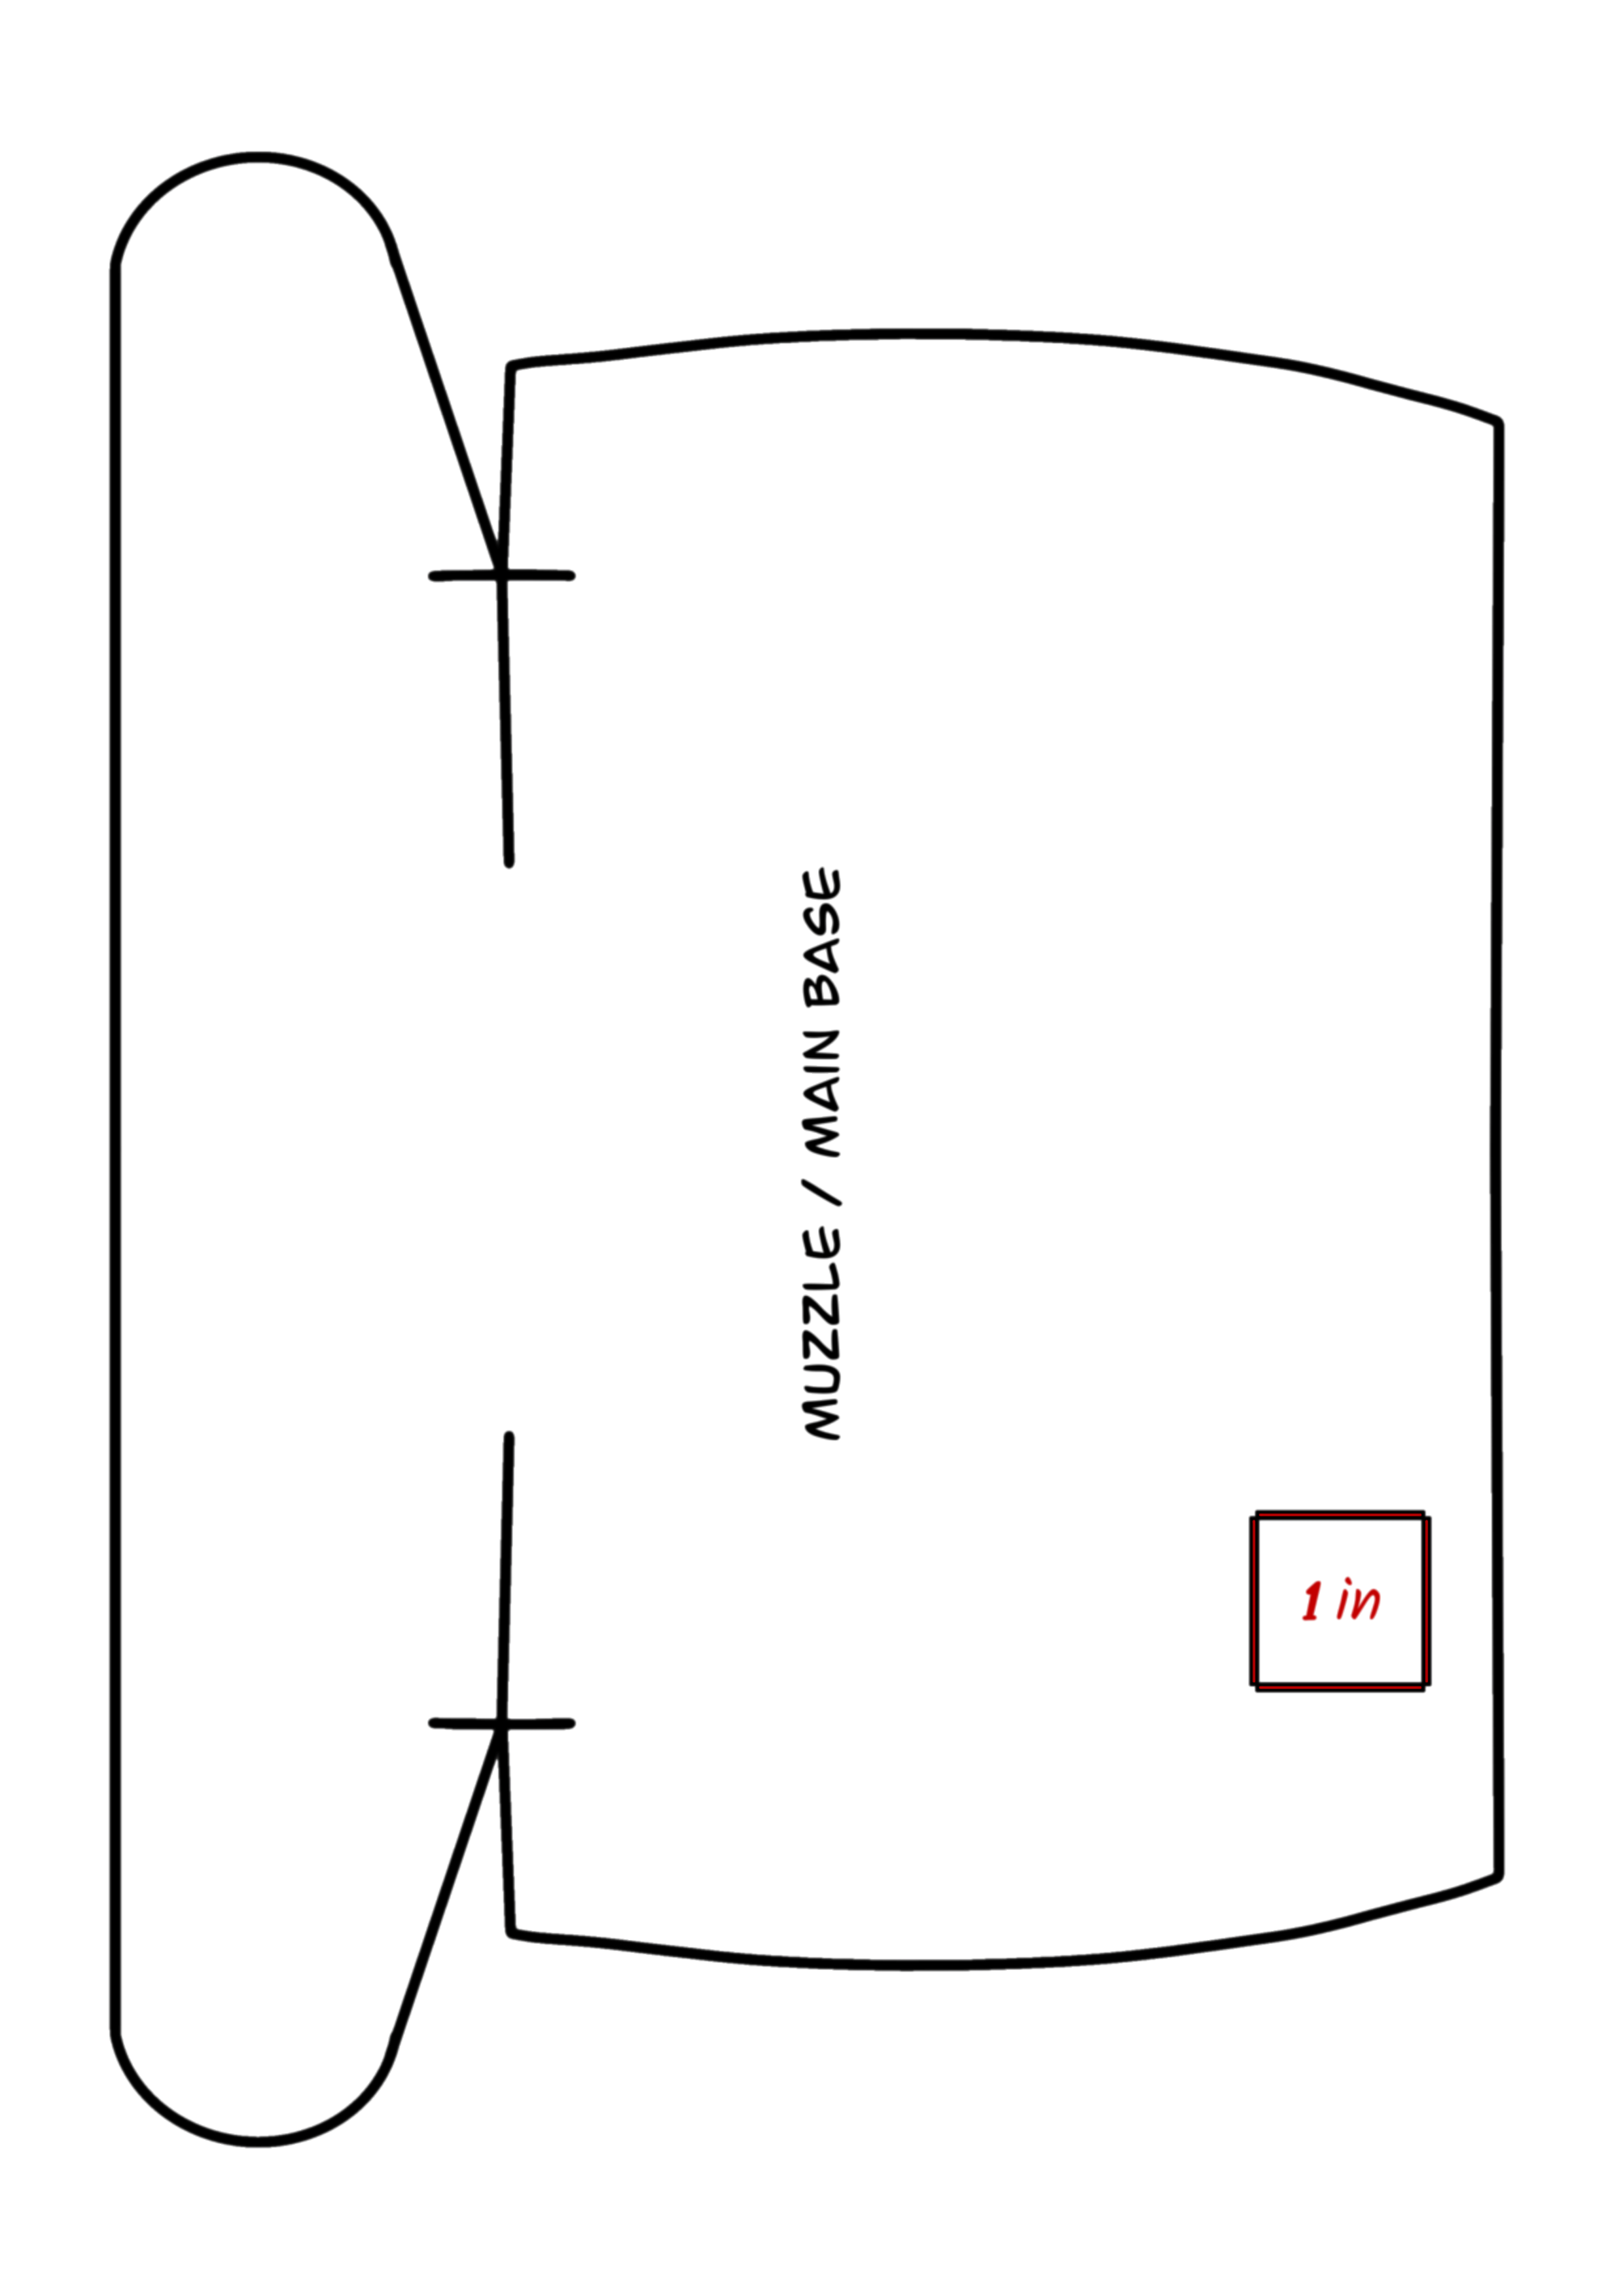
Your Pattern :
I based my pattern off of summertime overalls. I struggled a lot to visualize this part and made mini paper patterns to help! I wanted the fit to be loose and baggy, so I went with a big rectangular shape, I later didn’t like this and trimmed the sides of the torso down. Your pattern will look like the paper models, and drawn diagrams.
On mine, I added two triangular pieces on the shoulders, I honestly didn’t need to do this as it’d make no difference with or without them, I think I just got bored.
- Measure yourself, measure how long your body is from your shoulders to your knees, then measure the widest part of your torso. Keep in mind your pattern will be half of your body, ie; one pant leg and half of your torso. I’m not the best at explaining how to measure, so if you want something more form fitting I recommend finding a tutorial on how to measure for making overalls. I know this is a tutorial but I fear my explanation will be unclear :( To get my measurements I laid down on my paper and poorly traced half of myself…
- You’ve got your measurements, now all you’ve got to do is put them to paper and make your template. Once you’ve got your template made, trace it onto your fur fabric. If your fabric is thin or a light color, use chalk or something that’s a similar color so it won’t be seen from the outside. Note : When I made my pattern my fabric wasn’t wide enough, ideally yours will be, but if it’s not you can do what I did and cut off the part that won’t fit, trace it somewhere else, and attach it later. I chose to cut off the point that makes up the crotch of the suit since that was the smallest part I’d need to reattach.
- That being said, trace and cut out your pattern, you’ll have two front pieces and two back pieces, 2 left and 2 right. Don’t forget to cut out your sleeves too, for my sleeves I traced the sleeves of a T-shirt I liked.
Your pattern should look like the paper models in the first picture under the “ The Idea “ label!
Sewing :
- Once everything is cut out, pin it together and start sewing! Since I wasn’t sure how mine would fit I did a wide whip stitch to hold it together just enough for me to try on and make alterations, after making my alterations I did a stronger tighter final stitch. I recommend using a blanket stitch and using a thread that matches your fur color, especially if your fur is thin or light in color.
- Sew together the side you want to be the back and line up your zipper to the open front. I sewed my zipper in by hand.
Neck / Hood :
This is optional!
I can’t offer much help on this step as my freehand method didn’t turn out the best. Though if you want to make your head attachable / detachable this is where you’ll do it.
- Find a hood pattern or make your own. Be sure to measure how far the gap is between your body and head, that way you don’t end up with too much or too little fabric. Once you have a pattern you’re happy with, trace and cut it out.
- Decide if you want your head to be permanently attached or detachable. If you want it to be permanent, go ahead and sew your neck fabric to both your head and body and you’re done. If you want it to be detachable, you can either use hooks, velcro, buttons, or if you’re really fancy, a zipper. Sew the neck fabric to the body and attach whatever method you chose to the head being sure to line it up with the neck.
I will say I ended up preferring not having the neck attached, if you choose not to make a neck at all it’ll still look good!
Painting :
To keep from being repetitive, refer to the Painting section of Step 1 The : Head.
I chose to paint my body before adding padding, so I’d have a flat surface to work on. Just like with the head, start with your light colors and work in layers! Be sure to brush as it dries and avoid over saturating your fur. I started with a cream color / white paint on the belly and added black paint on the back fading it out to the sides. Use a reference photo of a rat with your fur color to help visualize what parts will be darker or lighter.
Try to line up the same colors you used on your head, for example, my head has a black line going down it so I continued it down the back.
DO NOT HANG IT UP TO DRY! Your paint water will drip off down your suit and onto the ground! Let it dry flat, only hang it up when you’re confident it will not drip, or better yet, wait till it’s dry!
Padding :
If you’re in a rush or simply don’t have foam, you can get away with not having padding, however, if you do choose to add it there are two methods you can use! Method A having solid layered foam padding, or Method B, having shell padding.
For both methods you’ll need to measure how long and wide / thick your padding needs to be by making a template and lining it up with your body suit. I chose to line mine up with my sewing seams.
For Method A, build up your foam layer by layer. This method will take up more materials but will last longer and be less likely to deform or bend out of shape when stored away.
For Method B, you’ll make a template like the one I drew, it’ll look like two flower petals stuck together and when glued it’ll take a shell shape.
To attach them you’ll either fully glue them in or sew them in. I recommend gluing A in and sewing B.
Sewing : You’ll notice that I originally stitched my padding in, however, due to the type of fur I used it caused a very noticeable crease line, so I ultimately decided to stitch my padding in with two anchor spots letting the rest move around however it wants. It looks quite ugly, but since this is all on the inside it doesn’t matter.
Lining : You’ll also notice I lined my padding! This was originally supposed to be neatly sewn to the side, but as you know, sewing didn’t work out. I still recommend lining your padding with something as having scratchy foam against your skin can get quite irritable over time. This can be done for either method too, and again it’s all on the inside so only you will see it if it ends up looking like a mess.
For these steps and making the body, looking at the pictures may be more helpful than reading my explanations lol. I tried my best, hopefully it’ll be enough to help you along! I’ve never made any full body suits so this was a learning experience for me and I messed up quite a few times along the way.


The Tail
What, there’s only 2 pictures for this step? That’s crazy.
Anyways, aside from making your ears, here’s where a sewing machine will come in handy, assuming you had to hand sew all the fur parts like I did. There’s not much point in separating these steps by pattern, sewing, stuffing, etc, so I won’t be doing that this time around.
- Decide how thick or big around you want your tail to be, do this by making a circle with your fabric measuring tape, and once you’ve got it, take the straight edge of your tail fabric and fold it over onto itself to half the length you measured, then fold the edge again but this time at an angle so you have a guide to cut. ( See picture 2, it’ll be more helpful and have a better explanation )
- Now if you cut along the fold you’ll end up with a long even triangular shape!
- Rats don’t actually have lines on their tails, so if you want your rat to be accurate, you can skip this step. To add rings to your tail, measure out your segments and sew straight lines across. Then fold the fabric over a very tiny bit and sew it again, this will mark the line more defined. ( See images labeled #2 in the first picture ).
- If you want to add fur to the base of your tail, now is the time to do so. Simply cut a rectangle of fur that is the same length as your tail pattern’s base width, and sew them together as if adding to the length. ( Sorry that’s a bit confusing to explain )
- Sew your tail together inside out, leaving a hole for you for you to flip it right side out as well as fill with stuffing.
- Stuff your tail starting by pushing the stuffing down to the tip of the tail, each time you add more you can roll and massage the stuffing to be less clumpy. The more stuffing you use the more firm and less flexible your tail will be!
- Once your tail is stuffed, use a ladder stitch to close it off.
- Add elastic belt loops to the base of your tail, make sure whatever belt you’ll be using fits through these loops! You can also sew your tail directly to your suit, but I don’t recommend this as it may rip and come off if it gets pulled too hard.
- Put on your suit inside out and mark where your belt sits / where your tail will be in the back. Now measure how far apart your belt loops are and cut slits into your suit for your belt to go through and attach to your tail. I did a blanket stitch along the slits into made so they wouldn’t stretch, rip, or fray.
- At this point you should be able to wear your tail with your suit! My tail had a gap between it and my suit so I did an extra step and made a cover for it to hide it by stitching a spare piece of fur around where my tail sat against the back. The pattern I used for that part was a half circle.
- Now the last thing to do is to paint your tail, again, to avoid being repetitive, refer to the Painting section of Step 1 The : Head. My only advice here is to try matching your tail’s colors and markings to your ears :)


FINAL!
You’ve made it! Now all there is to do is final touch ups and a gentle brushing out of all your fur!
I really hope this tutorial was easy enough to understand and helps you in some way, if not by making a giant rat then maybe by helping you get ideas for a similar project. I know some parts got quite wordy but hopefully if reading isn’t your thing the picture + description combo made it digestible.
The list in this final image is not complete, but it does have a majority of the items you’ll need!
Thank you so much for following along!
Link to tutorial images and foam base patterns incase these are blurry : https://files.fm/u/cch8p47pdv
( I will try to edit if I see any typos I missed, it’s pretty late as I type this and I’m tired lol )