Re-programing the Makey Makey
by ThisIsSteve in Circuits > Microcontrollers
5689 Views, 21 Favorites, 0 Comments
Re-programing the Makey Makey


After a bit of playing around with the Makey Makey, I decided to check out the further possibilities of Makey Makey. After all the Makey Makey is designed from an arduino and an arduino is capable of doing more than just, generating sounds from vegetables. I looked around instructables and did not find any instructables regarding this.
So this instructable will cover how to get started with re-programing the makey makey and how to re-map or change the key configuration of the makey makey. This tutorial is very simple if you have previous experience in working with the arduino, if you have no experience, I have kept this instructable as simple as possible.
So lets get the most out of the makey makey....
Tools and Resources


Here is all the things you need to get started with re-programming the makey makey.
- Arduino IDE (V1.5 +)
- Spark Fun Arduino add-on
- Makey Makey Driver (If required)
- And the makey makey with the USB cable
Arduino IDE
.jpg)
.jpg)
After you have downloaded the arduino IDE (version greater than 1.5 only) Its time to add the spark fun makey makey plugin to the arduino IDE.
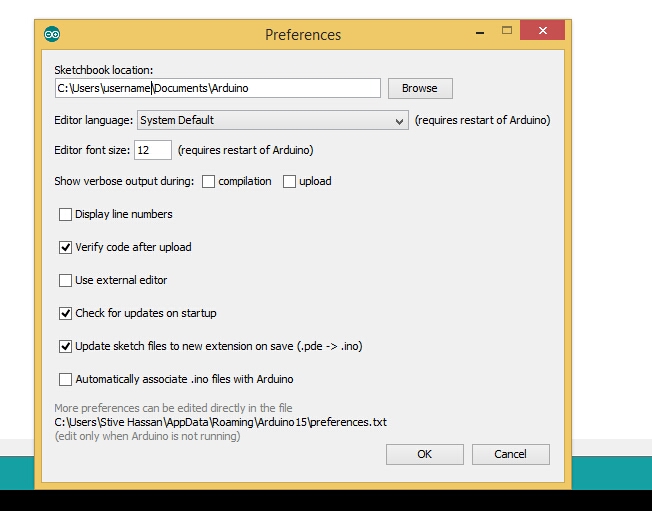
Step 1 - Unzip the zip file to the arduino sketch folder by default it is stored in a arduino folder in My Documents. The path can also be found in the arduino IDE in File > Preferences.
Step 2 - You should have a folder named hardware in the preference location.
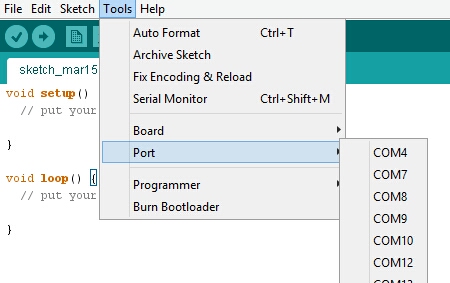
Step 3 - Open the arduino IDE and go to Tools > Board you should now have Spark Fun Makey Makey in the list of boards.
Once you have completed the above steps its time to get started with programing.
Factory Software
_20150315155131116.jpg)
The makey makey has a basic factory software which we are now going to modify, you can download the software from this link or just copy the code bellow.
#include "Arduino.h"

/*
/////////////////////////////////////////////////////////////////////////
// KEY MAPPINGS: WHICH KEY MAPS TO WHICH PIN ON THE MAKEY MAKEY BOARD? //
/////////////////////////////////////////////////////////////////////////

  - edit the keyCodes array below to change the keys sent by the MaKey MaKey for each input
  - the comments tell you which input sends that key (for example, by default 'w' is sent by pin D5)
  - change the keys by replacing them. for example, you can replace 'w' with any other individual letter,
    number, or symbol on your keyboard
  - you can also use codes for other keys such as modifier and function keys (see the
    the list of additional key codes at the bottom of this file)

*/

int keyCodes[NUM_INPUTS] = {
  // top side of the makey makey board  KEY_UP_ARROW,      // up arrow pad
  KEY_DOWN_ARROW,    // down arrow pad
  KEY_LEFT_ARROW,    // left arrow pad
  KEY_RIGHT_ARROW,   // right arrow pad
  ' ',               // space button pad
  MOUSE_LEFT,        // click button pad // female header on the back left side</p><p>  'w',                // pin D5
  'a',                // pin D4
  's',                // pin D3
  'd',                // pin D2
  'f',                // pin D1
  'g',                // pin D0  // female header on the back right side</p><p>  MOUSE_MOVE_UP,      // pin A5
  MOUSE_MOVE_DOWN,    // pin A4
  MOUSE_MOVE_LEFT,    // pin A3
  MOUSE_MOVE_RIGHT,   // pin A2
  MOUSE_LEFT,         // pin A1
  MOUSE_RIGHT         // pin A0
};///////////////////////////
// NOISE CANCELLATION /////
///////////////////////////
#define SWITCH_THRESHOLD_OFFSET_PERC  5    // number between 1 and 49
                                           // larger value protects better against noise oscillations, but makes it harder to press and release
                                           // recommended values are between 2 and 20
                                           // default value is 5</p><p>#define SWITCH_THRESHOLD_CENTER_BIAS 55   // number between 1 and 99
                                          // larger value makes it easier to "release" keys, but harder to "press"
                                          // smaller value makes it easier to "press" keys, but harder to "release"
                                          // recommended values are between 30 and 70
                                          // 50 is "middle" 2.5 volt center
                                          // default value is 55
                                          // 100 = 5V (never use this high)
                                          // 0 = 0 V (never use this low)

/////////////////////////
// MOUSE MOTION /////////
/////////////////////////
#define MOUSE_MOTION_UPDATE_INTERVAL  35   // how many loops to wait between
                                           // sending mouse motion updates

#define PIXELS_PER_MOUSE_STEP         4     // a larger number will make the mouse
                                           // move faster

#define MOUSE_RAMP_SCALE              150  // Scaling factor for mouse movement ramping
                                           // Lower = more sensitive mouse movement
                                           // Higher = slower ramping of speed
                                           // 0 = Ramping off

#define MOUSE_MAX_PIXELS              10   // Max pixels per step for mouse movement

/*
///////////////////////////
// ADDITIONAL KEY CODES ///
///////////////////////////- you can use these codes in the keyCodes array above
- to get modifier keys, function keys, etc KEY_LEFT_CTRL
KEY_LEFT_SHIFT
KEY_LEFT_ALT
KEY_LEFT_GUI
KEY_RIGHT_CTRL
KEY_RIGHT_SHIFT
KEY_RIGHT_ALT
KEY_RIGHT_GUI
KEY_BACKSPACE
KEY_TAB
KEY_RETURN
KEY_ESC
KEY_INSERT
KEY_DELETE
KEY_PAGE_UP
KEY_PAGE_DOWN
KEY_HOME
KEY_END
KEY_CAPS_LOCK
KEY_F1
KEY_F2
KEY_F3
KEY_F4
KEY_F5
KEY_F6
KEY_F7
KEY_F8
KEY_F9
KEY_F10
KEY_F11
KEY_F12

*/
Modifying the Code (Re-mapping)
.jpg)

Once you have got the code in the IDE, you should have two tabs one with a .ino extension and one with a .h extension. Generally you’ll only need to futz with settings.h. This is where all of the keys are defined, and there are a few more advanced options to play with the filters, and mouse movement speed.
You can Re-map the keys with other keys of the keyboard the Keys are mapped in the settings.h file and below are other alternative keys you can replace with.
ADDITIONAL KEY CODES
<strong><br></strong><p>KEY_LEFT_CTRL<br>KEY_LEFT_SHIFT
KEY_LEFT_ALT
KEY_LEFT_GUI
KEY_RIGHT_CTRL
KEY_RIGHT_SHIFT
KEY_RIGHT_ALT
KEY_RIGHT_GUI     </p><p>KEY_BACKSPACE
KEY_TAB
KEY_RETURN
KEY_ESC
KEY_INSERT
KEY_DELETE
KEY_PAGE_UP
KEY_PAGE_DOWN
KEY_HOME
KEY_END
KEY_CAPS_LOCK </p><p>KEY_F1
KEY_F2
KEY_F3
KEY_F4
KEY_F5
KEY_F6
KEY_F7
KEY_F8
KEY_F9
KEY_F10
KEY_F11
KEY_F12</p>
The first variable definition, keyCodes[NUM_INPUTS], is an array of 18 values. Each value in this array represents a single key or mouse input. Each variable in that array has a defined position, called an index, numbered from 0 to 17. KEY_UP_ARROW is at position 0, while, down at the bottom, MOUSE_RIGHT is at position 17
If the Key is an alphabet you can just enter the alphabet followed by apostrophes (only one case is allowed),
For Example a is written as 'a'.
Re-mapping 2

There can be a maximum of 18 Keys in the array in the .h extension file, each key is separated by a comma. The key mapping on the makey makey board can be found in the picture. And once you are done with the mapping you can flash the code to the makey makey, by clicking the upload icon in the arduino IDE. A few of the lights on the makey makey should start flashing and you would get a "Done Uploading" at the bottom of the IDE.
Going Further

The outputs found on the back side of the makey makey which reads "Key OUT" and "MS OUT" responds to key-press and mouse motion respectively, so you can connect a LED or and relay which would turn on when you click any key on the keyboard.
On my next instructable I'm going to show you how to control a Servo using the Makey Makey.