Upcycled Cardboard Clock

.jpg)
.jpg)


It's about "Time" I made something from Cardboard and this is a clock made from a recycled cardboard box, I have an old laser engraver machine but never actually used it for a Cardboard Project.
The theme of this clock is to highlight the importance of recycling materials like cardboard, Whether recycling domestically or commercially, everyone should try to recycle their cardboard materials! Why? because it can be used to make all kinds of other materials, here are a couple of examples:
New Boxes and Packaging.
This seems obvious but is still worth mentioning – old cardboard can be used to make new cardboard and other types of paper-based packaging like paperboard.
Because the paper fibers used in cardboard are so strong, it can be recycled several times over, meaning the more cardboard we recycle for new boxes and packaging, the less trees we need to use!
Paper Bags.
Whether used as grocery bags, gift bags, or delivery bags, almost any type of paper-based bag can be made using recycled cardboard. Given how many paper bags are used every day, it’s great that we can lower the amount made from fresh paper and stick to recyclable materials like cardboard.
Newspaper and Writing Paper.
Almost any type of paper can be recycled and used for other paper products, so it’s only natural that cardboard is often used to make standard paper. This means the paper you’re writing your report on or reading the news may have started life as a cardboard box!
The clock features the Mobius Loop which is a widely recognized recycling symbol and has 3 chasing arrows that loop back on themselves forming a triangle.
Useful Information:
The recycling symbol, often called the Mobius loop, was designed by Gary Anderson, a student at the University of Southern California. He won a contest sponsored by the Container Corporation of America to design a symbol that would be used on packaging to indicate recyclability, in preparation for the first Earth Day in 1970. The symbol is now globally recognized for recycling.
Supplies
Laser Engraver Machine
3D Printer for the hanger. (Optional)
Quartz Clock Mechanism (Recycled) Or online retailers, inexpensive.
Cardboard Box (Recycled)
Glue Stick
CA Glue
AA Battery
Clock Face Design
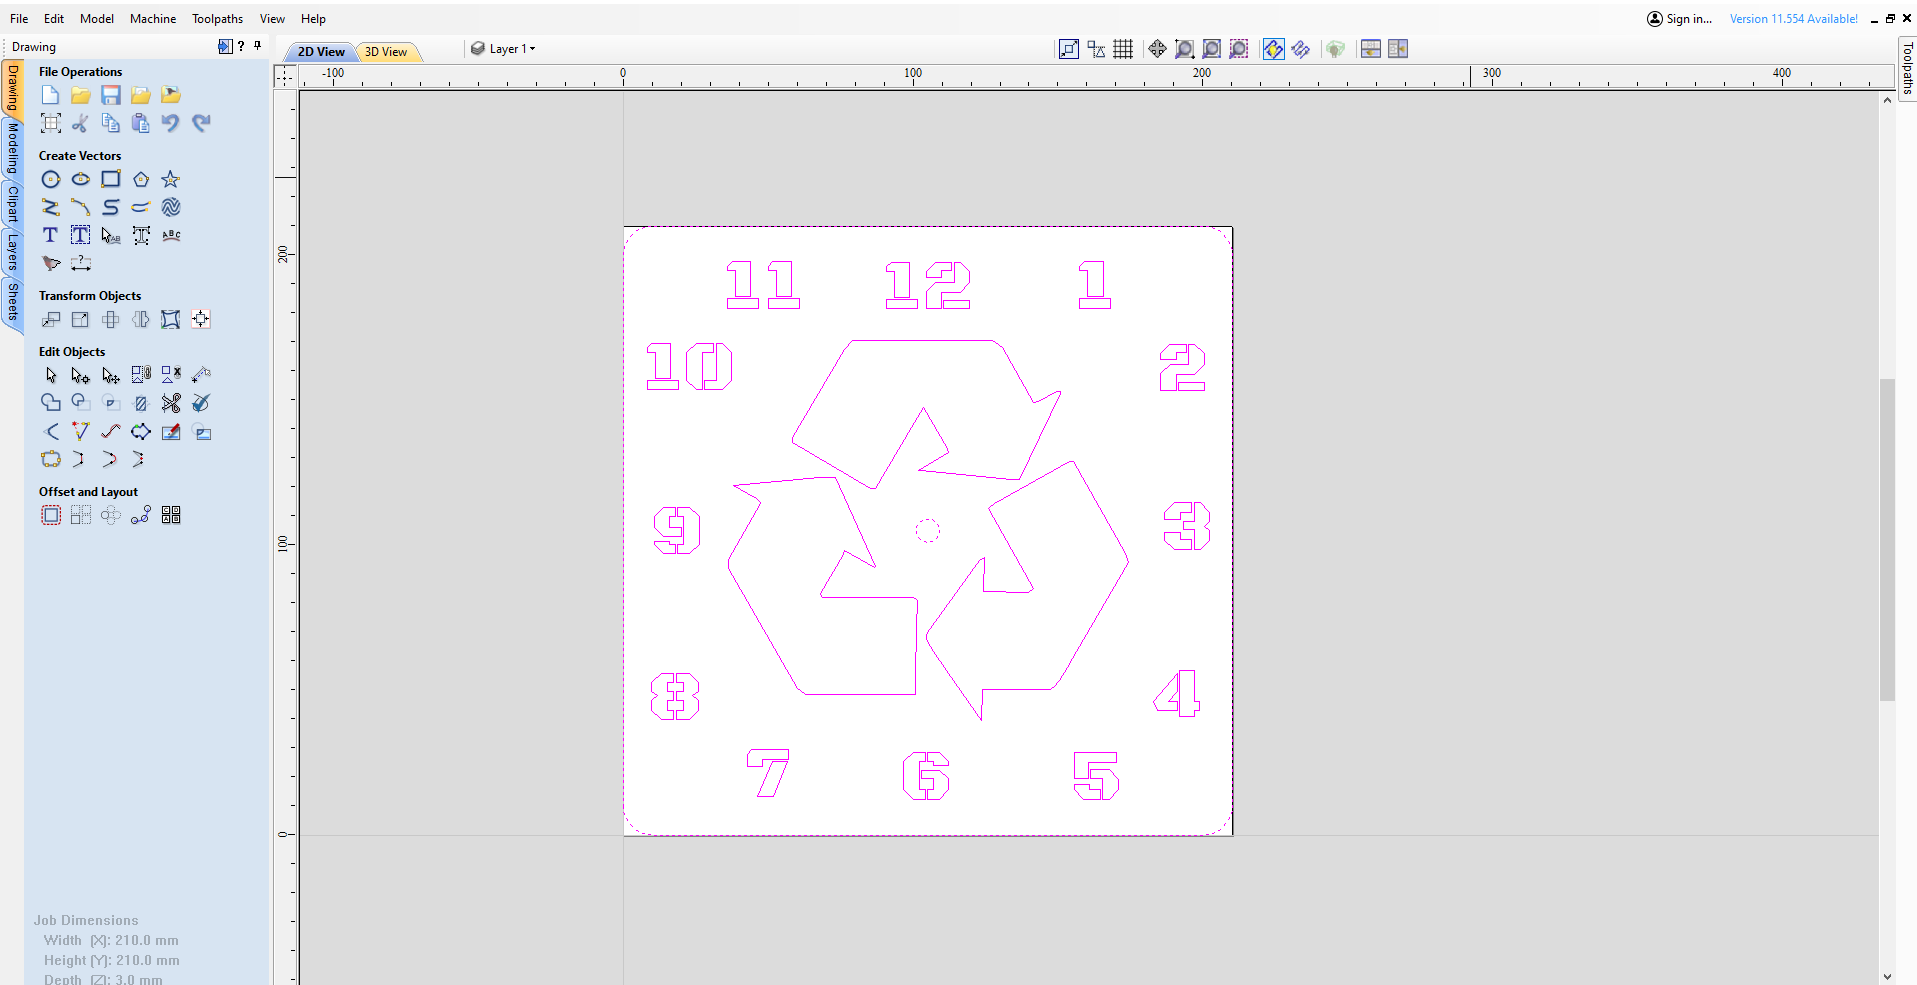


I decided to go for a square clock shape just to be different and the first job was to design the clock face, the size is 210mm x 210mm I made an error with the 1st design forgetting that I am cutting out of Cardboard and I opted for standard numbers, of course when I made the first cuts it was obvious what was going to happen, the numbers 4 6 8 9 10 all the inner bits were cut and they fell out which didn't look very good.
Thinking cap on I opted for a stencil font, which I downloaded for free, these files come in Zip form, extract the file and right click on the text true font and install for all users for it to become available in any text editor etc.
I needed to close the program and restart before the font file became available.
I used Vetric vcarve to design the clock face and Mobius Loop, I believe this could be done in Inkscape as well. I downloaded a square clock free template and imported it as a bit map, this was traced and I used this as my template for the stencil font numbers, I added each number and deleted the originals as I went along, at least I knew the clock digits were in the right place.
I traced the Mobius Loop from a recycling Image.
I saved the file as a dxf file, highlight the entire sketch and click on Export on the File Tab, Export and dxf, I saved to my Desktop.
Importing the Dxf File Into Lightburn


With the initial project I tried to engrave fill in the numbers and Mobius loop, with what I thought were mild laser settings, it literally burned right through the cardboard and nearly set it alight so caution was needed here, there are screen shots showing my first attempts.
I think at that point I had decided to cut the stencil numbers out instead of engraving and after some thought I decided to use a cut out a backing board as well of the same Cardboard, I could then place the cut board on top of the back for additional strength as well.
My Lightburn Settings:
On opening Lightburn, we create a new project and import the clock dxf, You can program the cut order within Lightburn so that was set and after some trials it looked like speed 600mm/min and 60% power was the best option, I cut the numbers and mobius loop, then the outline in that order, see the Lightburn Screenshots for clarity.
It took 2 attempts to get the settings just right as even with stencil numbers there were bits tying things together which easily broke when pricking the unwanted pieces of cardboard out.
I was pleased with how the laser cut the cardboard, the edges were very clean, around most of the numbers as well.
In my experience with open laser engravers it is good practice to wear a dust mask and the correct Laser eye protection at all times when in use.
I would never leave the laser unattended, especially when cutting wood or cardboard or any material, it proved with my first attempt at cutting cardboard how easily it could set alight, so some time with trial cut power settings is paramount.
With the 2 components now complete we could start the assembling process.
Making the Clock Digits Stand Out


I decided to highlight the Clock digits and Mobius Loop, I used the front clock face as a template and marked out the digits and mobius loop with a black Sharpie felt tip pen, Twin tip, fine and ultra fine on the backing board, I then filled in around the digits with the black felt tip pen and used some green Acrylic paint for the mobius loop to give the green recycling theme.
I used a glue stick to to stick the top face to the backing board, and stacked a couple of books on top until dry.
The final thing to do was to install the recycled quartz mechanism, this mechanism didn't have the usual nut and washer to secure so I had to glue it on using the glue stick.
All what was left to do was make a hanger for the clock, I was going to make out of cardboard, then I thought with the weight and hanging that I would make a simple 3D Printed hanger and secure with CA Glue to the back of the mechanism.
That concludes this Instructable with a very useful purpose, thanks very much for looking.
I have added the lightburn file should anyone want to use it.