Ripple Realms (Foxfire Tales)
by Haoxuan Huang in Design > 3D Design
3771 Views, 15 Favorites, 0 Comments
Ripple Realms (Foxfire Tales)


This project began with a simple idea: to create a whimsical and heartwarming forest scene that evokes feelings of peace, curiosity, and wonder. Inspired by children’s storybooks and animated worlds, I envisioned a nighttime woodland where playful foxes gather around a campfire, surrounded by stylized trees, oversized mushrooms, and lush vegetation.
The initial concept was born from a sketch, where I explored the theme of “cozy wilderness.” I wanted to blend nature with storytelling by building a safe, fantastical environment that feels both magical and believable. To bring the scene to life, I started by modeling each individual element in Blender—from the fox characters to the layered trees, soft grassy bushes, and decorative foliage. Every object was carefully stylized to retain a playful, soft-edged aesthetic.
As the composition developed, I paid special attention to lighting and mood. The warm glow from the campfire serves as the emotional centerpiece, drawing the viewer’s eye and creating a sense of intimacy amidst the vast, quiet forest. The cooler blue and moonlight-inspired rim lighting contrast this warmth, hinting at the mystery of the surrounding woods.
This scene was not only a modeling and rendering exercise, but also a storytelling exploration—where light, shape, and color work together to tell a tale without words. It's a gentle tribute to the magic we often overlook in the quiet corners of the world.
Flower Tree Modeling


The scene begins with the creation of a stylized flower tree, designed to serve as a symbolic and visual centerpiece of the animation. Using Blender, I started by blocking out the basic trunk form with a combination of cylinder primitives and proportional editing to create an organic, flowing structure. I aimed for a natural twist in the trunk that would suggest upward movement, like sap flowing or wind dancing through bark.
For the blossoms, I modeled a single petal shape, then used modifiers (Array and Curve) to duplicate and arrange the petals into full flowers. These flowers were then distributed along the branches using the Geometry Nodes system to achieve a procedural, randomized scattering that mimicked natural growth.
To unify the composition, I adjusted the scale and rotation of the flowers so they felt like they were blooming outward, interacting with the space around them.
Modeling the Grass Cluster

To enrich the environment and reflect the theme of "flow," I created a layered, dynamic grass cluster using Blender. I started with a single blade of grass modeled from a simple plane, which I shaped using proportional editing to create organic curves that mimic natural growth. The edges were slightly tapered and bent to evoke softness and movement, as if the grass were being caressed by wind.
I then used the Array Modifier and Curve Modifier to duplicate and bend multiple blades along circular curves, gradually forming a dome-like structure. To achieve a more natural and randomized effect, I applied the Geometry Nodes system, controlling variables such as rotation, scale, and position to make each blade slightly unique.
Lotus Leaf Cluster Modeling

To add a harmonious and decorative element to the landscape, I created a stylized lotus leaf cluster in Blender. Each leaf was modeled from a single plane using the subdivision surface modifier and proportional editing, allowing for smooth, organic curvature along the midrib. I added a central crease to give the leaf more dimension and a natural fold.
Once a single leaf was shaped, I used array duplication and manual rotation to arrange multiple leaves in a radial pattern, converging at a shared root point to mimic a blooming lotus. The overlapping structure creates a rhythmic visual effect, while also adding fullness and balance to the environment.
Tulip Flower Modeling

In this step, I modeled a stylized tulip to enrich the floral diversity of the scene. I started by creating a vertical stem using a simple cylinder and applied subdivision surface to smooth it out.
The tulip bud was constructed using multiple petal shapes. Each petal was formed from a curved plane, modified with proportional editing to mimic a natural wrap. I positioned them in a radial pattern and added subtle overlaps for realism.
The leaves were created separately with a slight bend along their midribs to simulate natural drooping. They were attached to the stem with a gentle offset, making the flower look both delicate and dynamic.
Olive Leaf Modeling

To enrich the botanical elements of my scene, I designed an olive branch with symmetrical leaf pairs. I started with a slender cylinder as the central stem, extruded to match the overall height I desired.
Each leaf was modeled using a single curved plane with a central vein indentation for realism. I duplicated and scaled them progressively smaller from bottom to top, placing them alternately on both sides of the stem to mimic the natural growth of olive leaves.
Banana Leaf Modeling
To create a large, tropical aesthetic element, I modeled a banana leaf. I began with a plane and used proportional editing to sculpt a broad, elliptical shape with a central spine. Then, I applied a solidify modifier to give the leaf realistic thickness and volume.
To emulate the natural notches of a banana leaf, I manually extruded and inset cuts along the edges using knife and loop tools. This gave it the signature tropical feel, while still keeping the form clean and stylized.
Christmas Tree Leaf Modeling

To give the scene more decoration, I created a stylized Christmas tree leaf. Starting from a flat plane, I shaped the leaf using loop cuts and proportional editing, focusing on achieving the iconic triangular silhouette with symmetrical protrusions on both sides.
The central spine was extruded slightly to emphasize structure and realism. I kept the overall shape geometric and playful to match the stylized look of the environment.
Campfire Setup Modeling

To enrich the atmosphere of my animated scene, I created a stylized campfire composed of logs and central burning stones. I started by modeling the logs using elongated cylinders with slightly distorted shapes to mimic natural wood. Then, I rotated and stacked them in a crossed formation to give a realistic structure.
For the flames or burning core, I sculpted a blobby organic shape using the Sculpt Mode in Blender, ensuring the form looks soft and dynamic — like animated fire stones or melting material. The simplicity of the model keeps it visually coherent with the rest of the stylized scene, while its placement enhances the warmth and storytelling of the environment.
Fox Character Modeling

To add charm and storytelling to the scene, I modeled a stylized cartoon fox character. I began by blocking out basic shapes using spheres and cylinders. The head is a slightly stretched sphere with large, pointed ears made from deformed cones. The body is simplified as a rounded form with small cylindrical legs and paws.
The most eye-catching feature is the exaggerated tail, curved around the fox’s body like a crescent moon, giving the character a playful and cozy vibe. I kept the facial features minimal — just a nose, eyes, and cheeks — to match the overall soft, friendly aesthetic of the animation style.
This character is meant to represent companionship and warmth in the scene, sitting beside the campfire to convey a sense of peace and gentle wonder.
Rock Modeling
To enhance the natural feel of the forest scene, I modeled several stylized rocks of varying shapes and sizes. I started with basic cube meshes and used proportional editing to push and pull vertices, giving each rock an irregular and organic form.
Instead of aiming for realism, I embraced a more low-poly, smooth aesthetic to match the overall cartoon style of the scene. The rock surfaces have soft bevels and rounded edges, making them look friendly and harmonious with other environment assets.
Stylized Tree Modeling

To add a whimsical and surreal touch to the scene, I designed a stylized tree with abstract, tubular branches. I started with a basic cylinder for the trunk, then used the Sculpt Mode and Proportional Editing tools to create an organic, flowing shape.
For the branches, I modeled multiple curved cylinders and connected them smoothly to the trunk. The ends of each branch were deliberately rounded, giving the tree a soft, friendly appearance rather than a realistic one.
Vine Modeling

To bring a sense of movement and organic growth to the scene, I modeled a winding vine that wraps elegantly through the environment. Starting with a Bezier Curve, I sculpted a flowing path that climbs and twists like a real plant. Then, I converted the curve into a mesh and added a cylindrical base structure using a curve modifier to follow the shape.
For the leaves, I created a single leaf mesh and duplicated it along the vine using the Array Modifier and Curve Modifier combo. The leaves were rotated slightly at random to make the vine look more natural and dynamic.
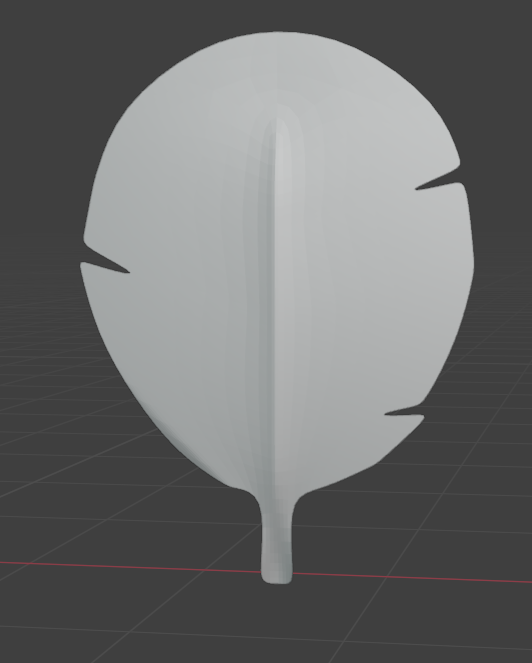
Large Leaf Tree Modeling

This large-leaf tree introduces a whimsical and soft aesthetic to the environment. I began by blocking out the tree trunk with a smooth, organically shaped cylinder, using Subdivision Surface Modifier to give it a soft and stylized silhouette.
For the leaves, I designed a single broad leaf with gentle curves, and then duplicated and rotated it into multiple layers stacked around the trunk in a spiraling arrangement. Each leaf was slightly tilted and scaled to give the canopy a fluffy, layered appearance, like a fairytale tree.
Palm Tree Leaf Modeling

To create the palm tree leaf, I started by designing a single narrow leaf using Bezier curves for its sleek curvature and then converted it into mesh for editing. I used the Array Modifier along a curve to duplicate the leaf shape symmetrically along a central stem.
Then, I added a slight bend and twist using a Simple Deform Modifier to give the leaf a natural arch, mimicking the way real palm leaves curve due to gravity. The overall design adds a sense of rhythm and tropical aesthetics to the scene, balancing the fantasy environment with more organic plant elements.
Monstera-Style Leaf Modeling (PIG GRASS))

To model the “pig grass,” which resembles a Monstera leaf, I first used a plane and shaped the general silhouette of the leaf using the Knife Tool and Extrude. The signature split cuts and natural holes were manually created using boolean operations and additional loop cuts.
Then, I adjusted the thickness and curvature by applying the Solidify Modifier and using proportional editing to gently curl the leaf ends, creating a sense of softness and realism. This oversized stylized leaf adds a tropical and whimsical feel to the forest scene.
Hollow Tree Trunk Modeling

To create the hollow tree trunk, I began with a cylinder and removed a section using the Boolean Modifier (Difference) to simulate the interior being carved out. The cross-section was carefully adjusted to appear clean and smooth.
Then, I added a stylized branch and root elements on each side using scaled cones and extruded shapes, giving the trunk a whimsical, cartoon-like silhouette. This hollow log serves as a potential habitat or passageway in the animated forest environment.
Flower-Shaped Cushion Modeling

To create this flower-shaped cushion, I started with a single petal mesh, modeled using a scaled and subdivided sphere with smooth curvature. After shaping the petal, I used the Array Modifier with an Empty object as the rotation axis to evenly distribute the petals in a circular pattern.
The center of the cushion was formed with a round, flattened sphere, which visually connects the petals and serves as the seating area. The overall form balances a soft, stylized aesthetic that complements the cute character seated on it.
Tree Stump Chair Modeling

To create the tree stump chair, I began with a cylinder as the base shape. I scaled the bottom to be wider and used the Sculpt Mode with the Grab and Smooth brushes to give the stump a more organic, grounded look.
The top was inset and extruded downwards to create a seat cavity, while the outer surface was slightly warped to resemble natural bark. I added branch nubs sticking out from the sides using separate cylinders and merged them into the main mesh for a unified shape. The result is a stylized, inviting stump chair that blends into the whimsical forest environment.
Stylized Mushroom Modeling

To create the mushroom, I started with a UV Sphere for the cap. I scaled it along the Z-axis to flatten the top and used Proportional Editing to shape a slight dome. For added character, I used the Sculpt Mode (Grab Brush) to warp the edges slightly and give it a more organic feel.
The stem was made using a cylinder with a subtle taper using Proportional Scaling, then adjusted with Sculpt Tools to add a natural curve. I modeled small circular blobs for the mushroom spots, duplicating and resizing them to place randomly on top of the cap for a whimsical cartoon aesthetic.
Modeling Complete – Time to Bring It to Life!

After countless vertices, countless Ctrl+Zs, and perhaps a few existential questions about topology, the base models of my animated forest scene are officially complete! Trees are branching, mushrooms are sprouting, and even the little fox looks ready for the spotlight.
Now it’s time for the real magic — rendering!
Rocking the Realism — Displacement Mapping for the Rock

To give the stone element in my scene a realistic, tactile feel, I used displacement mapping in Blender. Rather than relying solely on bump or normal maps, I opted for a real geometry displacement
Here's how I did it:
- Base Mesh
- I started with a simple, low-poly rock mesh created with basic sculpting.
- Subdivision Surface Modifier
- I added a Subdivision Surface modifier to allow enough mesh density for the displacement to take effect properly.
- Displacement Modifier + Texture
- I added a Displace modifier and plugged in a grayscale displacement texture (from a realistic rock surface image).
- The bright parts of the texture pushed the mesh outward, while the dark parts pushed it inward.
- Shader Setup
- In the Shader Editor, I applied a PBR texture set consisting of:
- Base Color Map – to give the rock its natural color
- Roughness Map – to define how shiny or matte the rock surface appears
- Normal Map – for extra surface detail
- Displacement Map – connected via a Displacement node through the Material Output under ‘Displacement’ input
Almost Here

Prepare to light the scene. Finally, it's time to do so.
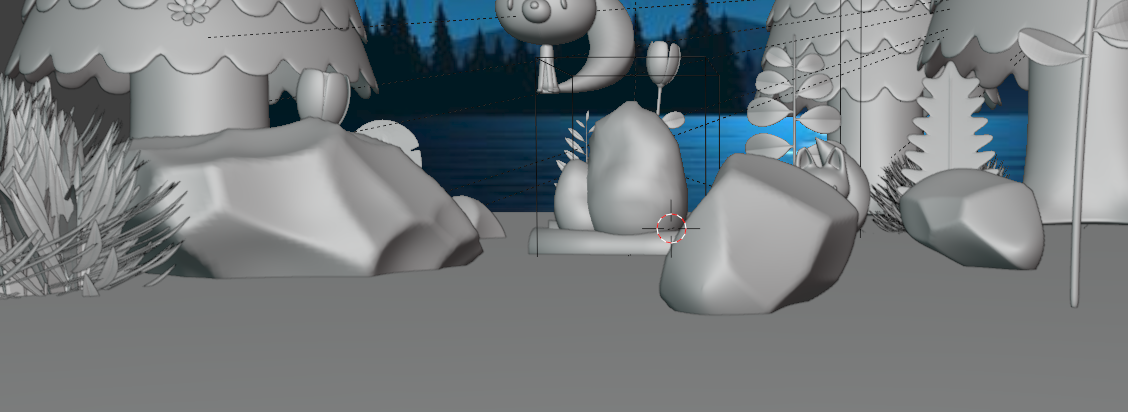
Midnight Mayhem

After setting the nighttime backdrop, my cozy little forest instantly transformed into something straight out of a horror film. Without any lights, the entire scene went pitch black — my cute characters now looked like they were plotting a jump scare in the dark. 😱🌲
At this moment, I realized a hard truth in 3D design:
No matter how good your models are, without lighting, they’re just ghosts in the void.
So up next: lighting!
Building the Mood With Layered Lighting

lighting — the secret sauce that brings everything to life.
Key Lighting Strategy:
- Moonlight Illusion (Area Light & Spot Light):
- I positioned a large area light coming from the direction of the moon in the background image to simulate soft, ambient moonlight. Then, I added a spot light slightly above and behind the trees to create subtle rim highlights, giving the illusion that the characters are being bathed in moonlight.
- Blue Fill Light on the Tree:
- To bring focus and drama to the left stylized tree, I added a cool blue light hitting it from an angle. This not only emphasized its texture and shape, but also reinforced the night-time atmosphere.
- Point Lights Around the Campfire:
- The campfire isn’t just decoration — it’s also a light source. I placed several point lights around it with warm orange tones, imitating the flickering firelight and casting cozy highlights on the surrounding characters and plants.
- Soft Fill Lights (Low-Intensity):
- To make sure key elements weren’t lost in shadows, I scattered a few low-intensity fill lights in darker areas. These helped gently reveal details without breaking the night-time mood.
- Color Temperature Play:
- I carefully balanced warm (fire) and cool (moon/sky) tones to create a harmonious and cinematic feel. The contrast between orange and blue guided the viewer’s eye and gave the scene emotional depth.
A Snapshot of a Dream


After carefully adjusting the lighting, materials, and composition, I proceeded with the final rendering. To ensure rich detail and a clean result, I used high sample rates and enabled anti-aliasing and ambient occlusion. The render was output at high resolution, capturing a warm and dreamy nighttime forest scene — a frozen moment from a fairytale world.