Simple Captive Portal for Er605
by bichagalpradyun in Circuits > Tools
595 Views, 0 Favorites, 0 Comments
Simple Captive Portal for Er605

.jpeg)
Free & Easy Captive Portal for TP-Link ER605
This is a completely free, open-source captive portal solution designed for the TP-Link ER605 router (standalone mode).
No RADIUS server needed — just adjust a few simple settings on the router and upload the website files.
✅ Beginner-friendly setup
✅ Fully customizable (background, logo, text)
✅ No hidden costs, no licenses
✅ Perfect for small businesses, cafés, hotels, and events
✅ 100% open-source — yours to use and modify
Give your guests a branded, professional Wi-Fi login page in minutes — no tech skills required!
Supplies

U will need er605
Deploy Your Website (using Netlify(u Can Use Any Other))


🚀 How to Deploy This Captive Portal Using Netlify (for TP-Link ER605)
*DOWNLOAD CODE FROM https://github.com/paduarduino/portal-for-er605 from this just take the captive portal plug n play folder nothing else very important or you will see error pop up
FOR CHANGING BACKGROUND
If you want you can change the background image you can do this by just removing the existing background image and replacing it with new one (The image name should be bg.jpg or it wont work)
FOR CHANGING LOGO
If you want you can change the logo image you can do this by just removing the existing logo image and replacing it with new one (The image name should be logo.jpg or it wont work)
This guide will help you set up your free, customizable captive portal using Netlify — no coding or server setup needed!
✅ Step 1: Clone or Download the Repository
- Go to: https://github.com/paduarduino/portal-for-er605
- Click the green Code button → Download ZIP
- Extract the ZIP file
- You’ll find a folder called captive portal — this is the only folder you need
🛑 Do not upload the README.md or any other files. Just the captive portal plug n play folder otherwise netlify will show an error .will say sit not found
✅ Step 2: Deploy on Netlify
- Go to https://app.netlify.com/ and sign in (or sign up)
- Click "Add new site" → "Import an existing project"
- Connect your GitHub account or choose manual deploy
- Drag and drop the captive portal folder into the upload box
- Netlify will deploy your site in seconds and give you a live public URL like:
- https://yourname.netlify.app
Changing Site Name
to Change Your Netlify Site Name (URL)
By default, Netlify gives your site a random name like bold-hill-12345.netlify.app. You can change it to something more professional or easier to remember (like yourcafe-login.netlify.app):
🔧 To change the site name:
- Go to https://app.netlify.com/ and log in
- Click on your deployed site from the dashboard
- In the Site Overview page, find the "Site settings" button
- Scroll down to the Site information section
- Click "Change site name"
- Enter your desired name (e.g., mycafe-portal)
- Click Save
Now your captive portal will be accessible at:
NOTE DOWN THE URL GIVEN TO U WHEN U CHANGE THE NAME OF WEBSITE **IMPORTANT** -(1)
EX: https://mycafe-portal.netlify.app
Login to Your ER605

LOGIN TO YOUR ER605
*enter your username and password which entered while first setting up you device
*make sure its running latest firmware (you can install latest firmware by going to tplink downloads website)
*********caution you need to update your tplink firmware step wise or else it might brick your device ***********
CHANGE LAN IP TO 192.168.1.1


Steps to Change LAN IP & DHCP Range Together in One Window
- Log into the Router
- Open your browser and go to: http://192.168.0.1 (or your current LAN IP).
- Enter your admin username and password.
- Go to LAN Settings
- Navigate to Network > LAN (this is the section where both LAN IP and DHCP settings are located).
- Change the LAN IP Address
- LAN IP Address: Change it to 192.168.1.1.
- Subnet Mask: Leave it as 255.255.255.0.
- Set the DHCP Range
- In the same window, set the DHCP Start IP to: 192.168.1.100.
- Set the DHCP End IP to: 192.168.1.199.
- This ensures devices will get IPs in the 192.168.1.x range.
- Save Changes
- Click Save or Apply.
- The router will apply the new LAN IP and DHCP settings and may reboot.
- Reconnect with New IP
- After the reboot, open your browser and go to: http://192.168.1.1.
- Log in again using your admin credentials.
** If you don't have lan setup click on add it will add lan interface**
LOGIN WITH 192.168.1.1 Setup Wan Interface

🌐 How to Set Up the WAN Link Using Quick Setup on TP-Link ER605
- Log in to the ER605 Router Admin Panel
- Open a web browser and type the router’s IP address: 192.168.1.1 (default)
- Enter your username and password (default is admin for both unless changed)
- Start Quick Setup
- Once logged in, click on Quick Setup in the left menu under System Tools.
- Select WAN Connection Type
- You’ll be presented with options to choose your WAN connection type. Select the appropriate type based on your internet service:
- Dynamic IP (DHCP) – Select this if your ISP automatically assigns an IP address.
- Static IP – Select this if your ISP provides a fixed IP address.
- PPPoE – Select this if you use a username and password provided by your ISP.
- L2TP/PPTP – Choose this if you need to connect using L2TP or PPTP with credentials.
- Configure WAN Settings
- For Dynamic IP (DHCP):
- The router should automatically acquire an IP address.
- For Static IP:
- Enter the IP address, Subnet Mask, Default Gateway, and DNS information provided by your ISP.
- For PPPoE:
- Enter the username and password given by your ISP.
- For L2TP/PPTP:
- Enter the username, password, server IP, and other details your ISP provides.
- Set Up WAN Backup (Optional)
- If you want to set up WAN failover, select the Backup WAN option and configure a secondary connection (such as a 4G/3G modem). This ensures your network stays connected if the primary WAN link goes down.
- Save Settings
- After entering the required details, click Next to review the settings and then click Save.
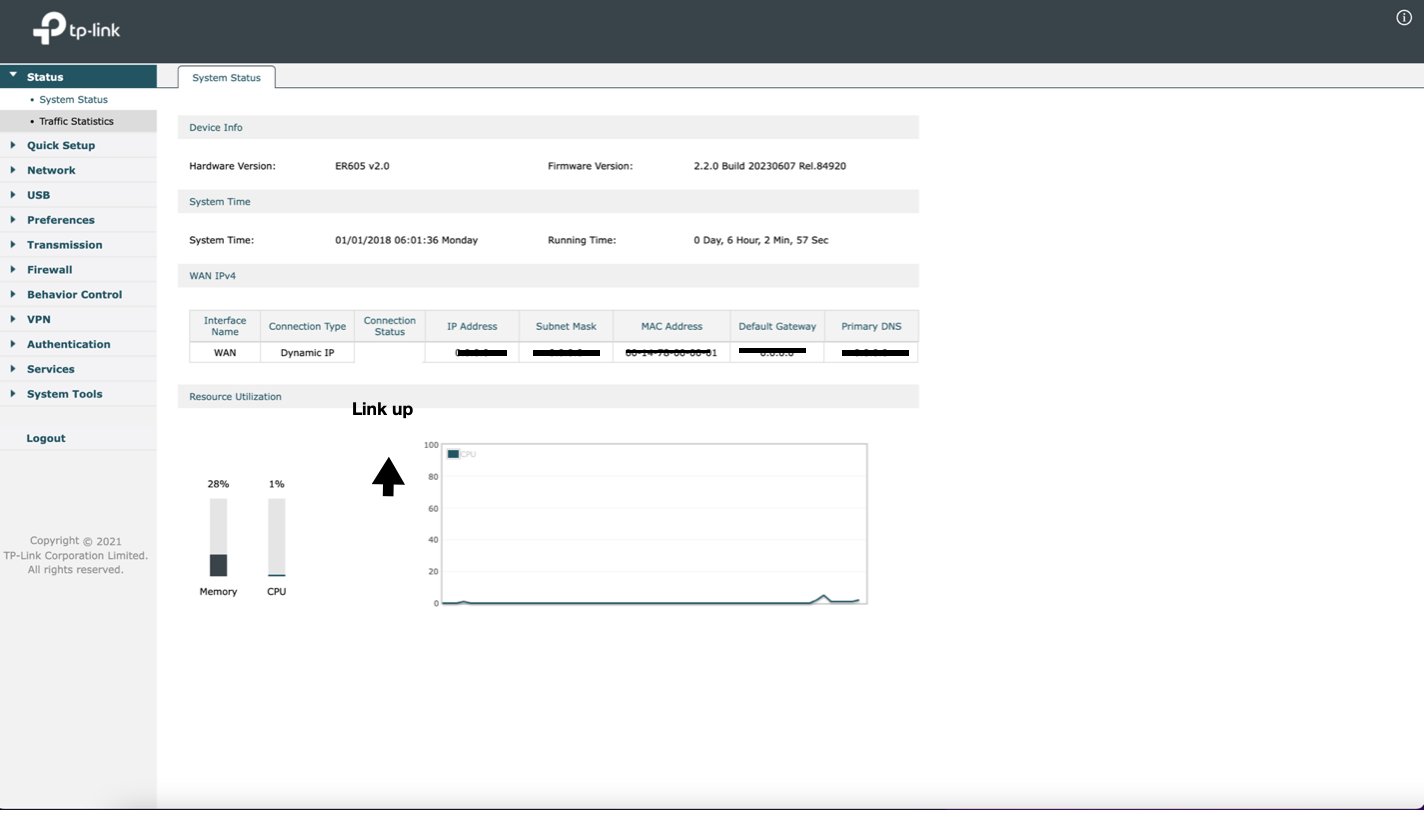
- WAN Link Up
- The router will automatically test the connection. If everything is configured correctly, the WAN link should be up and your internet connection will be established.
- Test the Connection
- Go to the Status page in the admin panel to check if the WAN connection is successfully established. You should see the WAN IP address and connection status.
SETUP USER IN USER MANGEMENT

✅ Steps to Create This User
- Log in to your ER605 admin panel (http://192.168.0.1)
- Go to Authentication > User management
- Click Add
- Fill in all fields exactly as shown above
- Click OK to save
🚨 Important: Do not change any values. Fill exactly as shown below.
All fields must be filled in. Leave optional fields empty.
FieldValue (exactly as shown)
User Type : Formal User
Username : portal
Password :1234
Expiration Date : 12/31/2030
Authentication Period : 00:00 - 24:00
MAC Binding Type : No Binding
Maximum Users: 1024
Upstream Bandwidth:0 (means no limit)
Downstream Bandwidth:0 (means no limit)
Name:(leave empty)
Telephone:(leave empty)
Description:(leave empty)
Status:Enable
Setting Up Authentication Url

COPY THE AUTHENTICATION URL GIVEN TO YOU BY NETLIFY(ex:https://omapadaportal-100.netlify.app)
GO TO AUTHENTICATION>AUTHENTICATON SETTINGS>AUTHENTICATION PAGE>EXTERNAL LINKS
STATUS : ENABLE
HERE :1 SELECT YOU LAN INTERFACE
2 SET THE PORT TO 8443(COMPULSARY)
3 SET THE IDLE TIMEOUT ACCORDING TO YOUR NEED
4 PASTE THE AUTHENTICATION URL GIVEN TO YOU BY NETLIFY IN AUTHENTICATAION URL INPUT BOX
5 FOR SUCCESS REDIRECT URL YOU CAN PASTE YOUR OWN LINK OR YOU CAN USE YOUR LINK WITH BY FIRST PASTING YOUR URL(EX:https://omapadaportal-100.netlify.app) AND PASTING THIS TO END OF YOUR CODE. (/success/index.html). SO YOUR URL WILL LOOK LIKE
*(https://omapadaportal-100.netlify.app/success/index.html)
6 LEAVE FAIL REDIRECT URL EMPTY OR IF YOU HAVE FAIL URL PLS PASTE IT HERE THE CODE I GAVE YOU DOSEN'T HAVE FAIL PAGE
7 SELECT AUTHENTICATION TYPE TO LOCAL AUTHENTICATION
Setup Guest Resource

✅ Steps to Configure Guest Resource(So that guest can view you captive portal)
- Go to Guest Network Settings
- In the menu, go to:
- Authentication > Authentication settings > Guest Resource
- Click “Add” to Create a New Guest Resource
- Fill in the Following Details:
- Leave all The Optional fields blank
- Type
- URL (select this from the dropdown)
- Name
- captive-portal (or any name you like)
- URL
- yoururl.netlify.app (paste only the domain — do NOT include http:// or https://)
✅ Important: Do not include http:// or https:// in the URL field. Only type your domain like:
mycafe-portal.netlify.app
- Save the Guest Resource
- Click OK or Save to apply the settings
CONGRATULATIONS YOU SHOULD HAVE YOUR CAPTIVE PORTAL RUNNING

SO REFRESH YOU R CONNECTION WITH ER605 NOW YOU WILL BE ABLE TO SEE THAT YOUR CAPTIVE PORTAL POPS UP IF DOSENT AND SHOWS CHECK DID YOU MISS ANY STEP AND IF YOU DIDNT PLS CHECK DEVICE FIRMWARE OR CALL TECHNICAL SUPPORT OF TPLINK
📡 Captive Portal Works on Any Connected Router or Access Point Connected to Er605

You don’t need to use only TP-Link access points — any brand of router or access point will work, as long as:
✅ It is connected to the ER605 router (via LAN cable)
✅ It is set up in Access Point (AP) mode
✅ The Wi-Fi network (SSID) it broadcasts is open (no password)
🔁 How It Works
When a user connects to any access point that’s connected to the ER605, and tries to open a website:
👉 The ER605 will intercept that request
👉 The user will be redirected to your custom captive portal page
👉 After authentication (or skip), they’ll get full internet access
🔧 Example Setup
- ER605 → Main router, handling the portal
- Any router/AP → Set in Access Point Mode, connected to ER605 via Ethernet
- Wi-Fi SSID → Open (no password) or set to a captive-enabled VLAN
📝 Even if the AP is from another brand (like TP-Link, Tenda, D-Link, Netgear), it will still work as long as it's in AP mode and connected to ER605.
✅ Result
Any user who connects to the AP’s Wi-Fi will automatically be shown the captive portal — simple, seamless, and fully controlled by the ER605.
THANK YOU
for any queries pls dm me at for any queries you can dm me on https://www.linkedin.com/in/pradyun-bichagal-0a6a10221