Simple Raspberry Pi Internet Radio Station
by jacobalze in Circuits > Raspberry Pi
1283 Views, 4 Favorites, 0 Comments
Simple Raspberry Pi Internet Radio Station
This project i stated when I just wanted to stream audio locally with Icecast. I developed it a little more and made it into a public radio station. It took some working, but I managed to do it. It uses Caster.fm, a free streaming service that uses a modified form of Icecast, an audio streaming software. We will also use Mixxx, a mixer software used to record and stream to Icecast. We will configure Mixxx to capture system audio, then broadcast that audio to Caster.fm for public streaming. Let's get Started!
Supplies
This project is fairly simple and requires only a few basic Raspberry Pi tools:
- Raspberry Pi 5 (the 5 is best but any model will work)
- Display Screen
- Keyboard/Mouse
- Bluetooth Headphones
- Cooling system (your Pi will be on for long periods of time, so it may be best for the Pi to have this)
- USB Microphone (Optional)
Set Up Your Caster.fm Station
- Navigate to Caster.fm.
- Create a free account.
- Configure the station following the prompts.
- Come back here when you are on the Dashboard and Streaming Server screen.
Set Up and Configure Your Audio Source


- First, ensure your software is up to date.
- Connect your headphones to your Pi and set the audio output device to your headphones (right click the volume icon on the taskbar and select your headphones, see image 1 above)
- Next, open a terminal and run this command:
- Look for something like bluez_output.<MAC-ADDRESS>.<profile>.monitor
- Ensure it is your device by looking for this under the name: Description: Monitor of <DEVICE NAME>
- Once you have found your device, copy or make note of the name (bluez_output.<MAC-ADDRESS>.<profile>.monitor). You will need this for later. (See image 2 for an example)
- What you just found was the monitor for this Bluetooth device. It controls the audio being output or input from that device. We can capture this audio and stream it to our station.
- Now we need to set the monitor as the default source. Run this command:
- Replace <source-name> with the name you copied in the previous step (bluez_output.<MAC-ADDRESS>.<profile>.monitor)
- Use this command to confirm the change:
- Now your audio source is set up! Now lets set up Mixxx!
Set Up Mixxx


Part 1: Install Mixxx:
- First, Install Mixxx:
Part 2: Install the Lame mp3 library:
- Before opening Mixxx, we need to add a configuration file that will stream in the mp3 format.
- I linked the file for you here. Click it and download the file. Make sure it is in the download folder on your Raspberry Pi.
- Use the following command to move it into the Mixxx files:
- Next, use this command to set the necessary permissions:
- Confirm you did it right with this command:
- The libmp3lame.dll file should be listed.
Part 3: Configure Mixxx Settings:
- Now we can start working with Mixxx.
- Open it by navigating to the Start Menu > Sound & Video > Mixxx (See image 1)
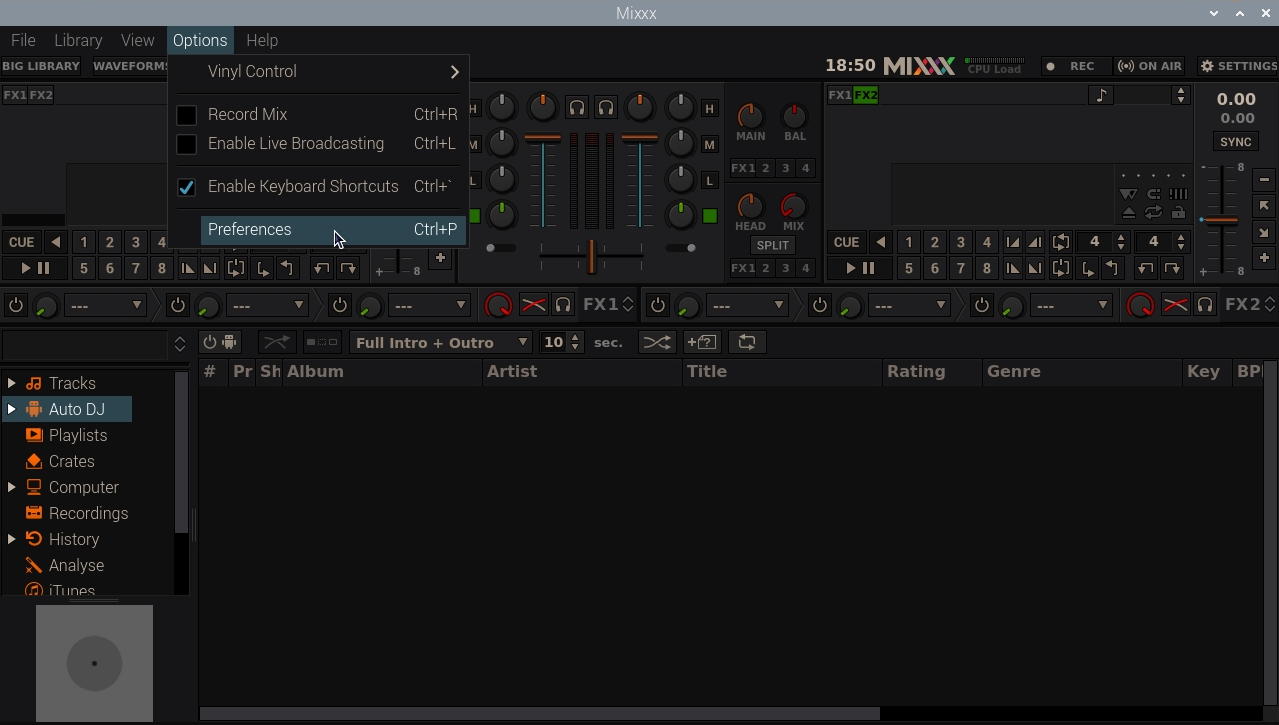
- After opening Mixxx, navigate to Options > Preferences (See image 2)
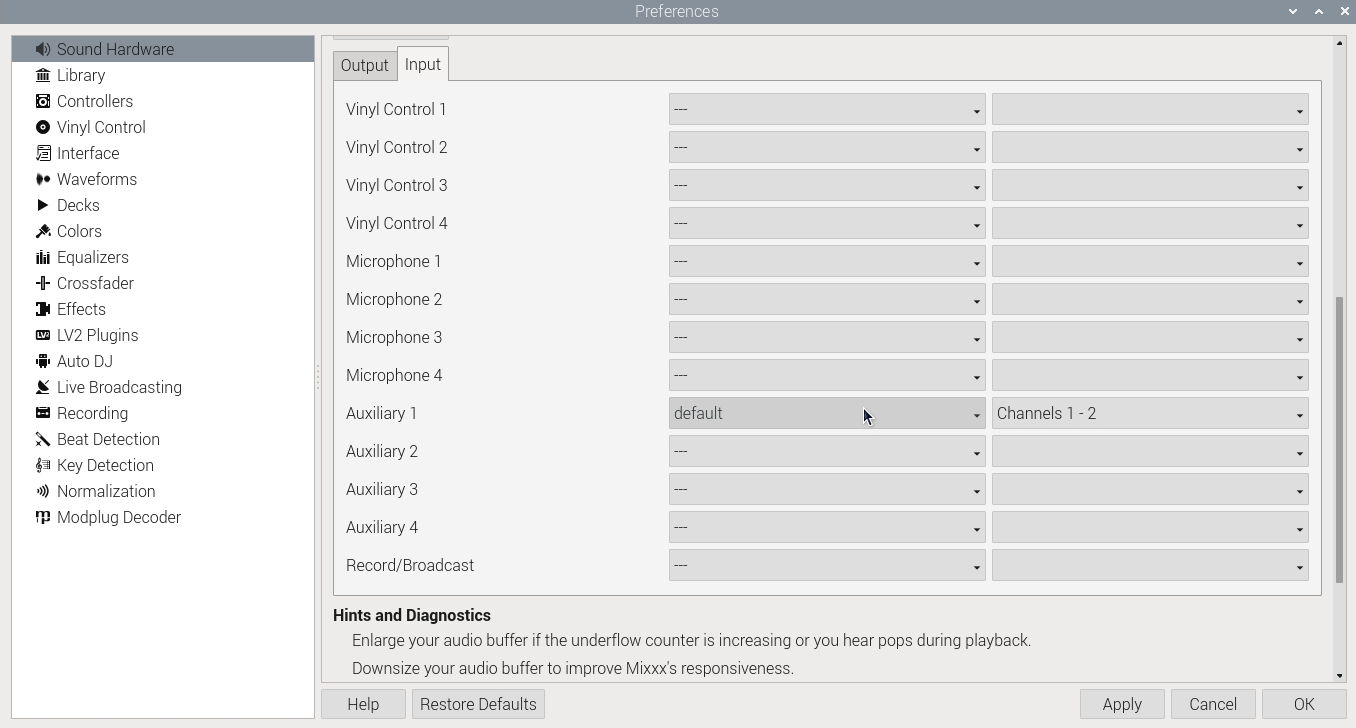
- Opening the preferences menu, you should already be on the Sound Hardware tab.
- Scroll down until you see the big chart.
- DO NOT SELECT OUTPUT DEVICES! Doing so will create a loopback and the sound on your station will have a lot of static.
- Instead, go to the Input tab. (See Image 3)
- Scroll down to Auxiliary 1, select default as the source (See Image 4).
- If you have one, add your USB microphone under Microphone 1.
- Click Apply to save.
- Now on the Left Panel, go to the Live Broadcasting tab.
- Select Create new connection
- See image 5 for the settings to configure. Replace the red scratched out parts with the ones shown on your Caster.fm dashboard.
- Scroll down to Stream Info and fill that in with what you want.
- Ensure at the top that your stream you just set up is enabled and delete other unused streams (renaming the stream would be helpful to keep track).
- Click Apply to save.
- You can close out the preferences window now.
Go Live!

- At the top, toggle the Mic/Aux button to show the controls for the sources (See image 1).
- To ensure it is working, play some music, and you should see the Aux 1 Mixer Bar move to the beat of the music!
- Now that we have everything working, time to Go Live!
- Go to your Caster.fm dashboard and under streaming server, click Start Server.
- This will start the Icecast Server.
- Now go back to Mixxx and Click the On Air button in the top right corner.
- This button will turn orange for a few seconds, showing it is trying to connect to the server.
- Once in connects, it will turn green, and now you are Live!
- Select Play under Aux 1.
- Navigate to a music streaming service website. (Not all streaming services work. I recommend either Spotify or Apple Music, as they work the best)
- Play some music, and it should be broadcast to your station!
Conclusion
Congratulations! You now have a fully functional radio station on your Raspberry Pi for free! This is a neat little project and I find it fun to stream, even if nobody is listening. Caster.fm has features where you cand create a station schedule with shows, specials, etc. With Mixxx, you can use the DJ mixer and control audio, record, and play audio locally on your Raspberry Pi. If you have any questions or issues with this project, let me know in the comments below. Thanks for reading and enjoy your new radio station!