Simple Scratch UI Instructable

To start off making this display, we need to set the scene in scratch. (scratch.mit.edu)
1. Set the background to solid black
2. Prepare all the sprites:
- "MET-D Display" header (currently visible)
- "No Memory Detected" message
- Moving line
- Input memory button (currently visible)
- Loading bar
- "Loading/Loaded Memory" message
- "Play Memory" button
- Memory GIF
- "On/Off" button (currently visible)
- Black screen
1st Display
.gif)


The first screen that is displayed is one that prompts the user to input a memory. In real-life the input would be plugging in an external device. In this mock up, clicking the button in the top right does the job instead.
There are two components to this display. The flashing message that says "No Memory Detected, Please Input Memory", and the animated line to point towards the input area.
Both these are made with the same code block command that utilizes costumes (aka different frames of a sprite).
1. In the costumes tab, prepare the frames for each sprite.
a. The message should have 2 frames, one with the message, and one that is blank.
b. The dashed line has 16 frames. Starting with no dashes, and each frame adding one dash to build up to the full line. The GIF shows this progression from frame 1 to 16.
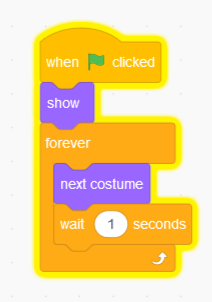
2. In the code tab, create a loop that switches to the next costume (frame) and waits briefly (.3 to 1 second) before switching again.
Clicking & 2nd Display
.gif)


This second display, with the loading bar and start button, will be shown once the memory is inputted. In order to simulate the memory being "plugged in", the "Input Memory Button" in the top right corner will be clicked.
When clicked it will broadcast a command to activate the "Loading Memory" message and the Progress Bar sprites.
1. In the code tab for the "Input Memory Button" sprite (sprite 4), use the blocks to broadcast a message called "inserted"
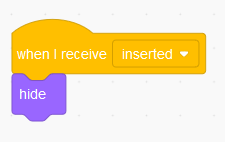
2. In the code tab for the dashed line and the "Input" message from the last display, add a condition where these sprites are hidden when "inserted" is broadcasted.
3. In the code tab for the Progress Bar and the "Loading" message sprites, have an opposite condition. Make them show when "inserted" is broadcast.
a. The "Loading" message should have two costumes. One that says "Loading" and another that says "Loaded". Without changing the costume yet, have a loop to switch between show to hide for the flashing effect.
b. The Progress Bar sprite should have 13 costumes, each where it fills up more. Similar to the last display's sprites, cycle through them with a loop and a wait for .3 seconds block. This loop should not be a forever loop.
4. At the end of the Progress Bar's costume loop, broadcast "let's go!" in the code tab.
5. When the Start Button and the "Loading" message receive this broadcast, they will react.
a. "Loading" message will change to costume 2, which now says "Loaded".
b. Use the show command to make the Start Button appear.
Play Memory & Display 3
.gif)


Pressing the "Play Memory" (or Start) Button will send us to the third display. This one doesn't provide a lot of user interaction, but it does display the actual memory, which is the important part.
1. The Start Button, which has previously been hidden, is now visible. In the code tab, when the Start Button is clicked, it should broadcast "PLAY VIDEO".
2. The Displayed Memory is in the form of a GIF that has been separated into frames. each of these frames should be a costume in the costume tab. There should be 39 frames.
3. The Displayed Memory Sprite has also been previously hidden. When it receives "PLAY VIDEO" it will show.
a. In a forever loop it should also be looping through costumes like previous sprites have done.
On/Off Function
.gif)


The On/Off Button's function can be used at any point to turn the screen black.
1. The On/Off Sprite should have two costumes, one that says "On" and one that says "Off".
a. When the button is clicked it will check to see if it is currently in the "On" or "Off" costume. If it is currently "On" (costume 1), then it will broadcast "off". If currently "Off" (costume 2), then it will broadcast "on".
2. When "off" is broadcasted, in the code tab for the Black Screen Sprite, that has previously been hidden, it should show. If it is showing, and "on" is broadcast, then it should hide again.
Export to HTML


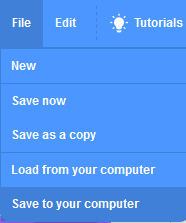
1. Save the project under File>Save to your computer
a. It will save as a .sb3 file
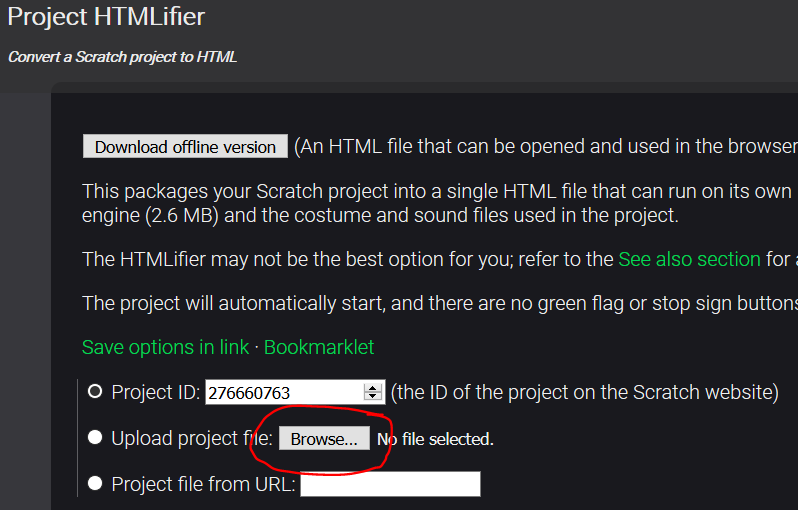
2. Go to https://sheeptester.github.io/htmlifier/
a. Upload the .sb3 file and then download it as HTML to be able to view it in browser.
All Done!