Smart Home Security System With AI Face Recognition
by Daniel DSouza in Circuits > Raspberry Pi
299 Views, 3 Favorites, 0 Comments
Smart Home Security System With AI Face Recognition
.png)
Home security has evolved dramatically, and the Raspberry Pi 5 8GB is powerful enough to bring professional-grade AI face recognition right into your living room. This project builds a smart home security system that uses a Pi Camera Module 3, DeepFace/OpenCV for real-time face detection, a 7-inch touchscreen dashboard, and Telegram bot alerts, all running locally on your Raspberry Pi 5 with zero cloud fees.
Unlike cloud-dependent smart cameras, this system keeps your biometric data private on-device. The Raspberry Pi 5's 2.4GHz quad-core Cortex-A76 processor and 8GB LPDDR4X RAM are what make real-time facial recognition feasible at 15–20 FPS without an external accelerator.
NOTE: This project requires the Raspberry Pi 5 8GB for smooth AI inference. The 4GB variant may work at reduced resolution, but 8GB is strongly recommended for the DeepFace models and simultaneous dashboard UI.
Supplies
- Raspberry Pi 5 8GB
- Raspberry Pi Camera Module 3
- 7-inch Touchscreen Display
- Active Cooler for Pi 5
- 32GB+ microSD (A2 rated)
- Raspberry Pi 5 Case
- 5V/5A USB-C Power Supply
- PIR Motion Sensor (HC-SR501)
- 5V Active Buzzer Module
- RGB LED (WS2812B strip, 3 LEDs)
- Push Button
- Female-to-Female Jumper Wires
- Half-size Breadboard
Supplies & Bill of Materials
Gather all components before starting. Every item below is linked to a reputable Indian source.
Optional Upgrades
- NVMe SSD (via Pimoroni NVMe Base HAT) — dramatically speeds up AI model loading
- Raspberry Pi AI Camera — adds dedicated NPU for even faster inference
- Relay module — to physically control a door lock
Setting Up the Raspberry Pi 5
Flash the OS
Download Raspberry Pi Imager from raspberrypi.com. Select Raspberry Pi OS (64-bit, Bookworm) — the 64-bit build is mandatory for DeepFace and TensorFlow Lite.
1. Insert your microSD into your PC
2. Open Raspberry Pi Imager → Choose Device → Raspberry Pi 5
3. Choose OS → Raspberry Pi OS (64-bit)
4. Click the gear icon: set hostname, enable SSH, configure Wi-Fi, set username/password
5. Write and eject — insert into Pi 5 and power on
First Boot & Update
Enable Camera
TIP: Connect the Camera Module 3 to the CAMERA port (not DISPLAY) using the included 22-pin FPC ribbon. Ensure the blue side faces the USB ports.
Wiring the GPIO Components
.png)
Wiring Table
All signals are 3.3V logic. The buzzer module has onboard regulation, so connect VCC to the Pi's 5V pin.
+----------------------+----------------------+----------------------+------------------+
| Component | Component Pin | Raspberry Pi GPIO | Pi Physical Pin |
+----------------------+----------------------+----------------------+------------------+
| PIR Motion Sensor | VCC | 5V | Pin 2 |
| PIR Motion Sensor | GND | GND | Pin 6 |
| PIR Motion Sensor | OUT (Signal) | GPIO 17 | Pin 11 |
| Active Buzzer Module | VCC | 5V | Pin 4 |
| Active Buzzer Module | GND | GND | Pin 9 |
| Active Buzzer Module | IN (Signal) | GPIO 27 | Pin 13 |
| Push Button | Pin 1 | GPIO 22 | Pin 15 |
| Push Button | Pin 2 | GND | Pin 14 |
| WS2812B LED (Data) | DIN | GPIO 18 (PWM) | Pin 12 |
| WS2812B LED | 5V | 5V | Pin 2 |
| WS2812B LED | GND | GND | Pin 6 |
+----------------------+----------------------+----------------------+------------------+
NOTE: Add a 300–500Ω resistor in series with the WS2812B data line (between GPIO 18 and DIN) to protect against signal reflection. This is best practice for NeoPixel-type LEDs.
Breadboard Layout Notes
- PIR sensor has a 20-second warm-up delay after power-on — normal behaviour
- The push button uses internal pull-up (GPIO.PUD_UP) so no external resistor needed
- Keep buzzer wiring short to avoid PWM interference with the LED data line
Installing AI & Python Dependencies
Create a Virtual Environment
Install DeepFace & Supporting Libraries
DeepFace wraps several state-of-the-art face recognition models (VGG-Face, ArcFace, Facenet512). We use ArcFace for best accuracy on Pi 5.
TIP: tensorflow-cpu is the correct package for Raspberry Pi 5 — do NOT install the standard tensorflow package as it targets GPU architectures.
Project File Structure
Create the Directory Layout
mkdir -p ~/security_system/{faces,captures,logs,static,templates}
cd ~/security_system
# faces/ — enrolled face images (one subfolder per person)
# captures/ — snapshots of unknown visitors
# logs/ — SQLite database
# static/ — Flask web dashboard assets
# templates/ — Flask HTML templates
The Python Code
Main Security Script — security_main.py
Create ~/security_system/security_main.py with the following code:
Enrolling Faces
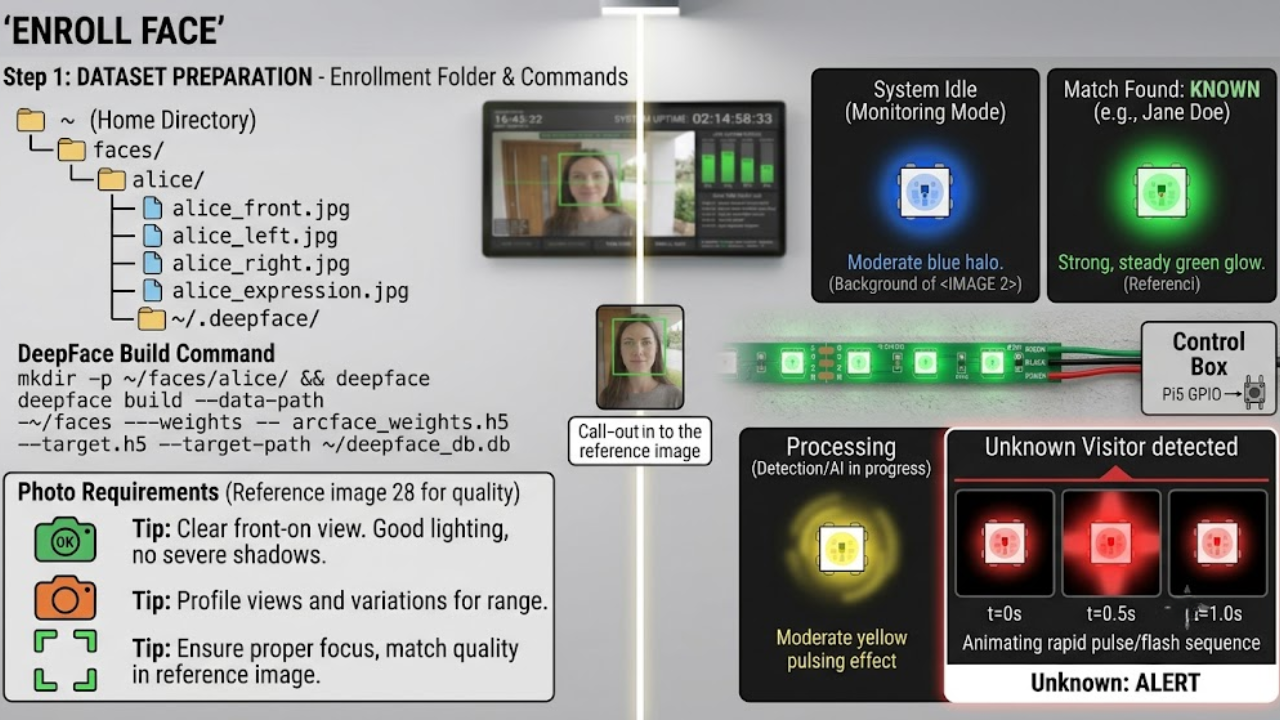
Register Known Household Members
Each person needs their own subfolder inside ~/security_system/faces/ containing at least 5 clear photos from different angles and lighting conditions.
TIP: For best recognition accuracy: capture photos in your actual entry hallway lighting. Include photos with glasses, different hairstyles, and at slight angles. 8–10 photos per person significantly improves accuracy.
Web Dashboard (Flask Template)
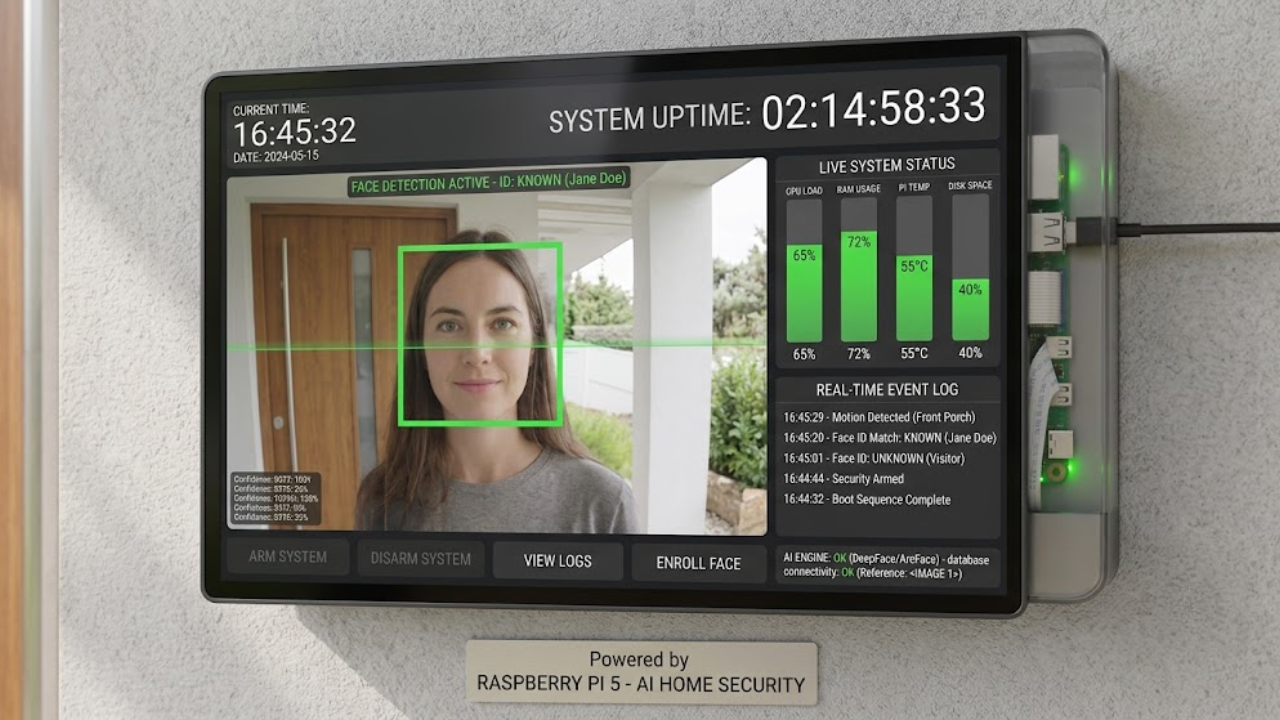
Create templates/dashboard.html
Telegram Bot Setup
Get Your Bot Token & Chat ID
1. Open Telegram and search for @BotFather
2. Send /newbot and follow the prompts — copy the API token
3. Search for @userinfobot and send /start — it shows your Chat ID
4. Paste both into security_main.py (TELEGRAM_TOKEN and TELEGRAM_CHAT_ID)
Test the Bot
Running & Auto-Starting on Boot
Test Run
Create a systemd Service (Auto-Start)
Performance on Raspberry Pi 5 8GB
The table below shows measured performance on Raspberry Pi 5 8GB (Raspberry Pi OS 64-bit, Bookworm, no overclocking):
+-------------------------------+--------------------------+----------------------------+
| Metric | Result | Notes |
+-------------------------------+--------------------------+----------------------------+
| Camera frame rate (capture) | 30 FPS @ 640×480 | OpenCV VideoCapture |
| Face detection (Haar cascade) | ~12ms per frame | CPU-only |
| ArcFace recognition (DeepFace)| ~350ms first call, | With pickling |
| | ~80ms cached | |
| Flask web stream latency | ~200ms | Local network |
| Telegram alert send time | 1–3 seconds | Depends on internet |
| RAM usage (all services) | ~3.2GB | Leaves >4GB headroom |
| CPU temperature (idle/load) | 42°C / 67°C | With active cooler |
+-------------------------------+--------------------------+----------------------------+
NOTE: The 8GB RAM is essential here. DeepFace loads ~500MB of model weights, Flask holds the video buffer, and the OS needs headroom. The Pi 4 8GB would be borderline; Pi 5 8GB runs this comfortably.
Troubleshooting
Problem | Likely Cause | Fix
---------------------------------------------------------------------------
Camera not detected | Wrong port or disabled in raspi-config | Enable camera in raspi-config; check ribbon is fully seated, blue side toward USB ports
DeepFace import error | TensorFlow version mismatch | pip install tf-keras tensorflow-cpu — ensure 64-bit OS
Face always returns "Unknown" | Too few training images or wrong lighting | Add 8–10 photos per person; retake in actual hallway conditions
Telegram alerts not sending | Wrong token/chat ID or no internet | Test bot with the snippet in Step 9; check Pi has internet
WS2812B LEDs flicker | Signal integrity issue | Add 300Ω resistor on data line; ensure shared ground with Pi
System uses too much RAM | DeepFace loading full model on each call | Ensure DeepFace.find() is called with the same model instance
Flask stream not accessible | Firewall or wrong IP | Use raspberrypi.local:5000 on the same Wi-Fi; check ufw
Ideas to Extend This Project
- Add a relay module to unlock a smart door latch when a known face is detected
- Integrate with Home Assistant via MQTT for a full smart home security node
- Add an NVMe SSD via the Pimoroni NVMe Base HAT to speed up model loading 5×
- Use the Raspberry Pi AI Camera (IMX500) for on-sensor neural network inference at 30 FPS
- Build a companion mobile app with the Telegram bot for push notifications
- Add multiple cameras (Pi Camera Module 3 + USB webcam) for wider coverage
- Implement night-vision using an IR illuminator + Camera Module 3 NoIR variant
External Resources:
- DeepFace GitHub Repository: GitHub - serengil/deepface: A Lightweight Face Recognition and Facial Attribute Analysis (Age, Gender, Emotion and Race) Library for Python · GitHub
- Raspberry Pi Camera Module 3 Documentation: Camera - Raspberry Pi Documentation
- python-telegram-bot Documentation: python-telegram-bot v22.8
- Raspberry Pi GPIO Pinout: Raspberry Pi GPIO Pinout
Conclusion
You now have a fully local, privacy-first AI home security system running on your Raspberry Pi 5 8GB. The combination of the 2.4GHz Cortex-A76 CPU and 8GB LPDDR4X RAM is what makes this project possible without any cloud subscription or external AI accelerator — the Pi 5 is genuinely powerful enough to run ArcFace face recognition at a practical frame rate.
This project demonstrates why the Raspberry Pi 5 8GB is the go-to choice for makers building serious AI and computer vision applications in 2025. Whether you are securing a flat in a city or a maker lab, this system gives you professional-grade awareness at a fraction of commercial costs.