Smart Railway Sistem

by mateisebastian4 in Teachers > 8

35 Views, 0 Favorites, 0 Comments

Smart Railway Sistem

eaa38ba9-057d-49d1-b301-080c84dcf425.jpg

Description


The Smart Railway System is a fully customizable, 3D-printed, and eco-friendly railway network designed to help students learn coding, 3D modeling, and 3D printing in a fun and engaging environment. Made from biodegradable PLA, the system combines accessible electronics and open-source software to give students hands-on experience in building and programming their very own smart railway. Perfect for educational settings, this system allows users to design, program, and operate a dynamic railway network while learning core principles of automation, engineering, and technology.


Premise


As a child, I spent a lot of time playing with toy trains. While this helped foster creativity and spatial imagination, my project aims to take my childhood passion to the next level. I seek to create an open-source, eco-friendly, fully programmable railway system that students can use to learn 3D modeling, coding, and 3D printing.

Supplies
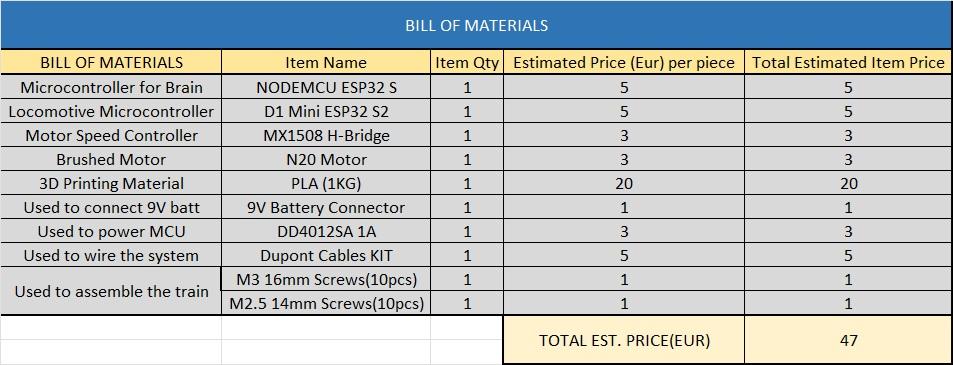
1f229712-8ff2-4acf-b2c9-9cfbc31d1b01.jpg

I used this tools

  1. Bambulab P1S for 3D printing
  2. 200W soldering hammer
  3. Soldering wire
  4. 2 USB-C cables
  5. Cutting pliers

Print the Train

Untitled.png

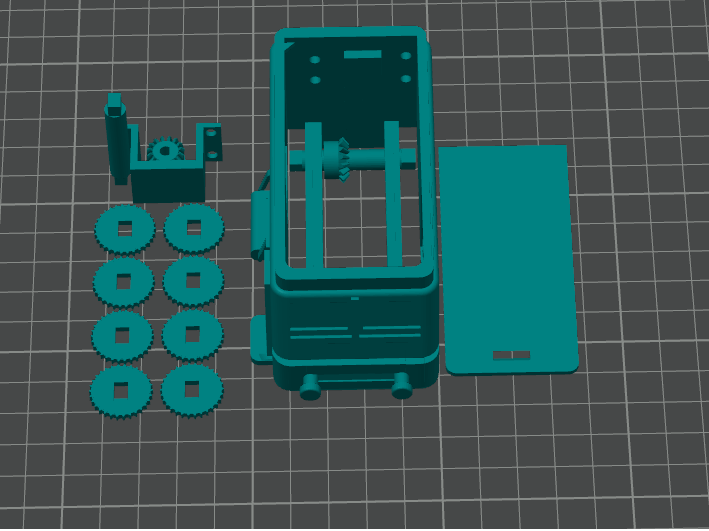
I recommend using a high resolution, specifically a 0.10mm layer height, for the train, as this layer height provides good tolerances for the shaft with the bevel gear. Additionally, use tree supports for optimal printing results.

After printing, use the pliers to remove the supports carefully.

Wire the Locomotive

diagram.jpg
ab4d6a4c-c972-4da9-93c1-389f7d963f4a.jpg
fe833560-90aa-4bd4-bd21-f59d89fa98b9.jpg

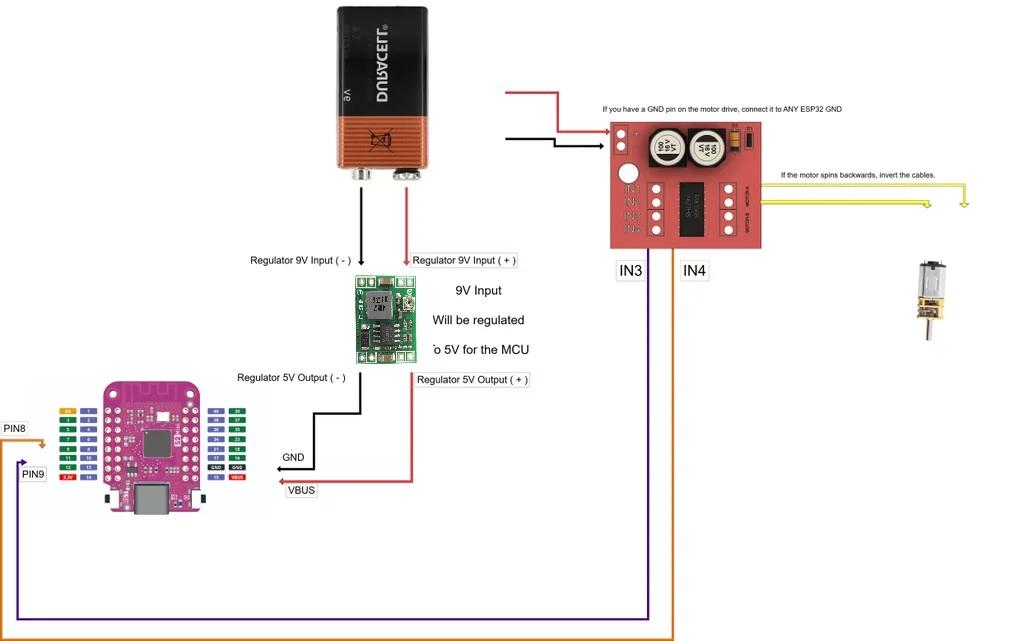
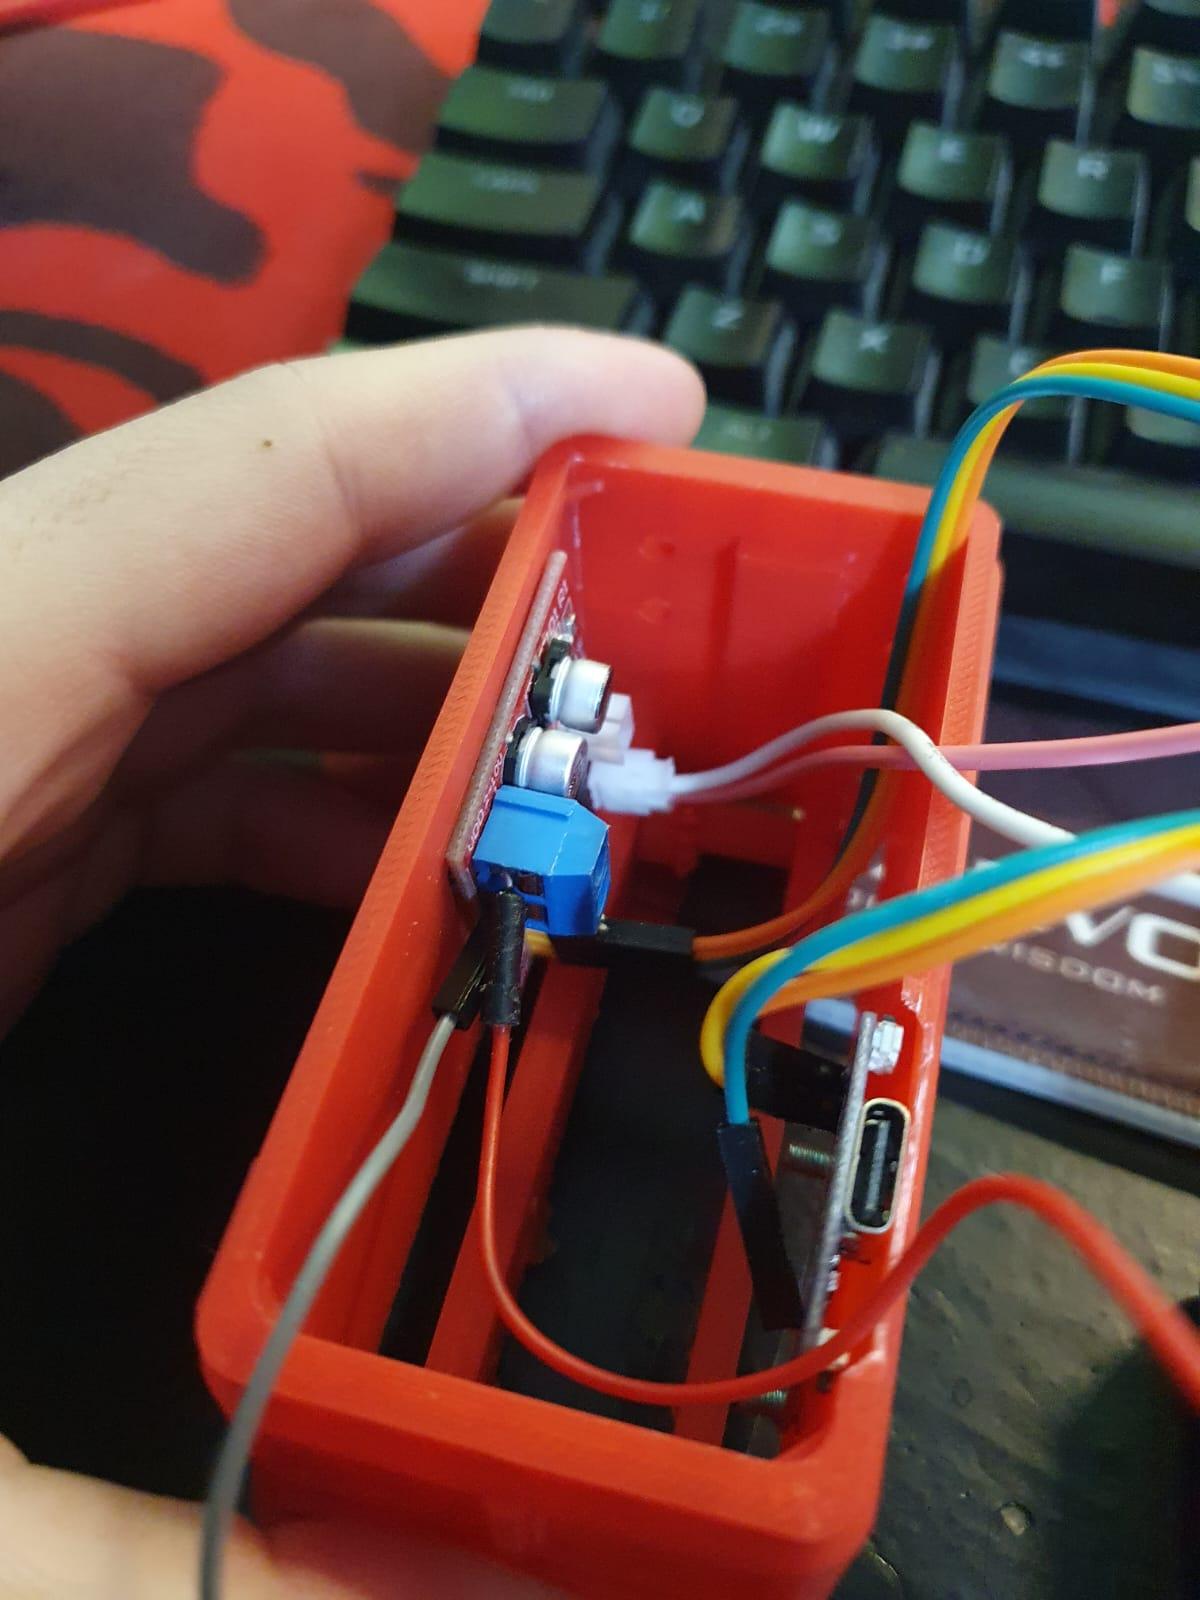
Wire the components as shown in the picture.

After wiring, place the components inside the train and secure them using screws.

Install and Setup IDE

Download the ARDUINO IDE

Add Board URL:

  1. Go to File > Preferences.
  2. In the "Additional Board Manager URLs" field, add the following URL:
https://raw.githubusercontent.com/espressif/arduino-esp32/gh-pages/package_esp32_index.json

Open Boards Manager:

  1. Go to Tools > Board > Boards Manager.

Install ESP32:

  1. In the Boards Manager, search for ESP32.
  2. Click on Install next to the "esp32 by Espressif Systems" entry


Upload Train Code ( ESP32 S2)

diagram2.jpg

Press the O and Reset buttons simultaneously.


The board COM should apper after you release the buttons.

If not, install the CP201x drivers and try again.


Select the COM of the Board and Name (ESP32S2 Dev Module)


#include <WiFi.h> // Include Wi-Fi library

// Wi-Fi credentials for Access Point
const char* ssid = "LocomotiveONE"; // The SSID of the ESP32-S2 Access Point
const char* password = "testpassword124"; // The password for the Access Point

WiFiServer server(80); // Create a server that listens on port 80

// Motor control pins (IN3 and IN4 connected to GPIO 8 and GPIO 9)
const int IN3 = 8;
const int IN4 = 9;

void setup() {
Serial.begin(115200);
delay(10);

// Set motor control pins as outputs
pinMode(IN3, OUTPUT);
pinMode(IN4, OUTPUT);

// Start the Access Point
Serial.println("Setting up Access Point...");
WiFi.softAP(ssid, password); // Set up Access Point with SSID and password

// Print the IP address of the ESP32-S2 Access Point
Serial.print("Access Point IP Address: ");
Serial.println(WiFi.softAPIP()); // Display the IP address of the Access Point

// Start the server
server.begin();
Serial.println("Server started.");
}

void loop() {
WiFiClient client = server.available(); // Check if a client is connected

if (client) {
Serial.println("Client connected!");

String data = ""; // Variable to store data received from client
unsigned long lastActivity = millis(); // Track the last activity timestamp

// Read data and process commands
while (client.connected()) {
if (client.available()) {
char c = client.read(); // Read a character from the client
data += c;
lastActivity = millis(); // Reset last activity timestamp whenever data is received
}

// Process the data if a complete command is received
if (data.indexOf("\n") >= 0 || data.indexOf("\r") >= 0) { // Command delimiter (optional adjustment)
Serial.print("Received data: ");
Serial.println(data);

// Check if the data contains the expected command
if (data.indexOf("movement_speed") >= 0) {
int speed = getMovementSpeed(data); // Extract speed from data
processMovement(speed); // Control motors based on speed

// Respond back to client
client.println("Command received and processed.");
Serial.println("Command received and processed.");
}
data = ""; // Clear the data after processing to avoid re-execution
}

// Disconnect the client if no activity occurs for 30 seconds
if (millis() - lastActivity > 30000) {
Serial.println("Client inactive for 30 seconds. Disconnecting...");
client.stop(); // Close the connection
break;
}
}

Serial.println("Client disconnected.");
}
}

// Extract movement speed from the received string
int getMovementSpeed(String data) {
int startIndex = data.indexOf("movement_speed=") + 15;
String speedStr = data.substring(startIndex);
return speedStr.toInt();
}

// Control motors based on the movement speed
void processMovement(int speed) {
if (speed > 0) {
// Move forward
analogWrite(IN3, map(speed, 0, 100, 0, 255)); // Use PWM for speed control
analogWrite(IN4, 0); // Stop reverse
Serial.print("Moving forward at speed: ");
Serial.println(speed);
} else if (speed < 0) {
// Move backward
analogWrite(IN3, 0); // Stop forward
analogWrite(IN4, map(abs(speed), 0, 100, 0, 255)); // Use PWM for speed control
Serial.print("Moving backward at speed: ");
Serial.println(abs(speed));
} else {
// Brake (stop the motor)
analogWrite(IN3, 0);
analogWrite(IN4, 0);
Serial.println("Motor stopped.");
}
}

Upload Station Code (ESP32)

Upload the code and as the dots flash on the screen, press the BOOT Button.


#include <WiFi.h> // Include Wi-Fi library

// Wi-Fi credentials (replace with your ESP32-S2 Access Point credentials)
const char* ssid = "ESP32_S2_Access_Point"; // The SSID of the ESP32-S2 Access Point
const char* password = "testpassword124"; // The password for the Access Point

WiFiClient client; // Create a client object

const char* serverIP = "192.168.4.1"; // IP address of the ESP32-S2 Access Point
const int serverPort = 80; // Server port

void setup() {
Serial.begin(115200);
delay(10);

// Connect to Wi-Fi
Serial.println("Connecting to Wi-Fi...");
WiFi.begin(ssid, password);
while (WiFi.status() != WL_CONNECTED) {
delay(1000);
Serial.print(".");
}
Serial.println("Connected to Wi-Fi!");

// Connect to the server
if (!client.connect(serverIP, serverPort)) {
Serial.println("Connection to server failed");
return;
}
Serial.println("Connected to server!");
}

void loop() {
// Example speed value to test (change to -100 to 100)
int speed = 50;

// Send speed command using composeCommand
sendCommand(composeCommand(speed));

delay(5000); // Send the command every 5 seconds
}

// Function to compose the command string
String composeCommand(int speed) {
return "movement_speed=" + String(speed);
}

// Function to send the command to the server
void sendCommand(String command) {
if (client.connected()) {
client.println(command);
Serial.print("Sent command: ");
Serial.println(command);

// Wait for server's response
if (client.available()) {
String response = client.readStringUntil('\n');
Serial.print("Server response: ");
Serial.println(response);
}
} else {
Serial.println("Client not connected to the server!");
}
}

Testing

Print the Rail( to Your Liking )

Considering a 90 deg curve has 4 long curves and 1 short curve, print as many straight and curved lines as you want.

Customize

The provided file are there to spark you creativity.

What will you build next?